Hello everyone, this is Jooyoung Kim, an audio engineer and music producer.
Today, I’d like to talk about some friends that, like the compressor, help us control dynamics: the Decompressor, Expander, and Gate.
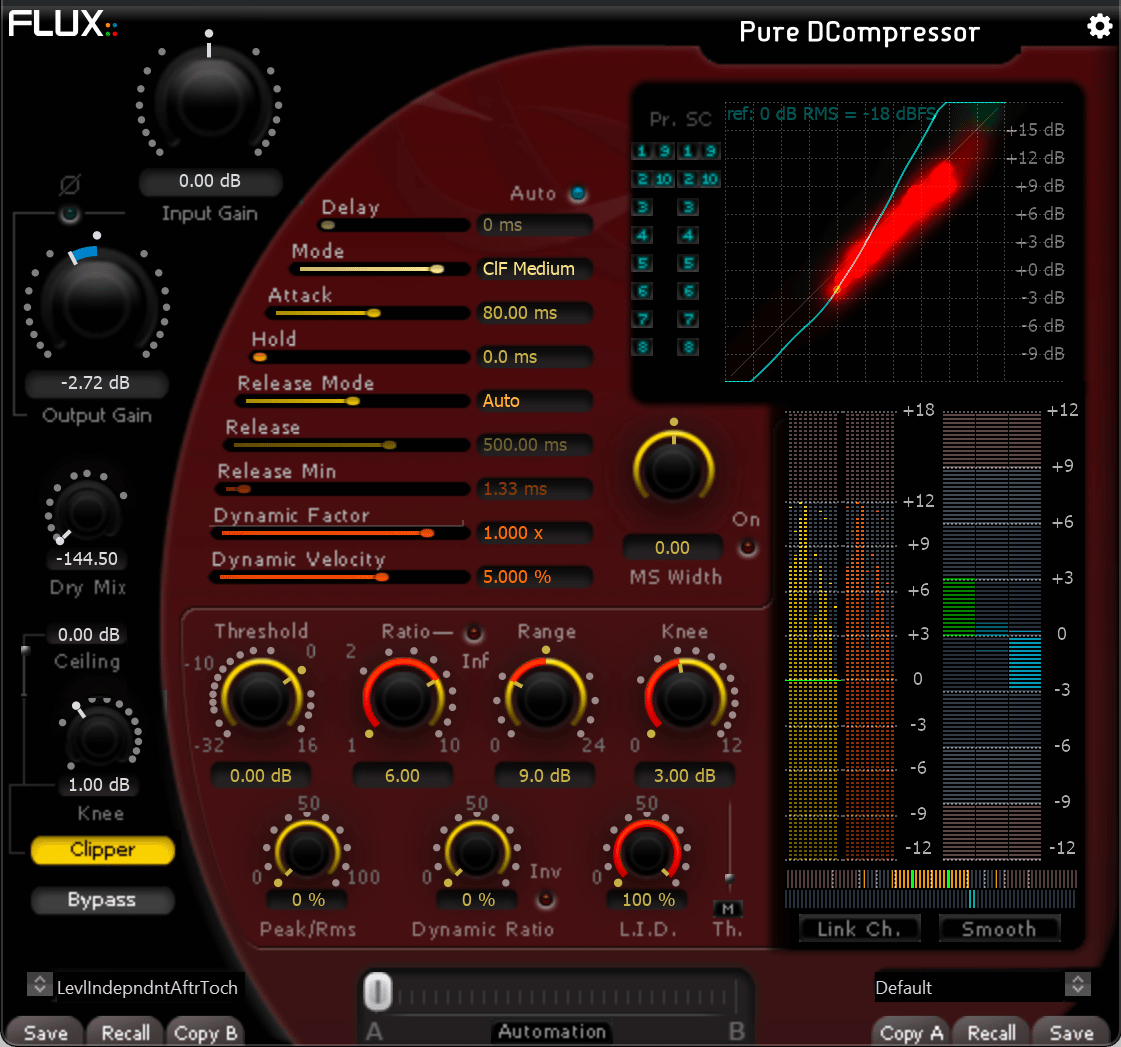
Decompressor
A decompressor works in the opposite way to a compressor, making sounds above a set threshold louder.
You might wonder, “Why would anyone use this?” Occasionally, it can be used to force a groove or to emphasize transient parts.
Expander and Gate
An expander decreases the volume of sounds below a certain threshold. When the ratio is increased, it starts to function as a gate.
Think of the relationship between an expander and a gate as similar to that between a compressor and a limiter. The parameters for these tools are similar to those of a compressor. If you understand how a compressor works, you can easily use these tools as well.
These effects can be particularly fun when used with sidechain.
For example, you can apply a gate to a track with white noise and use sidechain so that the white noise only plays when the hi-hats come in. Or, you can apply a decompressor to a track and use sidechain to make the instruments louder only when the snare hits.
There are countless creative ways to use these effects if you let your imagination run wild.
If you’re a songwriter, try applying these effects not only to your mixes but also to your instruments. They can be very effective.
That’s all for today. In the next post, we will look at other effects that have compressor-like functions. Stay tuned!
Hello! I’m Jooyoung Kim, a mixing engineer and music producer.
Today, I was initially planning to talk about historically famous compressors. However, I realized that discussing the characteristics of these famous compressors might not be as effective since many of their plugin emulations don’t faithfully reproduce the original characteristics.
You might wonder how I can make such a claim without trying every famous compressor. Well, simply measuring their frequency response often shows no changes, and many plugins are designed to produce only odd or even harmonic distortions, which is unrealistic given the nature of tubes and transistors.
Instead of delving into the history of famous compressors, I decided it would be more beneficial to explain how to analyze compressors, whether they are plugins or hardware, once you purchase them.
1) Understanding Frequency Response
To measure this, you’ll need a program called Plugin Doctor by DDMF. Unfortunately, I couldn’t find any viable alternatives.
With this program, you can immediately see how the frequency response changes when a plugin or hardware is applied. Experienced mixers and producers might already have a feel for the frequency response just by listening, but visual aids can be incredibly helpful for study purposes.
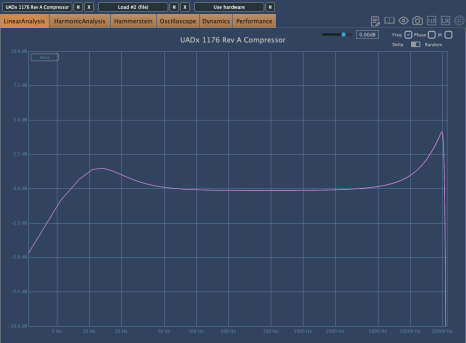
For example, some plugins alter the frequency response depending on how the input gain is set.
The above graph shows the frequency response of the UAD 1176 Rev A compressor. The left side shows the response with no changes, and the right side shows the response after increasing the input gain and adjusting the output gain.
Even a quick glance reveals significant differences.
2) Analyzing Phase Changes
Phase changes can greatly assist in identifying affected frequency bands. The graph below illustrates the phase changes of a tape machine emulation, indicating substantial alterations across the spectrum.
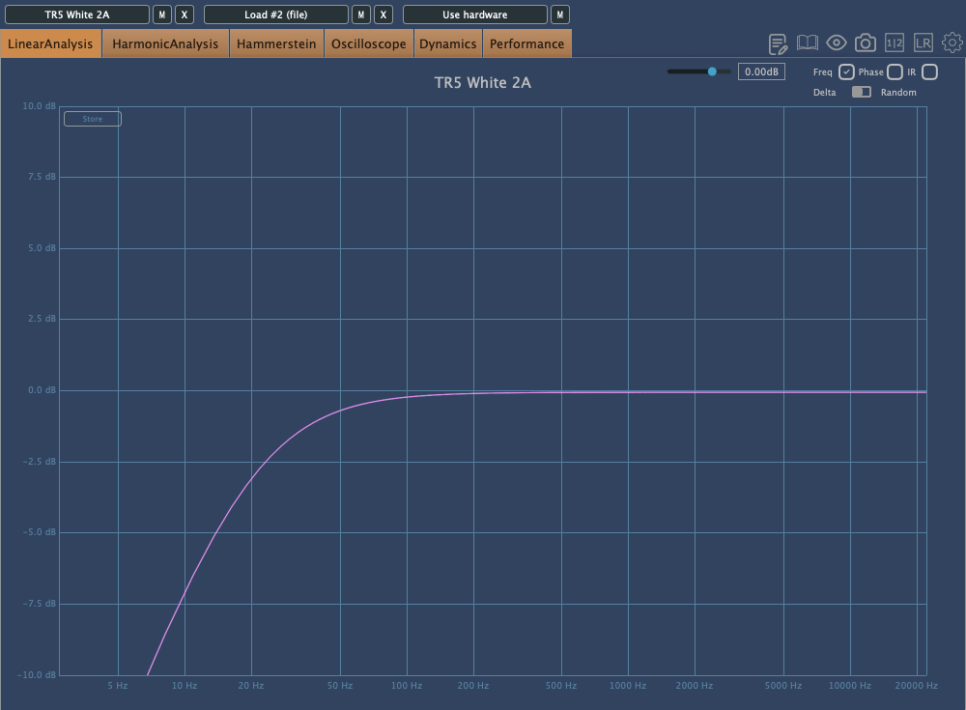
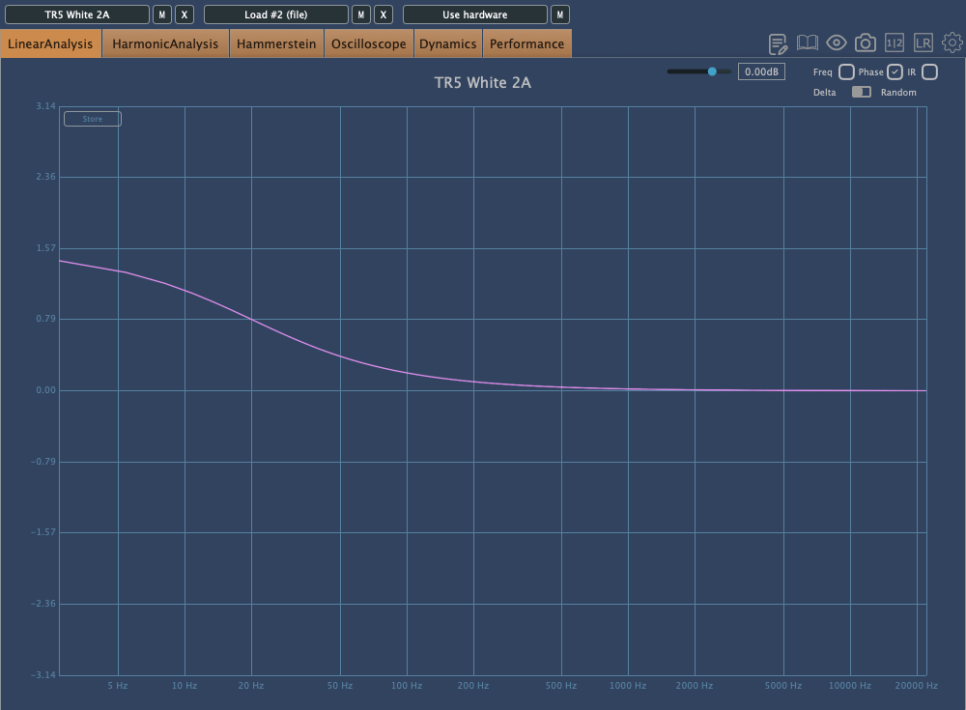
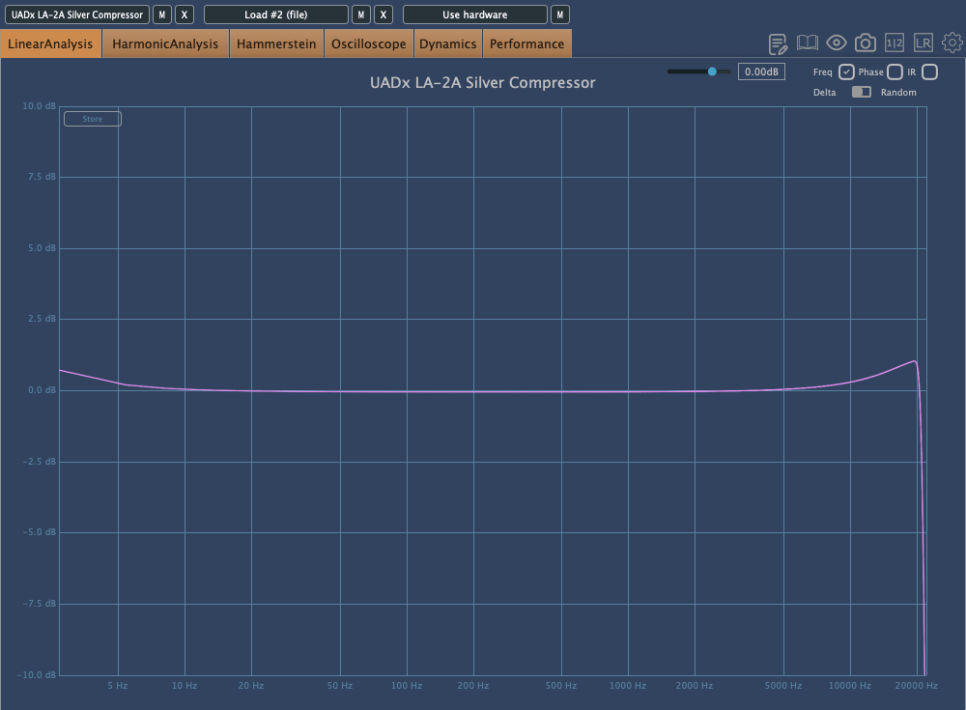
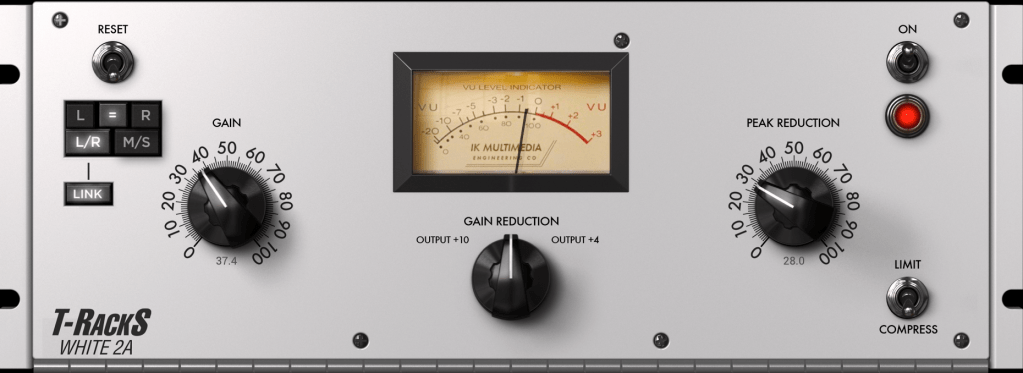
This graph shows the frequency response and phase changes of the White 2A compressor by IK Multimedia, which emulates the LA-2A.
From the frequency response, you can infer a low-cut filter was applied. The phase change graph suggests a π/2 shift, indicative of a -6dB/oct low-cut filter.
3) Assessing Harmonic Distortion
Harmonic distortion often refers to the presence of even and odd harmonics. Even harmonics tend to create a more pleasant sound due to their consonant nature, while odd harmonics can introduce dissonance and sound harsher.
By measuring and listening, you can identify whether a compressor produces more even or odd harmonics and how it affects your perception.
For example, I find the White 2A compressor somewhat dull, whereas the UAD LA-2A Silver feels richer in color.
This perception might be influenced by its slight high-frequency boost and the more complex harmonic distortion it introduces.
However, it’s important to note that more harmonic distortion doesn’t necessarily mean a better plugin. It simply provides insights into how and where to use it effectively.
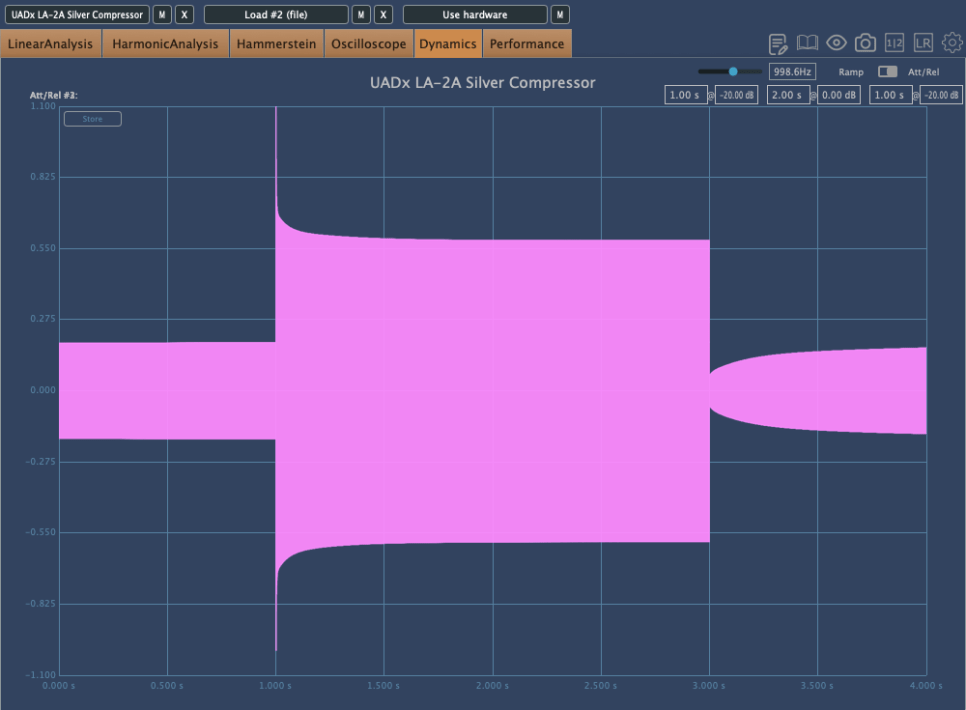
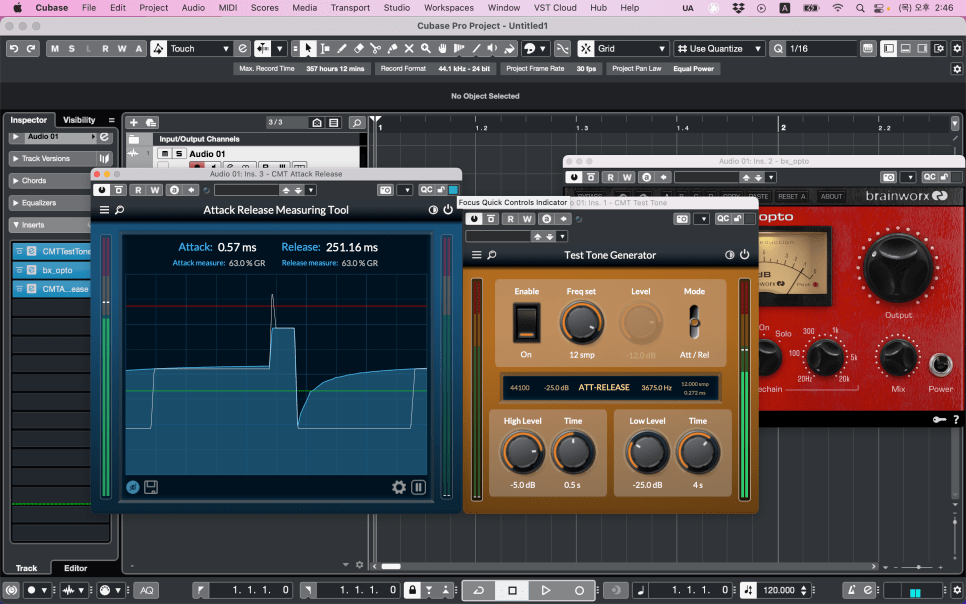
4) Evaluating Attack and Release
Although many plugins specify their attack and release times, some do not, necessitating manual measurement.
Using Plugin Doctor, you can visualize attack and release times with an oscillator. However, it doesn’t precisely indicate the time, which can be inconvenient.
A free tool called CMT can help here. You can download it from the description in a related YouTube video.
Knowing attack and release times is crucial because they influence how the compressor affects the source material’s groove and dynamics. Fast attacks can flatten a track’s groove, while fast releases can cause pumping effects.
Conversely, slow attacks may fail to control loud transients, and slow releases can cause continuous compression, making the sound feel squashed.
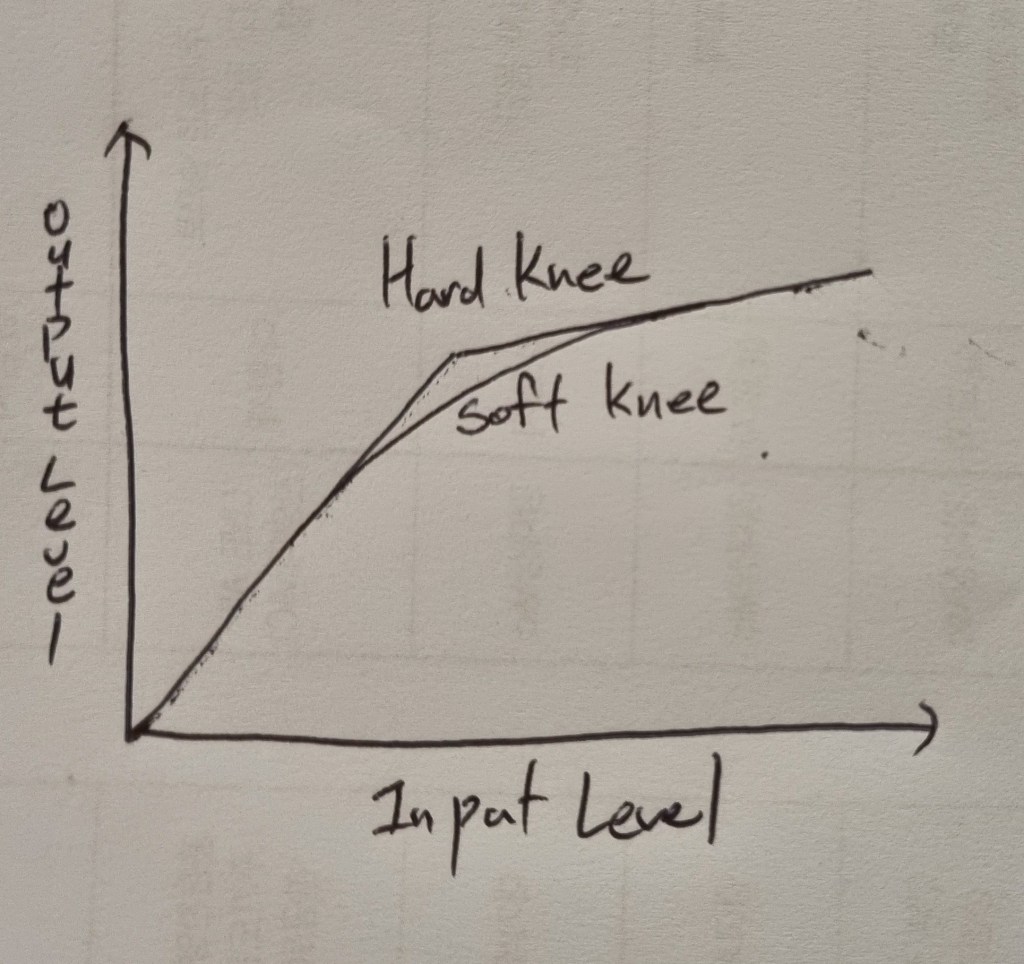
5) Examining Ratio Curves
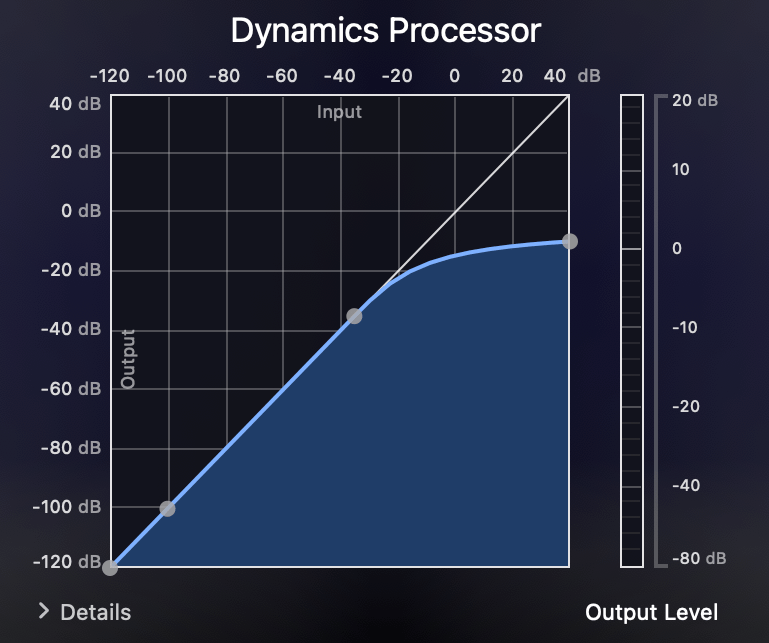
Ratio curves reveal whether a compressor uses a soft or hard knee. A soft knee compressor starts compressing gradually before the threshold, resulting in smoother compression.
Manuals often don’t specify the knee type, so you might need to measure it yourself.
Understanding the knee type helps in grasping the compressor’s behavior and its suitability for different sources.
6) Soft Clipping in Mastering Compressors
Some mastering compressors offer a soft clipping feature, which we’ll cover in detail later. Soft clipping changes harmonic distortion and waveform shape, as shown below.
Soft clipping rounds off waveform peaks, introducing non-linear harmonic distortion. The more it resembles hard clipping, the more noise-like it becomes.
Think of a guitar distortion pedal for hard clipping and an overdrive pedal for soft clipping to understand the concept better.
Conclusion
Understanding these aspects will give you a solid grasp of a compressor plugin or hardware. Remember, you don’t need to memorize these values.
The key questions are:
How does it sound when applied?
How can it be used musically?
Measure and analyze your plugins/hardware, and listen to how they affect various sources. This combination of measurement and auditory experience will solidify your understanding.
Pay attention to how the source moves (up/down as discussed in Mixing Basics 2.4), how the tone changes, and how the compression feels. Being able to describe these in your own terms is a significant achievement.
I continue to buy and use hardware because of these nuanced changes. Emulation plugins often lack the detailed frequency response and harmonic distortion of their hardware counterparts due to digital reproduction limitations.
However, using hardware doesn’t automatically improve your tracks. The key lies in understanding and using these changes appropriately to enhance your mixing and sound design.
Mixing is always challenging, as each track requires a different approach. With numerous plugins at your disposal, the choices can be overwhelming.
Hello, this is Jooyoung Kim, an engineer and music producer.
Today, we will discuss the different types of compressors based on their operating principles.
Before we begin, it’s important to note that most compressors we talk about today are named after the specific components used as attenuators in each type. These components give each type its unique characteristics, so understanding these classifications is essential.
Shall we get started?
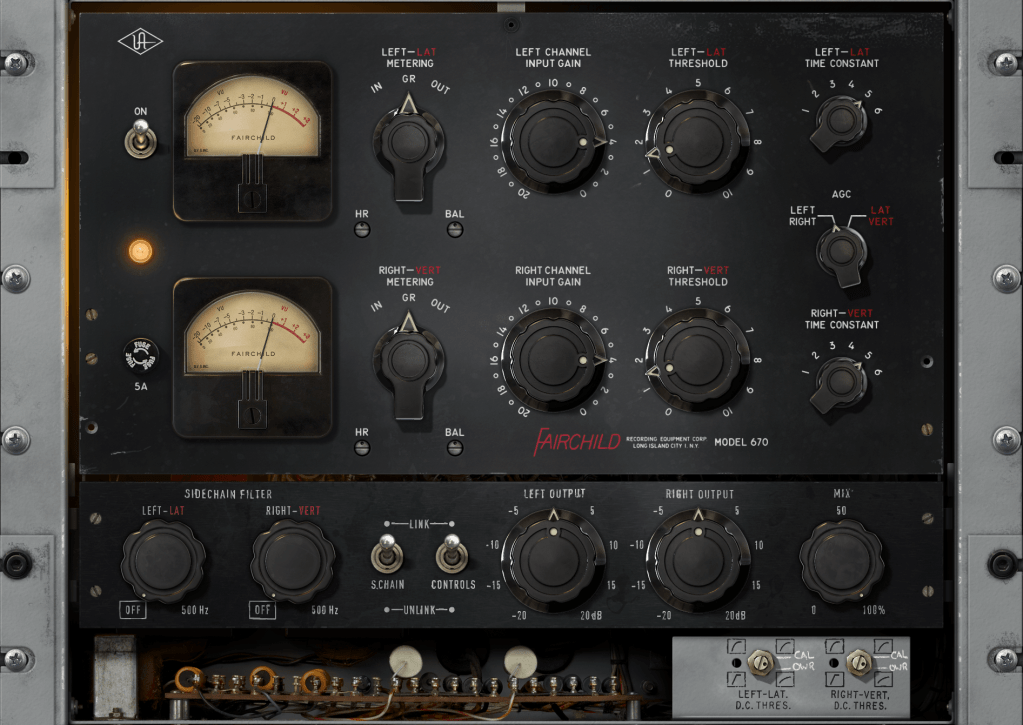
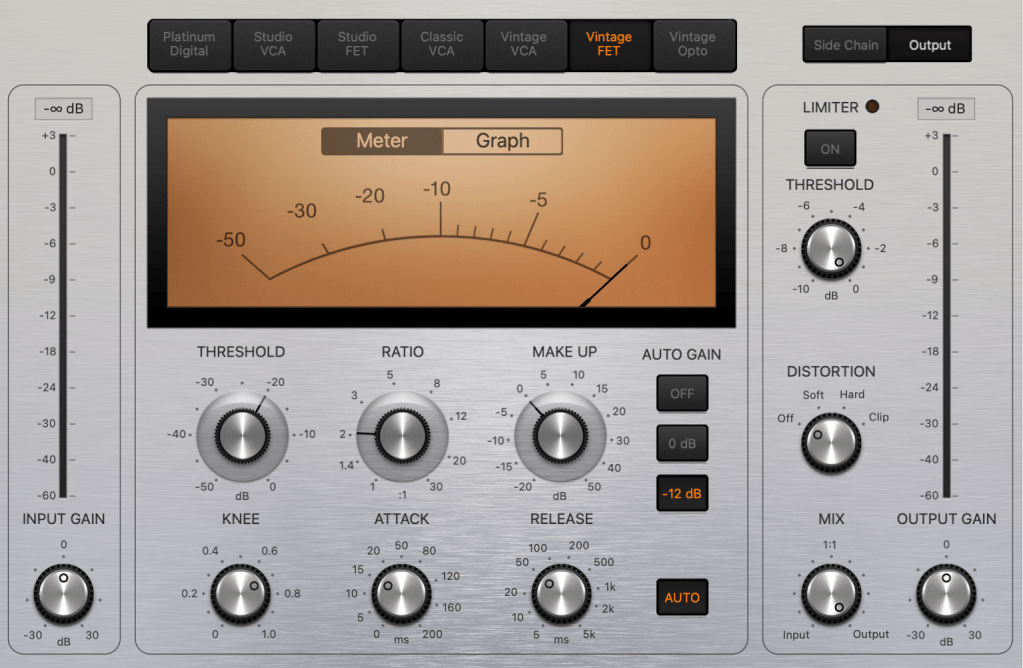
1) Variable-Mu (Vari-Mu)
Vari-Mu compressors use vacuum tubes as attenuators. (Note that just because a compressor has vacuum tubes doesn’t automatically make it a Vari-Mu compressor.)
“Variable” means adjustable, and “Mu” (μ) stands for gain. So, Variable-Mu essentially means variable gain.
This might sound confusing, but essentially, as the input signal increases, the current to the vacuum tube’s grid decreases, thus varying the output level and creating adjustable gain.
Vari-Mu compressors have a non-fixed ratio and typically feature a soft knee. They also impart significant coloration to the sound due to the nature of vacuum tubes.
Famous examples include the Fairchild 670, Manley Variable Mu, and Chandler Limited RS124. These were predominantly used in the early days of compressors.
2) Optical (Opto)
Opto compressors use an optical isolator (photo transistor) as the attenuator. The intensity of the light changes according to the input signal, which in turn adjusts the compression. The release time varies significantly depending on the amount of compression.
A well-known Opto compressor is the LA-2A, which was also called a 2-step compressor due to the significant difference in reduction levels around -3dB. This characteristic makes it popular for vocal sources.
Both vacuum tubes and transistors can be used for gain control in Opto compressors. For instance, the LA-2A uses vacuum tubes, while the LA-3A replaced these with transistors.
The Tube-Tech CL1B is another common Opto compressor found in studios.
3) Solid State
Solid State compressors use transistors or diodes as the attenuators. When transistors first became available, they replaced vacuum tubes due to their lower power consumption and smaller size.
The UA 1176 is a prime example and remains one of the most famous Solid State compressors. It is known for its very fast attack and release times. The Blue Stripe version of the 1176 is especially noted for its strong coloration, making it a favorite for drum sources.
4) Diode Bridge
Diode Bridge compressors use a diode bridge circuit for signal attenuation. These became popular in the 1960s for their faster response compared to typical Opto compressors and lower distortion compared to many FET designs.
Notable examples include the Neve 33609, 2254, Chandler Limited Germanium, and EMI TG12345.
5) VCA (Voltage Controlled Amplifier)
VCA compressors use a Voltage Controlled Amplifier as the attenuator. A VCA adjusts the amplification based on the input signal’s voltage, allowing precise control over the input signal level. VCA designs typically have low distortion and less coloration compared to Vari-Mu, Opto, and Solid State compressors.
The dbx 160 is a representative VCA compressor, along with the Amek 9098 Compressor Limiter, SSL G Compressor, API 2500, Vertigo VSC-3, and Shadow Hills Mastering Compressor (excluding the Opto section).
6) PWM (Pulse Width Modulation)
PWM compressors use pulse width modulation to control signal strength. They can turn on and off in less than 1 nanosecond, making them extremely responsive with even less distortion than VCA compressors.
Famous PWM compressors include the Crane Song STC-8 and the Pye 4060 and 5060.
7) Digital
Digital compressors are not replicas of analog compressors but are designed to detect the signal level in real-time and apply compression based on the set threshold and ratio.
Digital compressors may introduce harmonic distortion due to nonlinear responses and aliasing, although many modern plugins mitigate aliasing with oversampling.
Despite potential distortion, digital compressors typically have less coloration and are cleaner than analog counterparts. Most basic DAW compressor plugins fall into this category.
Conclusion
Nowadays, most compressors used are plugins. Even if they replicate the same vintage hardware, their characteristics can differ, making memorizing all these details unnecessary.
When purchasing or using a compressor for the first time, it’s helpful to understand its operating principle to get a rough idea of its characteristics.
Also, remember that digital replicas may still suffer from aliasing issues. The only way to completely avoid this is by using the actual hardware.
Hello, this is Jooyoung Kim, an engineer and music producer.
Today, we’ll discuss the basic principles of how a compressor works.
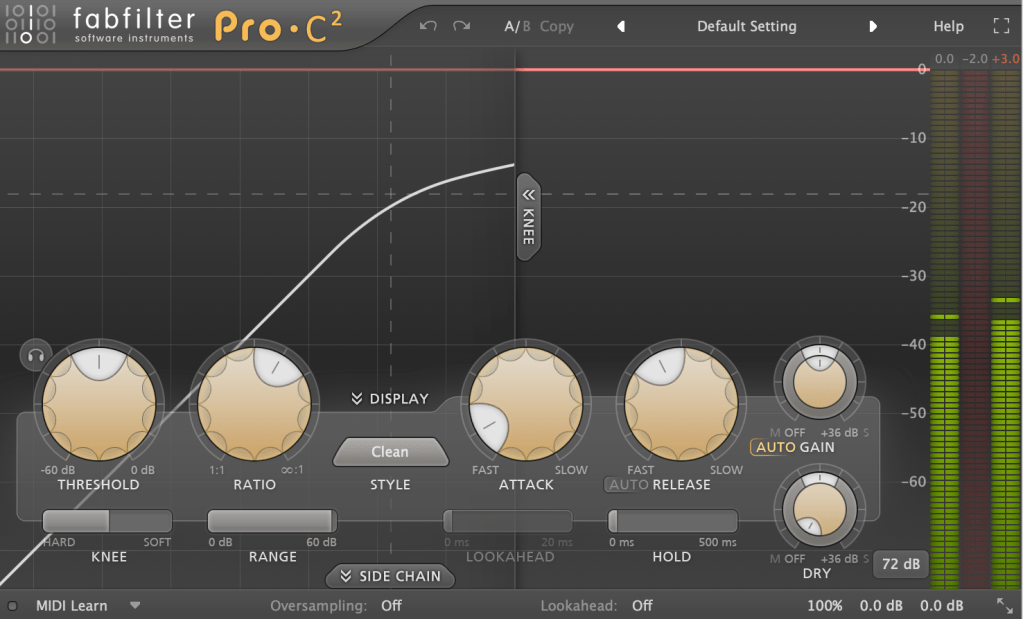
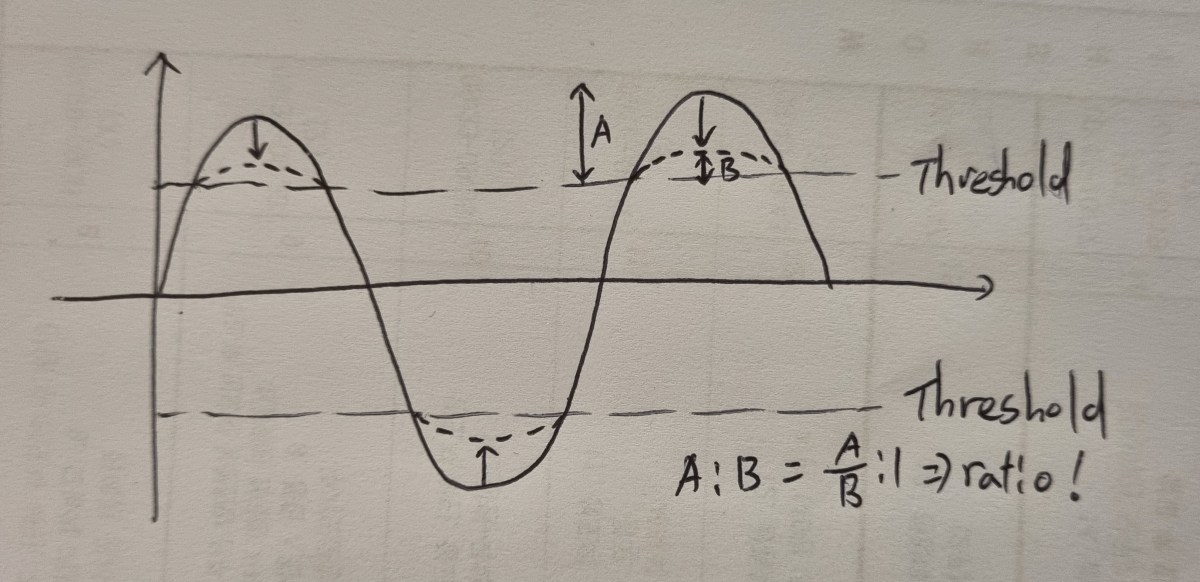
A compressor is a device that reduces sounds exceeding a set volume threshold by a certain ratio.
You can set how quickly the compressor reacts when the sound exceeds the threshold (Attack) and how quickly it stops compressing when the sound drops below the threshold (Release).
The four basic parameters of a compressor are Threshold, Ratio, Attack, and Release. By making louder sounds quieter and leaving quieter sounds as they are, a compressor helps to level out the volume.
Compressed sounds tend to become quieter. Therefore, to match the volume back to the original level, you use the Output Gain parameter.
Many compressor plugins have an Auto Gain feature that automatically adjusts the volume, but in my experience, none of them have worked well enough. So, if your compressor has an Auto Gain feature, it’s best to turn it off.
Another setting to consider is the Knee. Hard Knee means the compressor kicks in immediately once the threshold is exceeded, while Soft Knee allows for a more gradual compression as the sound approaches the threshold.
This covers the most basic operation and usage of a compressor.
However, just explaining the parameters and telling you to try them out isn’t enough guidance, right?^^;;
For example, the classic compressor LA-2A has a fixed ratio of 4:1.
Similarly, most versions of the 1176 compressor (excluding the AE version) start with a minimum ratio of 4:1. Starting around these settings can be a good approach.
The appropriate threshold setting varies greatly depending on the desired effect. If you’re new to this and have no idea where to start, try aiming for a Gain Reduction of around -3dB.
Other considerations include:
Setting a fast Attack can change the transient feel of the sound, affecting the instrument’s groove.
Setting a fast Release can cause the sound to pump as it recovers quickly.
Each instrument and sound source is different, so there’s no one-size-fits-all guide. Additionally, many compressors include saturation, which adds coloration to the sound, so various factors need to be considered.
Still, it’s important to start experimenting! By testing out different compressors, you’ll begin to understand which settings work best in different situations.
In the next post, we’ll look at the different types of compressors. Understanding their characteristics will give you a better grasp of how to use them effectively.