Basics of Mixing – 5.2 Types of EQ (1)

Hello, this is Jooyoung Kim, an engineer and music producer.

There are numerous types of EQs available.

Today, I will describe some of these EQs.

  1. Cut Filter, Band Pass Filter
  2. Shelving EQ
  3. Notch Filter
  4. Graphic EQ

That’s it for today.

  1. Parametric EQ
  2. Dynamic EQ
  3. Baxandall EQ

1) Cut Filter, Band Pass Filter

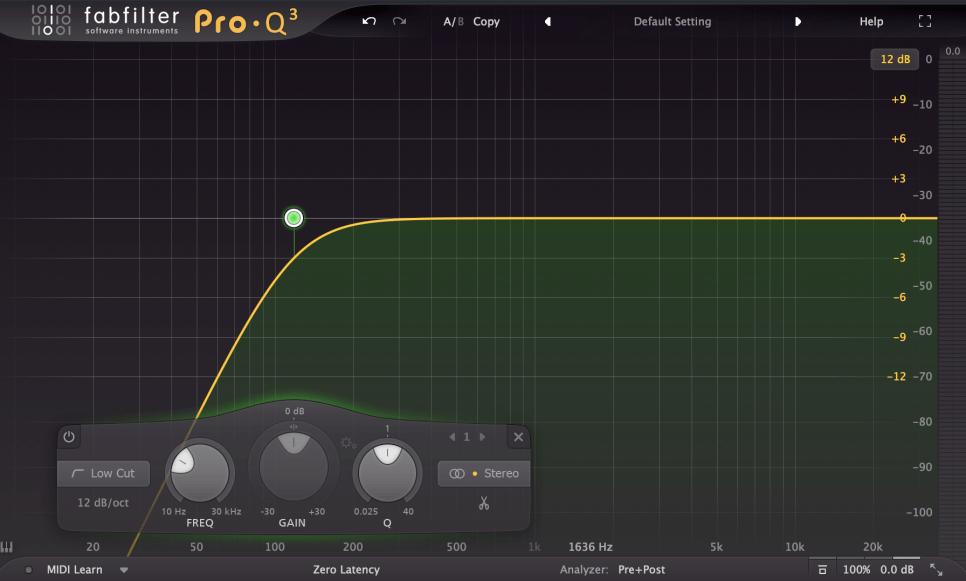
Cut filters are quite common and widely used. Low Cut and High Cut filters are frequently applied.

Low Cut filters are used to reduce low-frequency noises like vibrations from the floor or other low-frequency disturbances.

High Cut filters reduce high frequencies to create a lo-fi sound or to achieve a specific sound characteristic.

Low Cut filters are also known as High Pass filters because they let higher frequencies pass through. Similarly, High Cut filters are known as Low Pass filters.

The amount of reduction is often labeled as -6dB per octave (-6dB/oct) or Pole (with 1 Pole equating to -6dB/oct). Typical values include -6dB/oct, -12dB/oct, -18dB/oct, -24dB/oct, and so on.

While not exactly the same, a Band Pass filter can be thought of as a combination of these two filters.

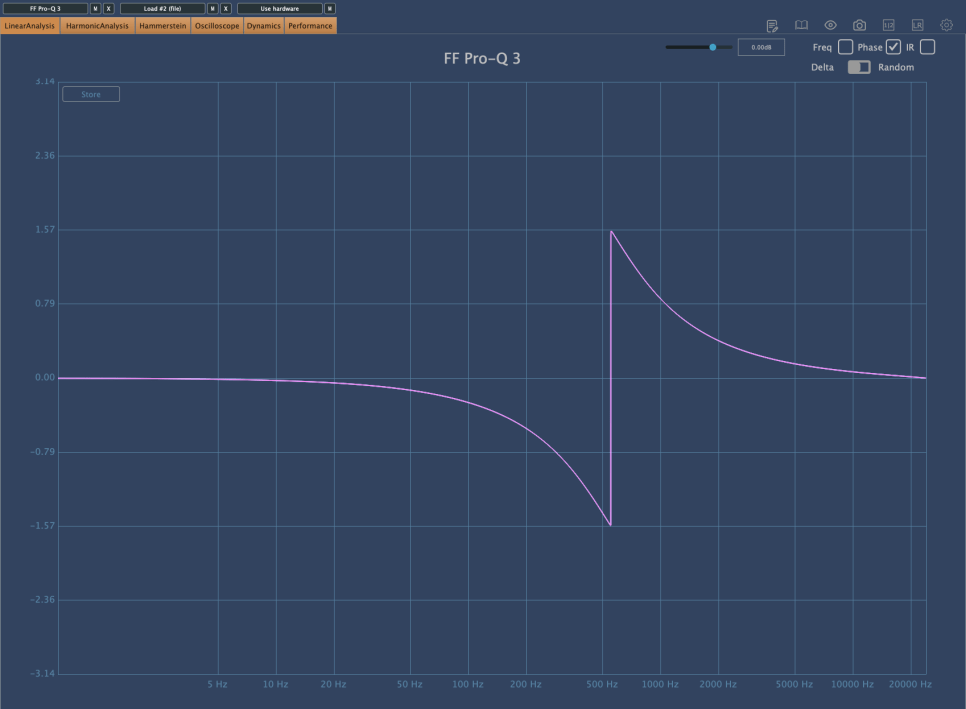
These filters significantly alter the phase.

The phase shift graph above shows the phase change when a -12dB/oct Low Cut filter is applied. You can see a phase shift of π (3.14) in the low-frequency range.

Comparing this with other phase graphs, you will realize that this is quite a significant phase shift. A large phase shift means that the sound will be quite different from the original. Therefore, using Cut filters indiscriminately can result in a sound that is far from the intended one.

I have previously discussed issues caused by phase cancellation.

Each Pole causes a phase shift of π/2. Using a steep Low Cut filter like -24dB/oct can result in a phase shift of up to 2π, so it’s generally not recommended to use it excessively.

However, use it when necessary.

2) Shelving EQ

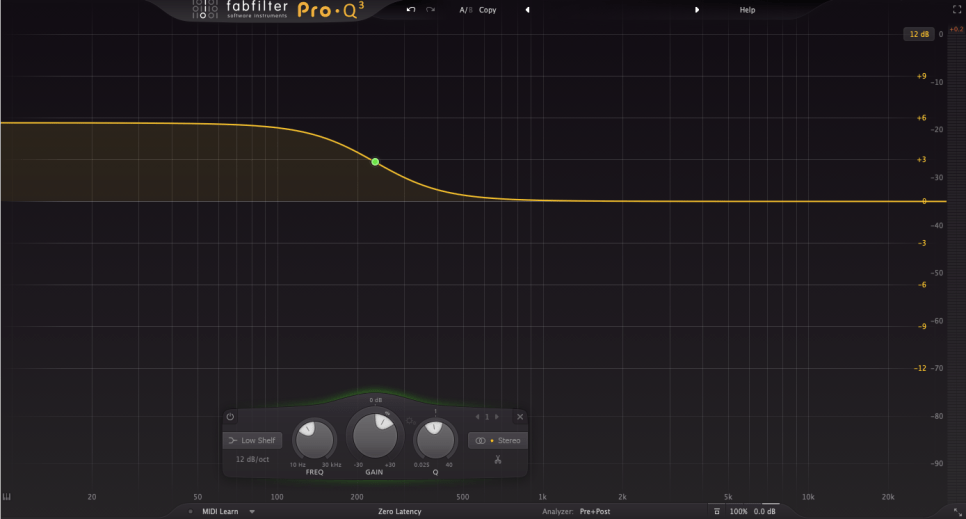
Shelving EQ, also known as Shelving Filter, adjusts the volume of frequencies in a shelf-like shape, as the name suggests.

It is used to lift or lower an entire frequency band.

As shown in the image above, Shelving EQs cause less phase shift, making them a good alternative to Cut filters.
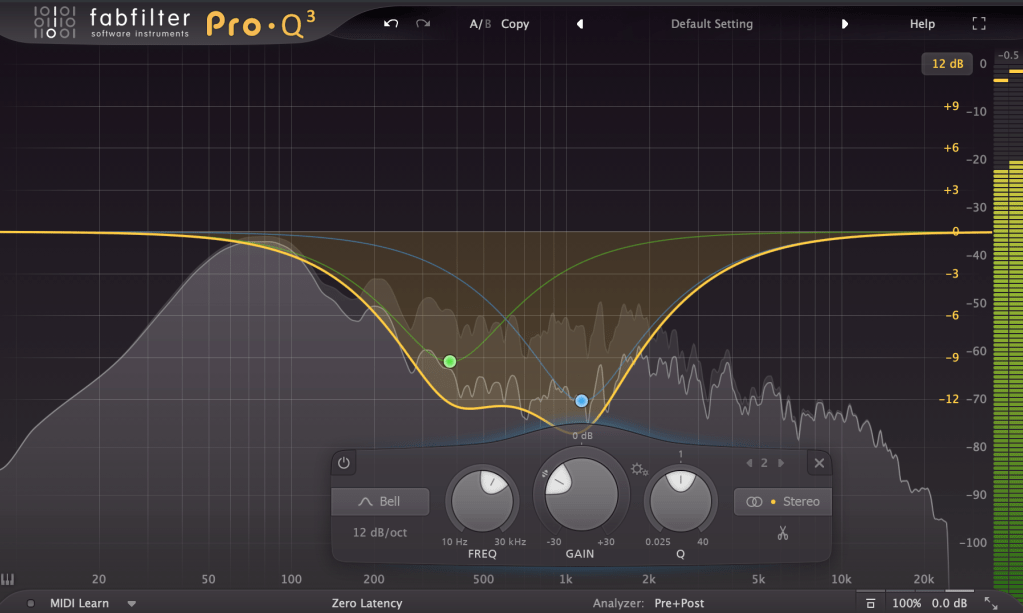
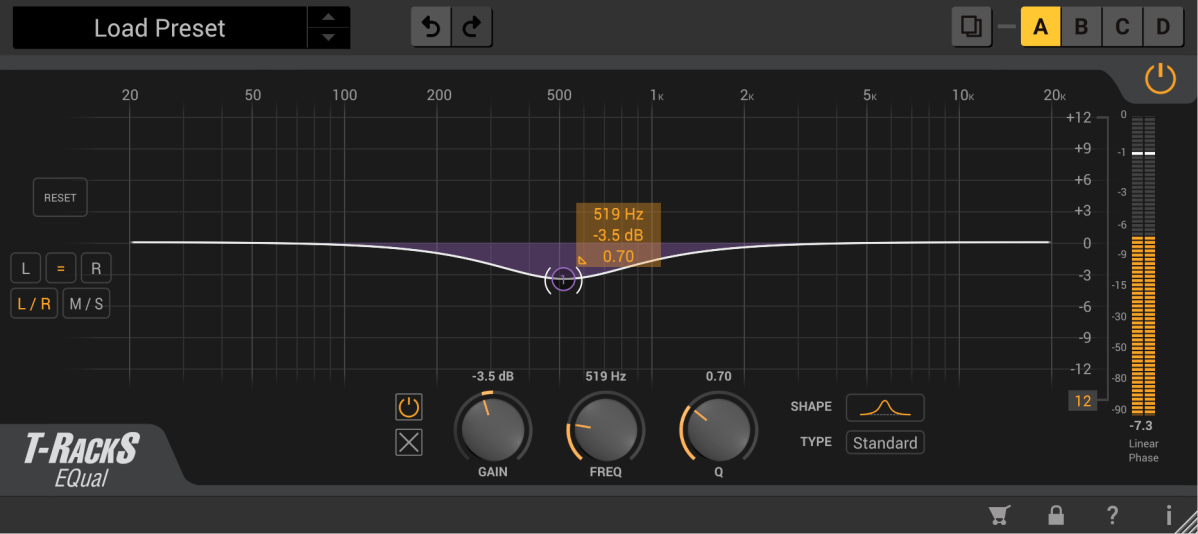
3) Notch Filter

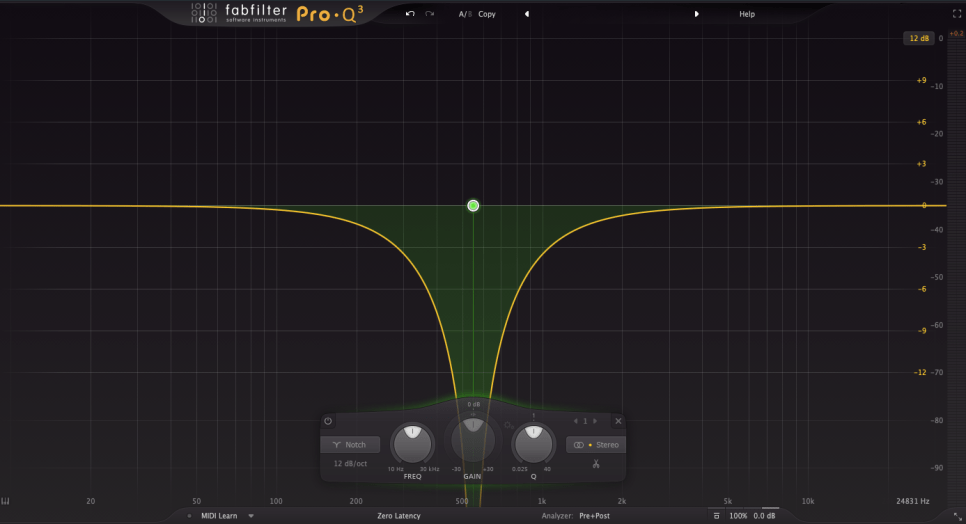
Notch filters can be used to eliminate resonances that are difficult to control with other EQs or to create specific musical effects.

It is quite rare to use Notch filters in mixing. They are typically used for problematic sources that are hard to manage otherwise. I personally use them perhaps once a year in mixing.

In music production, Notch filters can be used on synthesizers to create interesting effects by modulating frequencies over time with an LFO.

4) Graphic EQ

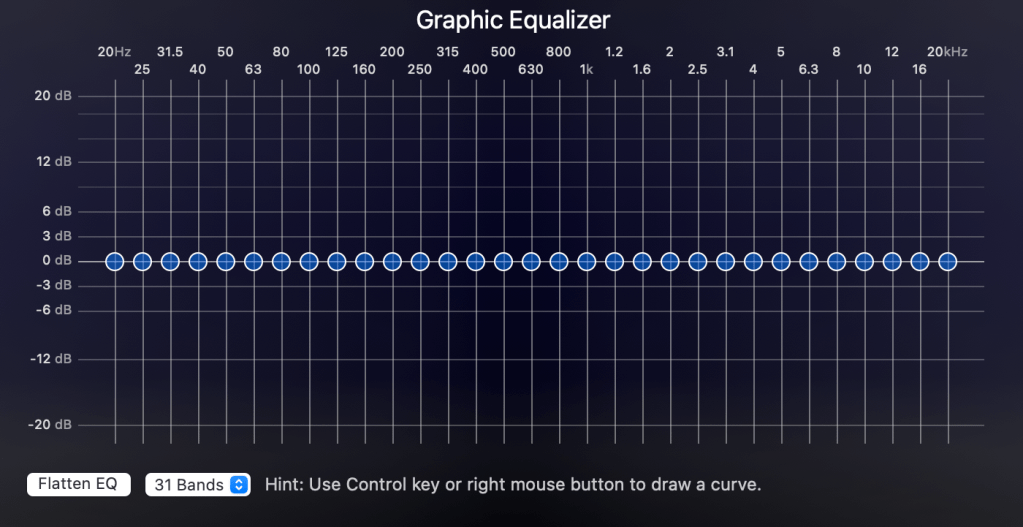
With a Constant Q setting, the Q value remains the same as the volume changes. With a Variable (Non-Constant) Q setting, the Q value changes with the volume adjustments.

These internal settings are usually described in the manual, so it’s best to read it for proper usage.

The phase shift is minimal. The common Bell-type Parametric EQ, which I will explain next time, also changes phase in a similar way.

In studio mixing, Graphic EQs are rarely used due to convenience. However, knowing these theories might be useful, especially if you also do live mixing.

Describing Parametric EQ, Dynamic EQ, and Baxandall EQ would make this post too long, so I will continue in the next article.

The main point I wanted to convey today is the importance of considering phase changes when using EQs.

If the sound is different from what you intended after adjusting the frequencies, it is often due to phase changes.

If it sounds good to your ears, that’s what matters. However, understanding what to watch out for and why can lead to more efficient and faster decision-making.

See you in the next post!

Basics of Mixing – 5.1 What is EQ (Equalizer)?

Hello, this is Jooyoung Kim, engineer and music producer.

Today, I want to talk about the basics of EQ. There’s so much to cover, I’m not sure where to begin… But let’s dive in!

EQ is a tool that allows you to adjust the volume based on frequency. Why would we need something like this?

The main reasons are:

1) To alter the tone of an instrument
2) To change the position of an instrument in the stereo image
3) To prevent sounds from different instruments from overlapping
4) To fix issues with recorded sources

    We’ll go into more detail on the types of EQ in a later post, but for now, let’s discuss these reasons in more depth.

    • To Alter the Tone of an Instrument

    A drum kick typically handles low frequencies. But is it only low frequencies? Of course not.

    High frequencies contribute to the attack, giving it a punchy feel, while the midrange can be quite prominent and can mask other instruments.

    Thus, by using EQ, you can adjust these frequencies to create a balance that fits the song. This applies not just to kicks but to other instruments as well.

    • To Change the Position of an Instrument in the Stereo Image

    Using EQ to adjust an instrument can change its position in the stereo image. In typical speakers with a tweeter on top and a woofer on the bottom, cutting high frequencies can make a sound seem to move lower, while cutting low frequencies can make it seem to move higher.

    You can also adjust just the left or right side with EQ to move the sound diagonally.

    • To Prevent Sounds from Different Instruments from Overlapping

    Instruments like acoustic piano, acoustic guitar, and synth pads produce sounds across a wide range of frequencies, which can cause other instruments, like vocals, to be masked.

    This phenomenon, where instruments obscure each other, is known as masking. Kick and bass are classic examples of instruments that can mask each other. EQ is a traditional and fundamental way to address this issue.

    • To Fix Issues with Recorded Sources
    Millhouse, Thomas & Clermont, Frantz. (2006). Perceptual characterization of the singer’s formant region: A preliminary study. 253-258.
    Singer’s Formant

    When recording instruments, resonance in the room can cause certain frequencies to be overly emphasized.

    There is also something called the Singer’s Formant, a specific resonance found in trained opera singers. Instruments, too, can have unique resonances or harsh sounds. For example, when recording a violin, the bow can produce a squeaky sound at certain high frequencies.

    EQ is used to resolve these resonances.

    Today, we covered why EQ is used. In the next post, we’ll discuss the different types of EQ and their uses. See you next time!

    Basics of Mixing – 4.2 Panning and Stereo Imaging

    Hello, this is Jooyoung Kim, engineer and music producer.

    Today, I want to talk about panning, which controls the left and right placement of instruments. To explain panning, let’s first discuss how to create a stereo image.

    • Creating a Stereo Image

    Stereo imaging starts with microphone recording techniques. On the left, we have AB stereo miking, and on the right, we have XY stereo miking.

    AB stereo miking forms a stereo image by utilizing the time difference between sounds arriving from the left and right. In contrast, XY stereo miking relies on the volume difference between sounds arriving from the left and right.

    Inspired by this, panning moves the audio source left and right by manipulating volume differences, much like the XY stereo miking method.

    A question may arise: How do we create these volume differences to achieve panning? This is defined by the Pan Law.

    • Pan Law

    Pan Law settings in DAWs typically include 0dB, -3dB, -4.5dB, and -6dB.

    The reason for these settings is that if you move an instrument to the left or right by simply lowering the volume of one side, the overall volume decreases as the instrument moves. This scenario occurs when the Pan Law is set to 0dB.

    In the case of -3dB, the center volume is reduced by 3dB, ensuring the volume remains consistent when moving stereo sources left or right.

    For -4.5dB and -6dB, the center volume is reduced by the respective amounts, making the sound appear louder as it is panned left or right.

    This might sound complicated, but there’s no need to overthink it. Just be aware that there are various panning settings.

    In practice, adjusting the volume balance while panning is common, so you don’t need to worry too much about it.

    • Haas Effect

    I also want to discuss the Haas Effect. As mentioned earlier, AB stereo miking creates a stereo image by the time difference in sounds arriving at two microphones.

    Similarly, what happens if the same sound is played with a time delay between the left and right speakers? The answer is that it will sound biased towards the side that plays first.

    This technique can make mono sources sound like stereo. However, from my experience, recording a double take sounds more natural and fuller than creating a stereo image with the Haas Effect.

    While it’s useful to know, it’s generally better to use this technique only when necessary.

    There are various ways to express panning.

    For example, Logic uses a scale from -64 to +63, while Cubase and Pro Tools use -100 to +100. Some DAWs use clock-face representations.

    There’s also Balanced Panning, which allows free adjustment of left and right panning.

    When sending signals externally using Send from a panned source, the panning settings do not apply. Therefore, each DAW provides a Send Panning function to send the signal with the applied panning.

    That’s all for today. See you in the next post!

    Basics of Mixing – 4.1 Volume Balance

    Hello! I’m Jooyoung Kim, an engineer and music producer.

    In my previous post, we discussed organizing tracks. Today, we’ll delve into volume.

    • Why Volume is Crucial

    Volume is the beginning and end of mixing. Higher volumes bring elements closer to the listener, while lower volumes push them further away. This simple principle helps place instruments within the stereo image created by your speakers.

    • How to Set Volume

    First, listen to some reference tracks. Songwriters often get so absorbed in their own work that they miss when certain instruments are too loud or too quiet. Reset your ears by listening to professionally mixed songs.

    Next, return to your DAW and mute all the tracks. Unmute a key track, such as the kick, snare, or vocal, and set its volume appropriately. Use this as a reference to balance the volumes of the other tracks.

    While adjusting volumes, align the phase of multi-track recordings like drums and start some basic panning of instruments.

    (Note: For more on phase alignment, refer to my previous post: 2.2 Phase and Interference. Details on panning will be covered in a future post.)

    Once you move into more detailed processing, you’ll use volume automation, but this initial balance setup is crucial.

    Avoiding Digital Clipping

    One key point is to avoid digital clipping. If signals in your DAW are too high, the DAC can’t process them, resulting in distorted sound. This is digital clipping, and it prevents proper mixing.

    Clipping occurs when the meter exceeds 0dBFS. Some DAWs can handle signals beyond this without clipping, but if your bit depth isn’t in a float format, clipping can happen when you export, causing damage.

    Ensure your final master doesn’t exceed the 0dBFS peak meter mark to avoid clipping.

    That’s it for today. Keep these tips in mind, and I’ll see you in the next post!