Basics of Mixing – 2.4 Speaker Placement and Listening Techniques

Hello, This is Jooyoung Kim, a mixing engineer and singer-songwriter.

To mix effectively, you need to listen to sound accurately.

What does it mean to listen to sound accurately? It can be a long discussion, but let’s focus on two main points:

  1. Minimize distortion (from the room, objects, speaker baffle, speaker unit limitations, etc.)
  2. Listen from the correct position.

These two principles form the foundation.

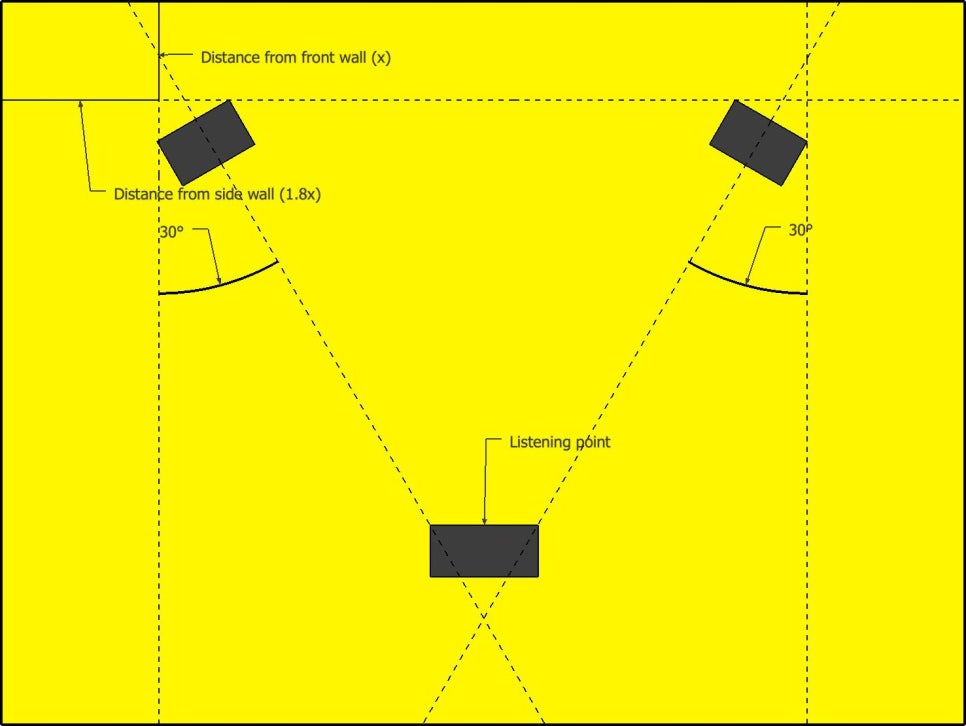
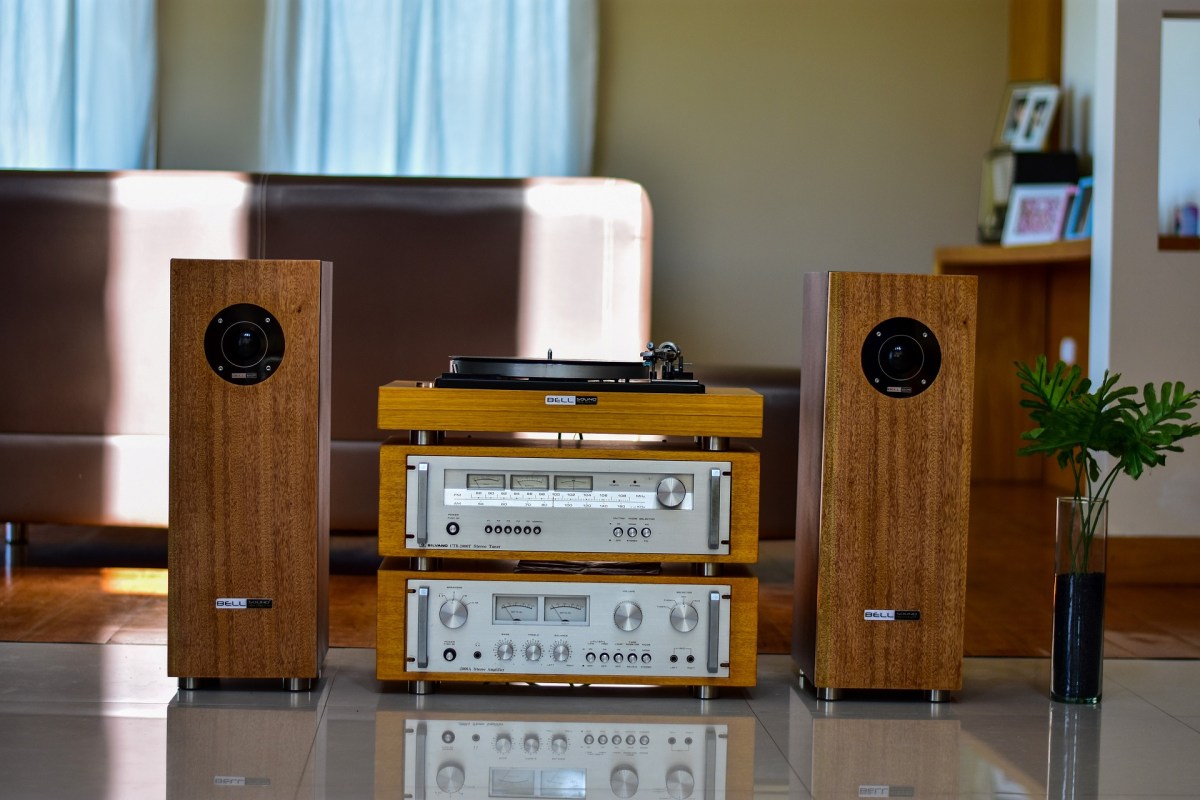
Generally, stereo speakers are arranged in an equilateral triangle. The angle marked as 30 degrees in the diagram above is called the Toe-In Angle. This angle can be adjusted slightly based on personal preference.

Additionally, the tweeter, which reproduces high frequencies, should be positioned close to ear level. This is because high frequencies are more directional and may not be heard well if the tweeter is placed too high or too low. Various stands are used to achieve this positioning.

However, recommended angles and placements can vary by manufacturer, so it’s best to start with the manual and then adjust as needed.

When changing placements, it’s important to measure and identify where the issues are. With some training, you can listen to a track and identify boosted or cut frequencies, giving you an idea of where the problems lie. Measurement, however, makes it easier to pinpoint specific issues you might miss by ear.

One of the simplest and free measurement programs is REW (Room EQ Wizard), which I introduced a long time ago.

You can use an affordable USB microphone like the miniDSP UMIK-1 for easy measurement, or, if budget allows, a measurement microphone like the Earthworks M50.

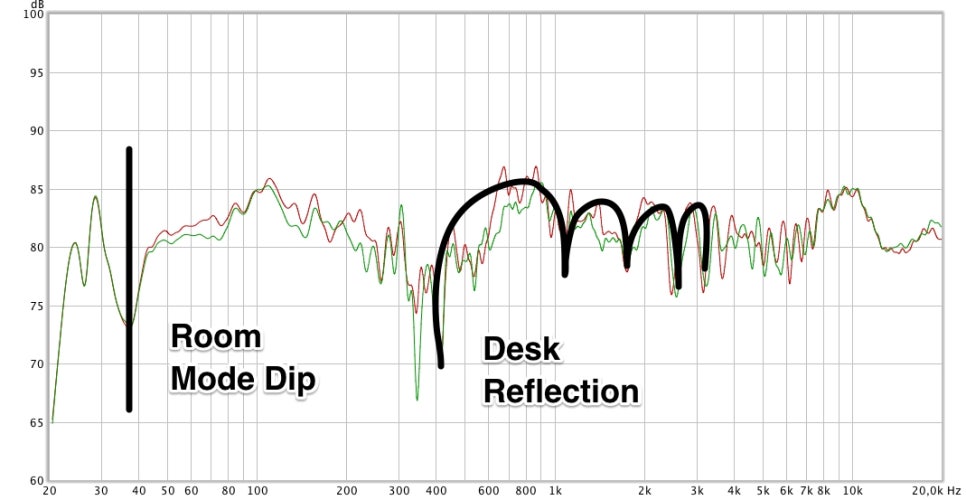
By measuring, you can understand various factors beyond just frequency response, such as phase, harmonic distortion, and reverberation time. This helps you identify and solve problems in your workspace.

Doing all this ensures you hear the sound as accurately as possible, allowing you to understand what proper sound and mixing should be.

So, you’ve set up your speakers correctly. How should you listen to the sound?

Of course, you listen with your ears, but I’m not just saying that. I’m suggesting you listen to the sound in layers.

In a typical 2-way speaker, the tweeter is on top, and the woofer is on the bottom, so high frequencies come from above and low frequencies from below. Consequently, low-frequency instruments seem to be positioned lower, and high-frequency instruments higher.

If your listening distance and room support it, well-made hi-fi tallboy speakers can make mixing easier.

That was about the vertical plane. Now, let’s talk about the front-to-back dimension.

When someone whispers in your ear versus speaking from afar, there are noticeable differences:

  1. Whispering sounds clearer (more high frequencies, less reverb)
  2. Whispering sounds louder.

These principles determine whether instrument images appear in the front or back. Panning also moves them left and right.

If you’re not familiar with this concept, try closing your eyes and identifying where each instrument is located in a mix.

Since stereo images vary with different speakers, it’s crucial to understand how your speakers reproduce images. Reference tracks are essential for this.

For example, I always listen to Michael Jackson’s albums and the MTV live version of “Hotel California” when I switch speakers. Michael Jackson’s songs are well-mixed for their age, and the live version of “Hotel California” is superbly mixed except for the vocals.

Let’s wrap it up for today. Creating the best acoustic environment in your room is essential for effective mixing.

My environment isn’t perfect either, but I’m continuously improving it..!

See you in the next post!

Basics of Mixing – 2.3 Digitalization of Sound

Hello, I’m Jooyoung Kim, a mixing engineer and music producer.

Today, I want to talk about how analog sound signals are digitized in a computer.

The electrical signals outputted through a microphone preamp or DI box are continuous analog signals. Since computers cannot record these continuous signals, they need to be converted into discrete signals. This is where the ADC (Analog to Digital Converter) comes into play.

Here, the concepts of Sample Rate and Bit Depth come into the picture.

The sample rate refers to how many times per second the signal is sampled.

The bit depth refers to how finely the amplitude of the electrical signal is divided.

For example, consider a WAV file with a sample rate of 44.1kHz and a bit depth of 16 bits. This file records sound by sampling it 44,100 times per second and divides the amplitude into 65,536 levels (2^16).

A file with a sample rate of 48kHz and a bit depth of 24 bits samples the sound 48,000 times per second and divides the amplitude into 16,777,216 levels (2^24).

In a DAW (Digital Audio Workstation), these digital signals are manipulated. To listen to these digital signals, they need to be converted back into analog electrical signals.

This conversion is done by the DAC (Digital to Analog Converter), often referred to as a “DAC”.

The image above shows a simple DAC circuit that converts a 4-bit digital signal into an analog signal.

These analog signals can pass through analog processors like compressors or EQs and then go back into the ADC, or they can be sent to the power amp of speakers to produce sound.

Various audio interfaces

Audio interfaces contain these converters, along with other features like microphone preamps, monitor controllers, and signal transmission to and from the computer, making them essential for music production.

Topping’s DAC

However, those who do not need input functionality might use products with only DAC functionality.

Inside these digital devices, there are usually IC chips that use a signal called a Word Clock to synchronize different parts of the circuit.

To synchronize this, devices called Clock Generators or Frequency Synthesizers are used.

In a studio, there can be multiple digital devices, and if their clocks are not synchronized, it can cause a mismatch called jitter. Jitter can result in unwanted noises like clicks or cause the sound to gradually shift during recording (I experienced this while recording a long jazz session in a school studio where the master clocks of two devices were set differently).

To prevent this, digital devices are synchronized using an external clock generator. If you are not using multiple digital devices, the internal clock generator of the device should suffice, and there is no need for an external clock generator.

An article in the journal SOS (Sound On Sound) even mentioned that using an external clock generator does not necessarily improve sound quality.

Today, we covered Sample Rate, Bit Depth, ADC (Analog to Digital Converter), DAC (Digital to Analog Converter), Word Clock, and Jitter.

While these fundamental concepts can be a bit challenging, knowing that they exist is essential if you’re dealing with audio and mixing. If you find it difficult, just think, “Oh, so that’s how it works!” and move on.

See you in the next post!

DC Snares (Drum Machine) Virtual Instrument Release Sale (Until July 31st, $31.9)

Hello, This is Jooyoung Kim, an engineer and music producer.

Today, I want to introduce a new virtual instrument developed by Plugin Boutique.

The newly released DC Snares is a virtual instrument that allows you to create sounds by synthesizing four different samples. You can use the Randomizer in the top right corner to generate sounds randomly.

There are a total of 10 built-in FX, allowing you to apply FX to individual samples, FX to the bus, and FX to the master track separately through the Advanced controls.

Each sample can be individually adjusted for envelope, pitch, and volume over time, and you can also set the start and end points of the samples to your preference.

In modern music production, it’s crucial to refine drum sounds meticulously to create a good groove. DC Snares offers all the necessary features for this and has a simple UI that makes sound creation convenient.

Despite its name, DC Snares is not limited to creating snare sounds. It can also be used to create hi-hats, kicks, bass, and other drum machine-like sounds. The presets are quite usable, making it a worthwhile purchase for around $30.

The sale runs until the end of July, so if you frequently work with samples, I recommend giving it a try. It also supports loading personal WAV files, adding to the fun and versatility.

See you in the next post!

Takamine Guitar Bodies and G Series Lineup

Hello, I’m Jooyoung Kim, an engineer and music producer. Today, I’d like to go over the body types and lineups of Takamine guitars.

Shall we begin?

Limited 2021 Blue Rose, which I really want… The 2020 model in olive was also great… The problem is always the wallet…
  • Body Types

Takamine guitars have seven body types: Dreadnought, FXC, NEX, Jumbo, New Yorker, OM, and Thinline.

The FXC is similar to a typical grand concert body, the NEX body is a small jumbo, and the New Yorker is a parlor body.

Jumbo
Dreadnought
NEX
OM
FXC
New Yorker

Most people are familiar with the Dreadnought and OM bodies, so you can use them as a reference to gauge the size of other bodies.

TSP100 DBS of the Thinline series

Thinline is a completely different body type, with a thinner body making it easier to play. This should cover the acoustic guitar bodies that use steel strings.

Now, let’s look at the lineup.

  • Takamine Guitar Lineup

Takamine guitars are broadly divided into the G Series and Pro Series.

Additionally, there are Thin Line, Limited Line, and Signature Line as special editions.

SeriesDescription
G SeriesGuitars produced in other countries such as China, Korea, and Taiwan to provide affordable options.
Pro SeriesGuitars produced at the main factory near Mount Takamine in Gifu Prefecture, Japan.
ThinlineGuitars with a thin body.
Limited LineLimited edition guitars.
Singnature LineArtist signature guitars.

Breakdown by Series

G Series:
– Improves in quality and price from 10, 20, 30, 50, 70 to 90 series.
– Even the highest value-for-money
– G90 series does not exceed $1000 overseas.
– Also includes acoustic basses, classical guitars, Takamine minis, and ukuleles.

Pro Series:
– Improves in quality and price from 1, 2, 3, 4, 5, 6 to 7 series.
-Even the lowest Pro 1 series is quite expensive as it is made in Japan.

Thin Line:
– A single line dedicated to thin body guitars.

Limited Line:
– As the name suggests, these are limited edition guitars and tend to be quite expensive due to their often flashy appearance.

Signature Line:
– No separate sub-categories, similar to the Thin Line.

Let’s first take a look at the specifications and features of the G Series.

  • G Series
GN30CE model from the G30 line of Takamine G Series

10 Series:
– Body: Laminate
– Top: Spruce (10), Mahogany (11)
– Sides/Back: Mahogany
– Nut Width: 42.5mm
– Nut/Saddle: Synthetic bone
– Split Saddle: Yes
– Remarks: Bridge pinless string change method

20 Series:
– Body: Top Solid
– Top: Solid Cedar
– Sides/Back: Mahogany
– Nut Width: 42.8mm
– Nut/Saddle: Synthetic bone
– Split Saddle: Yes

30 Series:
– Body: Top Solid
– Top: Solid Spruce
– Sides/Back: Mahogany
– Nut Width: 42.8mm
– Nut/Saddle: Synthetic bone
– Split Saddle: Yes
– Remarks: Available as 12-string guitar, 3-piece back option

50 Series:
– Body: Top Solid
– Top: Solid Spruce
– Sides/Back: Rosewood or Black Walnut
– Nut Width: 42.8mm
– Nut/Saddle: Synthetic bone
– Split Saddle: Yes

70 Series:
– Body: Top Solid
– Top: Solid Spruce
– Sides/Back: Quilted or Flame Maple, Black Walnut
– Nut Width: 42.5mm/42.8mm
– Nut/Saddle: Synthetic bone
– Split Saddle: Yes
– Remarks: 3-piece back option

90 Series:
– Body: Top Solid
– Top: Solid Spruce
– Sides/Back: 3-piece Black Walnut, Maple, Bocote, Madagascar Rosewood
– Nut Width: 42.8mm/43mm
– Nut/Saddle: Synthetic bone
– Split Saddle: Yes
– Remarks: Black Walnut sides/back standard, available as 12-string guitar, 3-piece back option

  • Naming Convention

The naming of G Series guitars follows the pattern G□△△○○-☆☆☆.

1) □: Body type (D-Dreadnought, N-NEX (small jumbo), F-FXC (grand concert), Y-New Yorker (parlor), J-Jumbo)
2) △△: Line and wood type
3) ○○: Cutaway and pickup presence
4) ☆☆☆: Color

GD93CE-NAT

For example, from the name GD93CE-NAT:
1) G Series
2) D: Dreadnought
3) 90 series
4) 3-piece back
5) CE: Cutaway with pickup
6) NAT: Natural color

However, older models seem to follow a different naming convention, which I’m not familiar with.

There are also classical guitars, acoustic basses, Takamine minis, and ukuleles, which I will organize separately if time allows.

Personally, I think the 20 and 30 series offer good value for money. Although I haven’t received demo units yet to hear their sound, I believe they could be recommended if they offer decent sound, intonation, pickup quality, and neck feel.

I will review and post about the demos as soon as I receive them.

I intended to cover the Pro Series, Thin Line, and Limited Line all at once, but it’s taking longer than expected.

I will organize the Pro Series and other lines in a separate post.

See you in the next post!