Sonnox Vocal Production Bundle Sale (~10/20, $64.9)

Hello, I’m Jooyoung Kim, an audio engineer and music producer.

Sonnox is currently offering a great deal on a bundle of vocal processing plugins, so I thought I’d share this with you.

(If you purchase through the link above or any of the other links below, I receive a small commission, which greatly supports the maintenance of this blog!)

This bundle includes three plugins designed specifically for vocal processing:

  • Claro: EQ and stereo width control
  • Vox Doubler (Widen, Thicken): Vocal doubler
  • Voca: A processor combining compression, saturation, and de-essing

Let’s take a closer look at each, starting with Claro.
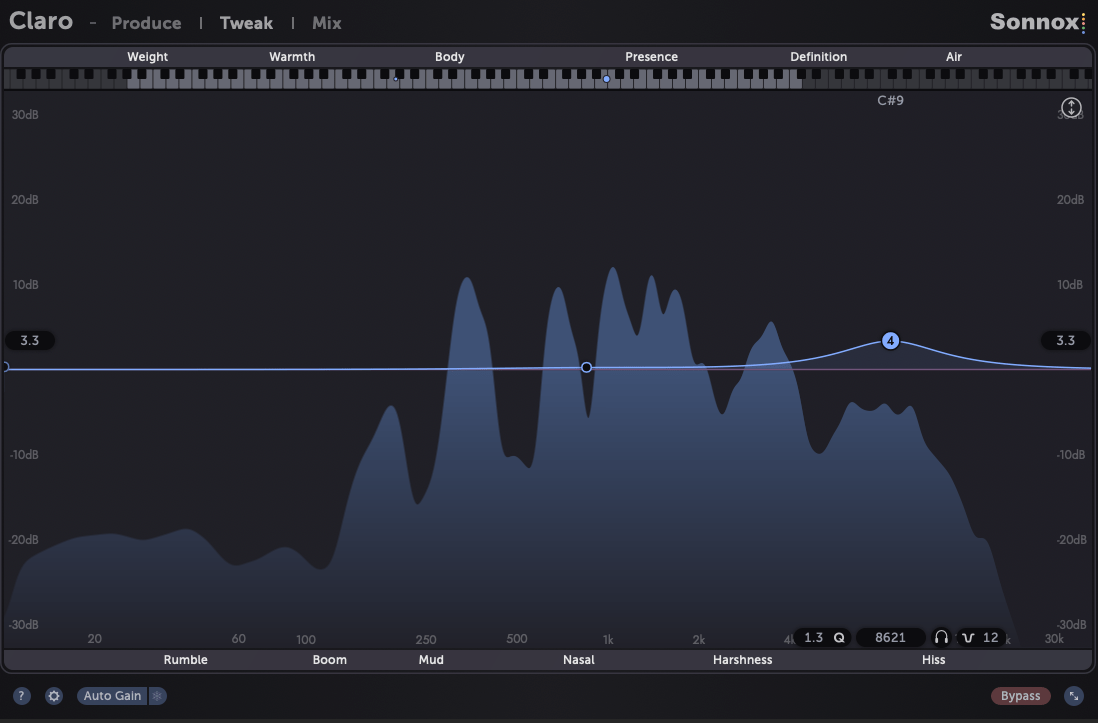

Claro

Sonnox’s Claro is a clean and highly functional EQ and stereo width enhancer. You can use it in a simple “Produce” UI, as shown above, or in a more detailed “Tweak” UI that includes a spectral analyzer.

Each frequency band features labels below for negative terms and above for positive ones, making it intuitive even for beginners to use.

Additionally, you can view frequencies in a keyboard format, which can be very familiar and useful for composers.

What impressed me the most about Claro is that you can view the EQ settings applied to other tracks simultaneously!

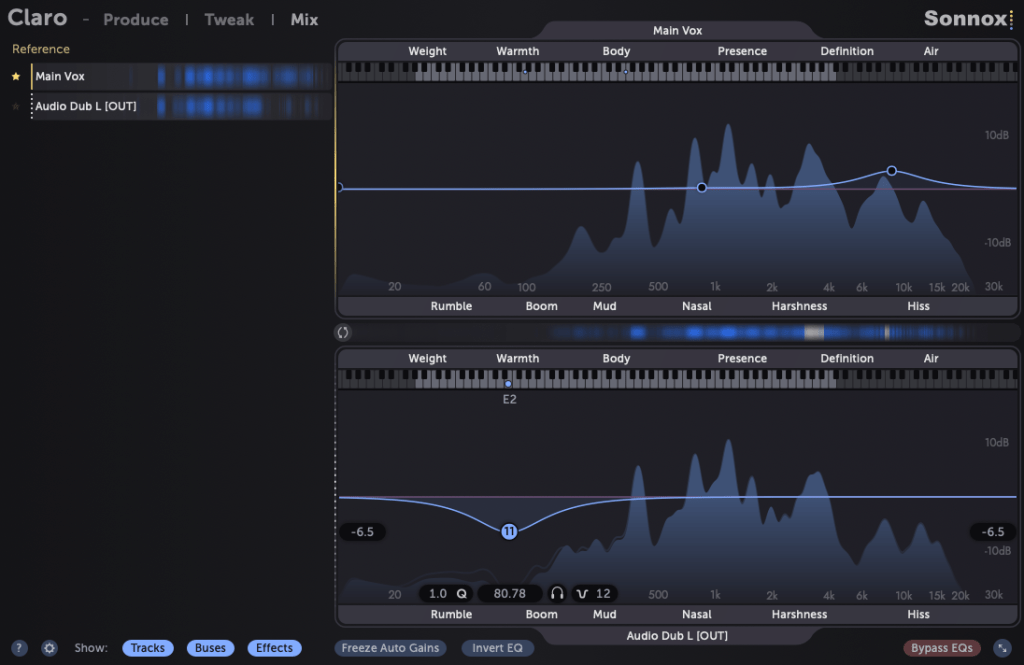
Moreover, you can adjust the EQ for those other tracks directly within this interface. This is an incredibly innovative feature.

For tracks that experience masking issues and don’t cut through the mix, you can quickly locate the interfering frequencies and make adjustments, significantly streamlining your workflow and saving time.

Claro’s competitor is clearly FabFilter’s Pro-Q3, but considering that you get two additional plugins for just $64.9, it’s a fantastic deal.

Although it’s not a dynamic EQ, it’s the first EQ I’ve seen that also allows width adjustment, making it a plugin I’m seriously considering as my main EQ from now on.

Vox Doubler

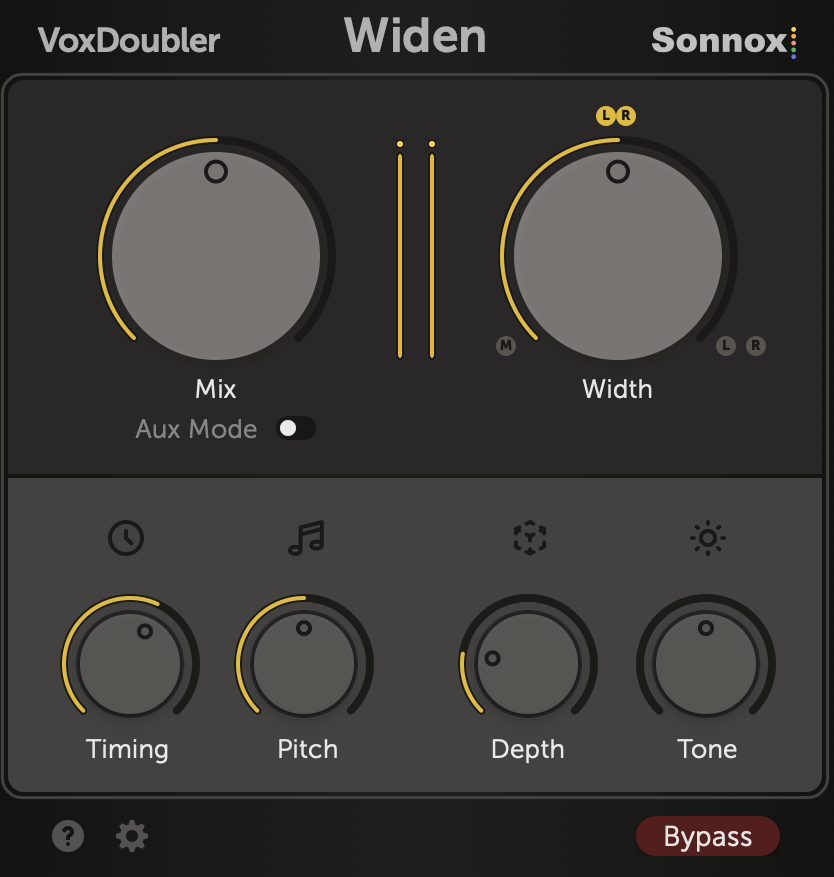
The Vox Doubler includes two plugins: Thicken and Widen. The difference is that Widen creates two separate mono tracks, one for each side, while Thicken produces a single stereo track.

While the difference is subtle, it’s perfect for background vocal doubling to emphasize the chorus parts.
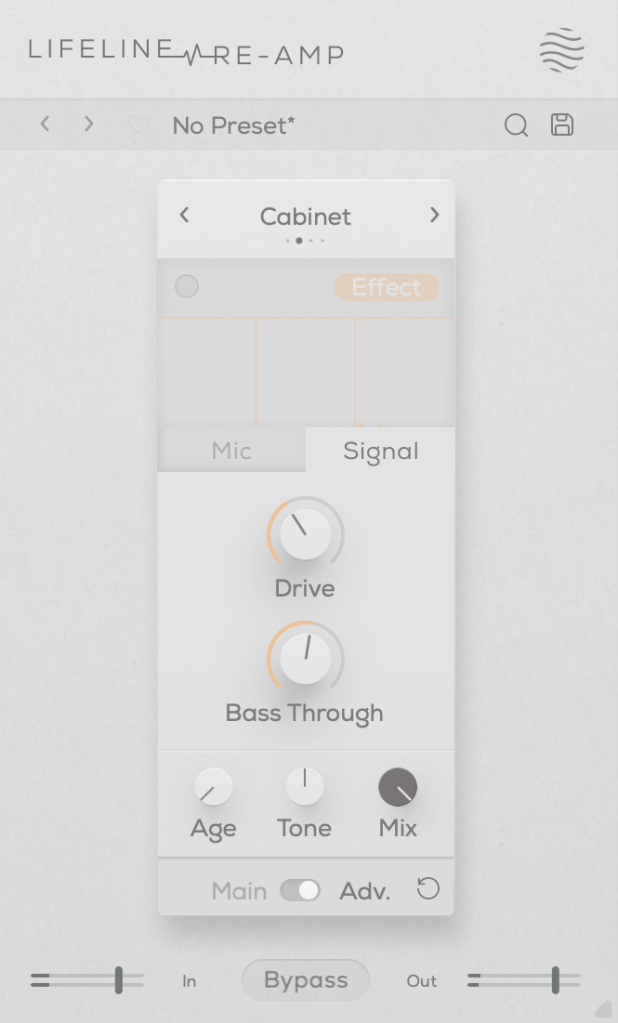
Voca

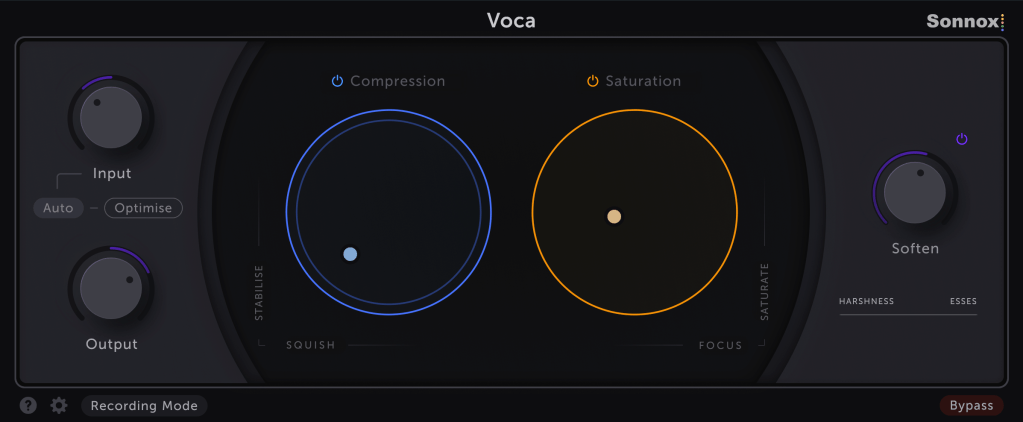
Voca is essentially an all-in-one channel strip. In the compression section, the left/right parameters labeled as “Squish” work like a ratio, and the “Stable” parameter functions similarly to a threshold.

In the saturation section, “Saturate” controls the amount of coloration, while “Focus” adjusts the EQ curve (higher settings boost lows and highs, while lower settings emphasize the midrange).

The “Soften” parameter acts as a de-esser, specifically targeting the area around 5kHz. You can think of this as a versatile all-in-one effect.

Additionally, if you purchase plugins from Plugin Boutique this month, you’ll receive either a “Solina” synthesizer, which focuses on string sounds, or Zynaptiq’s Orange Vocoder Nano.

Both are incredibly useful plugins, so be sure to claim them if you make a purchase.

That’s it for today’s post. See you next time~!

Mastering the Mix Best-Seller Bundle Sale (Until Sept. 22)

Hello! I’m Jooyoung Kim, an audio engineer and singer-songwriter.

Today, I’d like to introduce you to a fantastic sale from Mastering the Mix, featuring their Reference and Reso plugin bundle.

Reference is a plugin that helps you match the frequency response and loudness of your mix to a reference track, while Reso allows you to control the resonances in your audio source.

As someone who frequently works on mixing, I highly recommend Reso. Let’s take a closer look at what it can do!

(Note: I received the Reso plugin from Plugin Boutique, and if you purchase through the provided link, I’ll earn a small commission that helps support the blog.)

The Reso plugin’s user interface is straightforward—a frequency graph where you can plot points.

When you plot a point like this…

…it narrows down the selected frequency and reduces it. The Q factor is automatically set to an optimal value, but you can easily adjust it by scrolling your mouse over the point.

At the top, there’s a “Calculate Targets” button, which analyzes the frequencies where resonances occur and automatically sets points for you.

If the resonance is too strong to control with just EQ…

…the plugin starts applying compression/limiting! It’s an innovative concept, as it helps reduce problematic frequencies without completely destroying the audio like a notch filter might.

You can also use the Solo button to isolate and listen to specific frequencies. I believe this EQ is unparalleled when it comes to handling resonance.

This bundle is currently on sale at a very attractive price—$53.9 for both Reference and Reso, whereas each plugin normally costs $62.7 individually. Think of it as buying Reso and getting Reference as a bonus!

If you’re dealing with sources that have a lot of resonance, I highly recommend trying out the demo version. I recently had a vocal track with significant resonance, and this plugin helped me resolve the issue, leaving me very satisfied.

Additionally, if you purchase any plugin from Plugin Boutique this month, you’ll receive either the Pyros distortion plugin or the Bloom Vocal Aether Lite sampler instrument for free. Be sure to select your freebie at checkout!

That’s it for today. See you in the next post! 😊

Heavyocity MicroFX Intro Sale (Until 9/20)

Hello, this is Jooyoung Kim, music producer and audio engineer.

Today, Heavyocity has released a new set of plugins called MicroFX.

Heavyocity is known for selling virtual instruments and effects plugins, especially well-suited for film and video music production. However, the new MicroFX plugins can be used for a variety of purposes beyond those genres.

There are three plugins in the series:

  1. Obscene (Distortion)
  2. Filter
  3. Shimmer

Let’s take a closer look at each of them.

Obscene

Obscene true to its name, this plugin delivers a powerful, in-your-face distortion effect.

There are three types of distortion to choose from: BLASTER, CRUSHER, and NUKE.

  • BLASTER offers a guitar pedal-style distortion.
  • CRUSHER adds bitcrushing to the distortion.
  • NUKE provides a fuzz-like distortion.

On the graph, the X-axis controls the amount of distortion, while the Y-axis adjusts ring modulation and internal filtering.

You can activate the Mod function, and by double-clicking on the screen, you can place points, which are influenced by the speed settings on the right. You can place up to 15 points.

When you adjust Movement, the frequency response and harmonics change over time. The Tone control acts like a tilt EQ, while Feedback may seem subtle at first but becomes more noticeable as the distortion increases. The large knob at the bottom center is the Mix control.

Filter

Filter is a simple but versatile plugin.

In this case, the X-axis controls the cutoff frequency, and the Y-axis adjusts the resonance.

Through the buttons below the central knob, you can choose which filters to apply to the high and low frequencies.

By clicking the center of the interface, you can choose whether to link the filters in series, parallel, LR (left/right), or MS (mid/side) modes.

When you adjust Movement, the frequency response and harmonics change over time. The Tone control acts like a tilt EQ, while Feedback may seem subtle at first but becomes more noticeable as the distortion increases. The large knob at the bottom center is the Mix control.

Shimmer

Shimmer reverb will be covered in more detail in my upcoming blog post on the basics of mixing. It’s a reverb plugin that incorporates pitch modulation, producing a bright, extended effect.

This shimmering, elongated reverb is particularly popular in instrumental and cinematic music, especially on guitars.

Shimmer captures that classic sound well.

The X-axis controls the blend of the pitch-shifted delay, while the Y-axis adjusts various internal reverb parameters to shape the overall tone.

The buttons on the lower left let you shift the pitch an octave down, an octave up, or both.

The Size, Decay, and Mod knobs function like typical reverb controls, so I won’t explain those further.

Dynamic is a fader that adjusts the internal dynamics. Pulling it to the left applies an expander to the reverb’s input and output, while pushing it to the right activates a ducking compressor.

Summary

All three plugins are well-crafted and highly useful for sound design. If you’re interested, I recommend checking them out!

These plugins are priced at $42.9 each, or $108.9 for the bundle. Additionally, if you purchase from Plugin Boutique this month, you’ll receive either the Pyros distortion plugin or Bloom Vocal Aether Lite for free.

Thanks for reading, and I’ll see you in the next post! 🙂

Excite Audio Lifeline Modules Plugin Sale (until 9/30) and Review Part 2: Lifeline Expanse

Hello, this is Jooyoung Kim, a music producer and audio engineer.

Following the previous review on Lifeline Console, today I’ll introduce you to the plugins included in Lifeline Expanse.

As I mentioned in my previous post, these plugins are not resource-heavy on your computer. They’re affordable, high-quality, and come with a clean, intuitive UI, making them a solid option if you’re considering basic third-party plugins.

Lifeline Expanse is also being reviewed with NFR (Not for Resale) codes provided by Plugin Boutique.

Let’s dive into Lifeline Expanse!

Lifeline Expanse includes five modules: Format, Dirt, Reamp, Width, and Space.

The Lo and Hi options in Expanse are simple cut-off filters, so I’ll skip explaining them.

The waveform on the left shows a de-esser-like effect where high frequencies are attenuated based on the incoming signal, while the shield in the middle acts as a limiter.

Unlike Console, Expanse doesn’t add various types of saturation, but even with the filter range maxed out, it still introduces tonal changes. Now, let’s take a closer look at the individual modules.

Format

click image to buy Lifeline Format

The concept of Format is “digital distortion.”

This plugin adds a characteristic digital distortion to your source.

In the Advanced window, you can split the frequency range into three bands, adjust their volume, and even add noise. The Smooth option can make the changes less harsh.

Other key controls include Crush, which adds the distortion, and Tone, a tilt EQ centered around 650Hz.

There are four modes:

  • Degrade: Reduces the bit depth of the incoming audio, creating digital distortion.
  • Resample: Lowers the sample rate of the audio, adding digital artifacts.
  • Washed: Simulates the sound of a degraded, low-quality MP3, creating an underwater-like effect.
  • Flatten: Combines gating and bitcrushing, reducing the resolution of the audio.

Let’s take a closer look.

This is Degrade mode, where reducing the bit depth makes the waveform appear choppy in the oscilloscope.

In Resample, harmonics reflect back at the Nyquist frequency, and those oscillations can be seen on the scope. It’s constantly in motion due to added frequencies.

Washed mode just smears everything.

Flatten shows harmonic reflections, indicating a resampling effect, combined with reduced bit depth, resulting in multiple distortions.

Dirt

click image to buy Lifeline Dirt

The Dirt module focuses on “analog distortion.”

You can choose from four types: Tube, Tape, Rectify, and Fuzz. The controls are the same as in Format, so I won’t repeat the explanation.

All four modes emphasize low and mid frequencies while cutting highs. As the name “Dirt” suggests, pushing the Drive knob can make it act almost like a compressor or limiter at higher levels.

Re-Amp

click image to buy Lifeline Re-Amp

As the name suggests, Re-Amp is designed to simulate re-amping.

You can re-amp through small electronics, guitar cabinets, monitor speakers, or cassette recorders, with two speaker options in each category to choose from.

True to the re-amping concept, it allows you to adjust the distance of room and close microphones, and blend their sounds together.

Increasing the Age value causes the highs and lows to gradually roll off, eventually introducing wow and flutter effects.

The Drive knob adds harmonic distortion, while Bass Through prevents distortion from affecting the selected low-frequency range.

Width

click image to buy Lifeline Width

The Width module adjusts stereo imaging.

You can select from Haas, Mid/Side, Detune, and Mono modes.

The Haas effect, as shown in the image, uses time delays to create a stereo image. Mid/Side enhances the side channels, Detune creates a wider image through pitch modulation, and Mono narrows the stereo field, gradually converting the sound into mono.

The Stereo knob enhances these effects, and Bass Mono ensures that frequencies below a set threshold are converted to mono.

I’ll skip further explanation, as the rest of the parameters are the same as in Format.

Space

click image to buy Lifeline Space

Space is a reverb module.

You can choose from Hall, Plate, Spring, and Slap reverb types, all offering solid digital reverb sounds.

Slap, in particular, has a delay with a significant amount of feedback, making it quite versatile.

A unique parameter here is Duck, which reduces the reverb based on the incoming input signal. Other parameters are typical for reverb plugins.

Each of these modules is priced at just $11, making them very affordable. Plus, if you purchase any plugin from Plugin Boutique, you’ll receive either the Pyros distortion plugin or the Bloom Vocal Aether Lite plugin for free.

Thanks for reading, and see you in the next post! 🙂