Using BFD3 Virtual Drums: Features, Expansion Packs, and Year-End Sale (~50% Off, Until 12/31)

Hello! I’m Jooyoung Kim, a mixing engineer and music producer.

In my last post, I briefly mentioned submitting a short paper to a domestic academic journal.

Since I plan to continue participating in academic activities, I paid the lifetime membership fee, along with submission and publication fees. Let’s just say—it adds up! 😅

In the future, I’d like to continue publishing papers as a hobby, but I might need to look into funding options. My position is quite unique, and I don’t know anyone else doing this kind of work, so there’s not much guidance available. Regardless, I’m determined to push through!

If the peer review goes well, the journal issues quarterly publications, so I expect it to come out around March. Once it’s published, I’ll share the insights here, as they’ll be useful for engineers and producers alike.

Now, let’s dive into today’s topic: BFD3, my go-to acoustic drum virtual instrument, and its features, expansions, and year-end sales!


Support This Blog!

If you purchase through the links below, I receive a small commission, which helps me tremendously.

It doesn’t cost you anything extra compared to searching directly on Plugin Boutique, so if you find this guide useful and plan to buy, I’d greatly appreciate your support!


Overview of BFD3

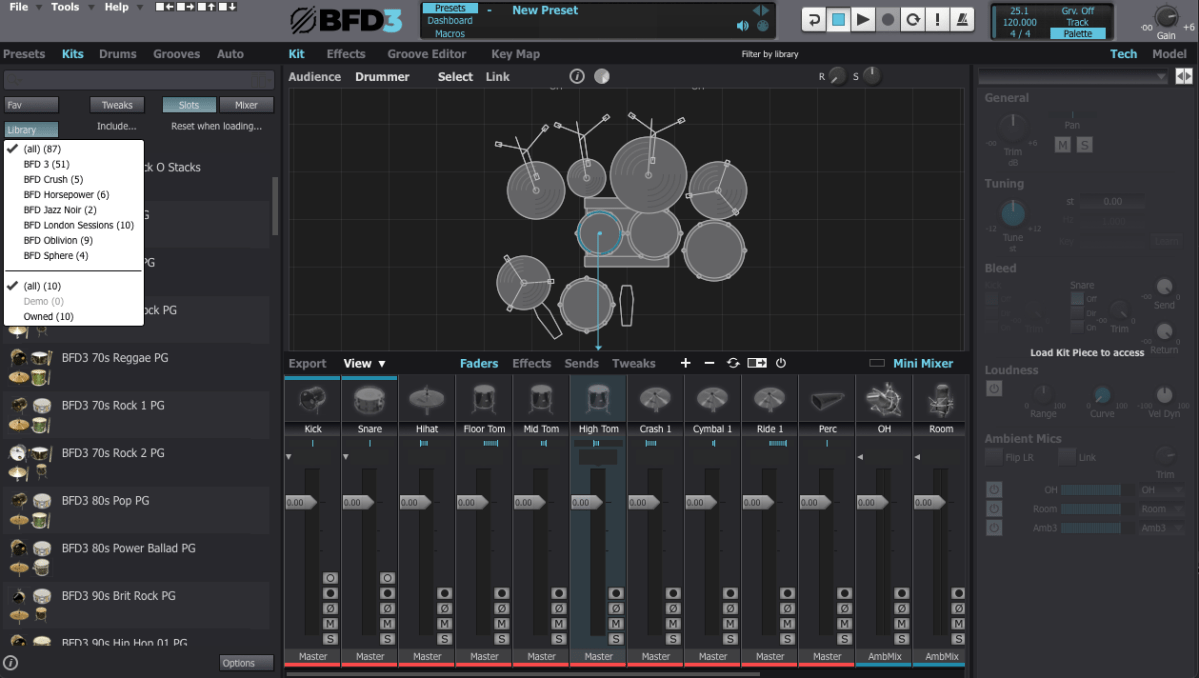
When you first open BFD3, it can feel overwhelming. The interface can be broadly divided into Left Panel, Center Panel, and Right Panel. Let’s break it down step by step.

Left Panel Features

  • Presets: Ready-made setups with pre-configured grooves and drum kits.
  • Kits: Entire drum kits without grooves.
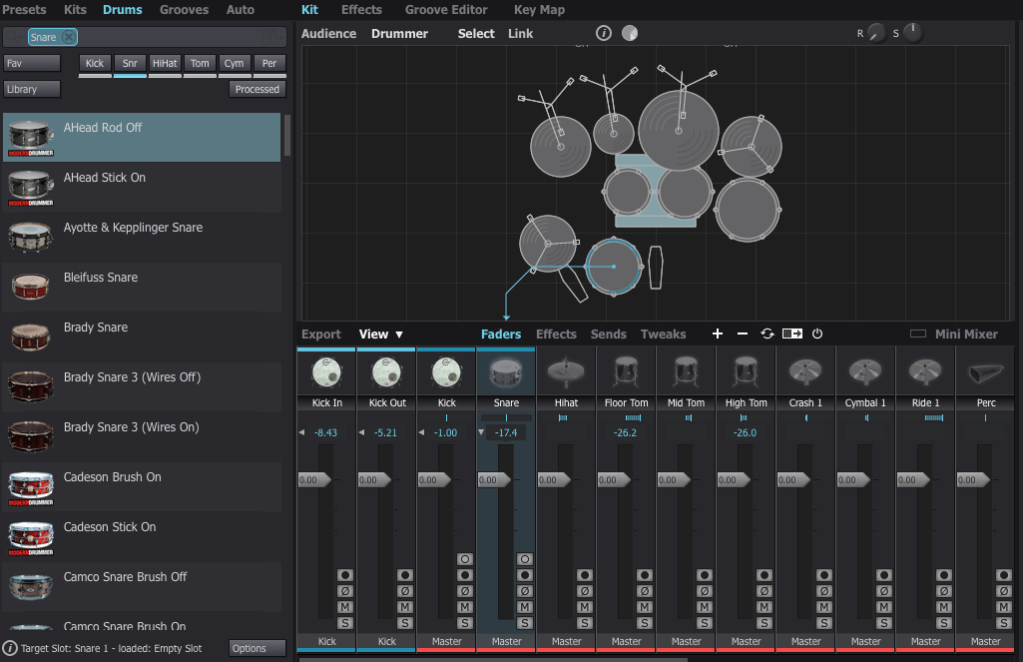
  • Drums: Allows selection of individual drum instruments.
  • Grooves: Built-in MIDI patterns for playback.
  • Auto: Automates parameters via MIDI CC mapping.

I personally prefer selecting individual drums from the Drums menu to create a custom setup tailored to each song.


Center Panel Features

The Center Panel provides a visual representation of your drum kit and its settings.

  • Select any drum instrument by clicking on it, and swap it out from the available options.
  • Add or remove instruments from your kit using the right-click menu.

For effects, BFD3 has built-in tools, but I usually handle effects within my DAW, so I rarely use the internal effects or sends.


Groove Editor & Key Mapping

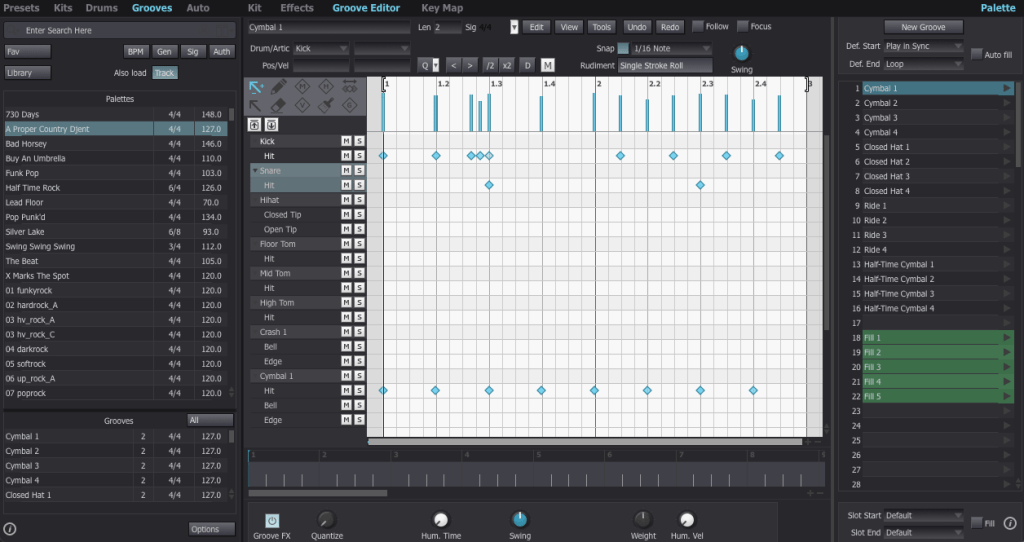
The Groove Editor lets you view, modify, or drag MIDI grooves into your DAW.

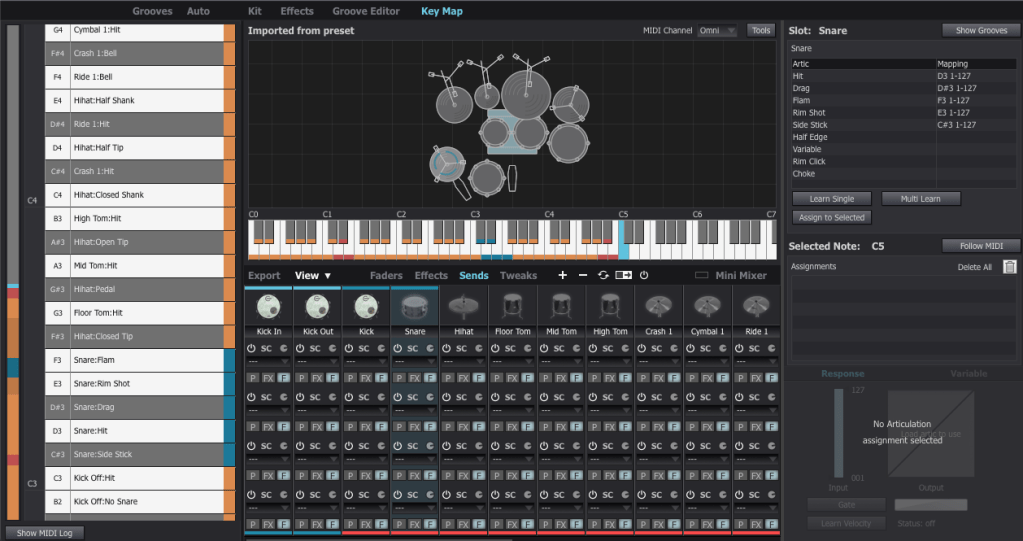
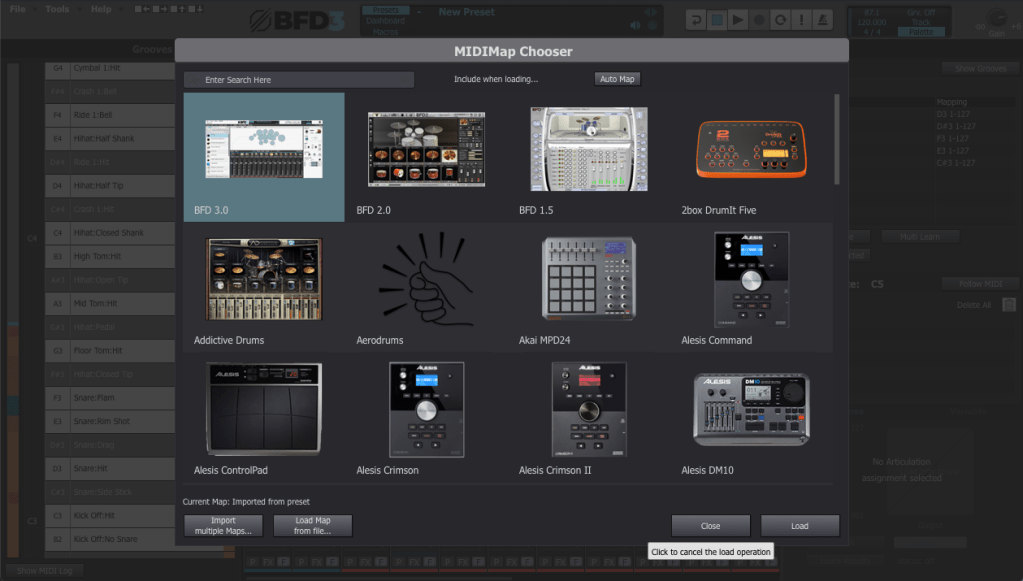
For drum mapping, I use the BFD2 GM-compatible Key Map, which was recommended by my mentor. You can load it via File > Load Key Map.


Mixer and Track Settings

The Tweaks, Tech, and Model sections are critical for fine-tuning drum tones.

  1. Tune: Adjust pitch to match your track’s key (e.g., align the kick with the tonic or dominant of the song).
  2. Damp: Control the release for each drum part.

Compression affects perceived release times, so apply it before adjusting.

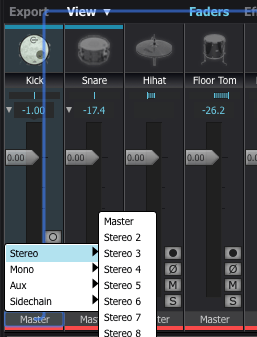
To route individual instruments to separate outputs, assign them to specific channels in the mixer.


Exporting (Bounce) Process

This part can be a bit tedious. If you don’t set the output to Master in the mixer window, the export often doesn’t work properly.

To solve this, I usually duplicate the track settings and reset everything to Master output.

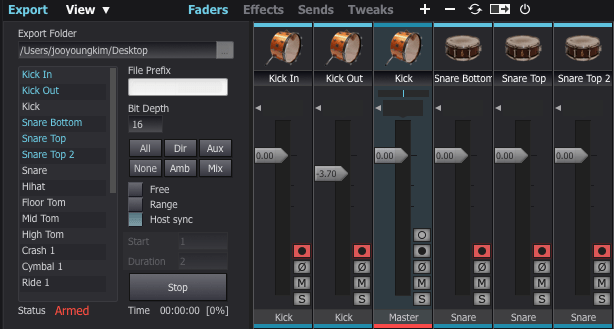
Next, enable the record buttons for the desired tracks in the mixer window. Then, click Export on the bottom left, choose your preferred bit depth, enable Host Sync, and hit the record button to start exporting.

Once you play back from the beginning, it records the drum track as if it were a live session, outputting a WAV file. And voilà—your drum track is ready for mixing!


Recommended Expansion Packs

The default pack in BFD3 is a bit limited in variety, making it less versatile for different styles of music. I initially purchased expansions like Crush, Horsepower, Jazz Noir, Metal Snares, and Oblivion during a major sale last year. However, some of the kits, especially snares, left me wanting more.

For this review, I collaborated with Plugin Boutique, who generously provided three fantastic expansions: London Sessions, Modern Drummer Snare Selects, and Sphere. Here’s my take on each:


1) London Sessions

As you can see from the library photo above, London Sessions offers a massive collection of kits (around 50GB) and includes various brands. This makes it highly versatile for different genres.

If you’re considering buying an expansion, this is the one I recommend starting with.

The sound quality is excellent, as you can hear here. After testing it myself, I found it to be a highly satisfying expansion.


2) Modern Drummer Snare Selects

This pack features 12 iconic snares handpicked by Modern Drummer Magazine. If you’ve ever used BFD3, you might have struggled to find the perfect snare, just like I did.

The stock snares in BFD3 didn’t quite meet my expectations. Even with my other snares, it was rare to find one that truly stood out. I often resorted to building my snares from scratch or using a sampler.

If you’ve faced similar challenges, this expansion will likely solve most of your snare-related frustrations.


3) Sphere

This expansion focuses on rock and metal genres, featuring DW/Vibe kicks and toms, and Ludwig’s Black Beauty Snare. The sounds in this pack tend to have shorter releases and punchier attacks, making it ideal for heavier music styles.

It’s somewhat similar to expansions like Oblivion (not the Skyrim game!) or Crush, but I personally found the sound quality to be superior. If you’re into those genres, this pack is a solid choice.


With that, we’ve come to the end of this guide on BFD3 usage and expansion recommendations.

BFD3 is a virtual drum instrument I highly recommend. While its learning curve is steep, the quality of its sound is exceptional when used correctly.

If you’re planning a year-end purchase, consider getting BFD3 bundled with London Sessions. It’s possibly the best value you can get for acoustic drum software.

See you in the next post! 😊

Record Before Modifying the Stam Audio SA-2A

Hello, this is Jooyoung Kim, mixing engineer and music producer.
Until a few days ago, I was planning to sell my Stam Audio SA-2A second-hand and purchase a product from a Japanese brand.

However, it didn’t sell easily, and with the sudden rise in the Japanese yen… So, I decided to modify the unit myself instead of selling it.


Identifying the Problems

Here are the issues I identified with the SA-2A:

  1. Dissatisfying Sound
    • Excessive saturation and dull highs give the audio a muffled feel.
  2. Gain Parameter Adjustment
    • The output volume only matches the original level when the Gain knob is significantly reduced.
  3. Peak Reduction Sensitivity
    • Compression only activates when the Peak Reduction is turned up considerably.
  4. Limit and Compress Switch
    • The switch works in reverse.

Initial Steps in Modification

Addressing Problems #2 and #3

  • Inside the unit, I found a variable resistor labeled A100K.
    • This logarithmic resistor seemed unresponsive at lower ranges.
    • However, since we perceive audio in dB, it made sense to use a logarithmic curve for the Gain control.
  • I decided to replace:
    • Peak Reduction with a B100K (linear) resistor (ideally A200K, but it was unavailable).
    • Gain with a lower resistance A50K resistor.

I placed the order for these parts and will replace them soon.


Fixing Problem #4

  • The Limit/Compress switch was simple to resolve—just unscrewed it and rotated it half a turn.

Investigating Sound Quality Issues

The core problem remained the sound quality. After extensive research:

  • I contacted Stam Audio for the circuit diagrams.
  • I emailed Cinemag, the transformer manufacturer, to get specifications for the input/output transformers:
    • Input: Cinemag CM-5722, winding ratio 1:5.
    • Output: Cinemag CM-2570, winding ratio (18:2):1 = 9:1.

While considering transformer replacements (e.g., Sowter), I found several insights:

  1. Cinemag’s CM-5722 input transformer is already highly rated and doesn’t need replacement.
  2. Discussions on Gear Space suggested that tubes or the T4 cell impact the sound more than transformers.
  3. A post from 2016 or 2017 on Gear Space mentioned that replacing a single input tube can significantly improve sound.
  4. A YouTube video comparing various 12AX7 tubes on a Marshall amp highlighted sound differences between tube brands.

From this, I concluded that the JJ Electronics 12AX7 (ECC83) used in the V1 position is likely the main culprit behind the sound I dislike.

Based on the video, the JJ Electronics tube produced a tone that immediately felt off to me.


Planned Tube Replacements

I decided to replace:

  • V1 Tube: JJ Electronics ECC83 with Mullard 12AX7, a sound I much prefer.
  • V4 Tube: JJ Electronics ECC83 with another Mullard 12AX7 for consistency.

However, due to unexpected expenses this month (e.g., AES membership fees, domestic conference fees, paper review fees, and repairs for another compressor), I’ll postpone the tube replacement until next month.


Side Discovery: DIY Compressors

While researching, I stumbled across a site selling DIY cases and PCBs.

https://collectivecases.com/

While there are plenty of LA-2A clones on the market, the PYE compressor clone caught my eye.

  • PWM-based compressors are rare, and even the clones are scarce.
  • The original units are prohibitively expensive.

Although the schematics look complex and sourcing components would require significant time and money, I feel deeply drawn to this project. Maybe someday, with enough budget, I’ll take it on.


For now, this concludes my record of the SA-2A before modification. Once I replace the tubes and complete further changes, I’ll share my experiences and the sound improvements in a follow-up post.

See you in the next update! 😊

Introducing the SSL Fusion Bundle and Its Limited-Time Discount (-92%, Until 12/11)

Hello, this is Jooyoung Kim, mixing engineer and music producer.

SSL is known for creating excellent plugins but rarely offers deep discounts. This time, they’re offering a significant discount exclusively on the Fusion plugins, so I wanted to share an overview of the SSL Fusion Bundle for those on the fence about purchasing it.

Purchasing through the link above supports me with a small commission, which helps me keep creating content. Thank you!

Now, let’s dive in.


What is SSL Fusion?

The SSL Fusion was introduced in late 2018 as a hardware unit.

This piece of gear falls under the category of enhancers, akin to the SPL Vitalizer or the Overstayer MAS.

It became quite popular due to its feature set and relatively affordable price. However, ever since the Fusion plugin series launched, I’ve noticed an increase in second-hand listings for the hardware on various marketplaces.

While the hardware offers unique textures, I personally don’t use it heavily due to the inconvenience of recall. Many might have switched to plugins for similar reasons.
Also, let’s be honest—printing and tweaking can be quite a hassle!

The SSL Fusion Bundle includes five core functions from the hardware (excluding the hidden “LMC” or Listen Mic Compressor feature). Personally, I was most impressed with the Transformer and Stereo Image plugins. Let’s take a closer look at each.


SSL Fusion Transformer

Click image to purchase SSL Fusion Transformer..! It’s really great!

The Transformer plugin replicates the hardware transformer circuit. Clicking the transformer symbol activates it.

  • Shine: Enhances high frequencies.
  • LF EXTND: Gently boosts sub-lows.
  • Amount: Controls the level of harmonic distortion.

In essence, it’s an enhancer that adds harmonics and high-end sheen. Right from the first test, it added pleasing high frequencies and harmonics, making it versatile for various tracks.


SSL Fusion Stereo Image

The Stereo Image plugin recreates the stereo enhancer from the Fusion hardware.

It offers more than just a width adjustment by including Stereo Shuffling, which allows control over stereo imaging in low-frequency bands.

  • Shuffle: Sets the cutoff for low frequencies.
  • Space: Adjusts the stereo width of these frequencies.
  • Width: Adjusts overall stereo width using M/S processing.

If you’re hesitant about pricier alternatives like Leapwing Audio’s StageOne 2, this plugin provides excellent stereo imaging control, especially for modern music where low-end stereo imaging is critical.


SSL Fusion Vintage Drive

The Vintage Drive plugin adds saturation and harmonic distortion while increasing low-end warmth.

With subtle settings, the low-end boost is manageable, but when pushed, it creates a more aggressive drive. If you’re a fan of the Soundtoys Decapitator or Arturia Dist TUBE-CULTURE, you might find this plugin fits your workflow.


SSL Fusion HF Compressor

The HF Compressor is a high-frequency compressor.

  • X-Over: Sets the frequency range for compression.
  • Threshold: Controls the compression amount.

This plugin is particularly useful when high frequencies enhanced by the Transformer plugin need some taming.


SSL Fusion Violet EQ

The Violet EQ is a shelving EQ, also available as a 500-series hardware unit.

Its FAT feature subtly boosts specific frequency bands when the HPF is set to 30, 40, or 50 Hz. Otherwise, it’s a clean and straightforward EQ with no added harmonics.


Final Thoughts

The Fusion Bundle is currently available for under $100 during this sale. Whether on a mix bus or master bus, these plugins deliver exceptional results.

Given the sound quality, I now understand why so many hardware units have hit the used market. It also makes me curious about the actual hardware’s performance—maybe I’ll get one someday!

I hope this overview helps those considering the Fusion plugins.

See you in the next post!

Basics of Mixing – 11.1 Enhancing Highs and Lows

Hello, everyone! This is Jooyoung Kim, mixing engineer and music producer.

If you’ve been following along with the previous posts, you already have enough knowledge to start mixing. The rest comes down to practice.

I skipped over automation because it’s something you really need to experiment with hands-on. Whether it’s volume automation or parameter automation, try as many creative approaches as possible!

Starting from Chapter 11, we’ll move into more advanced applications.

Today, let’s talk about enhancing the highs and lows in a mix. This content is based on my book Basics of Mixng.

Shall we dive in?


Enhancing the Highs

Boosting the highs? It’s pretty simple—just use an EQ, right?

But have you ever thought about which EQ, which frequency range, and how you should boost?

The image above shows the frequency response when using Slate Digital’s Fresh Air. It’s a popular tool for adding “airiness” to vocals.

The Maag EQ4, on the other hand, offers a different character.

Each EQ introduces varying amounts of harmonic distortion, which impacts how and when they’re used.

For example, the Air Band on the Maag EQ4 reaches up to 40kHz, a frequency far beyond the human hearing range (20Hz–20kHz).

Why does this matter if we can’t hear it?

Research dating back to 1991 suggested that sounds beyond the audible range can influence brain activity.

  • 1991 Study: High-Frequency Sound Above the Audible Range Affects Brain Electric Activity and Sound Perception.
  • 2014 Study: Frequencies of Inaudible High-Frequency Sounds Differentially Affect Brain Activity: Positive and Negative Hypersonic Effects.

The latter found that frequencies above ~32kHz significantly increased alpha-2 EEG activity (associated with a calm mental state).

Even if your session’s sample rate is 48kHz or 44.1kHz, boosting ultra-high frequencies can indirectly affect the audible range based on the Q-factor.

Of course, you won’t always need to get this scientific about it—experience is the best teacher here!

While boosting highs can create pleasing clarity, it’s important to avoid overdoing it. Excessive use can result in a mix that feels “floaty” and leaves no lasting impact after the song ends. Use it judiciously.


Enhancing the Lows

For the low end, you can use EQ, but there’s another option: the subharmonic synthesizer.

This tool generates ultra-low frequencies by synthesizing them based on an incoming signal. It’s often triggered by kick drum signals to reinforce their sub frequencies.

Personally, I’m not a big fan—it’s challenging to perfectly match the kick’s attack and timing.

Popular plugins include Waves’ Submarine, Brainworx’s Subsynth and Subfilter, and UAD’s Voice of God.

Hardware options like the dbx510 are also available, but if you’re on a budget, the free Bark of Dog plugin by Boz Digital Labs is a fun alternative.

While it’s best to start with well-recorded source material, subharmonic synthesis can be a lifesaver when the source lacks sufficient low-end.


That’s all for today. See you in the next post! 😊