Hello! I’m Jooyoung Kim, a mixing engineer and music producer.
It’s been a while since my last post, hasn’t it?
After getting rejected by AES for the second time, I was like, “Alright, let’s fix this research!” So, I scrapped my experiments, started over, re-collected all the data, and reformatted everything for submission elsewhere. Time just flew by in the process… haha.
I’m really hoping this one gets accepted before I graduate. Fingers crossed this time…
Lately, I’ve been working on recreating hardware compressors using deep learning. I trained the model with test signals, but when I fed it guitar sounds, all I got was white noise and sine sweeps… That took about two weeks of work.
So, I’ve spent the past few days coding from scratch, preparing new training data, and running the training process again. Here’s hoping the results turn out well, but man, it’s exhausting…
I’d love to own a Yamaha DX7 in real life
On another note, I recently wrapped up a year-long series on the basics of mixing, and I was wondering what to write about next. Then it hit me: why not talk about using synthesizers?
Even though my music style doesn’t heavily rely on synths, understanding how different synthesizers work can definitely broaden the creative spectrum for writing music. From an engineer’s perspective, learning about filter techniques and the unique sound characteristics of various synths can spark a ton of new ideas.
That said, I’m still organizing my research on this topic, and with some recent worries about making ends meet, it’s been tough to write as quickly as I’d like… Still, I’ll do my best to keep the posts consistent.
The content will likely follow a simple structure: “Sound synthesis methods and their history -> Iconic synthesizers”
That’s the plan. Looking forward to catching you in the next post!
Hey there! I’m Jooyoung Kim, a mixing engineer and music producer.
Now that my “Mixing Basics” series is wrapped up, I’m scratching my head about what to write next… haha. Maybe something about synthesizers? Lately, I’ve had a lot on my mind, and it’s been a bit overwhelming.
Anyway, today I’m excited to talk about two delay plugins from SSL’s X series—X-Delay and X-Echo—which are currently on sale. Let’s check them out!
I received these plugins as NFR (Not for Resale) copies from Plugin Boutique. If you buy through the links in this post, I’ll earn a small commission that really helps me keep going—thanks so much for the support!
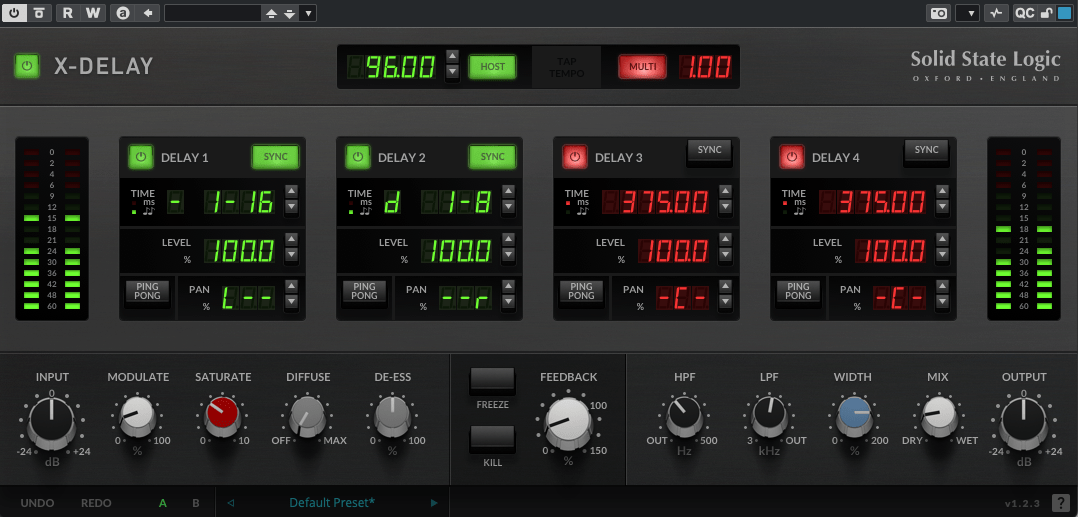
X-Delay draws inspiration from 1980s hardware digital delays. My guess? It’s channeling vibes from the iconic AMS DMX 15-80—those big, bold delays from back in the day… haha.
This plugin lets you run up to four delays at once, packed with a bunch of extra features. Let’s break it down.
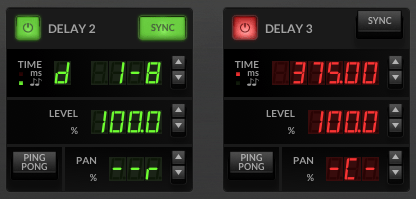
Up top, you’ve got a power button on the left and a Sync button on the right to switch between milliseconds (ms) and BPM sync. Below the “Time” label, it shows whether you’re in ms or BPM mode. To the right, you can tweak delay length in beats or ms—BPM mode offers options like straight (-), dotted (d), or triplet (t). In the screenshot, it’s set to dotted.
Then there’s Level control, a Ping Pong delay toggle, and Panning adjustments. Pretty simple, right?
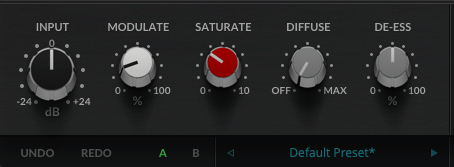
Now, let’s peek at the bottom section:
Modulate: This applies an LFO to the delay time, adding some wobble. Crank it up a bit, and your sound gets lush and full.
Saturate: Adds saturation (duh!). Max it out, and you’ll hear harmonic distortion kick in with a gentle soft-knee compression starting around -12.5 dB (it’s subtle, so hard to pin down exactly). It colors the sound nicely—turn it up for some rich warmth.
Diffuse: A room reverb effect.
De-Ess: Tames harsh highs.
Freeze: Locks the feedback sound in place.
Kill: Cuts all feedback instantly.
This thing’s a beast. It’s perfect for wet, dreamy tones but versatile enough for all sorts of uses. At a sale price of $24.99, it feels like a steal.
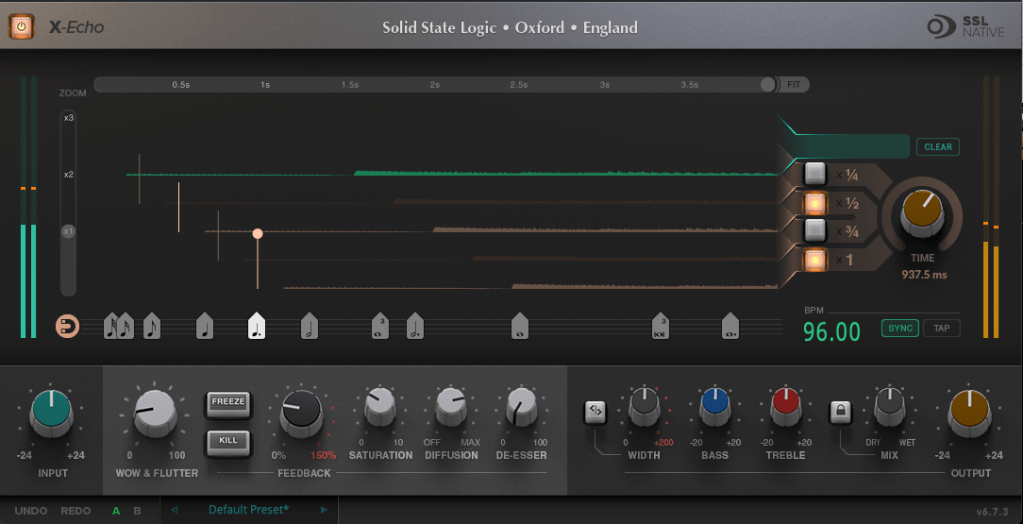
X-Echo takes its cues from 1960s tape delays—think Echoplex vibes, maybe? Haha. Unlike tape hardware built for playback, these old-school delay units often rolled off the highs due to slower tape speeds. You can see it in the frequency response—everything above 13 kHz just drops off.
It’s got that classic tape delay character—slight harmonic distortion included. One listen, and you’re like, “Yup, that’s tape delay!” Haha.
The controls are similar to X-Delay, but here’s what’s different:
Zoom: A scope to magnify the waveform for a closer look.
Grid: Adjusts delay time to your BPM with a grid—pick a note value (like quarter or eighth), or drag the connected circle to fine-tune.
Fit: Tweaks the waveform’s horizontal length.
Four Delay Buttons: Toggle between four delay lines, each with its own light.
Sync/Tap: Set BPM manually or tap it in.
The bottom section’s mostly the same as X-Delay, except for Wow & Flutter—that’s the tape-style distortion from uneven movement, like stretched tape, wobbles, or dust. Think vintage quirks!
Freeze: Holds the feedback sound.
Kill: Stops all feedback.
At $24.99 on sale, X-Echo nails that tape delay tone you’d expect—great for anyone hunting for that retro sound.
Bundle Deal & Bonus
The X-Delay & X-Echo Bundle is just $39.99. If you’ve been wrestling with spatial effects in your mixes, this is a fantastic deal worth considering.
Plus, this month, any plugin or virtual instrument purchase from Plugin Boutique comes with a free synth, MOK Miniraze. Don’t forget to grab it when you check out!
Wrapping Up
Both X-Delay and X-Echo bring something special to the table—vintage-inspired delays with modern flair. At these prices, they’re hard to pass up. The sale runs until April 14th, so now’s the time to jump in.
Hello? This is Jooyoung Kim, a mixing engineer and music producer. Today, I’ll talk about the music file codecs, final article of basics of mixing series. Those posts are based on my book, Basics of Mixing, published in South Korea.
Let’s dive in!
Codec
The term codec stands for coder-decoder—a hardware or software that encodes and decodes digital signals. There are three main types of codecs:
Non-compression: WAV, AIFF, PDM(DSD), PAM
Lossless Compression: FLAC, ALAC, WMAL
Lossy Compression: WMA, MP3, AAC
Non-compression codecs retain 100% of the original audio data with no compression applied.
Lossless compression codecs reduce file size while preserving all original data. This means they sound identical to uncompressed formats like WAV.
Lossy compression codecs remove some audio data to achieve a much smaller file size, which can affect sound quality depending on the compression level.
In the music industry, WAV, MP3, and FLAC are the most commonly used formats for mastering and distribution.
How is file size determined?
For WAV files, size is determined by sample rate and bit depth. How about mp3 and FLAC?
MP3 files use bitrate, rather than sample rate and bit depth. You’ve probably seen MP3 files labeled 256kbps or 320kbps. This means 256,000 bits or 320,000 bits of audio data are processed per second. Higher bitrates result in better sound quality but larger file sizes.
FLAC files use compression level to control file size. A higher compression level takes longer to encode but results in a smaller file. However, since FLAC is lossless, the sound quality remains unchanged regardless of the compression level.
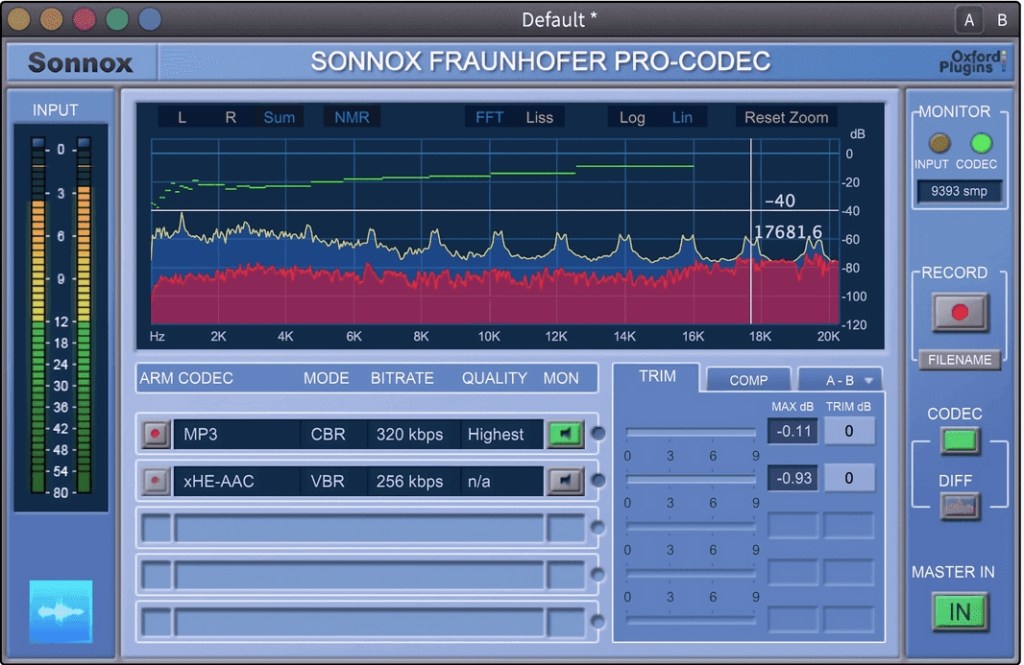
If you want to compare how different codecs affect sound quality, you can use tools like Sonnox Codec Toolbox or Fraunhofer Pro-Codec.
This is the last article for the ‘Basics of Mixing’ series. Time is really quick..haha.
I hope these posts have helped expand your knowledge and improve your mixing skills.
Thanks for reading, and I’ll see you in the next post!
Hi! This is Jooyoung Kim, mixing engineer and music producer.
A few days ago, I met my teacher, who taught me guitar and MIDI. We talked about various topics, including tape machine plugins. That conversation inspired me to write a blog post about using tape machine plugins.
If you purchase a plugin through a link in this article, I may receive a small commission.
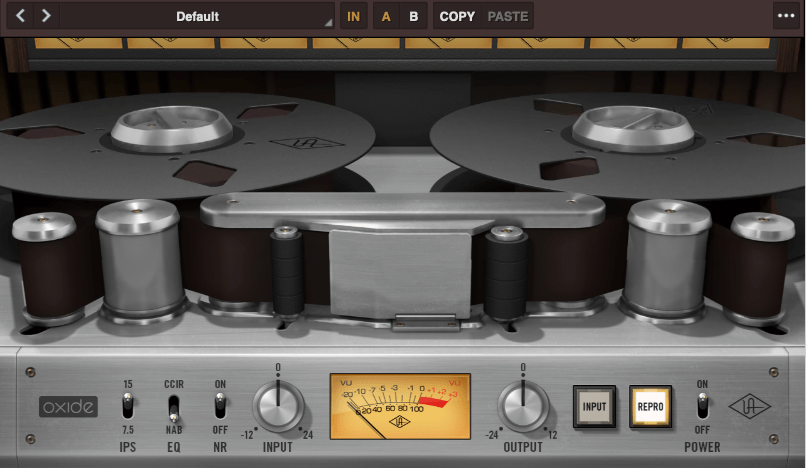
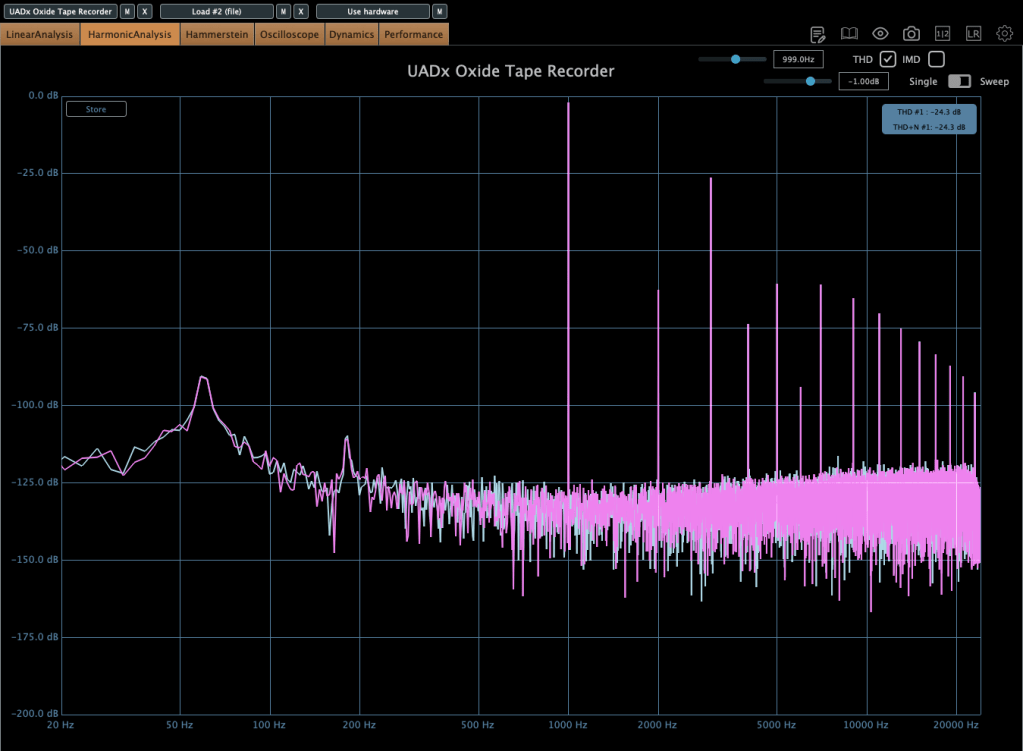
Oxide Tape Recorder is one of the best tape machine plugin made by UAD. The user interface of the Oxide Tape Recorder is simple and intuitive.
IPS means “Inches Per Second”. For example, when IPS is 15, the tape moves 15 inches per one second.
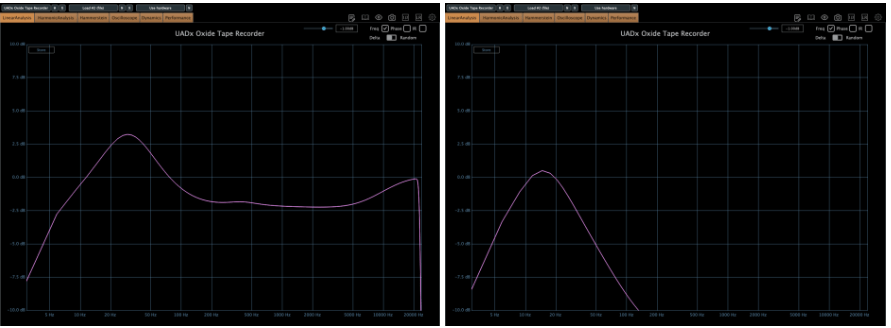
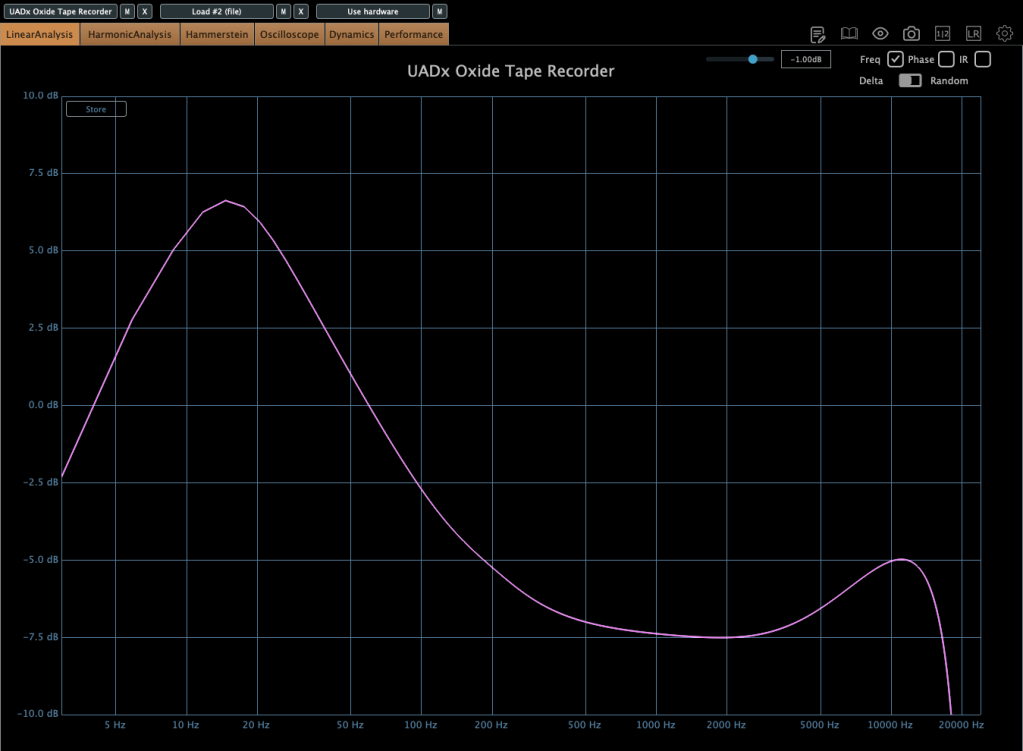
When EQ parameter is on NAB, left side is the frequency response of IPS 15, the other side is IPS 7.5
More gain at IPS 7.5
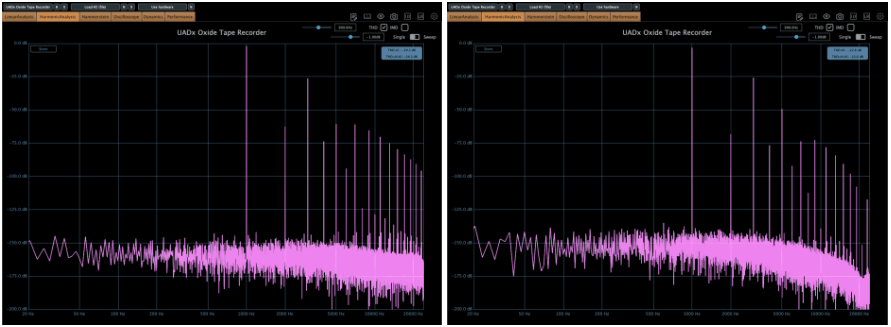
When EQ parameter is on NAB, left side is the harmonic distortion of IPS 15, the other side is IPS 7.5
You can see how IPS affects the frequency response and harmonic distortion.
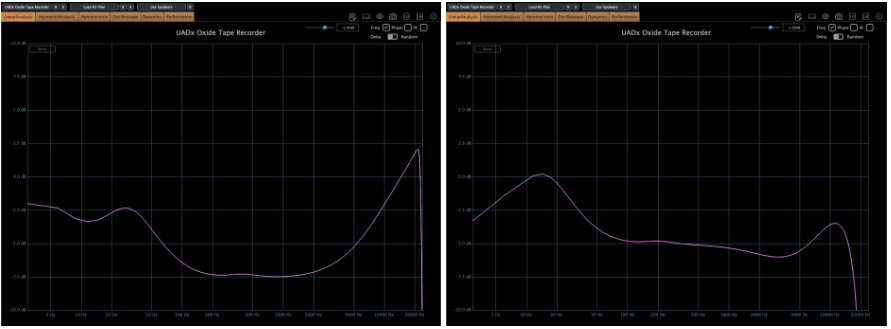
When EQ parameter is on CCIR, left side is the frequency response of IPS 15, the other side is IPS 7.5
If the input gain is too high, compression acts like a soft clipper.
The EQ parameter has two different values: NAB(National Association of Broadcasters) & CCIR(Comité Consultatif International des Radiocommunications, Now ITU-R)
People used to emphasize high frequency by recording process with tape recorder. This is due to high-frequency loss caused by the tape head and the machine. And then, de-emphasize the high frequency when the costumer play the tape.
At those situations, the EQ called NAB & CCIR was used.
NAB was the standard of the electricity with 60Hz alternating current like USA, and CCIR was the standard of 50Hz alternating current like EU(European Union).
The NAB standard sounds smoother and warmer than CCIR, whereas CCIR sounds clearer and sharper than NAB. It means CCIR more emphasize the high frequency field. You can see how the two differ by the upper frequency response graph.
The NR parameter means just “Noise Reduction”. If it turns off, the noise occurs.
That’s all you need to know about the Oxide Tape Recorder plugin. Simple!
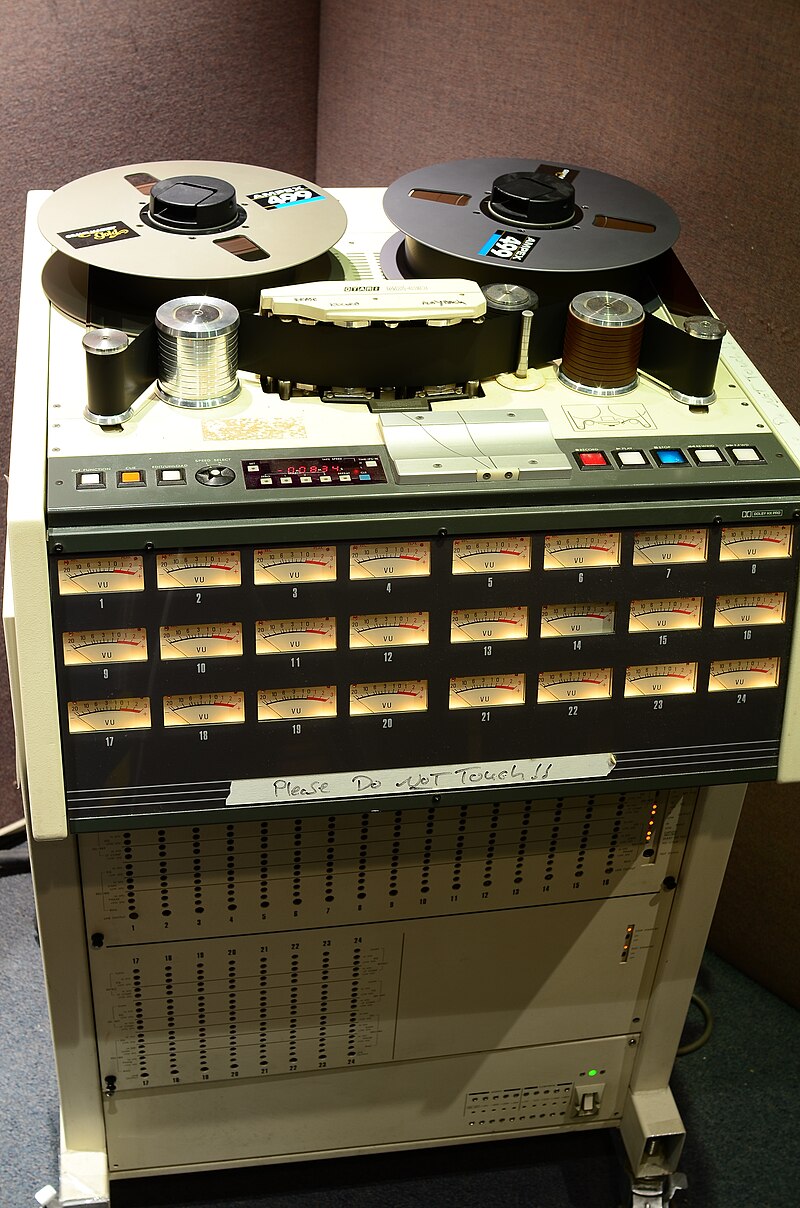
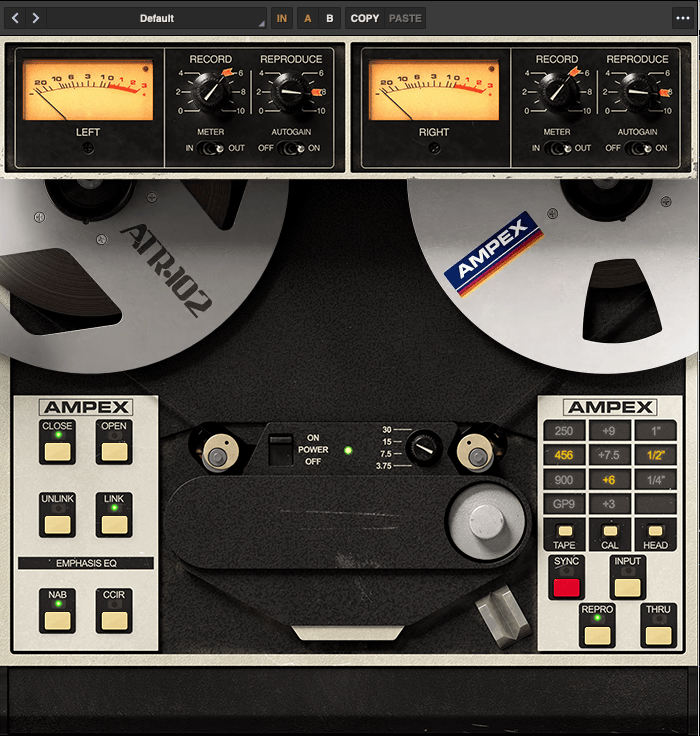
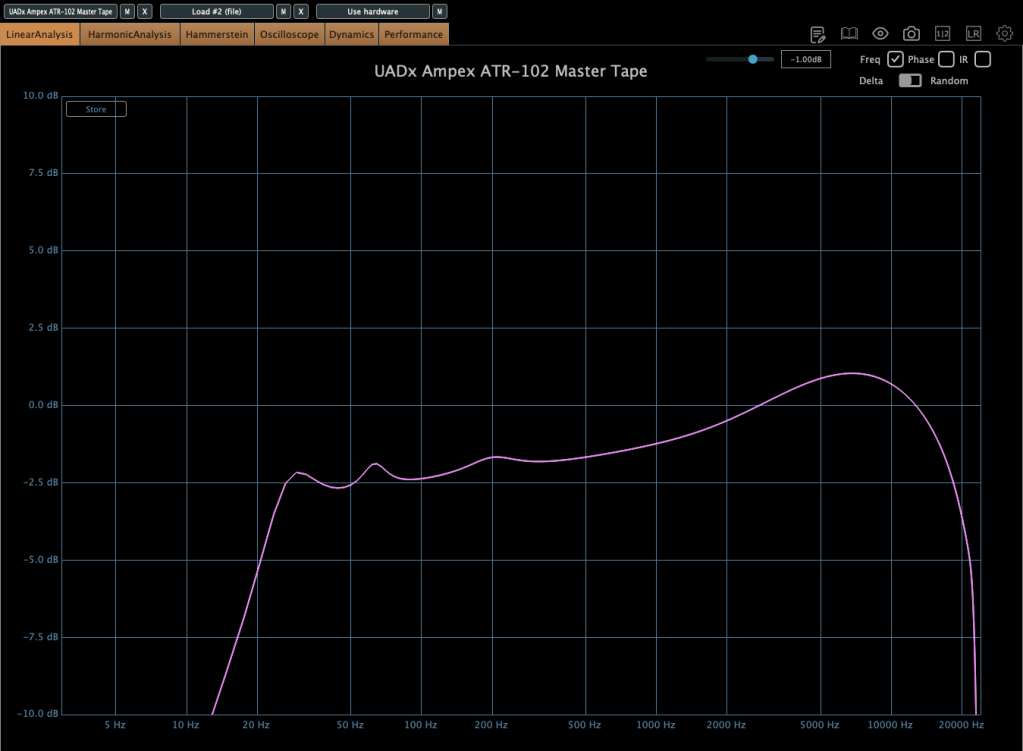
The parameters of the Ampex ATR-102 Master Tape are not as simple as those of the Oxide Tape Recorder. However, if you understand NAB, CCIR, and IPS, it’s easy to use.
Let’s see the parameters.
The record(input) and reproduce(output) knobs are located at the top of the plugin.
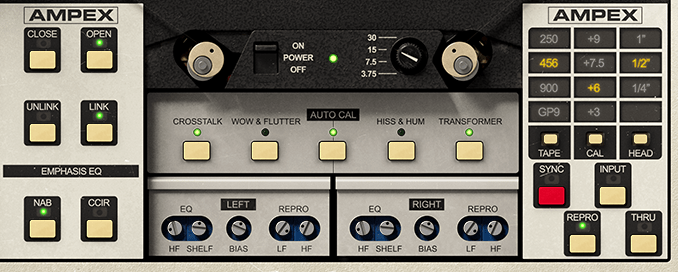
Down side of the plugin, there are buttons that enable detailed adjustments(open and close), and to choose NAB or CCIR.
The right side, you could change type of the tape, calibrate the volume, and choose the tape head width.
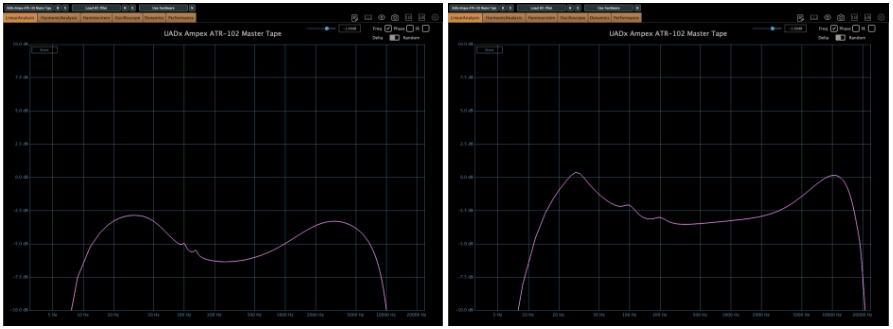
Based on 250 tape and NAB(when you choose IPS 30, couldn’t choice Emphasis EQ),
Left – IPS 3.75, Right – IPS 7.5
Left – IPS 15, Right – IPS 30
there are significant differences in frequency response.
When the tape speed is at IPS 15, this graph shows how the frequency response change by selecting NAB to the other(CCIR).
Input gain and output gain value also make some difference, but it’s not that important..
Compression characteristic is unusual – increase high-volume signals even more – however, it’s not a noticeable difference, so I’ll skip the explanation.
Now, without further ado, you can think of it as a friend that emphasizes the low range, and the frequency response changes like this depending on the IPS!
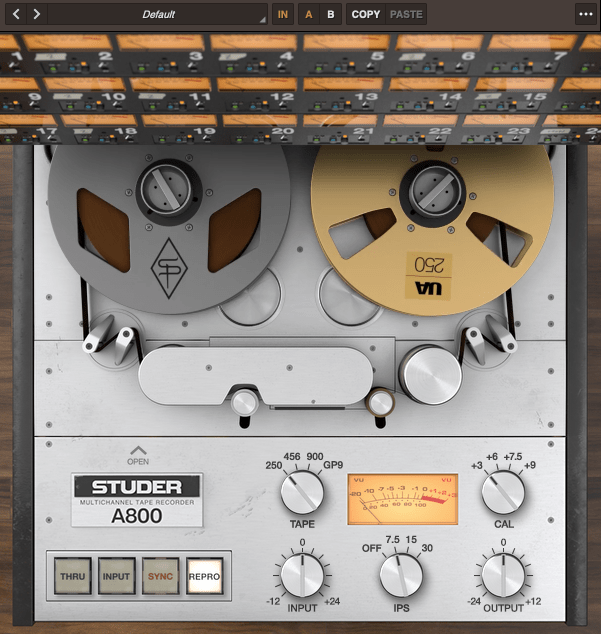
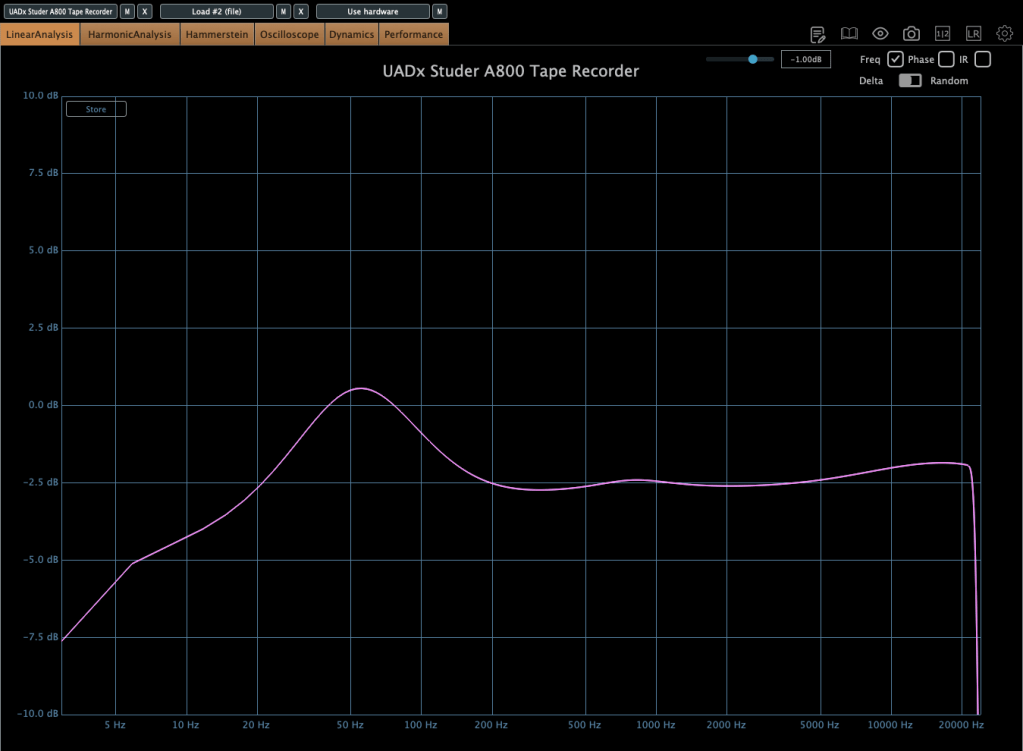
IK Multimedia makes various plugins like virtual instruments, mixing and mastering effects – their tape machine plugins are really great.
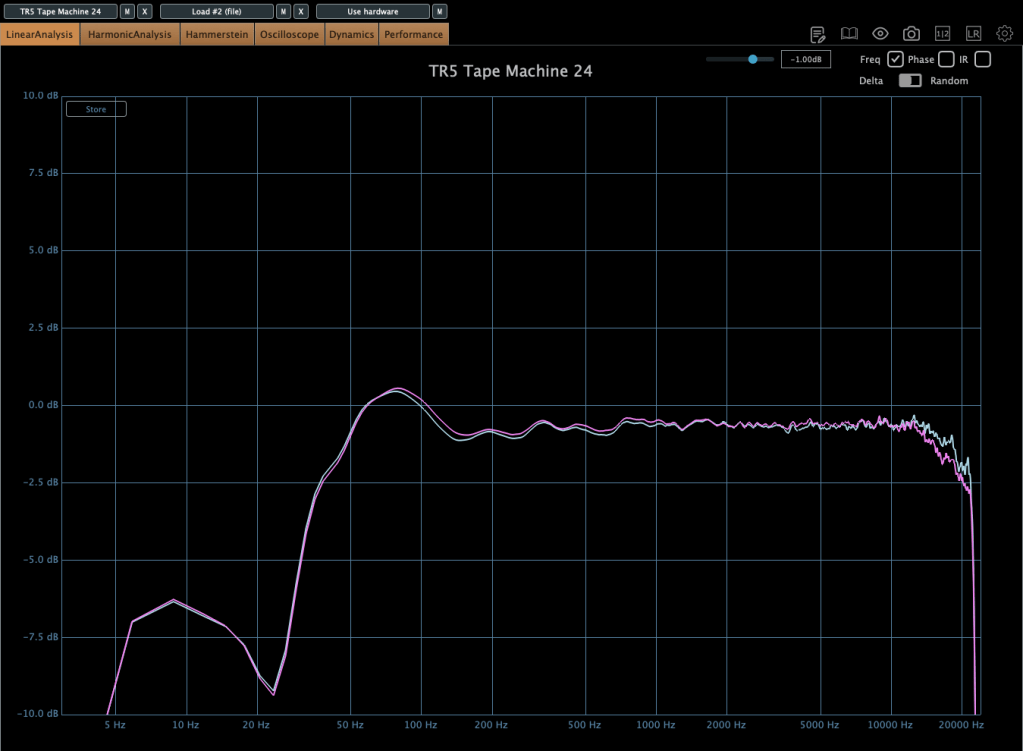
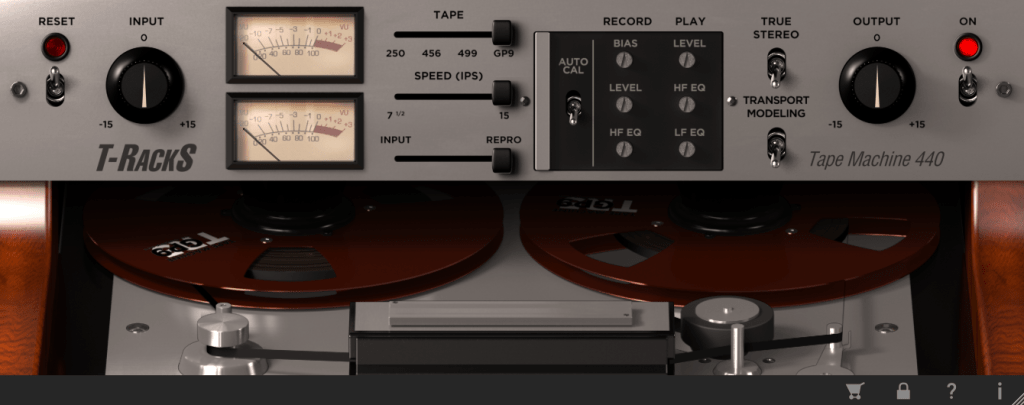
The total bundle sale started on Black Friday, but it’s still on sale. T-racks 5 MAX included in the total bundle includes a total of four tape machine plug-ins: Tape Machine 24, 80, 99, and 440. Let’s look around.
Parameters seems similar.. Tape types, IPS..
IPS 15 in GP9 tape
True stereo parameter makes the difference response between left and right, and transport modeling makes the variation value of the volume by time.
IPS 30 in GP9 tape
The other plugins’ parameters are same as Tape Machine 24 plugin. Just the machines are different, and they make difference in frequency response.
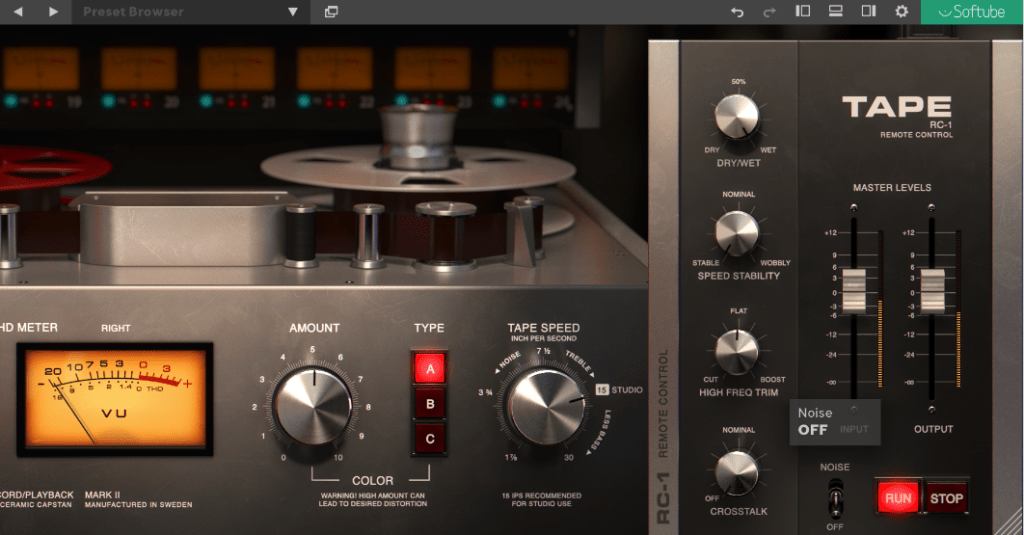
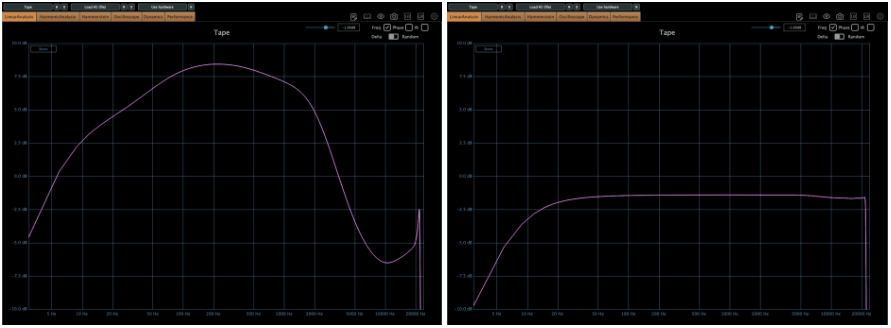
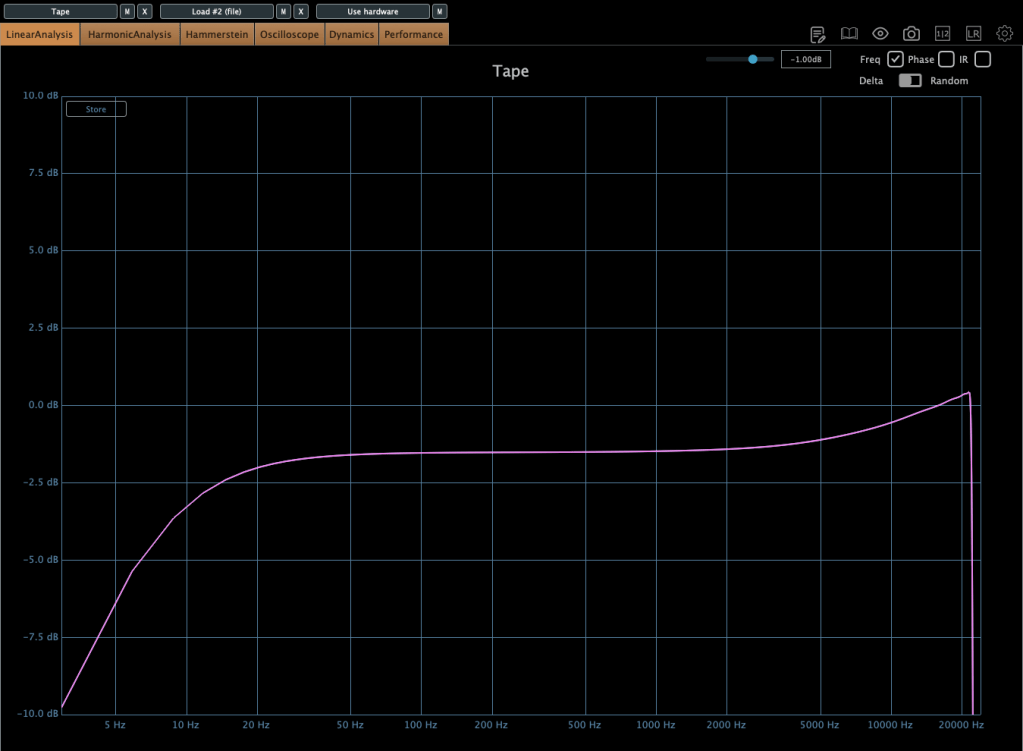
Softube’s Tape plugin is very clean tape machine plugin. The harmonic distortion quantity could changeable by Amount parameter, and tape type could be selected by the Type parameter. (Type A is clean side, B has quit a lot of low frequencies, C has the characteristic between A and B)
Left – Default type A, Right – Default type B
Default type C
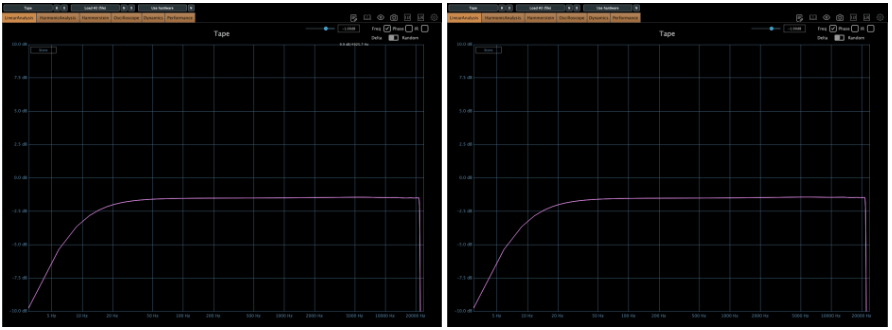
Tape speed could be changed by IPS too.
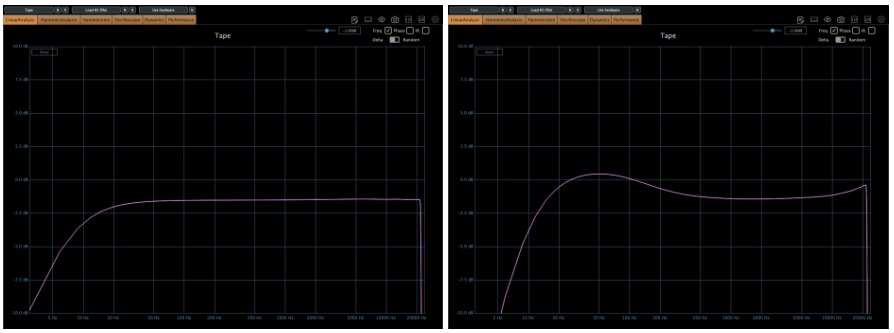
Type A tape Left – IPS 7/8, Right – IPS 3 3/4
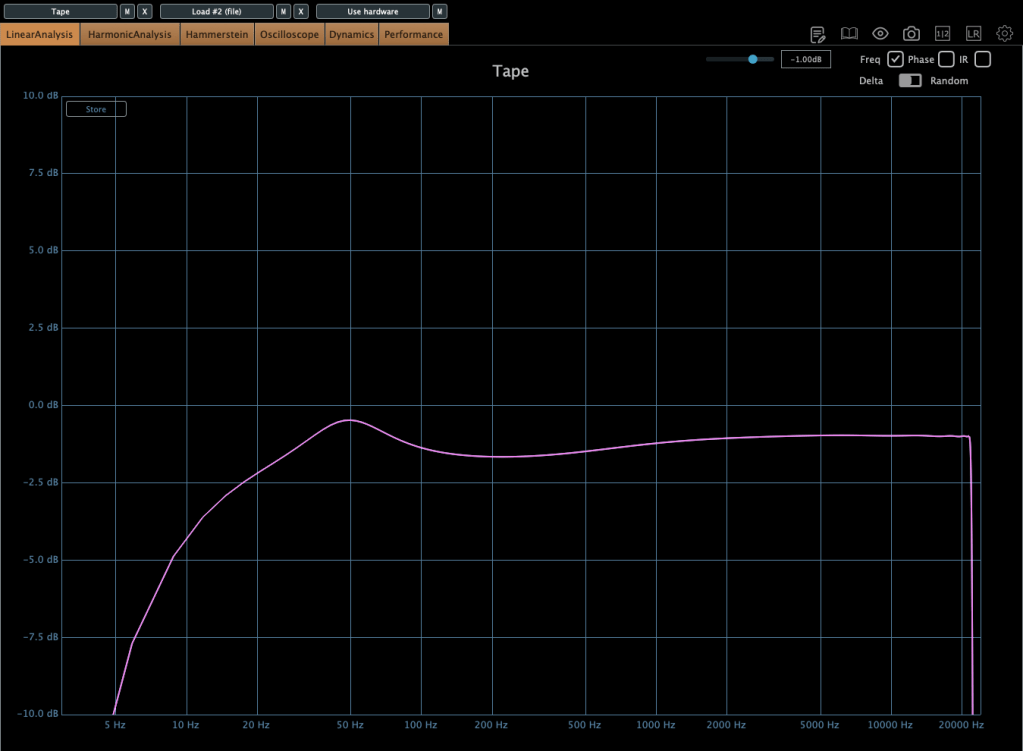
Type A tape Left – IPS 7 1/2, Right – IPS 15
Type A tape IPS 30
Waves also has a famous tape machine plugin called Kramer and J37, but as I was writing this, the patterns became too similar, so I will omit them.
However, there is a parameter called Bias that exists only in Waves.