Basics of Synthesizers (2) – Subtractive Synthesis

Hey there! I’m Jooyoung Kim, a mixing engineer and music producer.

Looking at synthesizer history, additive synthesis came first but was limited to physical, mechanical methods. Modern additive synthesis came much later, so let’s start with subtractive synthesis!

Quick heads-up: if you buy virtual instruments through the links in this series, I get a small commission, which really helps me keep going. ^^ Ready to dive in?

The Early Subtractive Synthesis Synthesizer: Telefunken’s Trautonium

Subtractive synthesis is named for how it shapes sound by filtering out (subtracting) frequencies. The “filter” here is like an EQ’s cutoff filter, tweaking low or high frequencies.

These synths use voltage to control filters, hence the term VCF (Voltage Controlled Filter). Built entirely with analog circuits, they’re also called analog synthesizers.

They have three main parts:

  1. VCO (Voltage Controlled Oscillator): Generates the signal
  2. VCF (Voltage Controlled Filter): Shapes the sound
  3. VCA (Voltage Controlled Amplifier): Controls volume

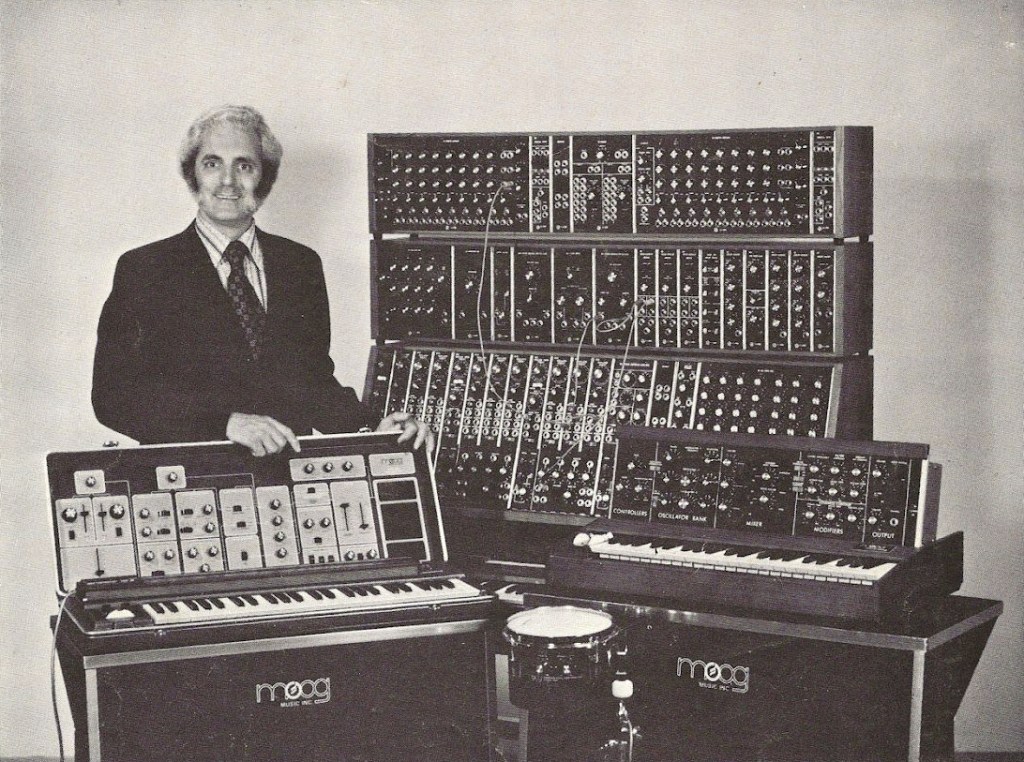
The Iconic Minimoog Model D

Left – 1979 Minimoog Model D, Right – 2017 Reissue Minimoog Model D

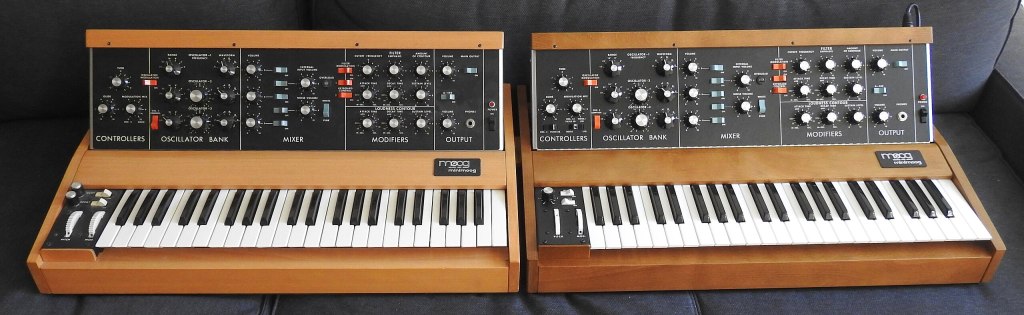
The Moog Minimoog Model D is the most famous subtractive synth, with others like the ARP 2600, Oberheim OB-1, and Korg MS-20 also standing out. Let’s check out the Minimoog Model D virtual instrument, a favorite for many.
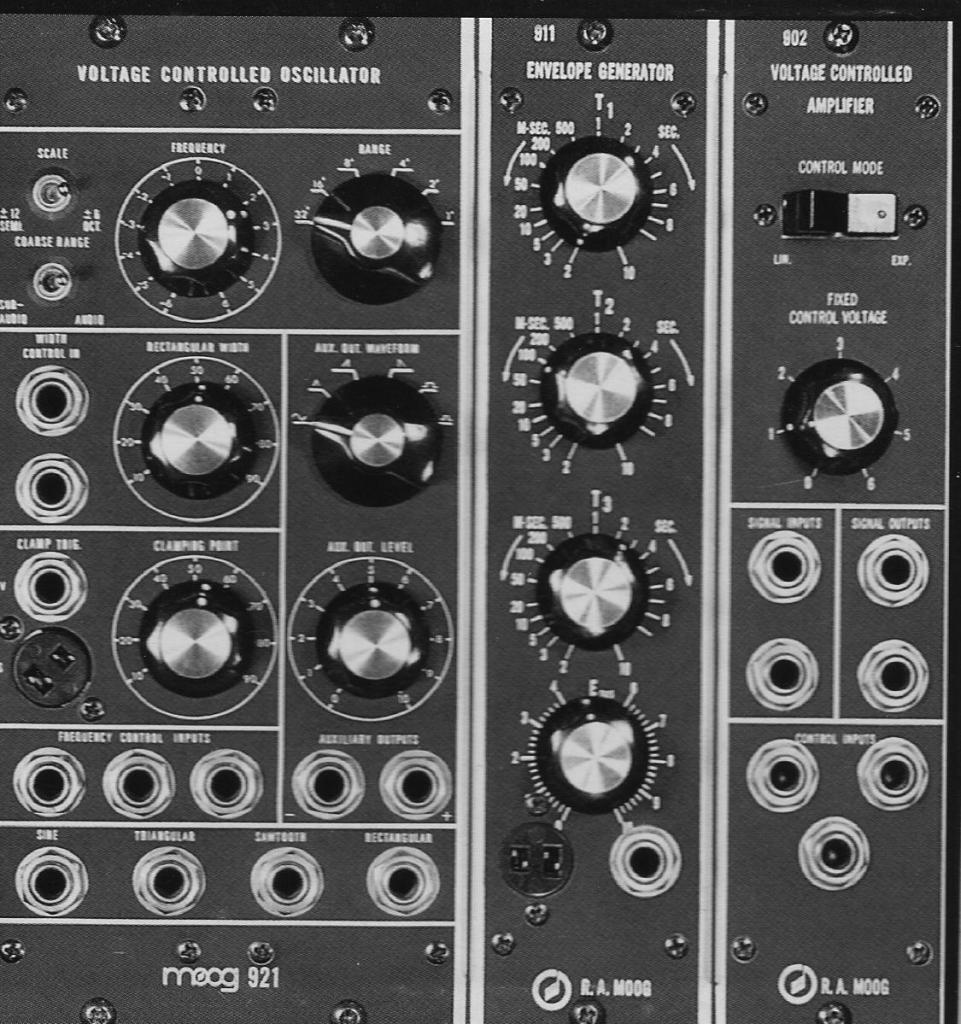
UAD’s Moog Minimoog

Since most subtractive synths share similar concepts, we’ll use the UAD Minimoog as our example. It breaks down into four sections:

  1. VCO: Oscillators (signal generators)
  2. VCF: Filters with resonance control
  3. VCA: Amplifiers with Attack, Decay, Sustain controls
  4. Modulation and other components

Let’s look at the oscillators first.

Oscillators

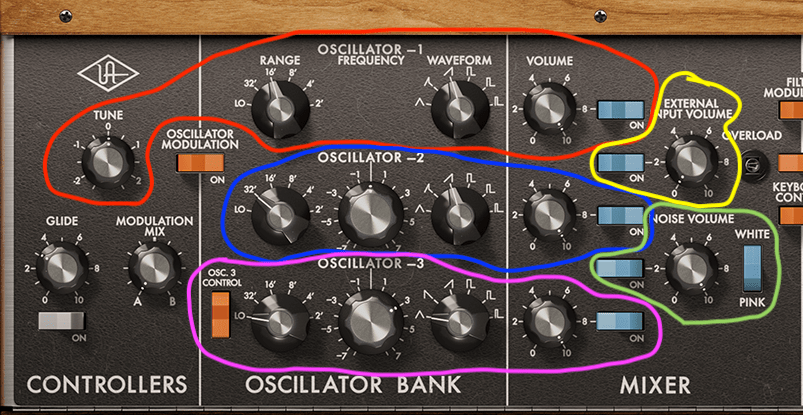
The oscillator section has about five parts. Oscillators 1, 2, and 3 are exactly what they sound like—three separate oscillators.

Being fully analog, the Minimoog Model D’s tuning could drift due to humidity, temperature, runtime, or electrical conditions. So, each oscillator has a pitch tuning knob. The tuner’s at the far left in the red section (labeled “Tune”), with others in the blue and pink sections.

  • Range: Sets the octave. Higher numbers give lower pitches.
  • Waveform: Chooses the waveform type.

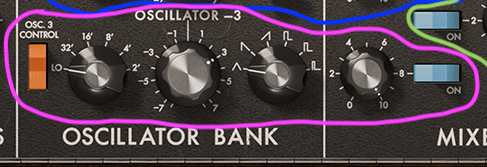
Oscillator 3 could be used for modulation instead of sound output, controlled by a switch on the far left.

The yellow section, though not an oscillator, lets you process external signals through the synth’s filter—a feature often used to apply the Minimoog’s filter to other sounds.

The green section is a noise generator for white or pink noise. You can modulate with noise, an extra LFO, or an envelope filter.
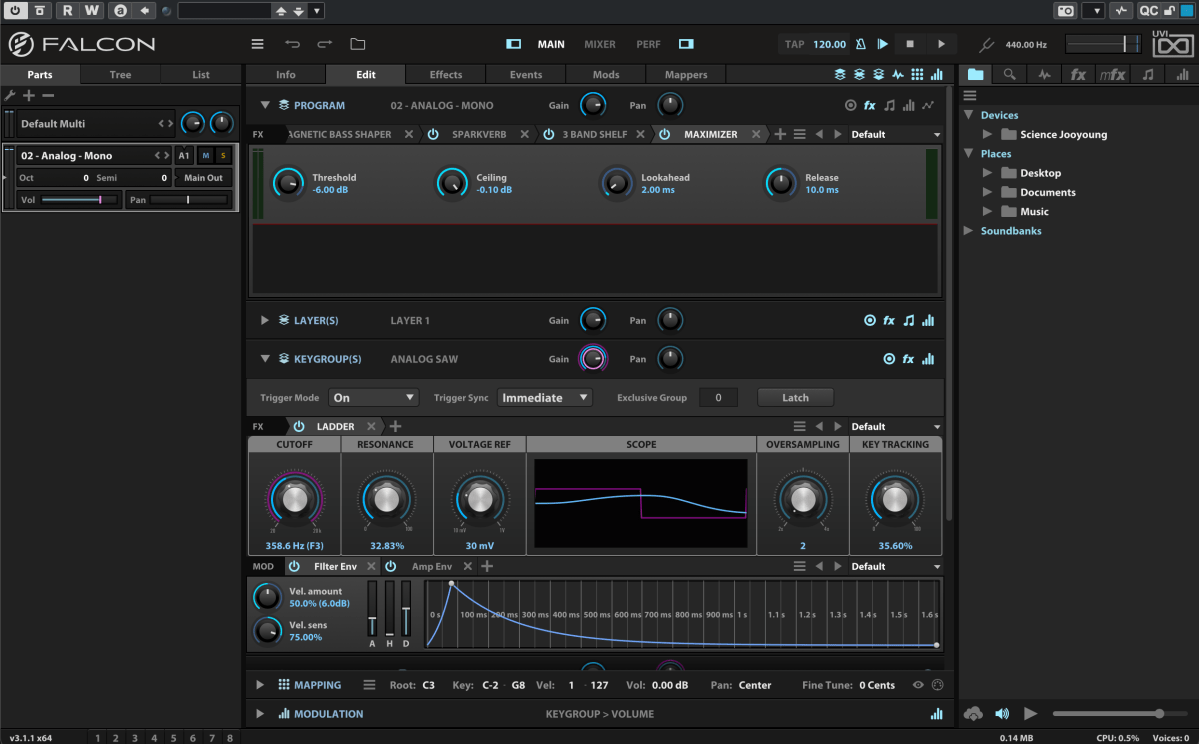
Filters and Output

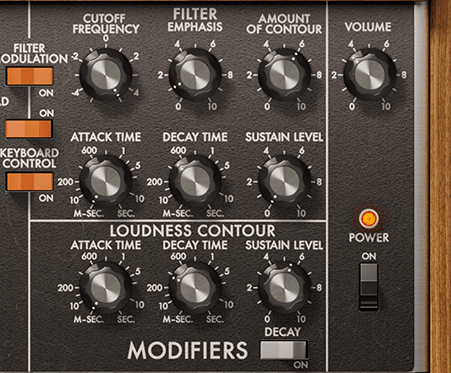
The filter section is the top three knobs in the “Modifiers” area:

  • Cutoff Frequency: Sets which frequencies to filter.
  • Emphasis: Boosts frequencies near the cutoff point.
  • Amount of Contour: Controls how much the Attack, Decay, and Sustain knobs affect the filter.

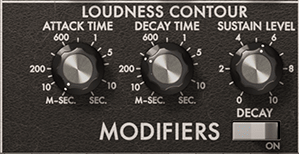
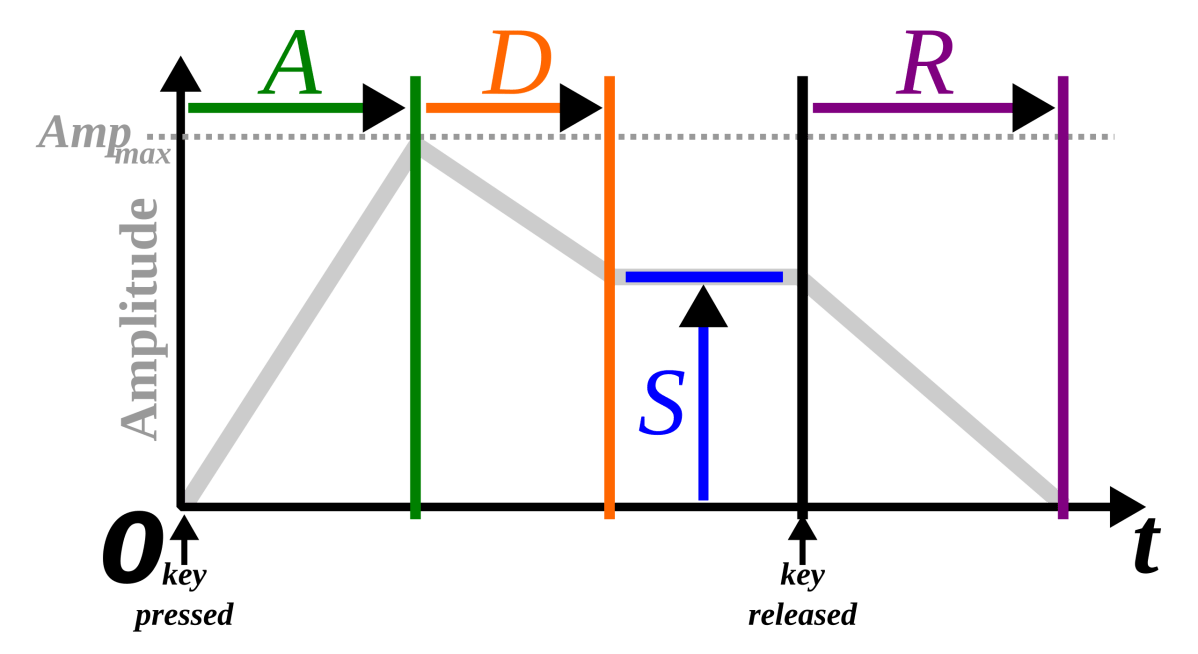
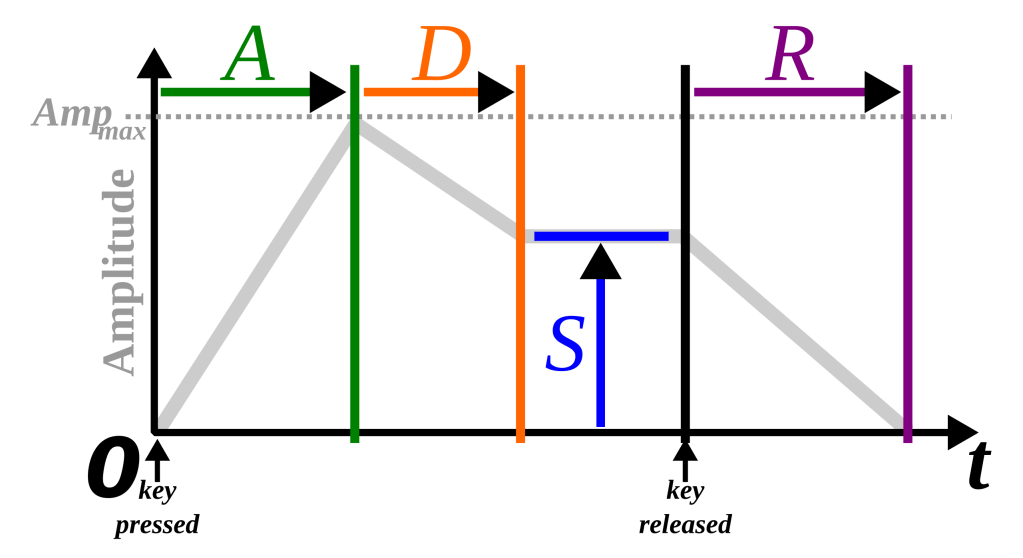
Below, the Loudness Contour (Attack, Decay, Sustain) shapes the output sound’s envelope, not the filter’s. (I explained Attack, Decay, and Sustain in my last post.)

Turn on the Filter Modulation switch, and the cutoff frequency gets modulated. The Keyboard Control switches make the cutoff follow keyboard notes:

  • Switch 1 (top): Tracks by 1/3.
  • Switch 2 (bottom): Tracks by 2/3.
  • Both on: Cutoff moves in sync with notes for consistent timbre.

It might feel tricky, but tweak it for five minutes, and you’ll get the hang of it.

Other Minimoog Model D Virtual Instruments

Besides UAD’s Minimoog, there are other solid options:

Arturia’s Mini V is a great Model D emulation.

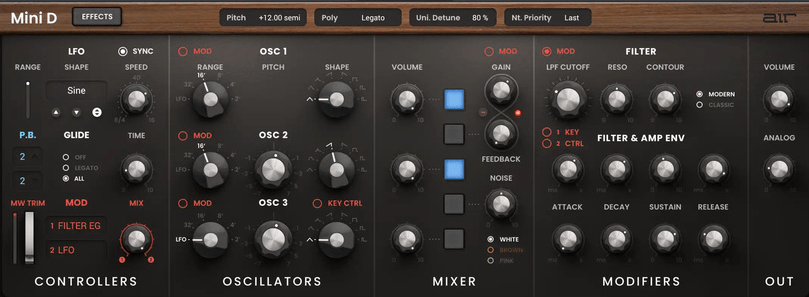
Air Music Technology also makes a Model D virtual instrument.

As mentioned, the Minimoog can filter external signals. There are even standalone filter plugins, like:

Arturia’s Filter Mini, a plugin designed for this purpose.

Not all Moogerfooger pedals from Moog come from the Minimoog, but the Moogerfooger MF-101 Lowpass Filter uses its 4-pole (24dB/octave) ladder filter design. Moog turned these pedals into plugins too.

I’ve covered these separately before. [link]

Owning a Physical Model D

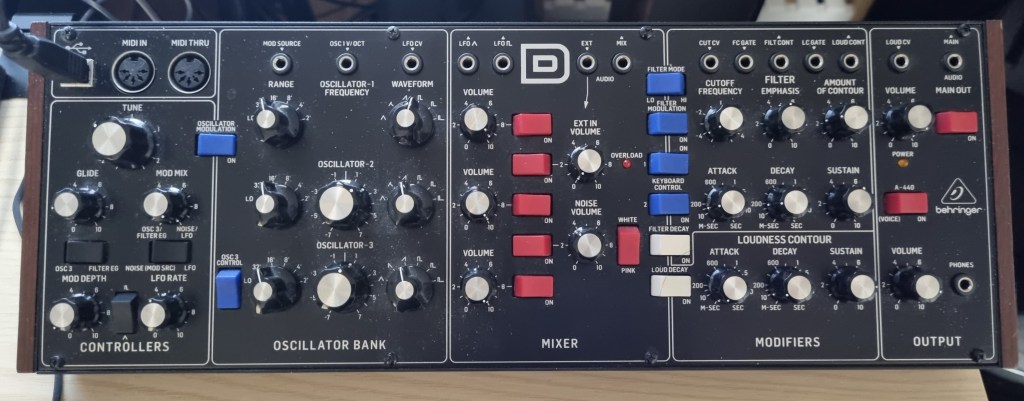
I always wanted a real Minimoog Model D and ended up with Behringer’s Model D reissue. Hardware synths shine when run through preamps or compressors for a fully analog vibe. But tuning is a chore, and since it’s monophonic, you’d need to record each note for chords. Also, dusting those knobs is a nightmare! 😅

Still, it’s affordable, so a used analog synth like this can be a cool addition.


Not all subtractive synthesis synthesizers work exactly like the Minimoog, but understanding its basics should give you a solid foundation for handling most early subtractive synths.

See you in the next post! 🙂

What is ADSR? – Envelope Generator

Hello! I’m Jooyoung Kim, a mixing engineer and music producer.

While working on the next post in my synthesizer basics series yesterday, I realized I’ve never covered the concept of ADSR on my blog. So, today, let’s dive into what ADSR is all about.

I’ve included a plugin link below, and if you purchase through it, I earn a small commission that really helps me keep going. Thank you for your support!

Let’s get started!

Envelope Generator

A single oscillator produces a steady sound, like a sine wave, square wave, or triangle wave, at a specific frequency. But these sounds can feel flat or even harsh on the ears.

To address this, Robert Moog, the founder of Moog, developed the Envelope Generator to make simple oscillators mimic real-world sounds by varying their amplitude over time.

The 911 module in the center is the Envelope Generator.

Early envelope modules were labeled with terms like T1 (Attack), T2 (Decay), T3 (Release), and ESUS (Sustain). Later, the ARP 2500 synthesizer used Attack, Initial Decay, Sustain, and Final Decay, and the ARP Odyssey replaced Final Decay with Release. This standardized the envelope as ADSR (Attack, Decay, Sustain, Release).

So, what exactly is ADSR?

ADSR Explained

  1. Attack: The time it takes for the sound to reach its maximum volume after being triggered.
  2. Decay: The time it takes for the sound to drop from its maximum volume to the sustain level.
  3. Sustain: The volume level maintained while the key is held down.
  4. Release: The time it takes for the sound to fade to silence after the key is released.

Pretty straightforward, right?

The Envelope in the Casio CZ-1

However, Envelope Generators aren’t limited to just ADSR. For example, the Korg MS-20 includes a Hold parameter, which lets you set how long the sound stays at its maximum amplitude after the attack. This could be represented as AHDSR.

The Casio CZ-1 has a particularly unique envelope design.

Transient Shaper

SPL Transient Designer

With the development of the Envelope Follower, which tracks changes in an audio signal, it became possible to apply ADSR-like changes to real audio signals. The pioneer of this concept is the SPL Transient Designer, part of a category called Transient Shapers.

There are tons of these plugins out there. The link above takes you to Plugin Boutique’s dedicated Transient Shaper category, where my blog is affiliated.

I own several myself, like Native Instruments’ Transient Master, SPL Transient Designer Plus, Waves Smack Attack, and Oxford TransMod. Personally, I find Oxford TransMod to be the best of the bunch.

Modern music production uses these tools to meticulously sculpt and refine sounds, almost like crafting a fine piece of art.

That wraps up my explanation of ADSR. See you in the next post! 😊

Basics of Synthesizers (1) – Types of Synthesizers

Hello! I’m Jooyoung Kim, a mixing engineer and music producer.

Today, I’ll continue from last time and briefly classify synthesizers. Let’s dive in!

The Money Pit: Modular Synthesizers…

Synthesizers can be categorized based on their synthesis methods. Here’s a breakdown:

No.Synthesis MethodDescription
1Subtractive SynthesisApplies filters to a signal to shape the sound.
2Additive SynthesisCombines waveforms to create sound.
3Modulation SynthesisModulates one signal using the values of another.
4SamplingModulates pre-recorded sounds (not strictly a synthesizer but often integrated).
5Physical ModelingMathematically models the principles of how real sounds are produced.
6Phase DistortionDistorts the speed of phase changes to synthesize sound.
7Vector SynthesisUses a basic wavetable approach, often with a joystick to shape sounds.
8Spectral ModelingA type of modeling that uses white noise and variable filters to create sound.
9Linear ArithmeticCombines subtractive synthesis with PCM (Pulse Code Modulation) sampling.
10FormantA modeling technique based on the frequency spectrum peaks that occur in human speech, called formants.
11GranularA sampling method that synthesizes sound by manipulating small units called grains.
12WavetableSynthesizes sound using waveform tables.
13AI (Neural / Deep Learning)Trains models to synthesize sounds based on specific parameters.

Quite a list, right?

The Father of Moog, Robert Moog

After the first commercially successful analog synthesizer from Moog appeared, many companies saw the potential for a profitable synthesizer industry. At the same time, academia recognized its research value, leading to numerous collaborations. This fueled rapid advancements in synthesizer development.

As a result, most synthesizer instruments we know today were fully developed before the 2000s.

Today, technologies like Physical Modeling and AI synthesis have advanced synthesizer creation, but we don’t always think of these as “synthesizers.” For example, a modeled piano is perceived as a piano, and a modeled woodwind as a woodwind.

Pianoteq is a synthesizer, but it doesn’t feel like one, does it?

I previously introduced a tool that uses AI and sheet music to synthesize strings that sound incredibly realistic. I believe this is the direction future synthesizers will take.

The recently released Serum 2 synthesizer. I think this is about as far as what we consider “synthesizer” instruments will evolve.

Once you master a few synthesizers, you’ll find that the parameters are largely similar across others. In upcoming posts, I’ll explore representative synthesizers for each synthesis method and how to use them. Reading through these will help you navigate complex synthesizer workflows.

Until next time!

UVI Falcon Sale (50% Off, Until May 9)

Hi there! I’m Jooyoung Kim, a mixing engineer and music producer.

UVI is a company renowned for its piano virtual instruments, much like Spectrasonics. These days, they’ve expanded beyond pianos to develop synthesizers and a variety of audio effects.

Recently, UVI joined Plugin Boutique, kicking off an exciting Intro Sale. Currently, Plugin Boutique offers two UVI products:

The Sonic Bundle, which includes all of UVI’s products, and FALCON, UVI’s flagship synthesizer/virtual instrument engine. Today, I’ll be diving into Falcon.

Full disclosure: I received an NFR (Not for Resale) code for this product from UVI via Plugin Boutique. If you purchase through the links in this blog, I earn a small commission, which helps me keep creating content and, frankly, survive! Thank you for your support.

Let’s get started!

What is Falcon?

Falcon is a versatile engine, similar to Native Instruments’ Kontakt, capable of loading virtual instruments or functioning as a synthesizer/sampler with 20 oscillators and various synthesis methods.

Like Kontakt, Falcon can feel overwhelming if you dive into all its detailed settings or try to build a sampler from scratch. It’s especially tricky for beginners, particularly when combining FX and modulation with synthesizer configurations.

Instead of trying to master everything at once, let’s start with the basics.

When you first open Falcon, you can choose from 21 default preset synthesizers, including Analog, FM, Additive, Organ, Wavetable, Noise, Pluck, Texture, Sample, Drum, MPE, Granular, Vosim, Harmonic Resonator, Bowed String, and more.

Once loaded, the Info tab displays the most basic parameters for tweaking.

In the Edit tab, you can fine-tune more detailed parameters, such as FX, Layer, Key Group, Oscillator, Mapping, and Modulation for the loaded synthesizer or virtual instrument.

The Effects tab lets you dive deeper into FX adjustments. With over 100 effects included in Falcon, it’s tough to cover them all! They lean more toward sound design than traditional mixing, offering incredible creative possibilities.

In the Event tab, you can add MIDI FX processors and other MIDI-based effects.

The Mods tab is where you control modulation effects like LFOs and ADSR envelopes.

In the Mappers tab, you can draw shapes to scale, quantize, curve, or pattern modulation source values, allowing you to customize how modulation effects evolve.

On the left, you can add modules to incorporate more virtual instruments or synthesizers.

The Tree view shows which sounds or effects are applied to each part, while the List view displays the data settings for the virtual instrument or synthesizer.

On the right, you can browse sounds by folder or soundbank and preview them with a quick click.

The search bar helps you find presets, while the waveform icon loads sounds into the mapping editor. The “fx” category covers effects, and “mfx” refers to music FX for sound effects. The note icon represents MIDI effects for the Event tab, and the frequency spectrum-like icon is for modulation effects in the Mods tab.

Falcon’s extensive features can take time to master, but its versatility lets you create an incredible range of sounds.

Until May 9, Plugin Boutique is offering a 50% discount on Falcon as part of the Intro Sale. If you’re looking for a single, all-in-one synthesizer virtual instrument, Falcon is a fantastic choice.

Thanks for reading, and I’ll see you in the next post! 😊