Arturia FX Collection 2 Plug-In Review (Part 6, Flanger BL-20)

※This article is a review written on July 21, 2021 after being selected for the FX Collection 2 experience group run by ‘Samick’ and receiving product support for a certain period of time. I only received support for the product and wrote the rest myself.

The Flanger BL-20 is a plug-in that is a clone of the Bel Flanger BF-20. This friend is said to have been released by a British company called Bel Electronics in the late 70s.

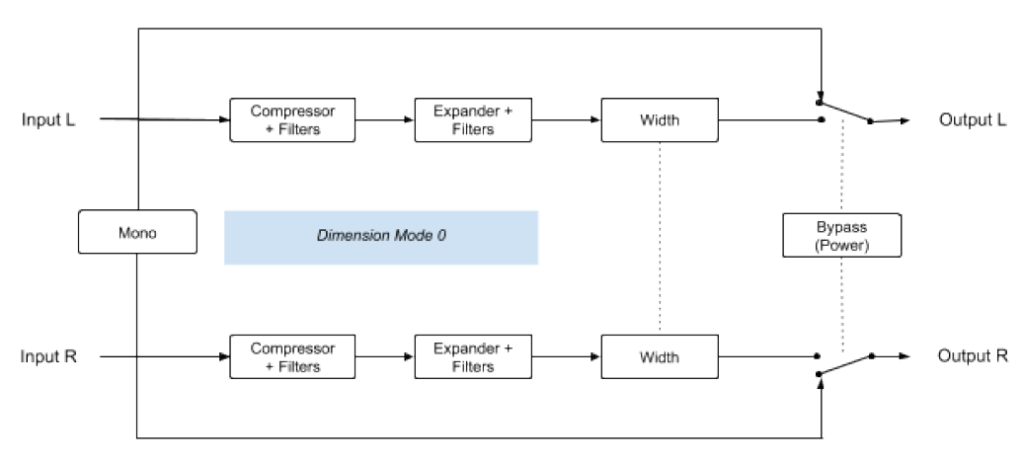
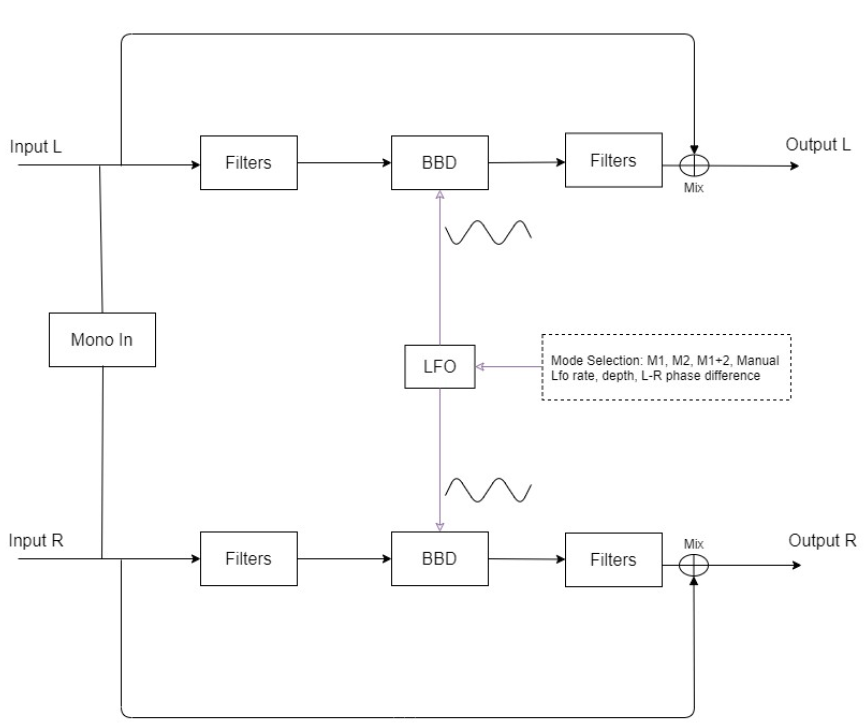
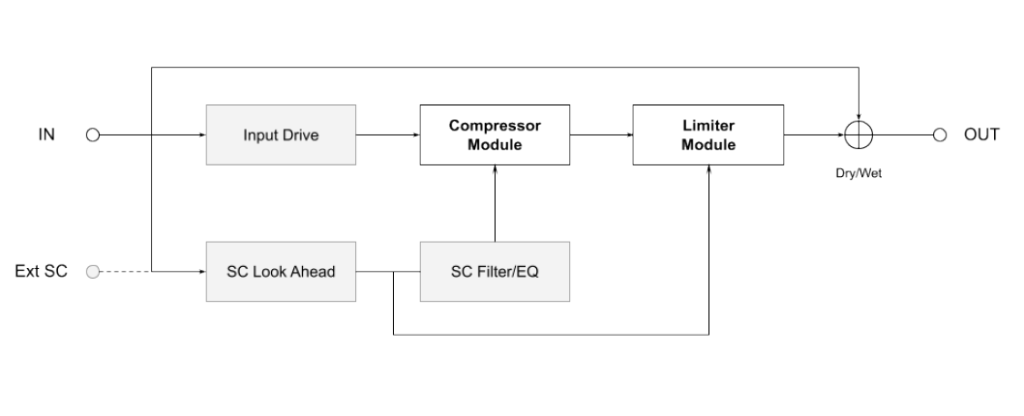
​Like the other two Chorus introduced above, it features BBD in the internal circuit and has a signal flow slightly similar to Dimension-D.

In some ways, this friend’s Signal Flow is similar to Dimension-D, but if you exclude Reverse Sweep, Stereo Offset, CV Gen, and the Regen part, which is the feedback part, the circuit can be considered almost the same.

Let’s move on to the parameter description.
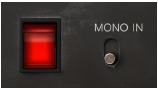
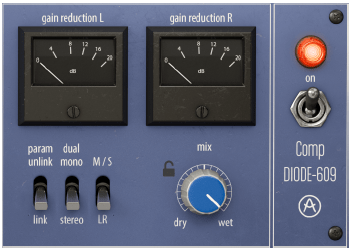
  • Power

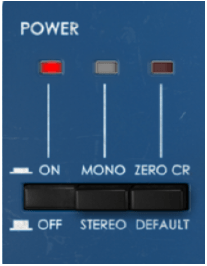
First of all, there are three switches in the power section. The leftmost switch is the On/Off switch, and the middle switch determines whether to receive the signal in Mono-Sum or Stereo.

​The switch on the right is not a switch on the original hardware, and is the switch that activates Zero Crossing Mode. When this button is activated, the polarity of the modulated signal is reversed and the dry signal of the average delay curve is delayed, resulting in a zero crossing effect.

​Generally, a Flanger is an effect that creates a Comb Filtering effect by combining a delayed signal and a dry signal. According to Arturia’s explanation, the Zero CR button inverts the phase of the delayed signal, resulting in the effect being created by subtracting the delayed signal from the dry signal. It still has the Flanger effect, but it’s stronger, thicker, and wetter.
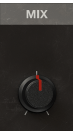
  • Mix & Regen

Mix represents the ratio of the delayed signal (wet) and the original signal (dry). When you mix the two signals, the Comb Filter effect appears and the Flanger effect appears. If you turn it completely to Dry or Wet, the Flanger effect does not appear prominently.

Regen is the side shown in red in the Signal Flow above. Control the amount of feedback. You can increase the Comb Filter effect by increasing this amount.
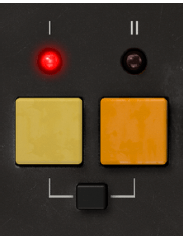
  • Control Mode

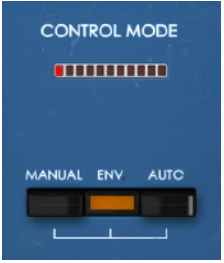
There are three buttons in Control Mode. Each button is a button that selects the way it operates, and you can use a combination of 2 or 3 types.

The effect can be adjusted by adjusting the corresponding part on the right side of the panel for each button, and the red LED above moves around depending on how you adjust it.

​By default, Auto Mode is turned on, and in this Auto Mode, the original triangle waveform LFO is controlled, but through Advanced Control, you can change the LFO waveform or adjust it as desired.

  • Manual & Env

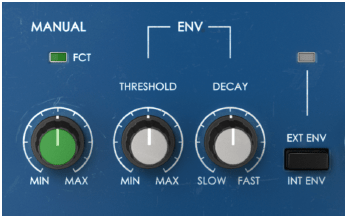
Manual is a knob that manually adjusts the flanger. As you go to Min, the Comb Filter becomes a bit looser, and as you go to Max, the Comb Filter becomes tighter.

Env is a value created to respond to the level of the audio signal.

Env has three controls:
1) Threshold is a knob that adjusts the intensity of the flanger differently depending on the level of the audio signal.
2) Decay is a knob that controls the time it takes for the value to reach 0 after the envelope is deactivated.
3) The third control button is a button that can accept external sidechain signals and adjust the envelope accordingly.

It is not easy to understand if you just look at it like this, but you can think of it as somewhat similar to the Compressor parameters.

If you adjust the Threshold well, you can clearly see the difference between where the flanger enters strongly and where it enters weakly, and the faster you set Decay, the faster the flanger comes out, allowing you to use it more effectively.

  • Auto & Reverse Sweep

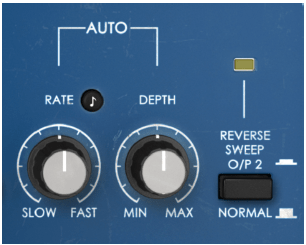
Auto literally gives an LFO automatically to create a flanging effect. So the knobs are quite intuitive. You can adjust the speed (frequency) of the LFO or select the amount of Depth.

​The Reverse Sweep button inverts the phase of the Right channel, greatly widening the stereo image. It seems to be the same as the principle of M/S, and according to this, sound is produced even in the anti-phase area.

  • Advanced Control

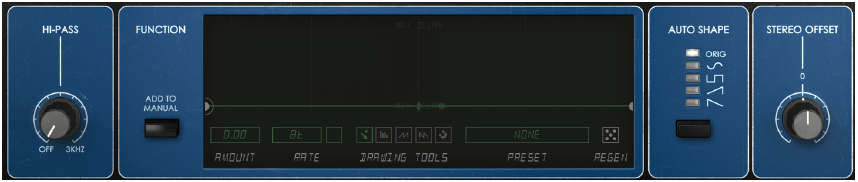
In Advanced Control, there is a 12dB/Oct Hi Pass Filter function, a function to create the shape of a function generator that can be added to Manual mode (said to be the same as the generator included in Arturia’s Pigments or OB-Xa V), and an Auto LFO of 5. There are two functions to choose from, the Stereo Offset function, which is similar to Stereo Width, but works differently.

​Especially in the Function Generator function, you can use the Flanger quite a bit and have fun. We recommend that you try to drastically adjust the values ​​or waveforms displayed under the display with Preset.

  • Samples

I will just attach a simple sample. There are so many different parameters that it seems like it would be very confusing, but I will set it to my liking in the following order: Original Track – Manual – Manual+Function Generator – Env – Auto.

I’m really sorry to keep telling you this, but I think you’ll get a better feel for this type of modulation if you try it yourself.

​Also, the mono sounds were too boring, so I pressed the Reverse Sweep button to widen the stereo image. If you listen to the Reverse Sweep button being pressed in the Manual, you will get a feel for how Reverse Sweep works.

How do you feel? There are quite a number of ways to use these values, such as plug-in and mixing them, using the Function Generator in various ways, or changing the oscillator waveform in the Auto section.

​It felt a bit extreme, but I really liked it.

  • Flanger BL-20 overall review

It’s a plugin I didn’t expect much from, but it leaves a pretty good impression.

​The parameters are not that simple, so it takes some time to learn how to operate them, and you have to think about how to operate them, but once you learn them, you seem to be able to operate them quickly.

This friend thought it would be good to come out with a minor version of the plug-in that would not use the Advanced Control part.

Hmm… As I was writing this, a thought suddenly occurred to me. Arturia’s plug-ins are often a bit heavy, so it would be nice to be able to download not only BL-20 but also minor version plug-ins that do not use Advanced Control for all plug-ins. Although I took a slightly different route while using it, I am quite satisfied with the plugin.

Arturia FX Collection 2 Plug-In Review (Part 5, Chorus Dimension-D)

※This article is a review written on July 21, 2021 after being selected for the FX Collection 2 experience group run by ‘Samick’ and receiving product support for a certain period of time. I only received support for the product and wrote the rest myself.

Chorus Dimension-D is the one that made me interested in Arturia’s FX Collection.

The original was released in the late 1970s and operated with just a few simple buttons. This friend also has the characteristic of using BBD like Jun-6, and it can be seen that it is in line with the fact that the parameters are quite simple.

​Arturia added additional parameters to the original to allow for more diverse control of the Chorus effect.

Signal Flow is quite complex. The front part is somewhat similar to the previous Jun-6 (that’s why I introduced Jun-6 first…^^), but Comp and Expander are also added to the filter, and it shows various complex aspects. It is said that the reason for this was to solve the problem of a lot of noise in the BBD area.

​Anyway, there aren’t that many things we can control, so I think you can roughly look at it like this.

  • Mode & Dimension Mode

The Mode button is a button that determines whether to receive the source in Stereo or Mono. If you select Mono, the signal combined through Mono-Sum from the stereo source goes into the input.

There are a total of 5 Dimension Mode buttons. In the original hardware, the 0 button was just a Bypass button, but like the Signal Path below, Arturia made it possible to apply some color through Comp, Expander, and Filter together.

Additionally, button 1 is the softest Chorus, button 2 is a stronger Chorus but has half the Delay Time, and button 3 has a shorter Delay Time than the other two modes, but has twice the amount of LFO Modulation, making it a more distinct Chorus.

​Button 4 is a special button that applies more wet signals in addition to the other 3 buttons. Therefore, pressing it alone will not work. (There are quite a few different explanations on the web, but Arturia says this is what they actually measured..^^)

​In the original hardware, you can press multiple buttons, but even if you actually press them, only the effect with the highest number is used, so such a function is not included in the plug-in.

  • Advanced Control

In Advanced Control, you can adjust the shape of the LFO oscillator, Compressor/Expander’s Time Constant (you can think of it as a general term for response speed or methods), Width, and Dry/Wet.

​There are five types of oscillators to choose from: triangle wave (Default), Sine, Ramp (Ascending Saw Wave), two random forms, Sample & Glide, and Sample & Hold. The colors are much different than you might expect, so we recommend that you try them all.

In Dynamic Color, LF Sat 1&2 has a shorter Time Constant, resulting in slightly more Saturation, which is noticeable at Lower Frequency. Additionally, the position marked as Default is the same as the hardware’s default setting, and the position marked as Smooth is said to have smoother attack and release.

Width literally controls the stereo image, and Mix lets you control Dry/Wet.

  • Samples

There are so many additional parameters from Arturia that it would be too much to do them all. Therefore, we will not touch any additional parameters and will only adjust the Dimension Mode button in the default state.

The order is repeated a total of 8 times in the following order: original track – (0) – (1) – (2) – (3) – (1+4) – (2+4) – (3+4)

Surprisingly, contrary to Arturia’s explanation, I felt that button 3 was a bit quiet. I really liked the effects themselves.

  • Chorus Dimension D Overall Review

This is a plugin that I really liked. I wasn’t able to hear it here, but if you adjust the oscillator shape or dynamic color, the effects sound different and richer.

Also, personally, I thought that if I used this plug-in on friends who obscure the vocals in the center, such as Clap or Snare, and widened the stereo image a little, the effect would be really good.

Of all the plugins I’ve featured so far, I’d say just please take my money. Even if I don’t receive the plugin as a review event product, I will definitely buy it if it goes on sale someday.

Actually, I don’t have anything worth showing about this type of Modulation series, so it seems very difficult to use it analytically like Compressor or EQ. Therefore, it seems that a lot of subjective opinions are mixed in unintentionally. This can feel quite different from person to person, so if you are curious, we recommend that you try the demo right away.

Arturia FX Collection 2 Plug-In Review (Part 4, Chorus Jun-6)

※This article is a review written on July 21, 2021 after being selected for the FX Collection 2 experience group run by ‘Samick’ and receiving product support for a certain period of time. I only received support for the product and wrote the rest myself.

Chorus Jun-6

Chorus Jun-6 is a Chorus that was released for free by Arturia at the end of 2020, so I know there are quite a few people who have it. This friend is a plug-in that is a clone of the Chorus part that was included in the old Roland synthesizers Juno 6 and Juno 60. As for hardware, there is also a clone pedal from TC Electronics called June-60.

​In fact, the Chorus part that was originally attached to the synthesizer did not have various parameters like the plug-in above, but simply had three buttons as shown in the picture below.

In the above part, you could have three types of Chorus effects by pressing the I or II buttons, or both buttons.

The reprint plug-in from Arturia reproduces all three Choruses, but adds several additional parameters to allow people to further refine the Chorus effect.

The Signal Flow of Chorus Jun-6 is as shown in the photo above. The original Chorus included in the Juno synthesizer accepts a Mono signal and outputs it as Stereo, but Arturia’s plug-in accepts a Stereo signal and directly produces a Chorus effect, or converts Stereo to Mono through Mono-Sum and outputs it as Stereo. There is a function that can add a chorus effect.

I think you will get a feel for it if you look at the input section of Signal Flow. In Modulation, you can think of Filter as it is common to use a filter to modify the phase, and BBD is an abbreviation for Bucket-Brigade-Divice and can be thought of as a type of specially made capacitor.

​Well, this is not particularly important, and most of the parameters we can control in the plug-in are values ​​related to the LFO applied to BBD. The sound that has passed through the LFO passes through the Filter, is mixed with the original sound through the Mix knob, or is completely subtracted, and then goes out through the Output.

Now, let’s take a look at the parameters.

  • Power

The power side is very simple. You can turn it on and off by pressing it. And if you select Mono In, the Stereo signal will be converted to Mono as mentioned above.

  • Buttons

First of all, there is a button that looks similar to the Chorus button on Juno. It’s not particularly difficult to use, simply click the button you want and the Chorus sound for the selected button will sound.

The black button below is used to press the I and II buttons simultaneously. Mode I is said to be a slightly quiet Chorus, and Mode II is a deep and rich Chorus. Surprisingly, pressing I and II at the same time does not produce the effect of combining the two, but rather sounds like Vibrato, not Chorus. Let’s take a look at this in a sound sample.

  • Manual Button

The Manual Button allows you to adjust 3 parameters. Rate can adjust the LFO rate between 0.050 Hz and 15.0 Hz, and the note display next to it can be adjusted from 1/64 to 8 (8 quarter notes) with the Sync button.

​Depth is said to be the amount of modulation applied to the BBD Delay. You can select from 0.00 to 10.0ms.

Phase literally means phase difference from the original. You can select from 0 to 180 degrees.

  • Mix Knob

You can turn the Mix knob to determine the amount of Dry/Wet signal from 0 to 100.

  • Samples

Likewise, I selected a few samples and tried them.

The order is original track -> I -> II -> press both I and II -> press Manual and set to very, very extreme settings, and the Mix knob is set so that Dry/Wet is 50:50.

How do you feel? Certainly, as explained in the manual, pressing both I and II seems to perform a Vibrato rather than a Stereo Chorus effect.

The extreme settings seem to produce very interesting results.

  • Chorus Jun-6 Overall Review

A simple yet effective Chorus.

In fact, I think in my head that I need to use modulation effects such as Chorus well when making a song, but it’s really difficult to actually apply them well, so I think it’s good to have a friend who can help me without any pressure. Actually, the biggest problem is that I haven’t studied enough and can’t experience it physically..

In any case, I think one advantage is that it is fairly intuitive. You can try walking right away and if you don’t like it, just take it out..^^

Arturia FX Collection 2 Plug-In Review (Part 3, Comp Diode-609)

※This article is a review written on July 21, 2021 after being selected for the FX Collection 2 experience group run by ‘Samick’ and receiving product support for a certain period of time. I only received support for the product and wrote the rest myself.

Finally, this is Diode-609, a clone of Neve’s 33609. Rupert Neve can be said to be synonymous with British sound. In addition to the famous Neve 1073, 1081, and 2254, he left a great mark by creating many famous sound equipment and companies such as the Focusrite and Portico series. Unfortunately, he passed away in February of this year…

​Neve 33609 is a solid state Compressor/Limiter 2 Step Processor using a diode bridge. (Although there is no limiter, this 2-step method is also used in the Shadow Hills Mastering Compressor) The diode bridge is made of a shunt (circuit configuration method) like the 1176, and is said to use 4 diodes. It is said to use Optical Gain Reduction and VCA, and like SSL G Comp, it has an Auto Release function.

​Arturia’s manual says that it was used with analog EQs such as Sitral W295 and was mainly used in the Mix Bus stage in the 70s and 80s, and was also used as a Master, etc., and as an individual Compressor. However, it is recommended to use it with analog EQ on the group and master bus.

I knew that 33609 was only available in Precision Comp from IK Multimedia in addition to UAD, so it was nice to see it as a new plug-in. I’m happy that I have a new option, but the thought of spending money again brings tears to my eyes..

​As it is a plug-in that I am interested in, I will compare Diode-609 with UAD’s 33609C along with sound samples.

First of all, Signal Flow is like the picture. I think it will be easier to understand if you simply think of it as going through the Compressor, then the Limiter, and then going to Out.

You can think of this as the same as UAD’s 33609, but the difference is that UAD cannot use an external sidechain.

  • Control Difference

Just by turning on the plugin, there are some differences between UAD and Arturia’s clone plugins. Let’s take a look at not only the location of the compressor or limiter, but also the number of compressor knobs, additional knobs or switches, oscilloscopes, etc., one by one.

  • Compressor

First of all, Arturia’s products can be adjusted smoothly by allowing you to choose between a step knob or a smoothly rotating knob. Previous products are the same, but I couldn’t tell you..^^;;

​Also, what is unique is that you can select the Attack Time. Arturia’s Attack is 5ms (Fixed, adopted from existing hardware), variable from 5 to 75ms, and UAD’s Attack is 3ms (Fast; they say it was adopted from existing hardware, but I don’t know why they are different from Arturia..^^;;) , 6ms(Slow).

Ratio can also be selected up to a smaller value, such as 1.2:1 or 1.1:1, and the Release value appears as a number, but Auto Release is slightly different. Arturia’s a1 automatically changes between 100ms and 2000ms and a2 automatically changes between 50ms and 5000ms, and UAD’s a1 automatically changes between 40ms and 800ms and a2 automatically changes between 150ms and 1500ms.

The basic Frequency graph when all limiters and compressors are removed from the plug-in are Arturia on the left and UAD on the right. The two are quite different.
Attack was set to Fix and Fast, Release was set to a1, and Ratio was set to 2:1. As the parameters change, the graph also changes.

Arturia is on the left, UAD is on the right. Harmonic Distortion is also a bit different.

​By the way, Arturia’s Diode-609 has a fairly high and shaky floor noise. It seems that the noise from the AC circuit was brought directly from it. Personally, I wish they could make this type of noise more selectable. The bass is about 150dB and the treble is about 140dB, so it’s low, but you still need to be careful when using it on individual tracks.

Also, the Compression Curve is slightly different. In particular, Arturia is impressive in that the sound becomes louder from a very quiet sound. I think it might be because of floor noise.

Both companies seem to have reproduced the part where compression occurs quite similarly.

  • Samples

I selected a few samples and compared them. Arturia set the Attack to Fixed, set the Release to a1, and only adjusted the Threshold and Make Up Gain.

There are three ratios: 1.5:1, 3:1, and 6:1.

No extreme processing was done. At 6:1, I adjusted the VU meter so that the needle moves only within 0 to 4 dB.

I feel sorry for not being able to tell you about various cases, but if I assume various cases and do everything, not only will I be tired, but I think the viewers will also be tired, so I will just compare them like this.

My personal experience is that Arturia’s Attack Fixed is slower and the minimum value of a1 Release is longer, so UAD reacts a little quicker. Conversely, Arturia responds more smoothly. I think you can feel this well in Drum.

In addition to these basic parameter differences, the characters of the two plug-ins seem to be quite different due to the difference in Harmonic Distortion.

  • Limiter

There is no significant difference in the limiter’s parameter configuration. The Attack Time of Arturia Diode-609 and UAD 33609C is the same at 2ms (fast) and 4ms (slow).

However, the difference in Release Time is that Arturia’s a1 is 100ms~2000ms and a2 is 50ms~5000ms, while UAD’s a1 is 40ms~2500ms and a2 is 150ms~3000ms.

This is a graph where the Threshold is lowered to the minimum, Release is set to a1, and Attack is set to Fast.

Arturia is on the left, UAD is on the right. Like Compressor, Harmonic Distortion appears a little differently, and different Noise seems to be another characteristic.

​Compression Curve seems to appear similar. They press it without any mercy.

  • Samples

I selected a few samples and compared them.

Arturia and UAD both have the same parameters, so I set Release to a1 and only adjusted Fast, Slow, and Threshold of Attack. No separate gain compensation was provided.

Personally, I was surprised to find that it felt somewhat similar. I wonder if it’s because the attack time is the same and the attack nuance is similar.

However, the difference is noticeable in Release and the feeling of release is a bit different. Still, I don’t think the two feel completely different like Compressor.

  • Advanced Control

First, let’s look at the right side of the plugin. When you click on the VU meter, it turns into an oscilloscope measuring dB. You can click again to change it to a VU meter.

From the left below, there are three switches: a Link switch that links two channels, a switch that selects Stereo and Dual Mono, and a switch that allows Mid/Side processing.

Additionally, there is a Mix knob and power switch that can be used to mix original and processed sources.

Click Advanced in the top right corner of the plugin and Sidechain controls for triggers will appear below.

​I think this part is the biggest advantage of the Arturia Comp Diode-609. It can accept not only internal sidechains but also external signals, so you can use sidechains, and you can use the Look ahead function and Sidechain EQ for both internal and external signals. You can also listen to all of the sidechain signals.

The Input Drive on the right is not a Sidechain function, but a Saturation knob that makes Harmonics Distortion stronger.

  • Comp Diode-609 Overall Review

It is difficult to say that it is an exact replacement for the UAD Neve 33609 C, but I think it is a good friend to use for songs where the attack is not fast or strong.

​In particular, the Sidechain feature seems to have been included so well that I wish it were included in all Compressor plugins.

Another disappointing thing is that noise cannot be controlled. I wish there was an update to turn off the noise. Rather than saying “Wow! I love it!”, I think it’s just another new Bus Comp option.