Manley Nu Mu Stereo Limiter/Compressor Review

Hello! This is Jooyoung Kim, an audio engineer and music producer.

Now that the semester is over, I have a few weeks to rest and prepare materials for my next classes. Even so, I still have a lot of work to do on my new research, my DIY hardware projects, and my English studies. It will be very busy holidays.


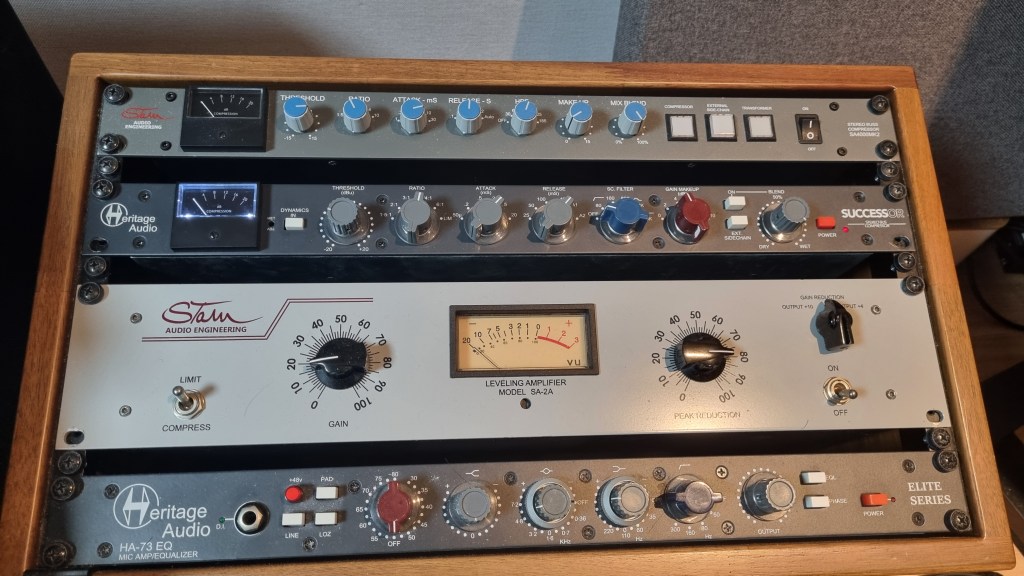
By the way, recently, I decided that I need to sell my compressors, the Heritage Audio Successor and the Stam Audio SA-4000 MK2, and replace them with a mastering-grade compressor to mix and master music better.

Fortunately, last week I sold both of them, and I have been happily considering which mastering-grade compressor I should buy. There were several options to choose from, but I finally decided to buy the Manley Nu Mu Stereo Limiter/Compressor.

This decision came from my experience with the SPL IRON, the SPL Venos, and the Chandler Limited RS660 compressors, which are vari-mu-style compressors. They sound great across many genres, but they aren’t within my budget. (If I bought them, I’d have to live on cup noodles for about three months! :))

I also had an experience with the original Neve 33609/C compressor/limiter and the Chandler Limited EMI TG12413 Zener Limiter. These are diode-bridge compressors that have really great saturation; however, they are also unaffordable.

I found two reasonably priced compressors: the Rupert Neve Designs 5254 Shelford Diode Bridge Compressor and the Manley Nu Mu Stereo Limiter/Compressor. I ultimately chose the Manley because it was more affordable. Also, having previously owned a diode-bridge compressor—the Heritage Audio Successor—I was ready to explore a different style.

I was also attracted to the WesAudio ngBusComp, which features a handy digital recall system. However, it is a VCA-style compressor, which is the same type as the Stam Audio SA-4000 MK2 that I used to own.

Therefore, I decided to buy the Manley Nu Mu Stereo Limiter/Compressor!


Build Features

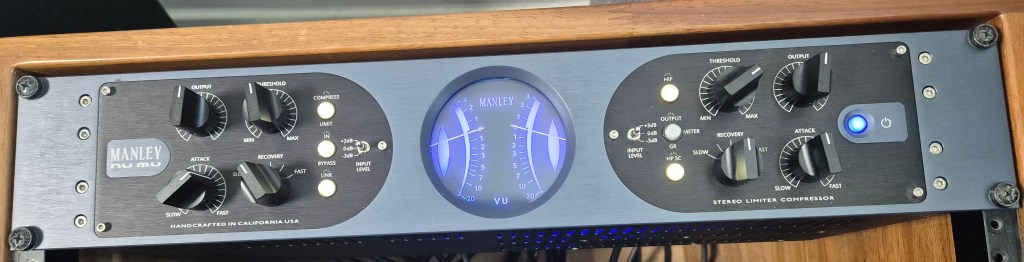
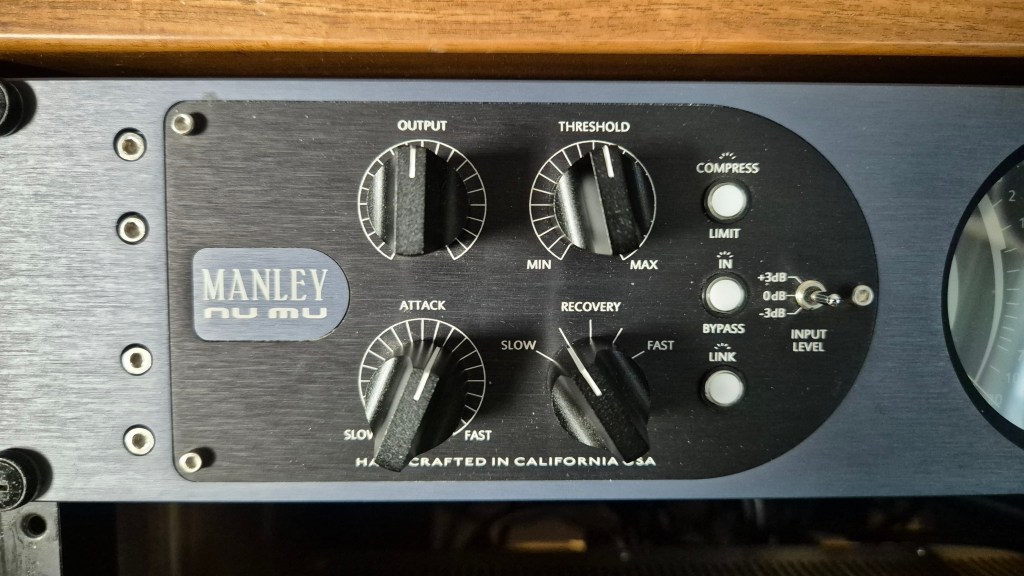
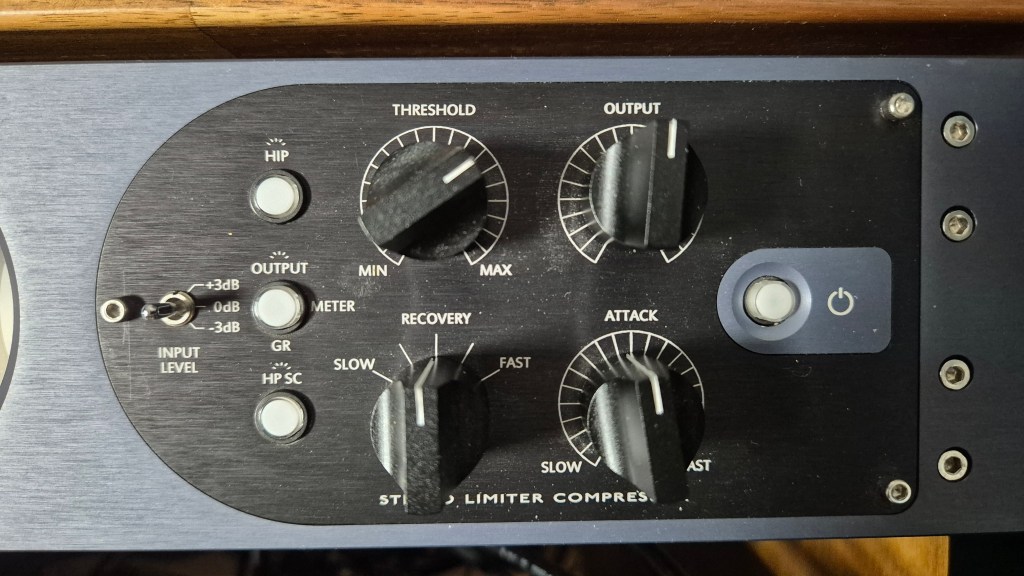
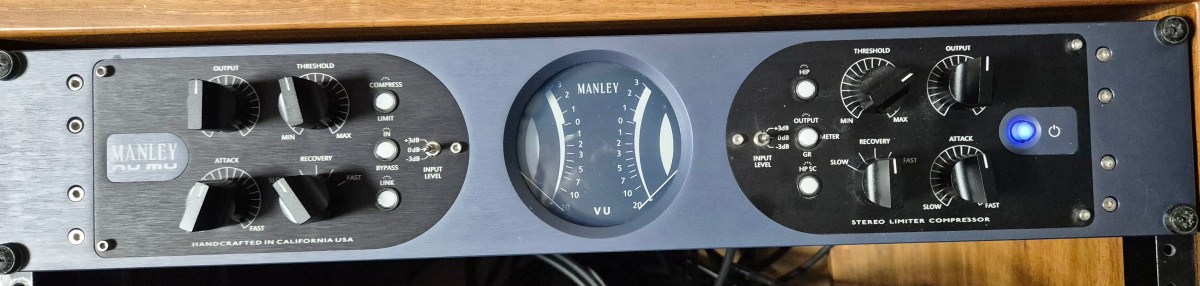
The Manley Nu Mu features eight knobs, six buttons, and two switches, excluding the power switch. The knobs (Threshold, Output, Recovery (Release), and Attack) and switches (Input Level) on the left side are identical to those on the right, allowing for independent adjustment of the left and right signals.

The Link button couples the left and right signal control knobs, with the notable exception of the Output controls. Consequently, these must be matched manually via measurement. Furthermore, apart from the Recovery knob, all controls feature continuous rotation, which makes precise recall of previous settings difficult.

The HIP (High Impact Preservation) control compresses quieter sounds while leaving loud peaks untouched. It processes these signals internally to achieve results similar to parallel compression. I found that the audio sounds more natural when engaged, so I may leave this button on permanently.

The HP SC (Sidechain High Pass Filter) button activates an internal filter with a 100Hz corner frequency and a 6dB/octave slope. This prevents the compressor from reacting to low-frequency energy below 100Hz, ensuring more stable gain reduction.


Measurments

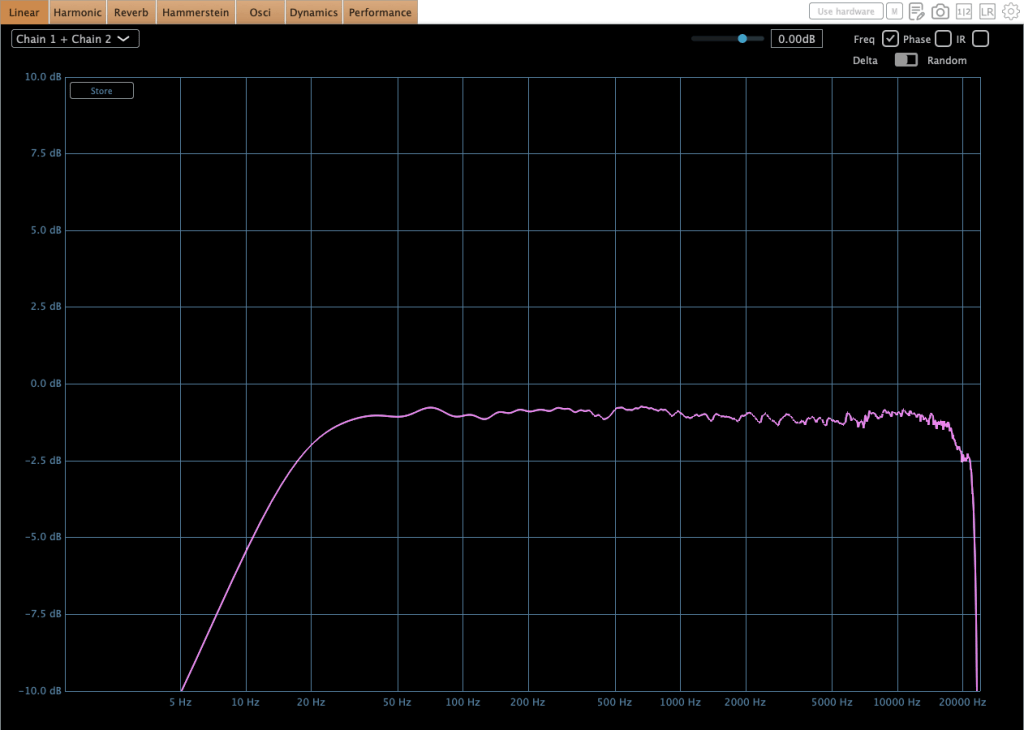
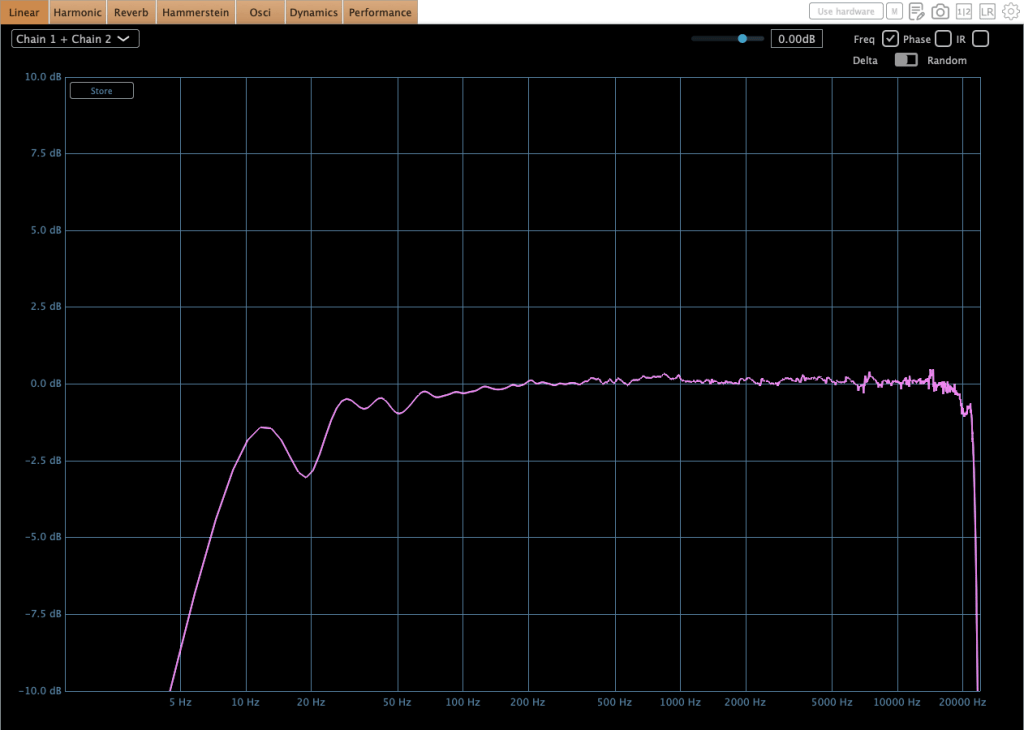
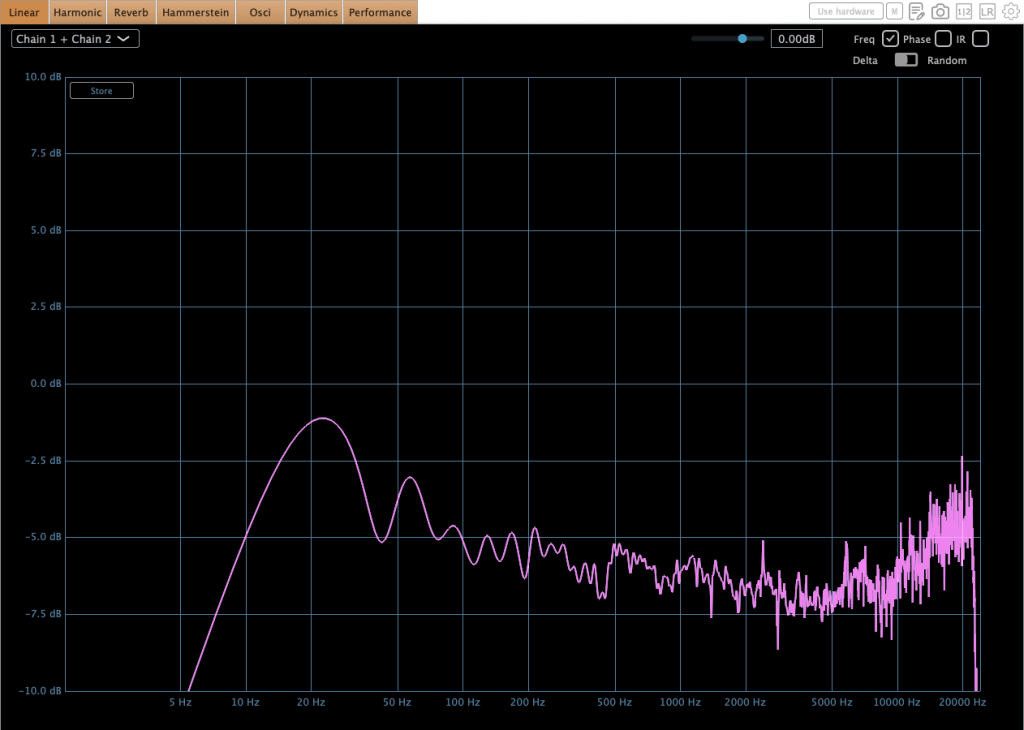
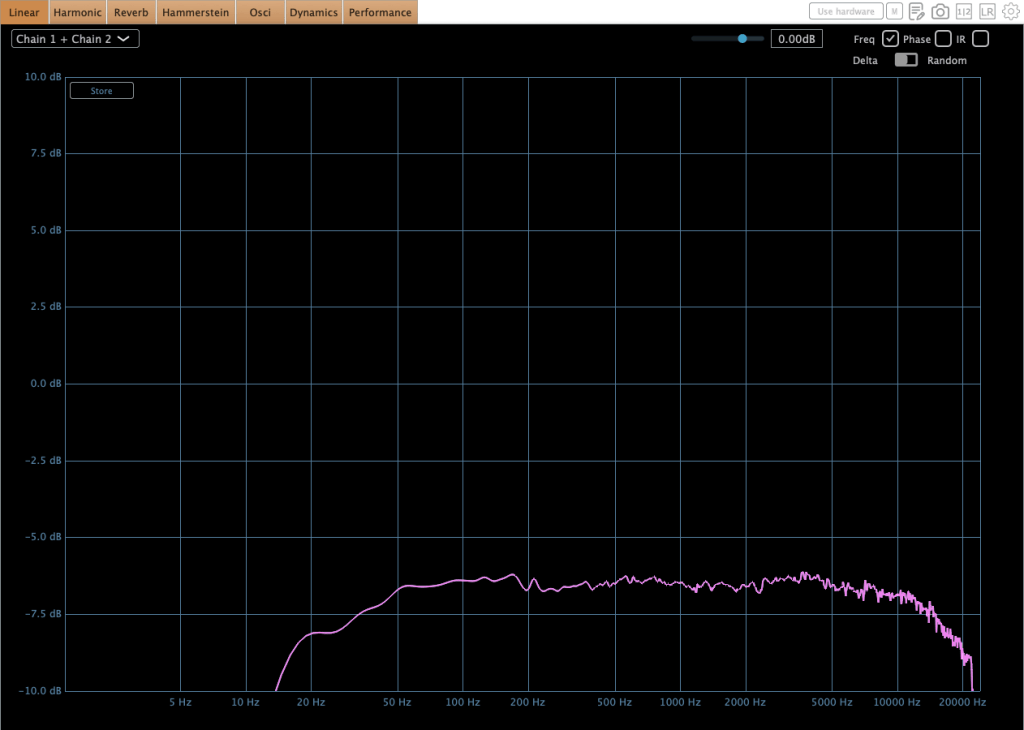
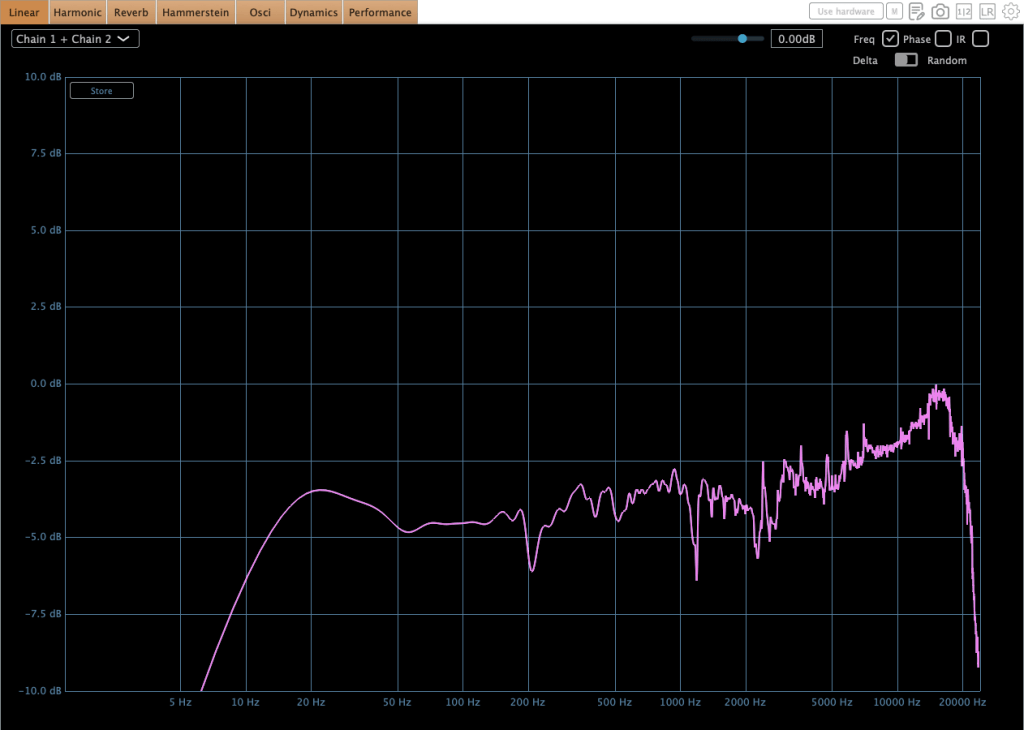
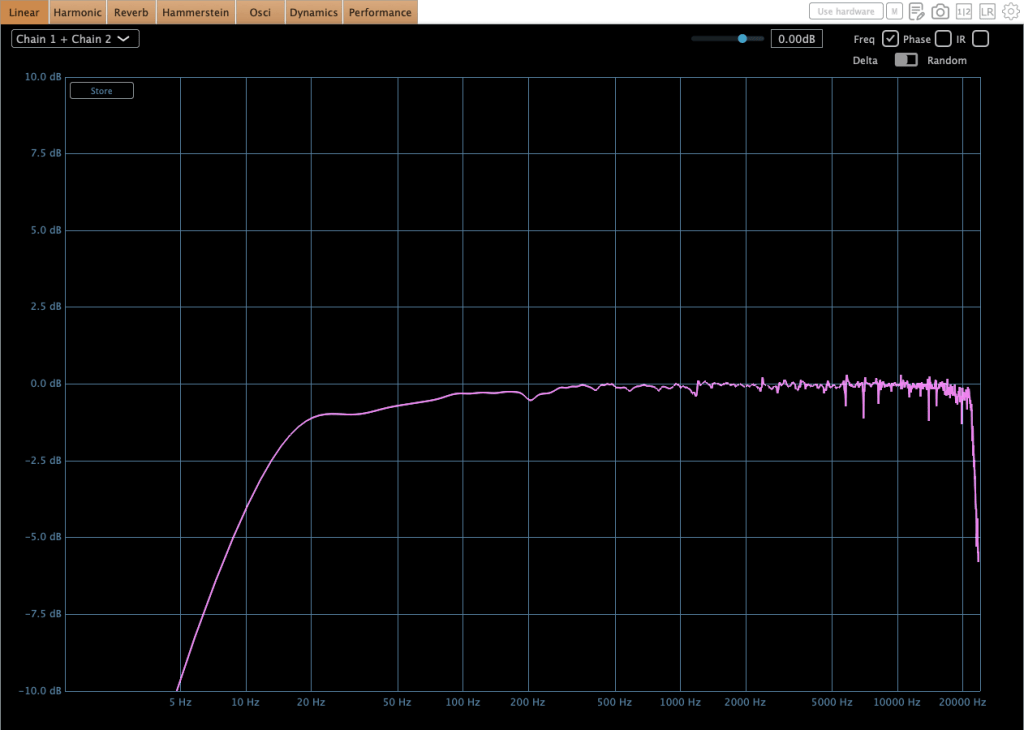
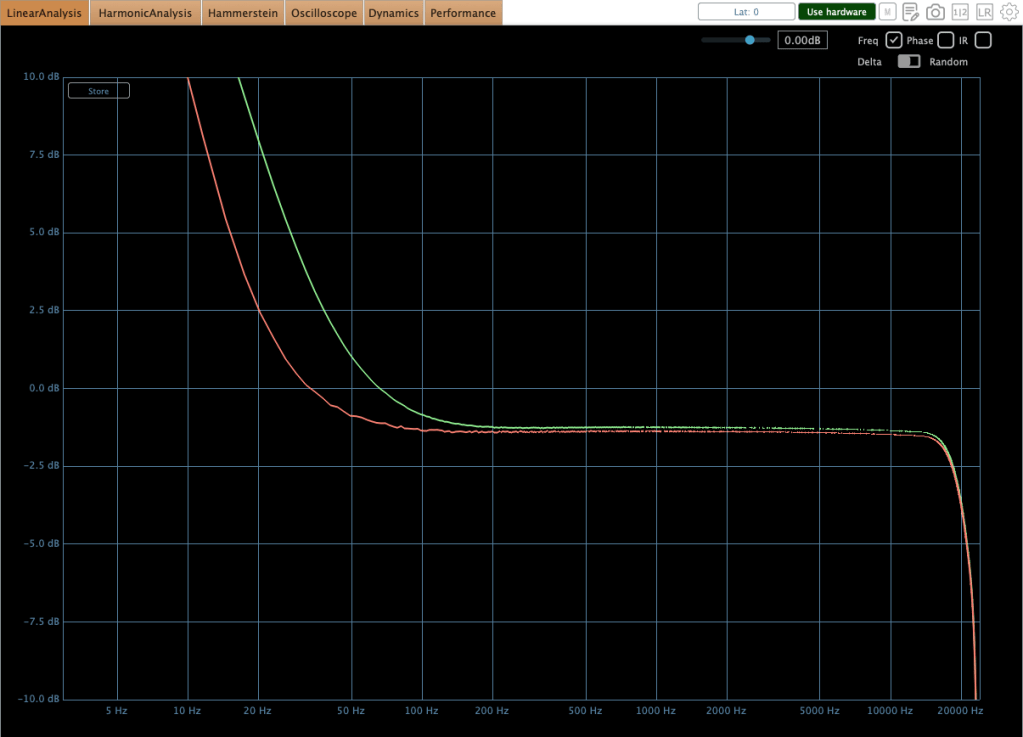
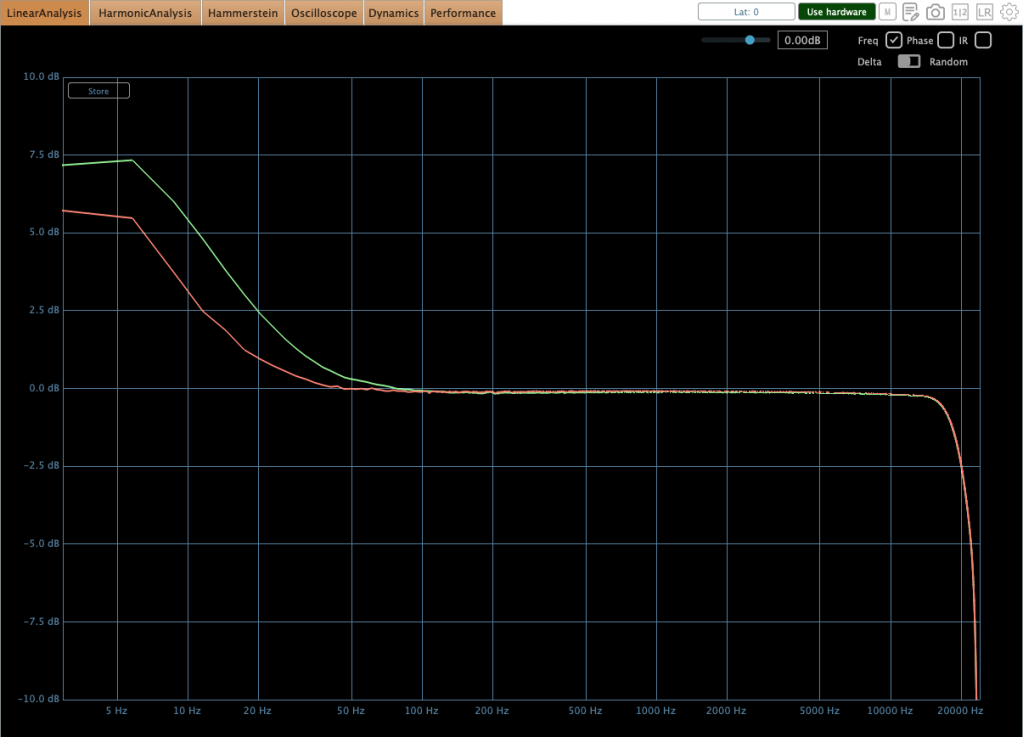
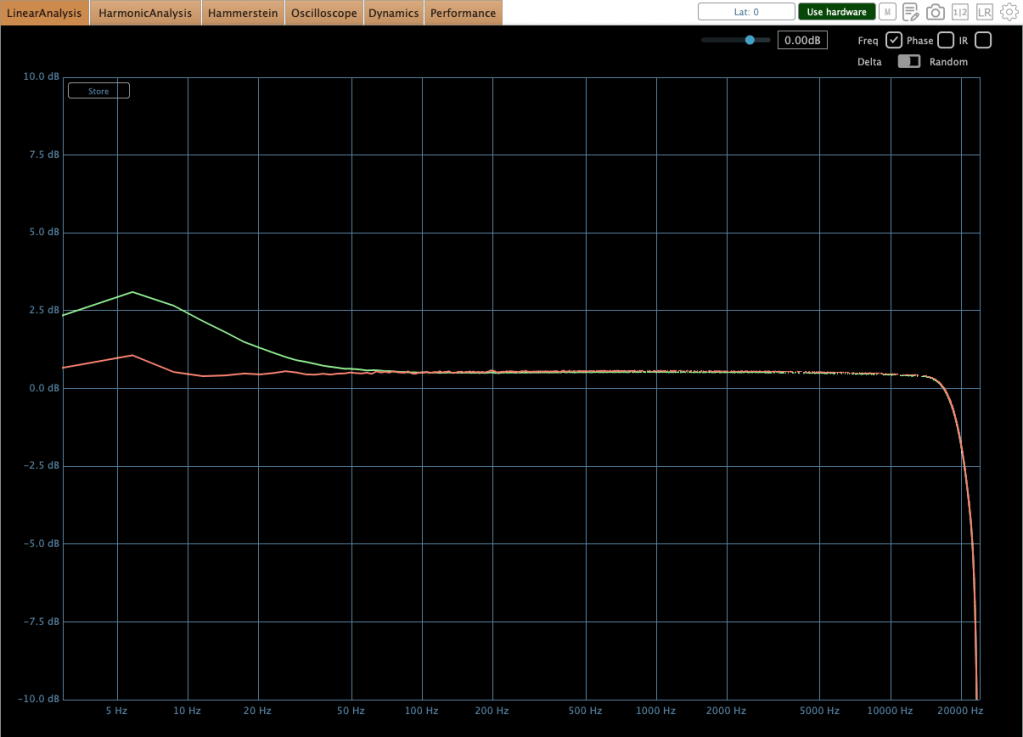
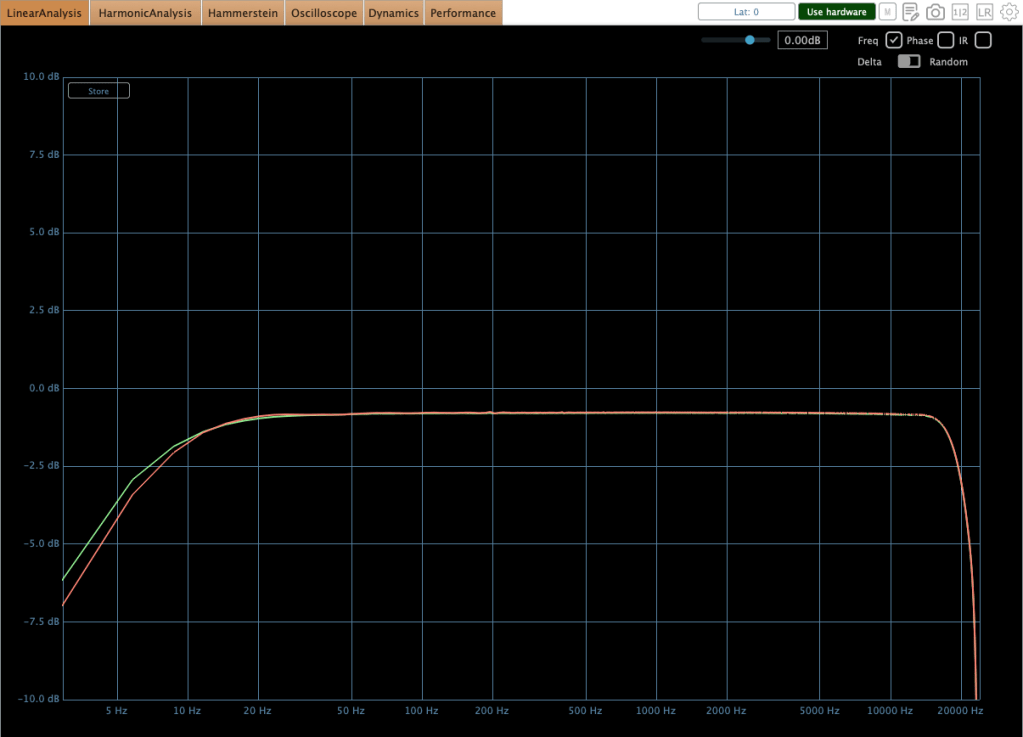
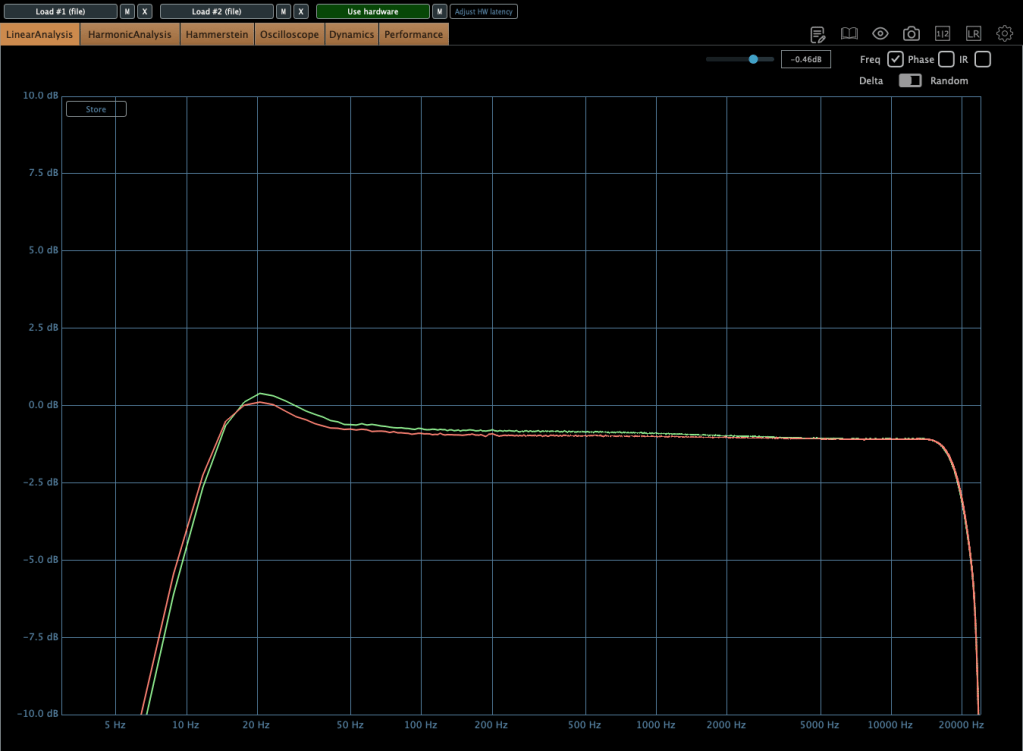
This equipment exhibits characteristic behaviors. Variations in input gain, threshold, attack time, and release time significantly affect the low-frequency response. Additionally, there is a slight amplitude discrepancy between the left and right circuits in the low end. This difference is easily observed in many compressors that do not naturally exhibit a low cut in their frequency response. For instance, when I demoed the SPL Venos, I found a significant discrepancy in the low-frequency output. Furthermore, an engineer peer of mine mentioned struggling with the same low-end inconsistency after purchasing an SPL Iron.

So, this level of discrepancy is acceptable.

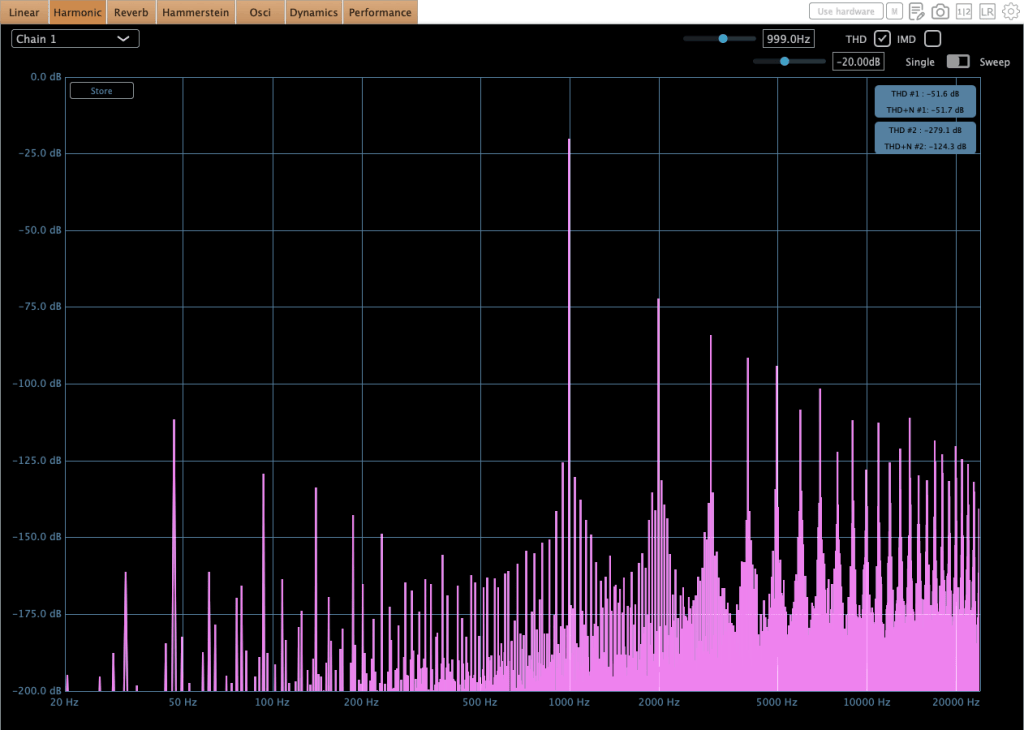
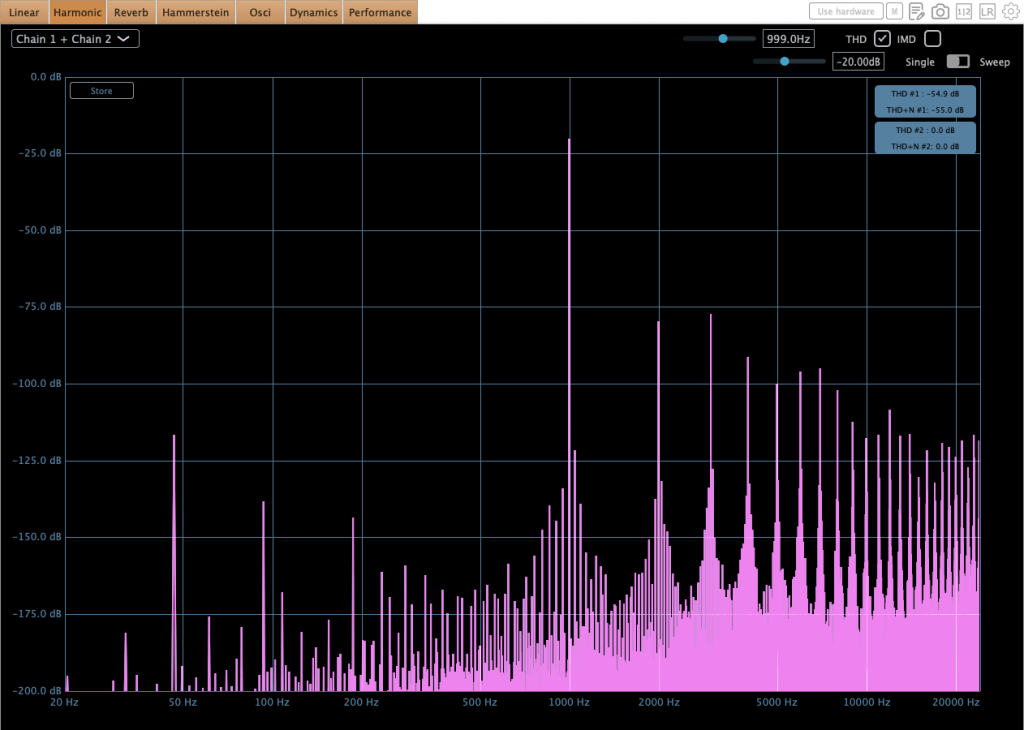
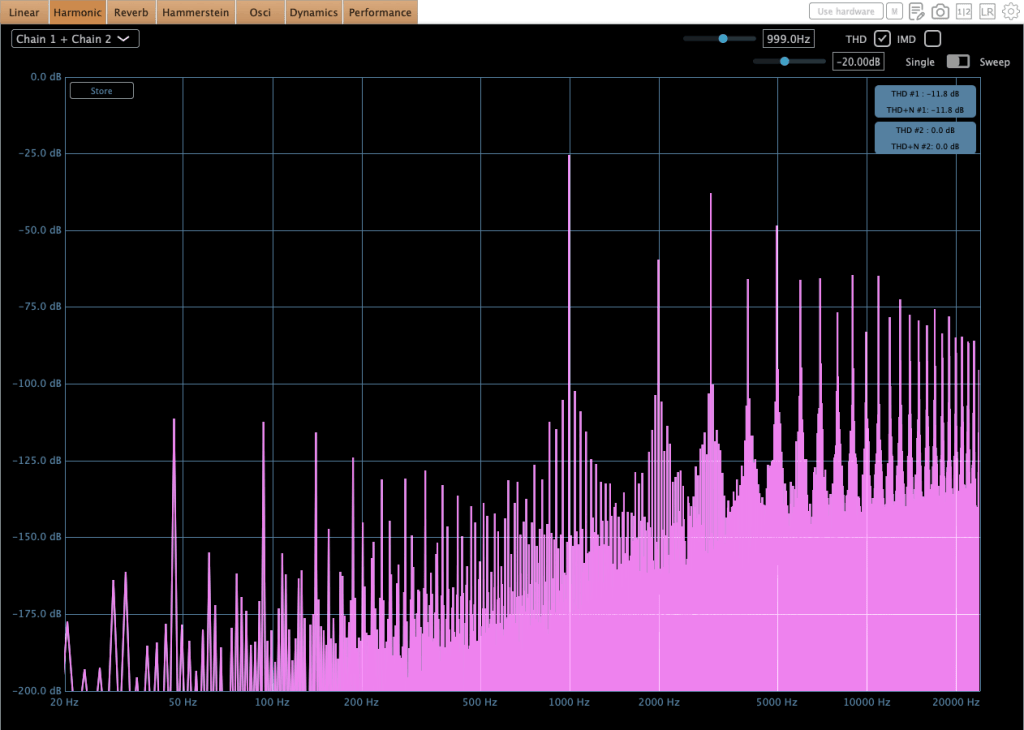
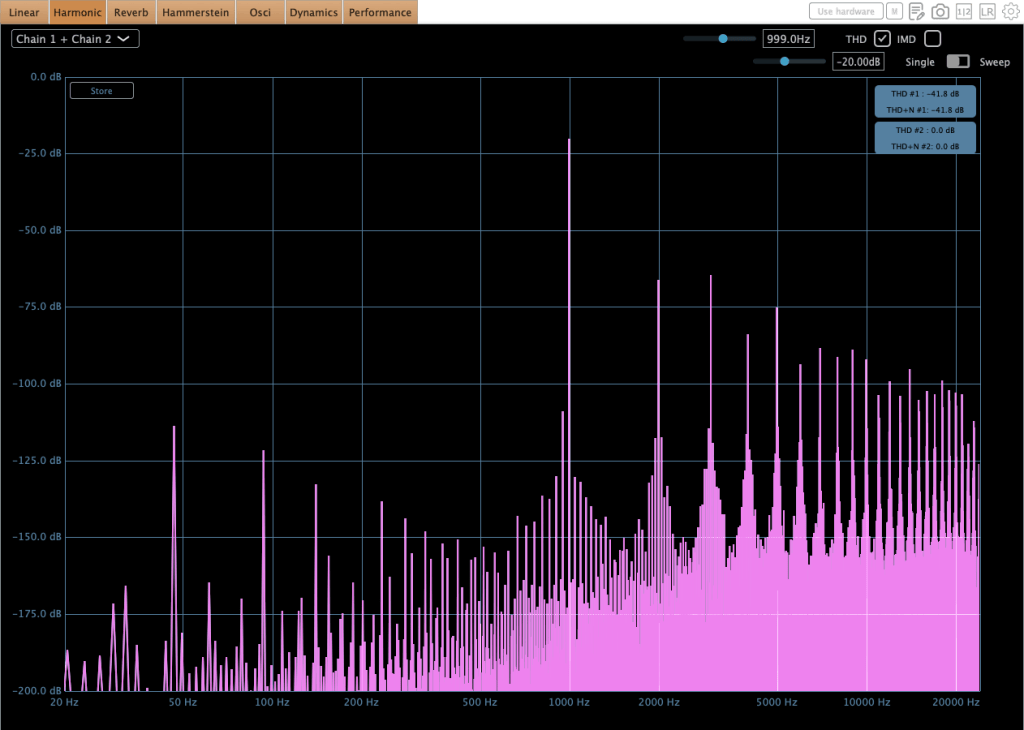
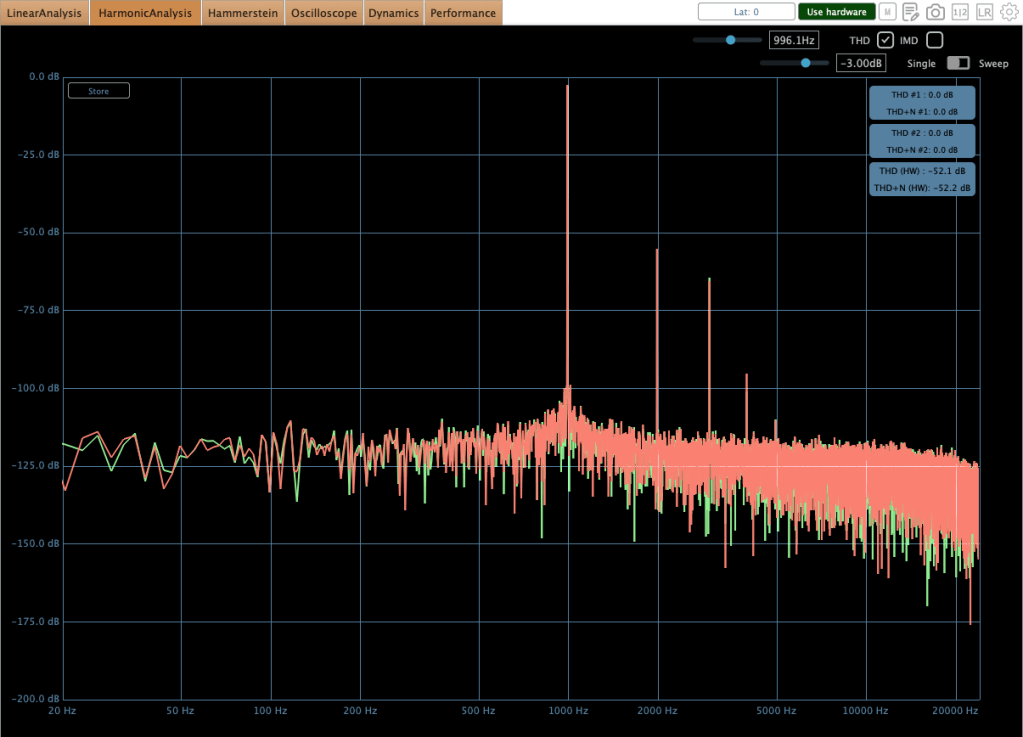
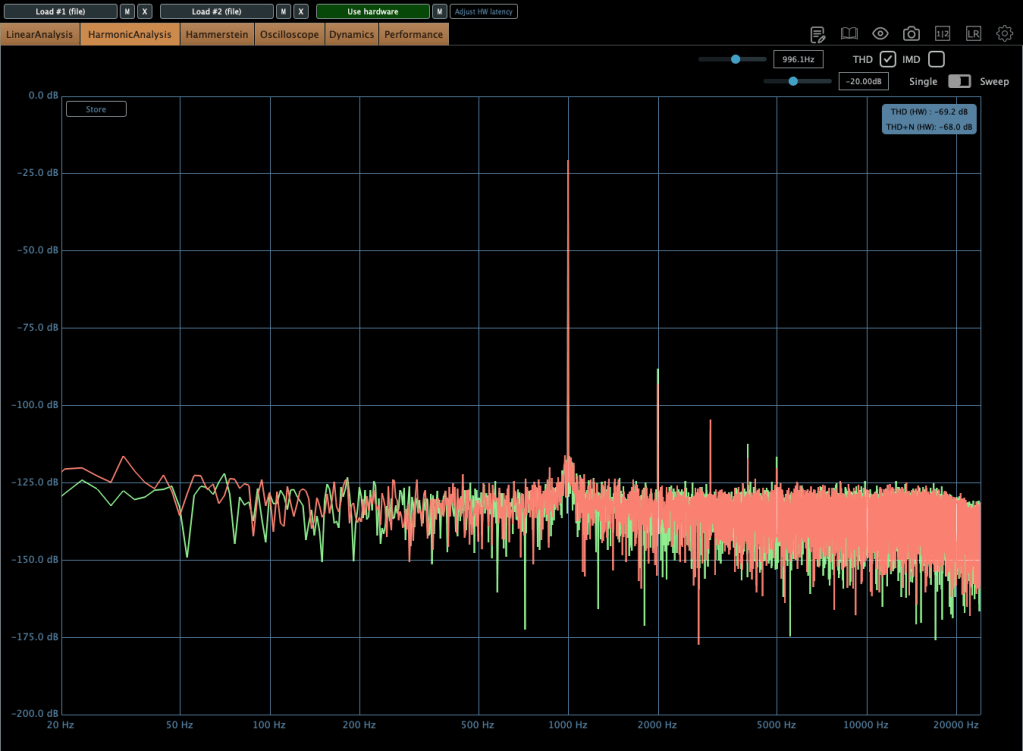
As shown in the image above, harmonic distortion levels are relatively low; however, they remain sufficient to noticeably alter the timbre of the sound.

Compressor mode
Limiter mode

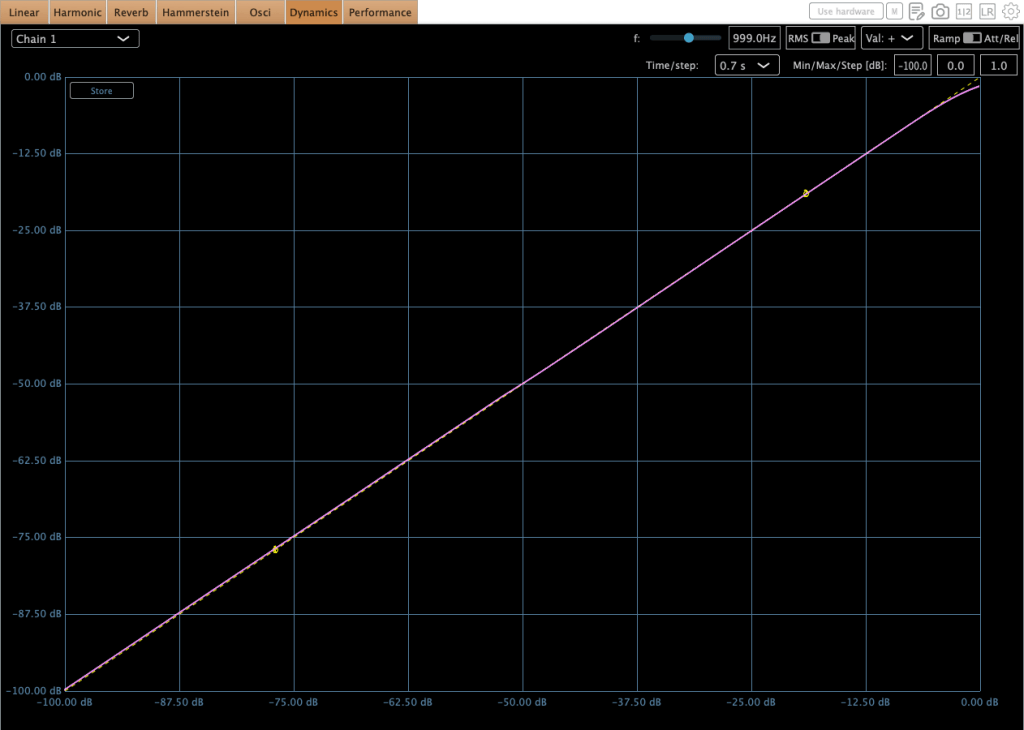
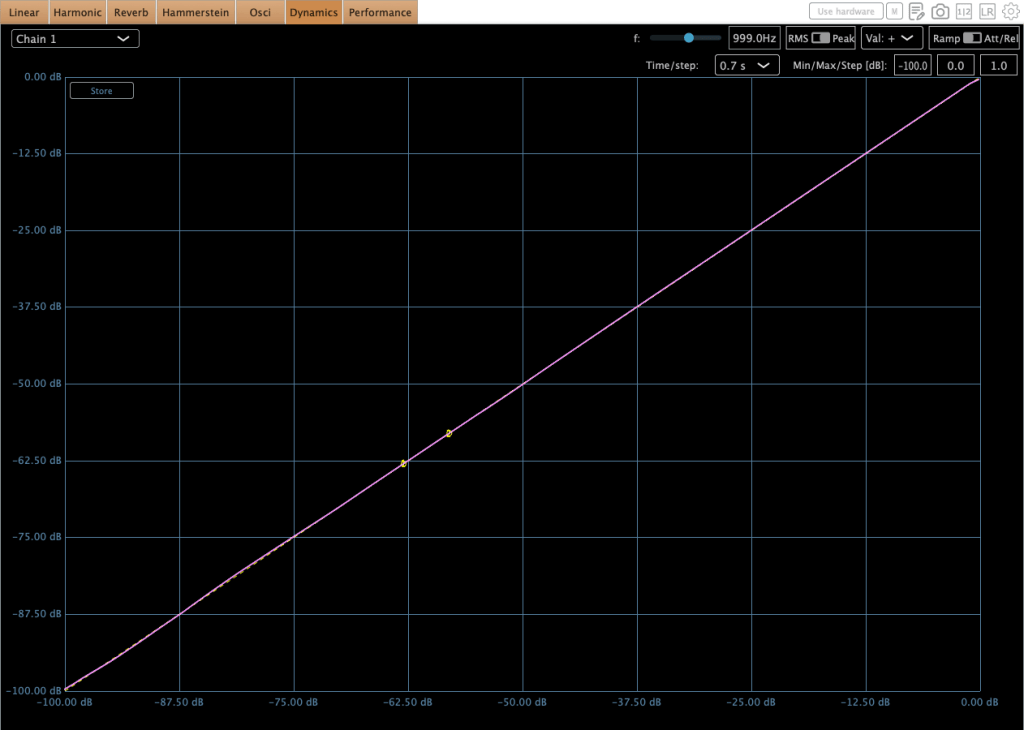
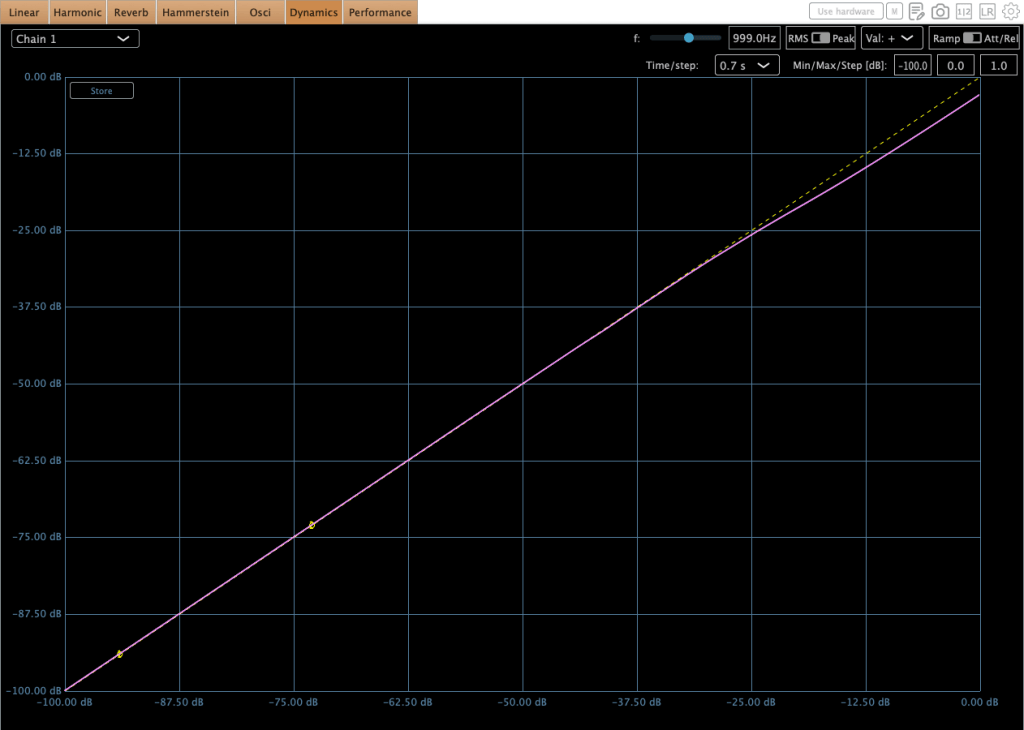
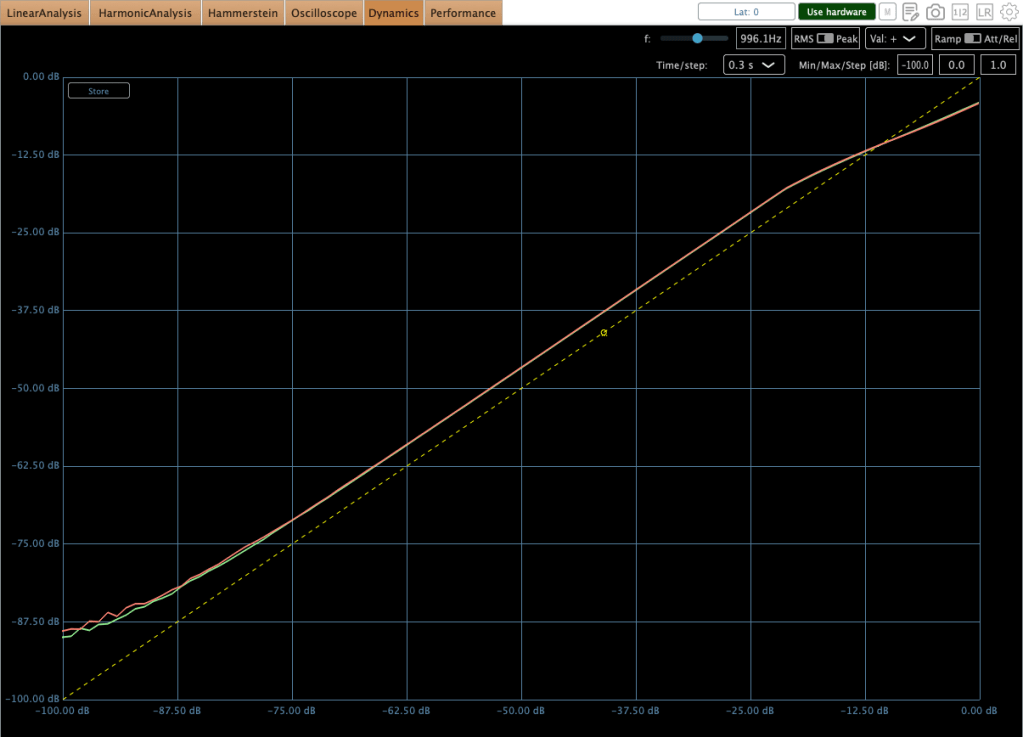
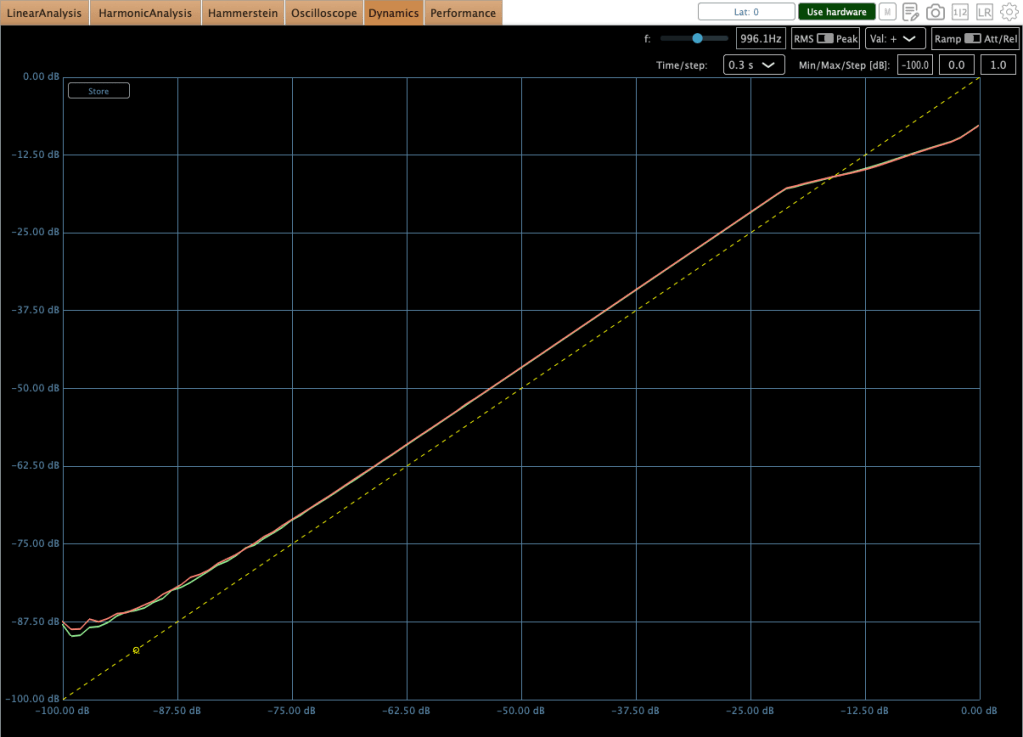
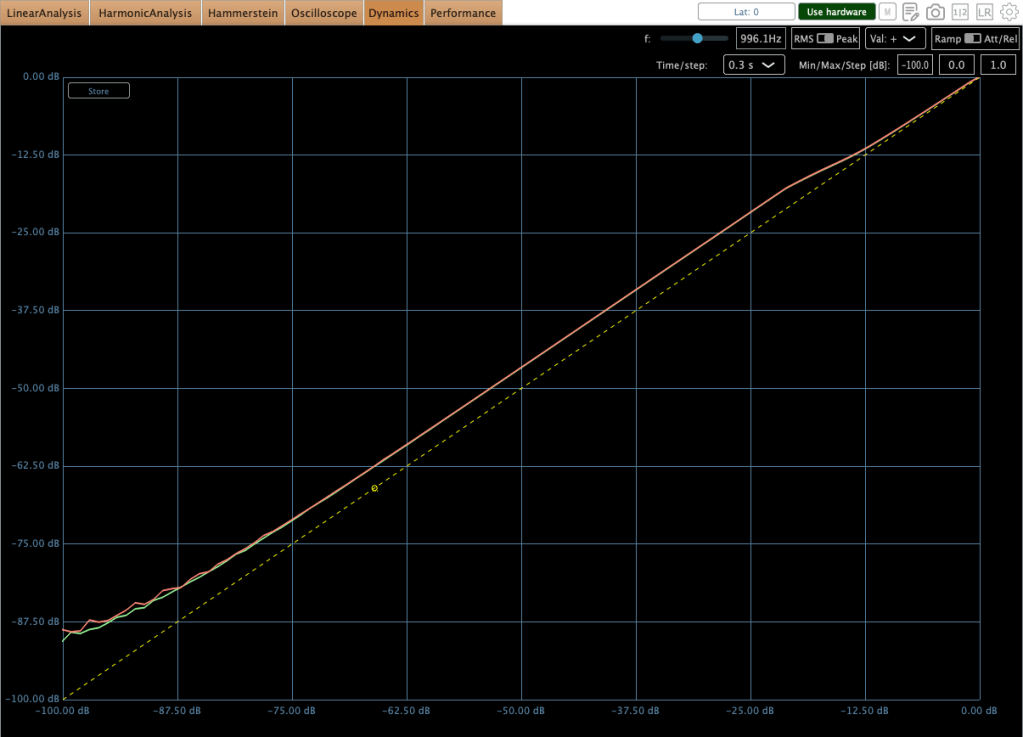
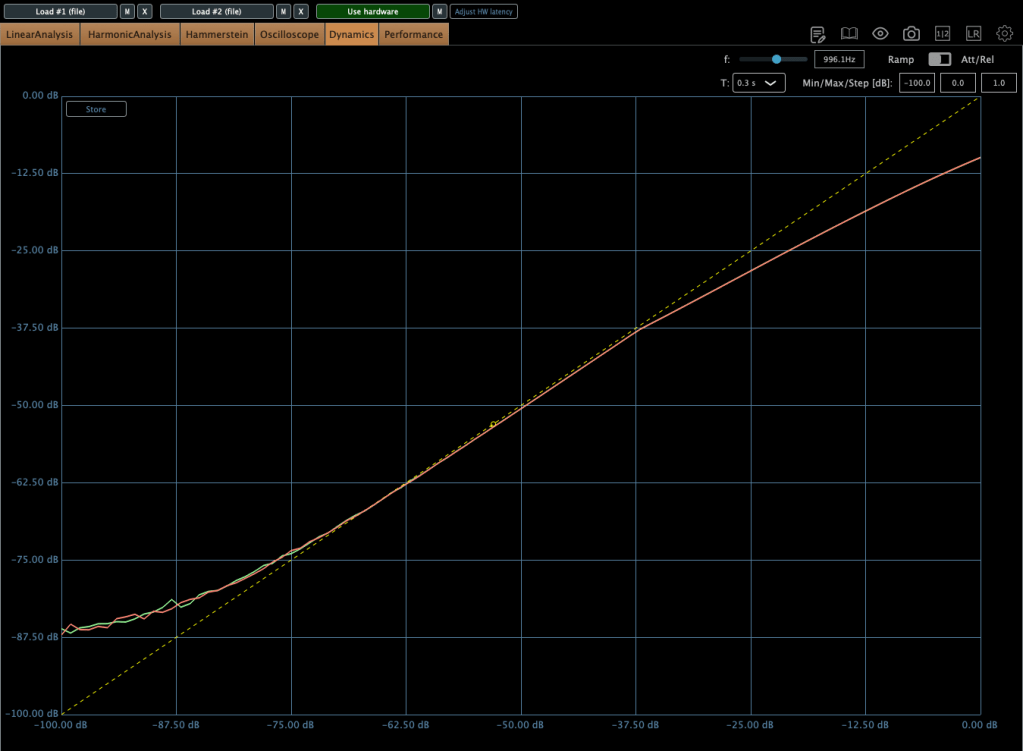
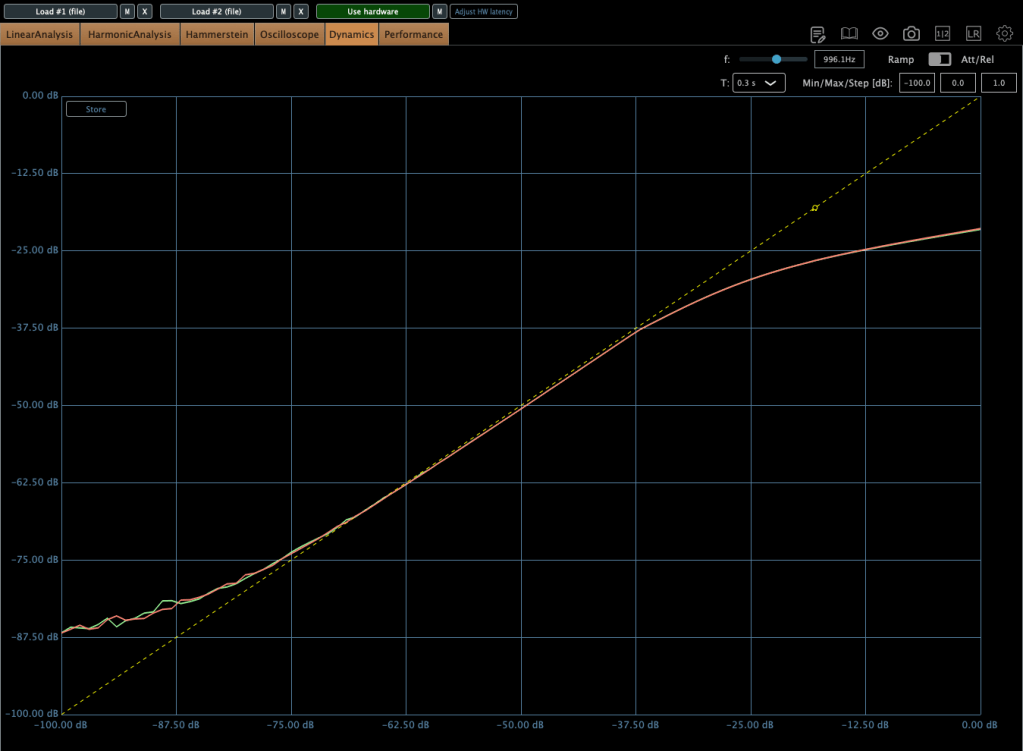
Regarding the compression curves, the unit provides a smooth transition in both modes; however, the Limiter mode utilizes a hard knee, whereas the Compressor mode employs a soft knee.

Compressor mode
Limiter mode

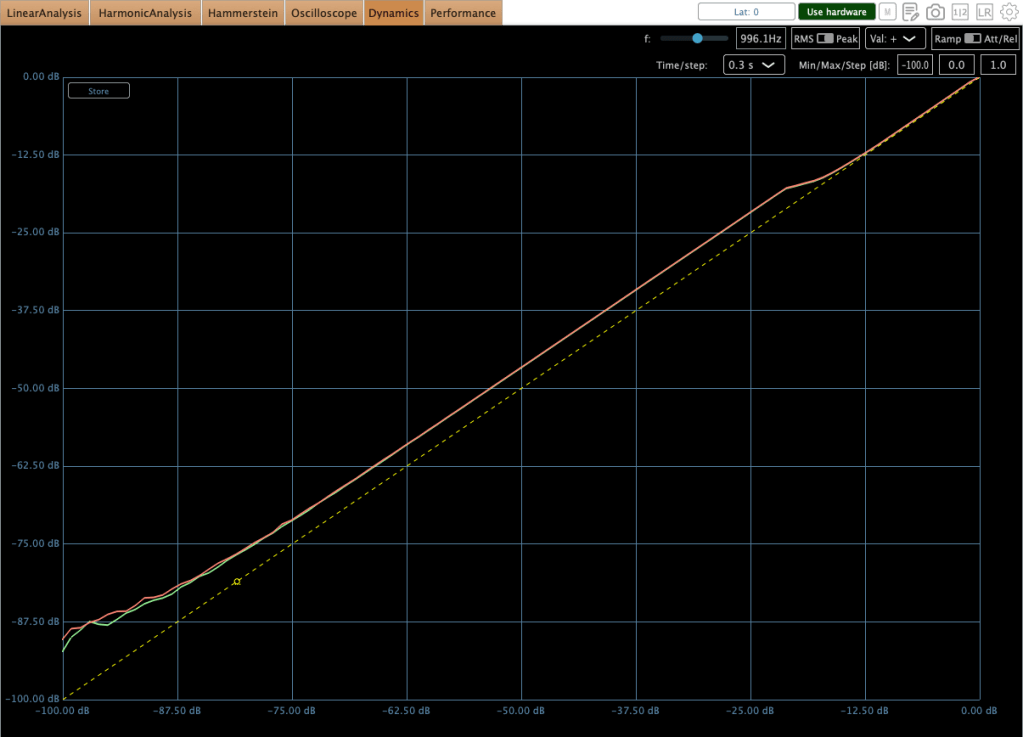
The images above illustrate the behavior of the unit in HIP mode

GR 2-3 dB
GR 1-2 dB

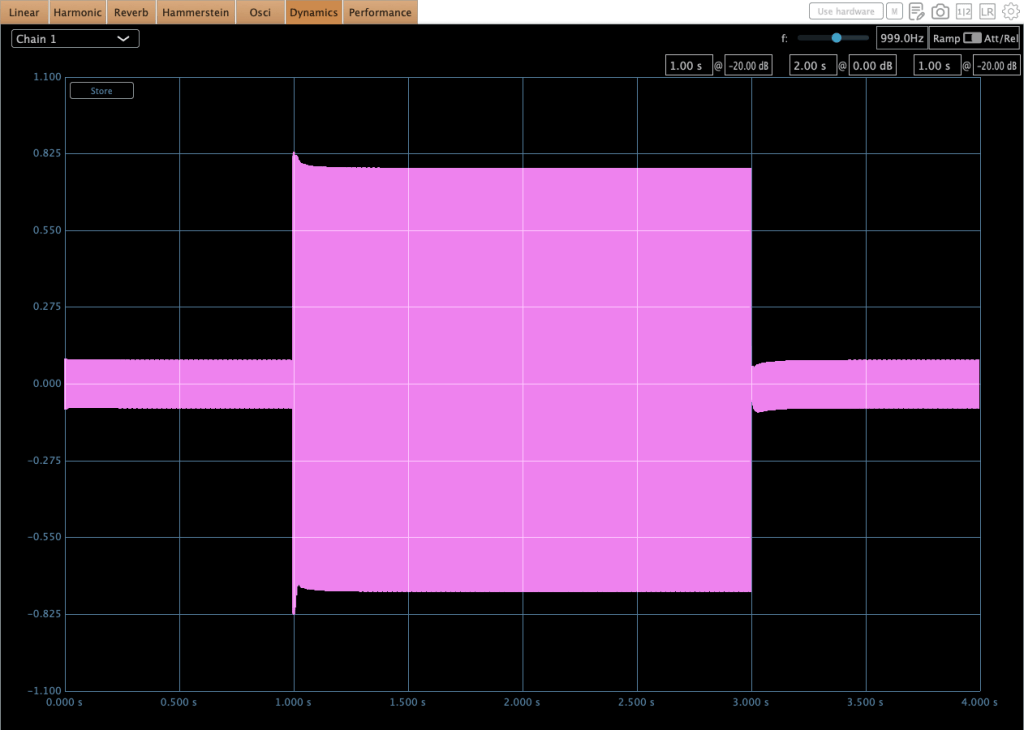
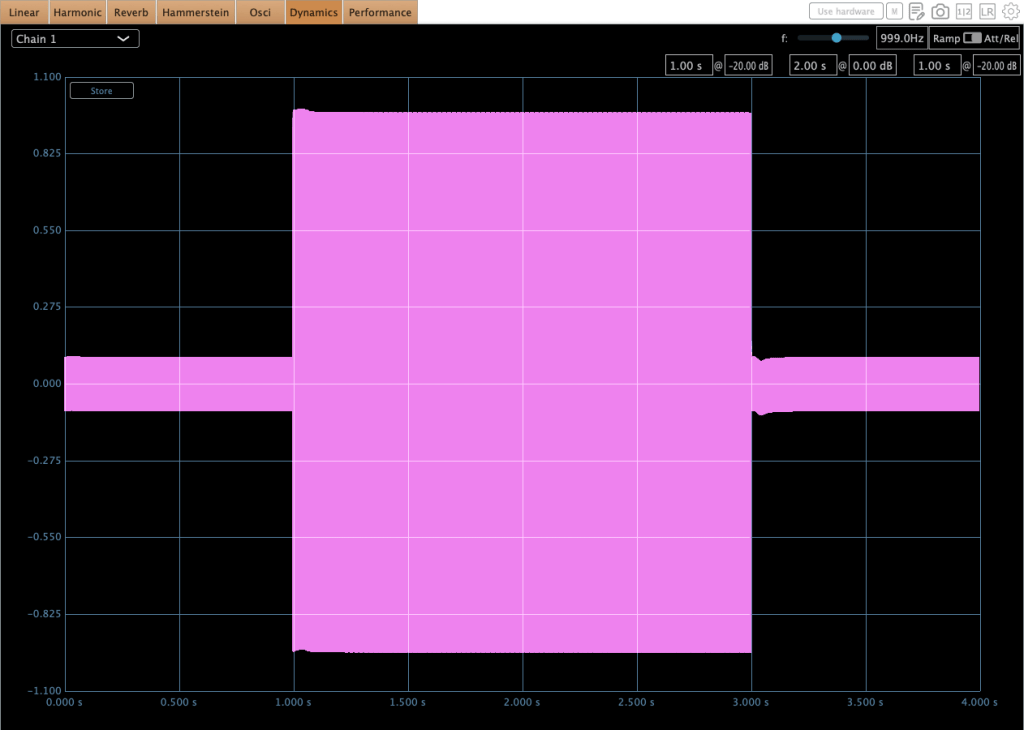
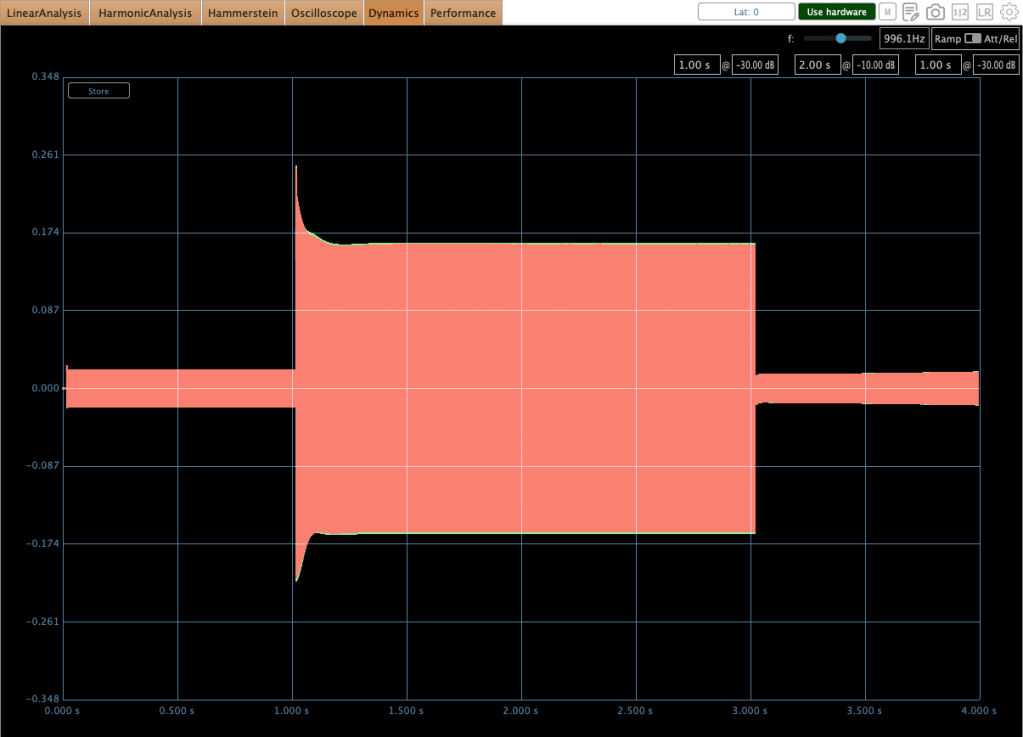
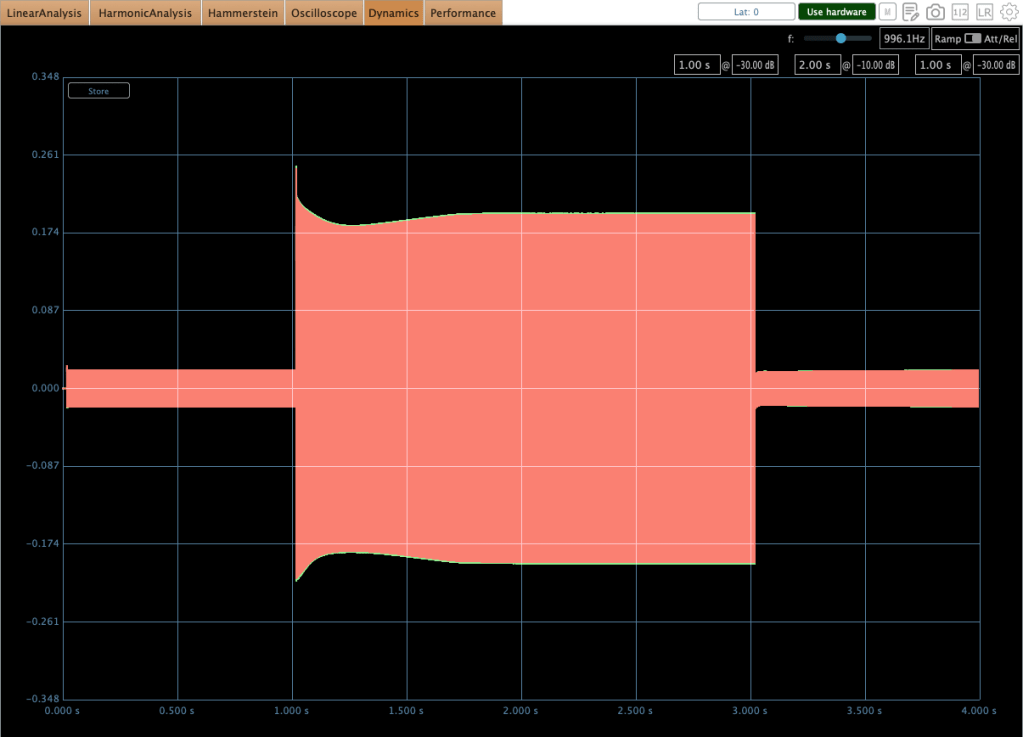
Furthermore, some peculiar behaviors occur during operation. Engineers typically target 0–2 dB of gain reduction on a mastering or mix bus compressor to achieve effective ‘glue.’ However, in this range, audible ‘pumping’ occurs. You can observe this specific behavior in the second photo above.

I encountered numerous discussions regarding this issue while researching the compressor prior to purchase. Although I anticipated the behavior, the audible effect was more critical than I had expected upon testing it myself.

Ultimately, I realized that the 0–2 dB gain reduction range is not ideal for this unit. Interestingly, pushing the gain reduction to 2–3 dB yields much better results, where the behavior stabilizes significantly in both compressor and limiter modes. This performance difference is illustrated in the first photo above.

It has a great sonic taste! It adds rich saturation and harmonic distortion across all frequency ranges, which fills out the empty spaces within the stereo field—a quality that is clearly audible.

However, because the character is so flavorful, I believe that applying a stereo imaging processor will help ‘release’ the sound that has become dense from the harmonic distortion, resulting in a more open and balanced result for mixing or mastering. To this end, I am looking forward to acquiring either an SPL Vitalizer MK3 or a Big Studio.

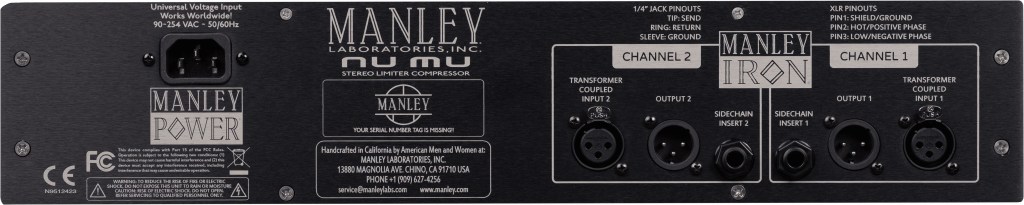
The unit features a 100 Hz high-pass filter with a 6dB per octave slope for internal signal detection, while also providing sidechain send/return inserts for external processing.

When the sidechain send/return inserts are connected, the internal detection circuit is bypassed, and the unit derives its detection exclusively from the external sidechain signal.

Therefore, a simple EQ connection is recommended for this function. To facilitate this, I am currently seeking a cheap used 1U rackmount EQ (like the Behringer FBQ1502HD) to utilize specifically with this sidechain insert.


Final Thought

It’s really great gear! I think it can be used in three ways:

  1. As a saturator: Running signals through the Manley Nu Mu without any gain reduction.
  2. For characteristic grooves: Using the sidechain function to create unique grooves with rhythmic signals.
  3. As a bus compressor: Using it for mixing or mastering.

I’ll be writing a follow-up post once I acquire an EQ or stereo imaging hardware for my setup. Thanks for reading! See you in the next post.

Lewitt Space Replicator Year End Sale (~50% off, until 4 Jan)

Hi! This is Jooyoung Kim, a mixing engineer and music producer. Today, I’ll introduce a room/headphone simulator, Space Replicator made by Lewitt.

I received the NFR code for this product from Plugin Boutique for this review, and if you purchase the plugin using the links included in this article, I’ll earn a small commission that helps me keep going…!

Let’s start!

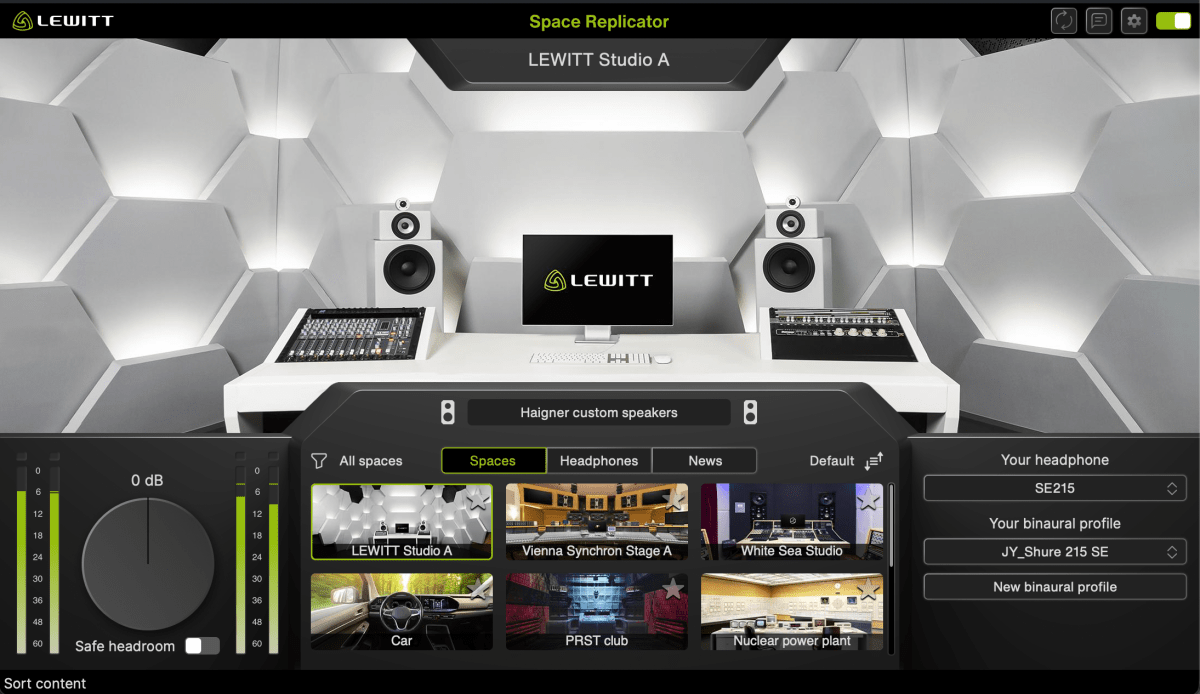
Space Replicator is a plugin that uses HRTF (Head-Related Transfer Function) modeling to allow you to experience sound with a sense of spatial depth, making it sound like real acoustic space when listening through headphones or earphones.

While there are indeed several plugins offering similar virtual monitoring functions, and some competitors boast larger headphone/earphone catalogs, Space Replicator’s distinct advantage lies in its specialized focus on HRTF and the process of creating personalized binaural profiles.

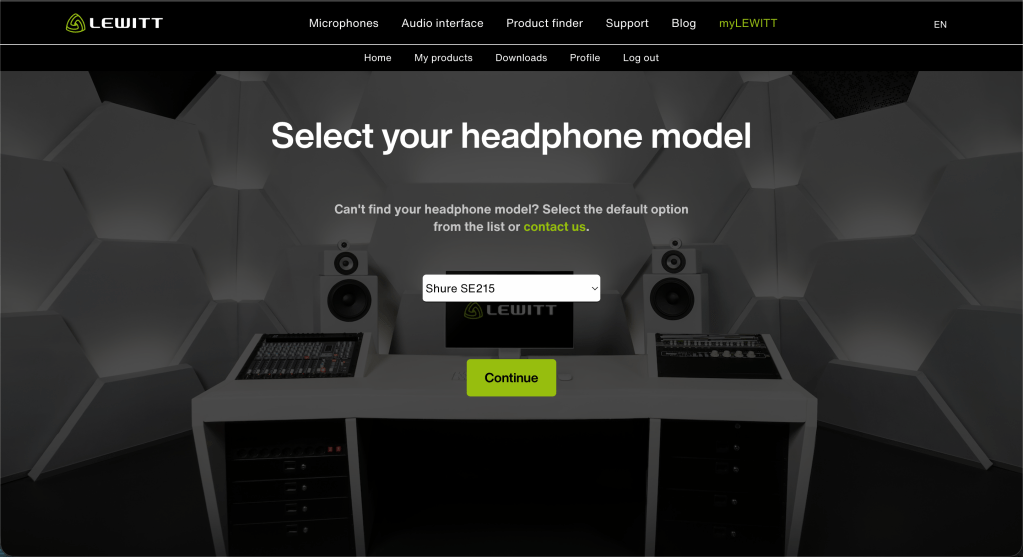
If you select a headphone or earphone model that you own and that is supported by LEWITT, you can generate a personalized binaural profile through a few simple steps. Although the results may not be perfectly precise, the effect was noticeably effective when I tested it.

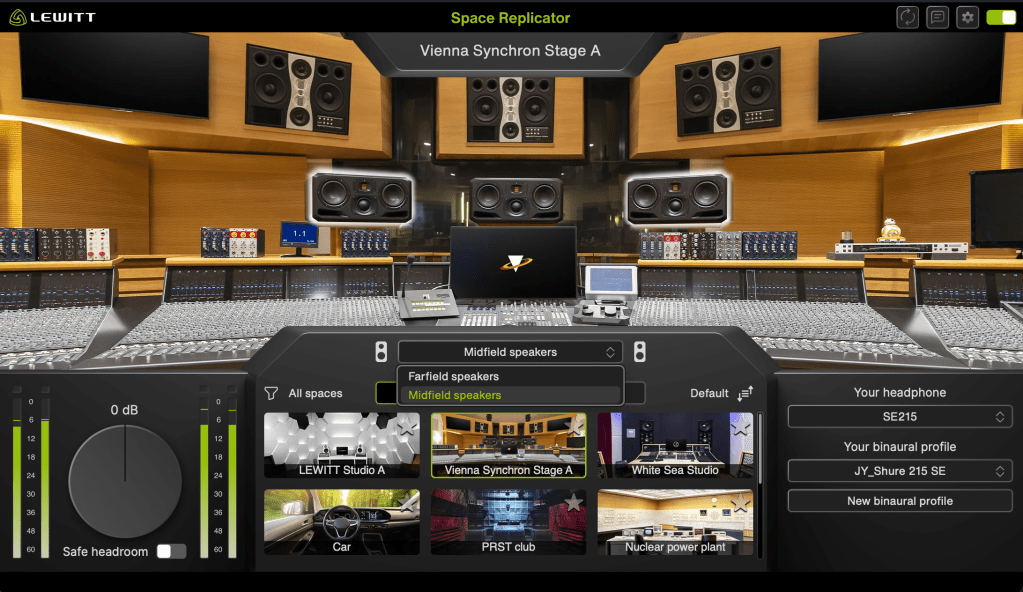
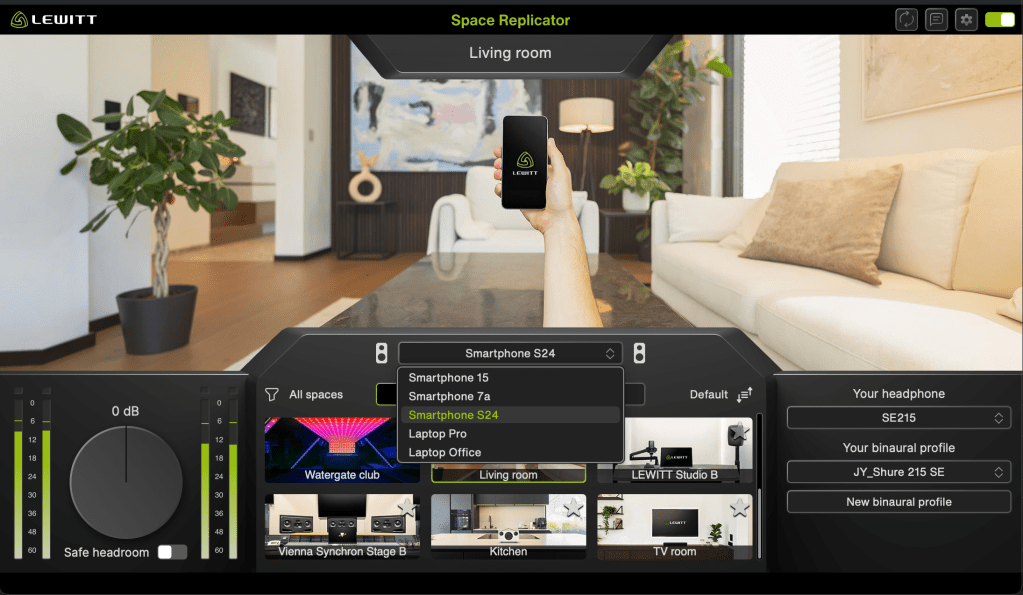
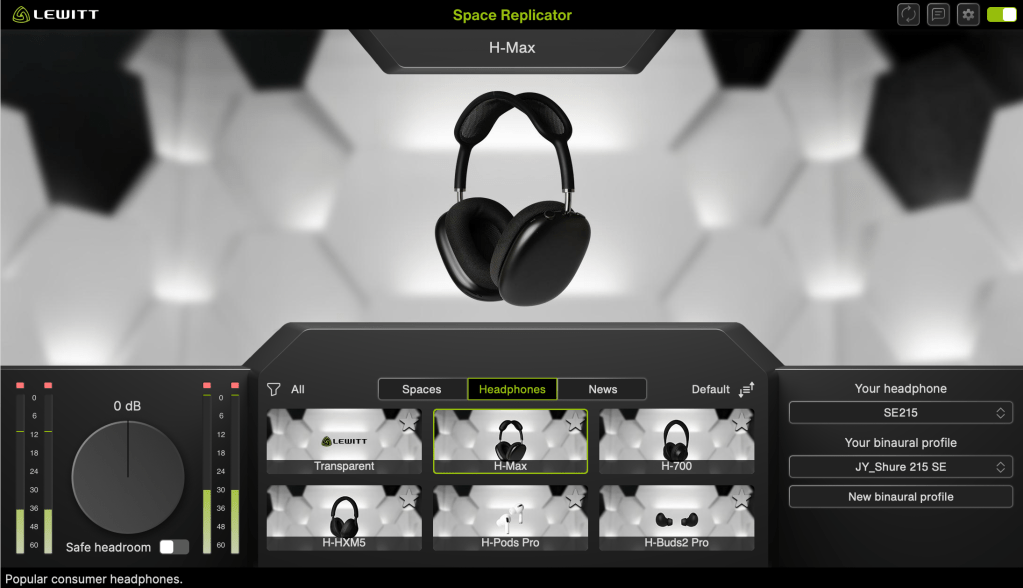
Furthermore, the plugin features 12 different virtual spaces, each offering various listening perspectives or speaker options, and it also provides 6 different headphone simulations.

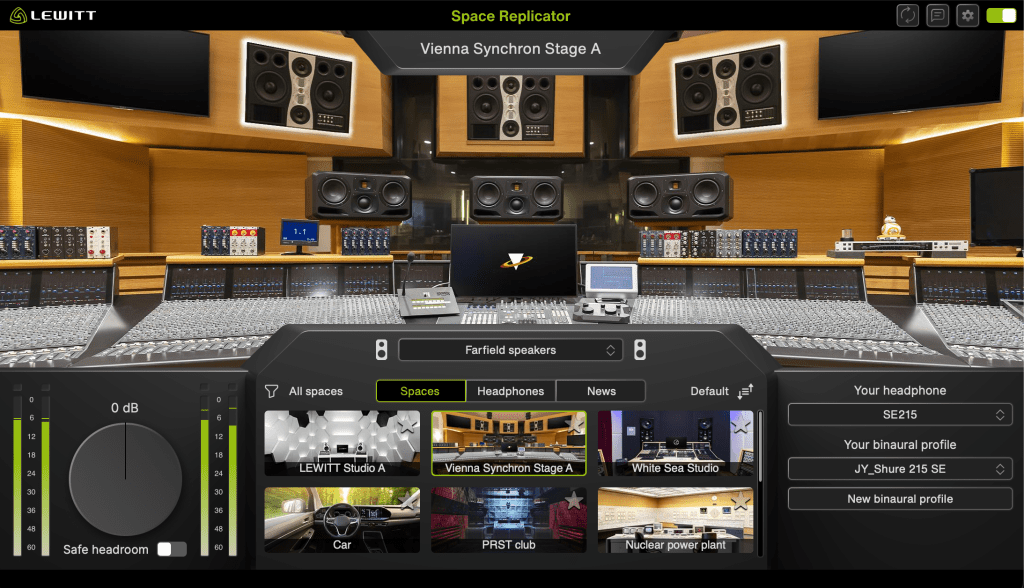
My favorite virtual space is the Vienna Synchron Stage A, which accurately provides the acoustics of far-field speakers. Since small studio producers and engineers usually can’t access such a setup—and neither can I—this particular feature offers me a tremendous amount of practical things.

It is currently 50% off until January 4, 2026. Therefore, if you work in a space with acoustic limitations, I highly recommend this plugin.

That’s all for today. See you in the next post!
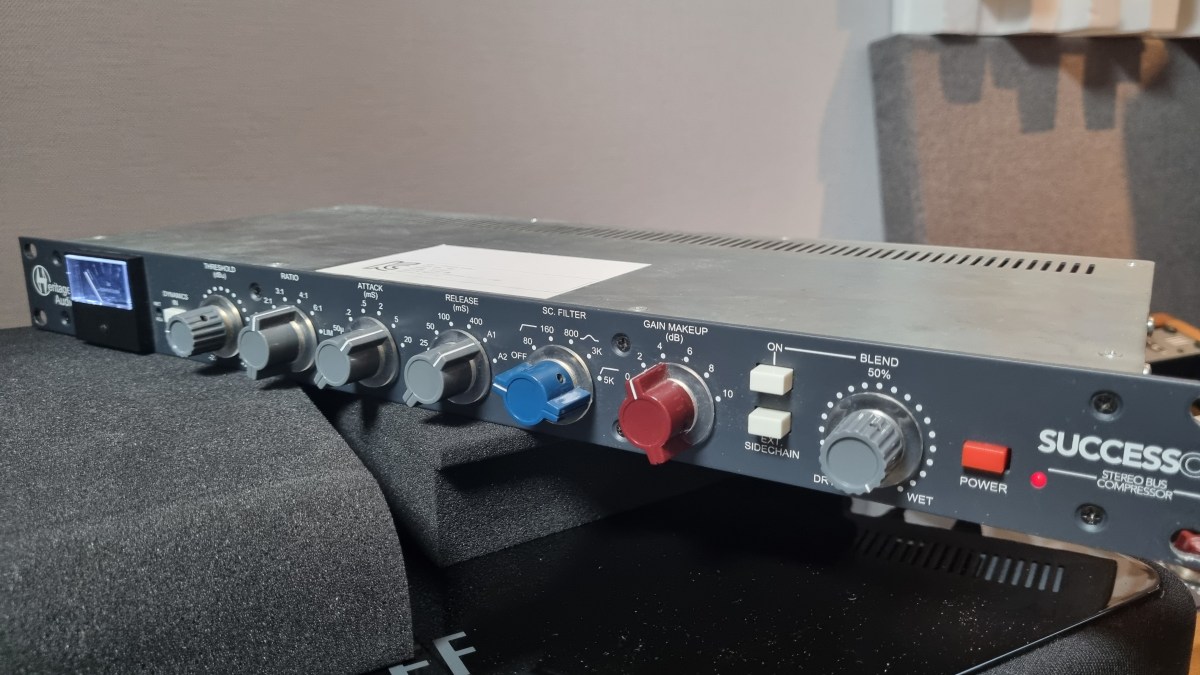
Heritage Audio Successor Hardware & Plugin Review

Hello, there! I’m Jooyoung Kim, a mixing engineer and music producer.

About half a year ago, I bought a Heritage Audio Successor that had some intermittent noise issues. I kept telling myself I’d write a review after getting it fixed… and, well, here I am finally getting around to it now, haha.

I didn’t originally have any burning desire to get this unit, like, “I have to own this thing!” It was just a good deal, even factoring in the repair costs, so my hand moved faster than my brain, lol.

I was initially eyeing the Behringer 369, but since this is also a diode bridge compressor, I figured why not. Plus, it’s a mastering compressor pushed by Heritage Audio, so I thought the channel balance would be decent enough, and it wouldn’t be a total gamble. So, I went for it.

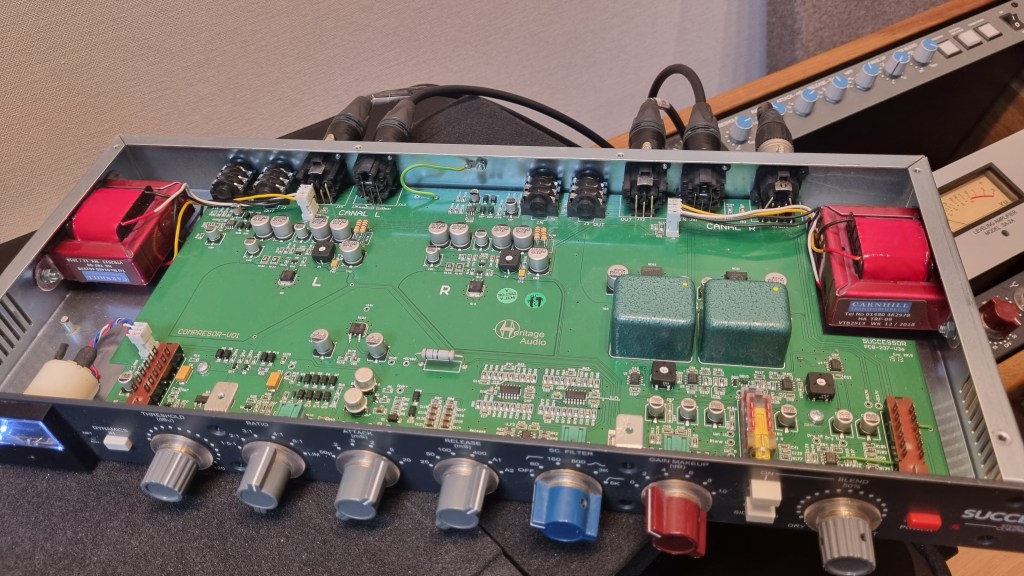
As expected, there was noise coming from the left channel, so I just dove in and opened it up without much thought. Usually, noise or low output points to a capacitor issue—something simple, right? Or so I thought…!

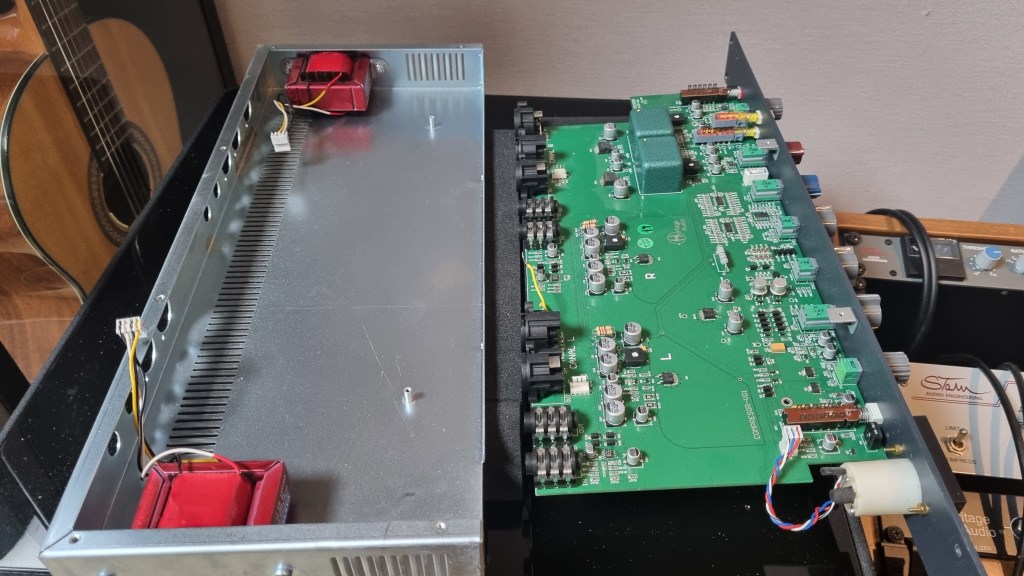
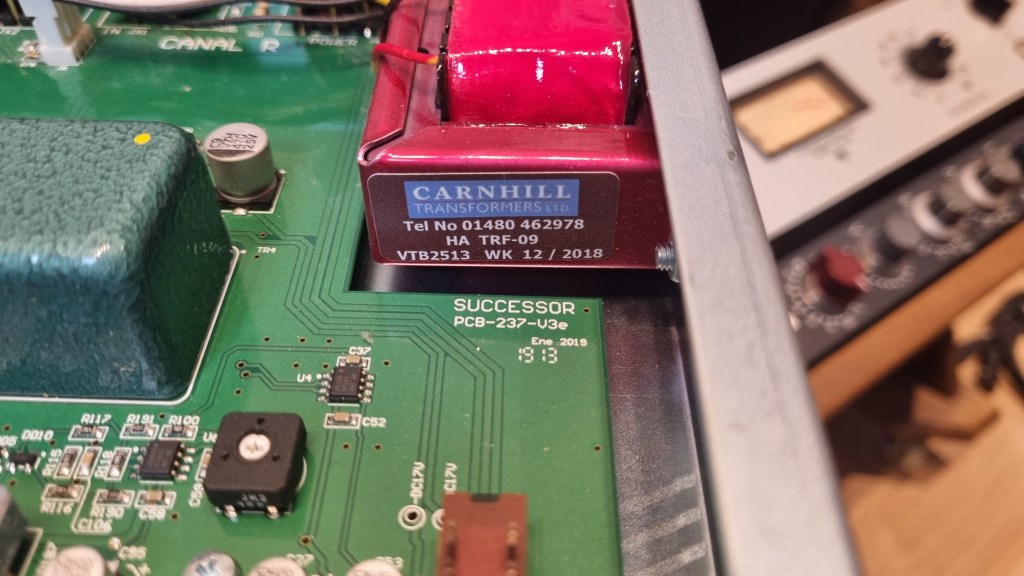
No matter how much I looked, it didn’t seem like a soldering issue or a blown capacitor. So, I detached the circuit board and swapped the left and right transformers, but the left channel was still the problem.

Testing every tiny component by buying replacements was, frankly, not humanly reasonable. So, I handed it over to the folks at MS Tech for repairs, explaining the tests I’d done and admitting I couldn’t pinpoint the issue.

A few months later, I went to pick it up. When I asked the technician, he said he wasn’t entirely sure, but it seemed like the variable resistor in the left channel was the culprit. On the outside, the components looked fine, but something inside was faulty, haha.

Yeah, I probably underestimated the repair when I bought it. But, thankfully, it’s all fixed now, so no harm done.

And here’s something cool:

Even though I bought it secondhand, I reached out to Heritage Audio’s Support Center to ask if they could provide the plugin, and they happily gave it to me! The plugin is actually pretty solid, and I find myself using it quite a bit.

Hardware Measurements

The channel balance is pretty tight, though, being analog, it’s not completely perfect. You might wonder if the repair changed anything, but even before the noise issue, the balance was about the same.

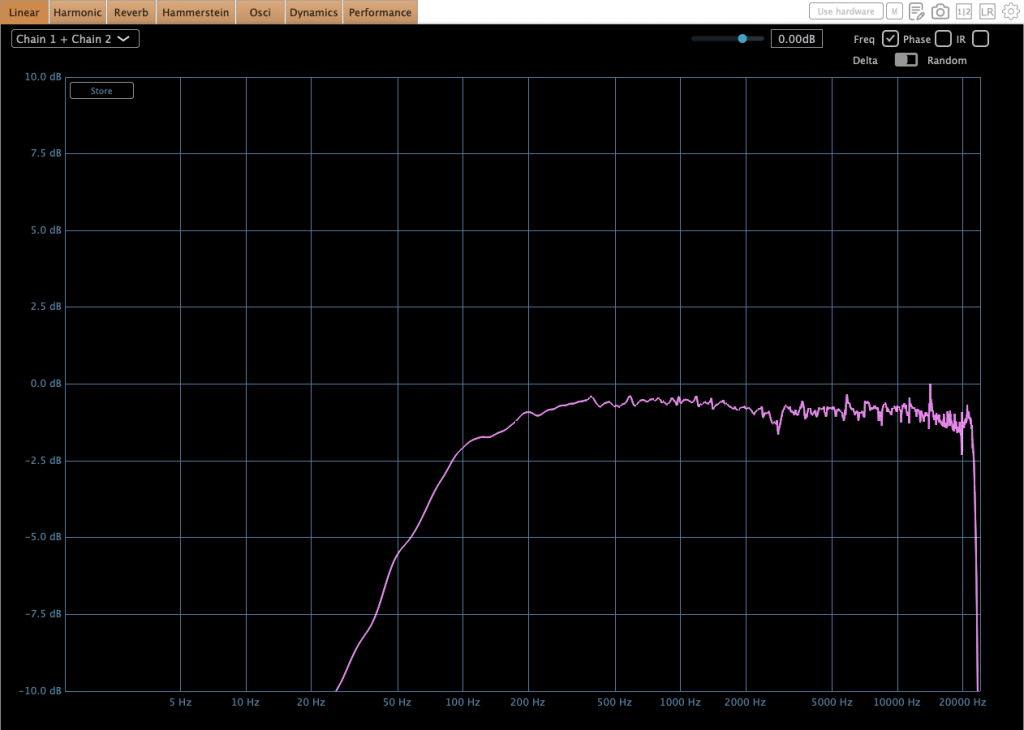
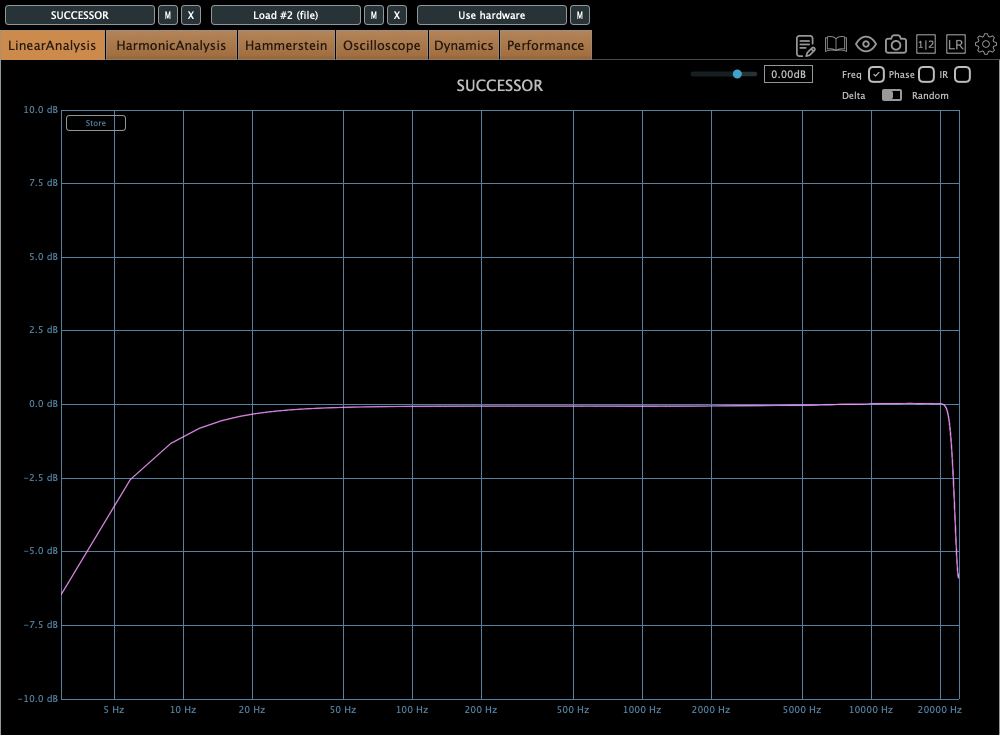
The extreme high frequencies are slightly boosted, and, like many hardware units, it looks like there’s a high cut around 20kHz. The low frequencies are boosted as well.

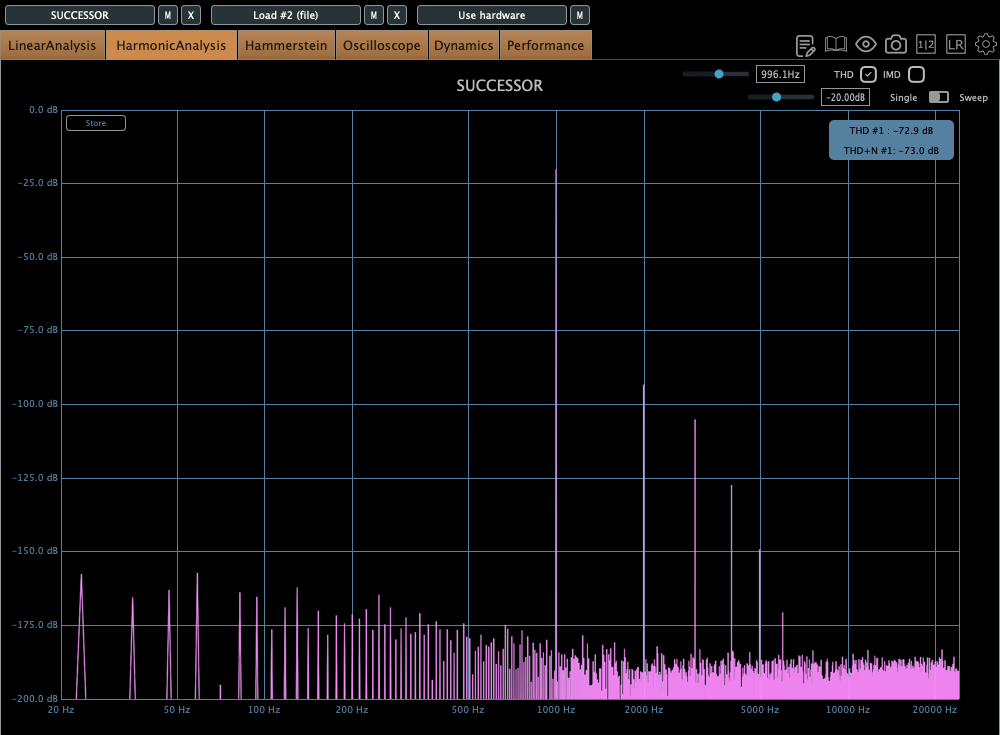
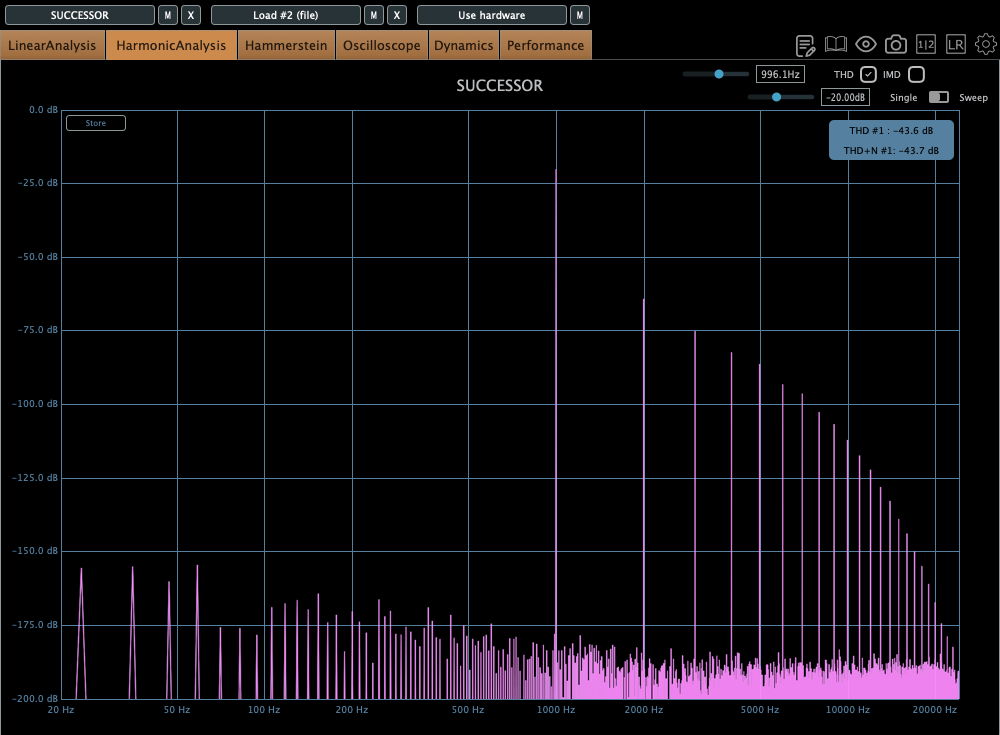
The THD looks clean, but it definitely has some character.

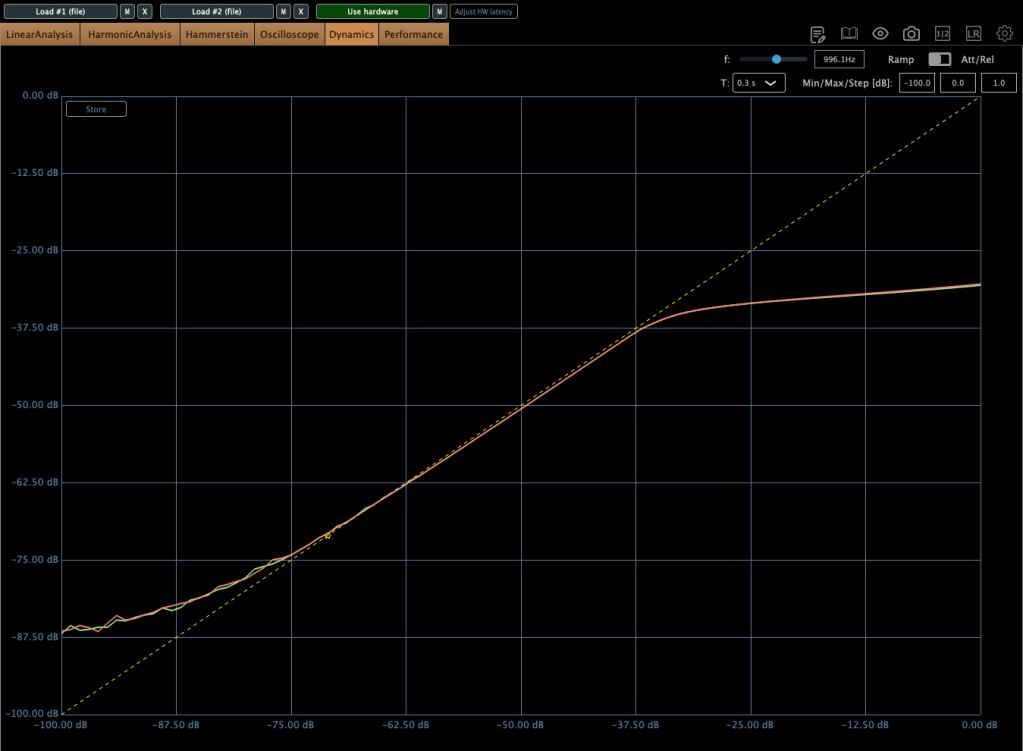
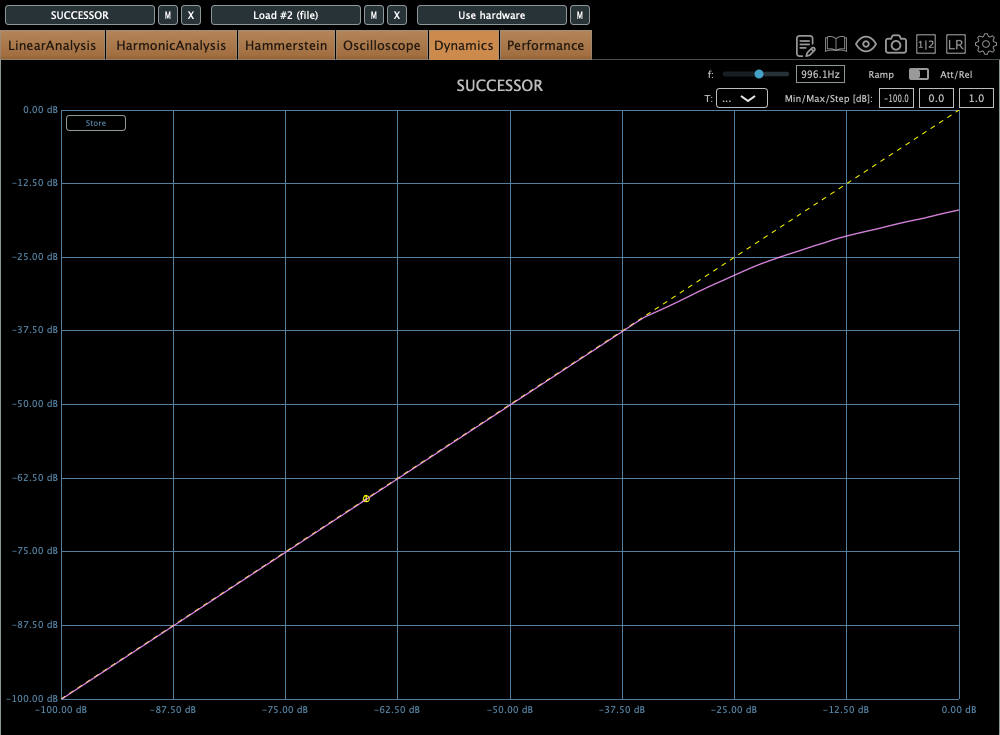
The compression curve shows a gentle knee.

Even when limiting, it’s not a completely hard knee.

This unit has a max input of +22 dBu. Since pro audio typically works at +24 dBu, it’s a bit shy of that, but my interface operates at +20 dBu, so it’s plenty for my mixes or mix bus.

The max output is +26 dBu at 600 ohms, so as long as you manage the input carefully, it should work well for mastering too.

Plugin Measurements

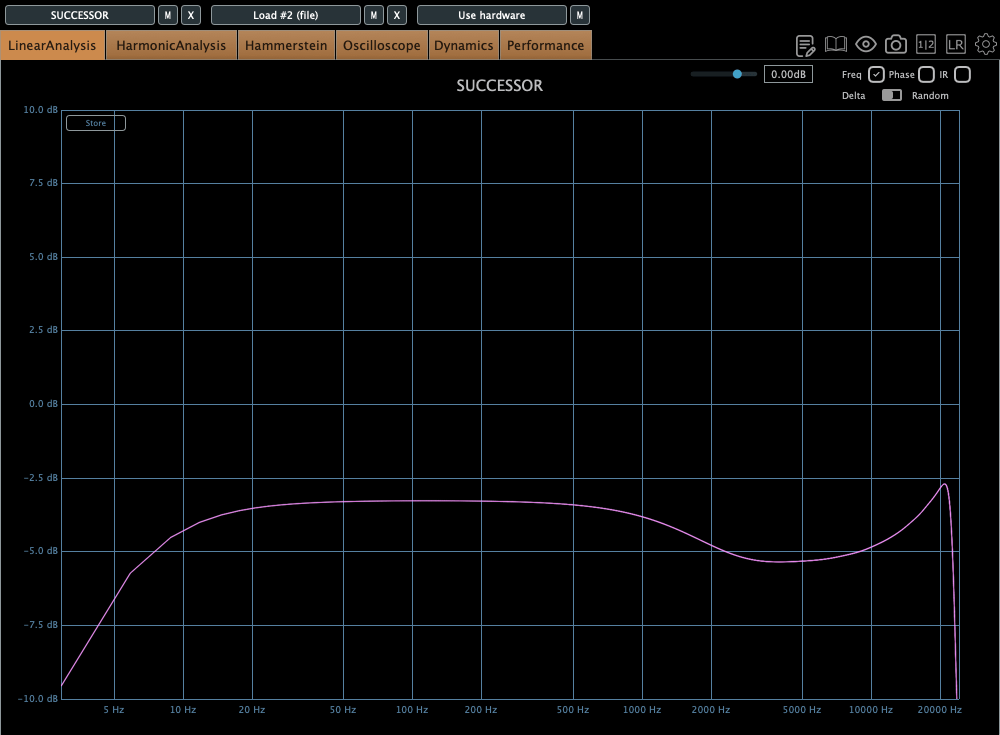
The plugin has a unique feature called “Nuke.” It pushes the input by 20 dB for some intense saturation.

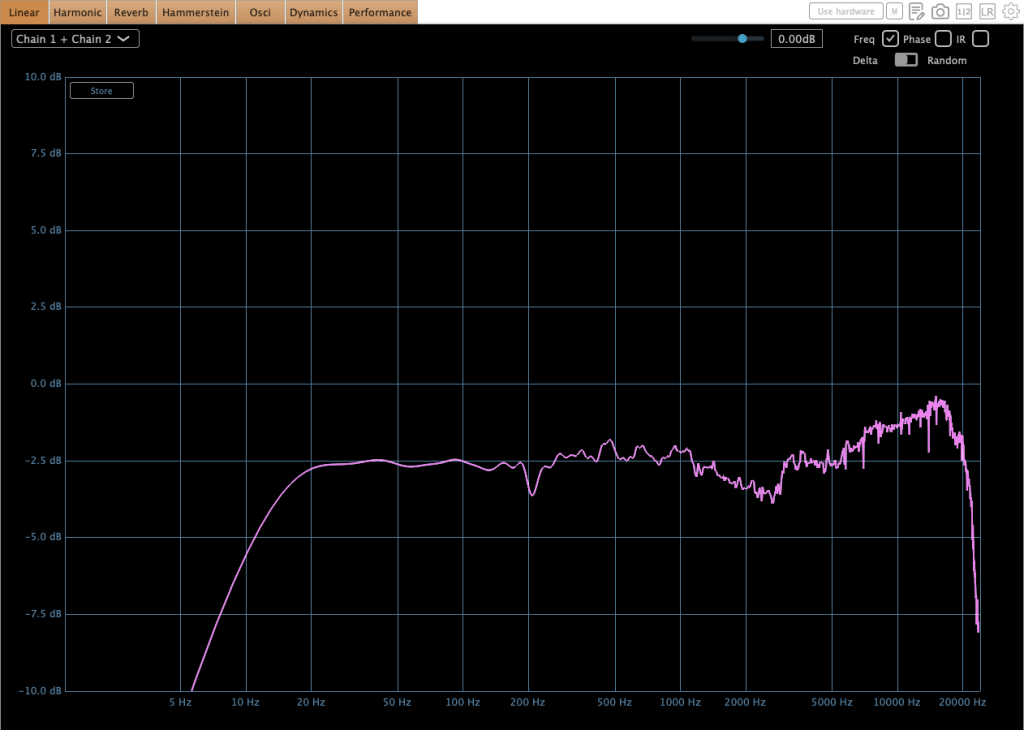
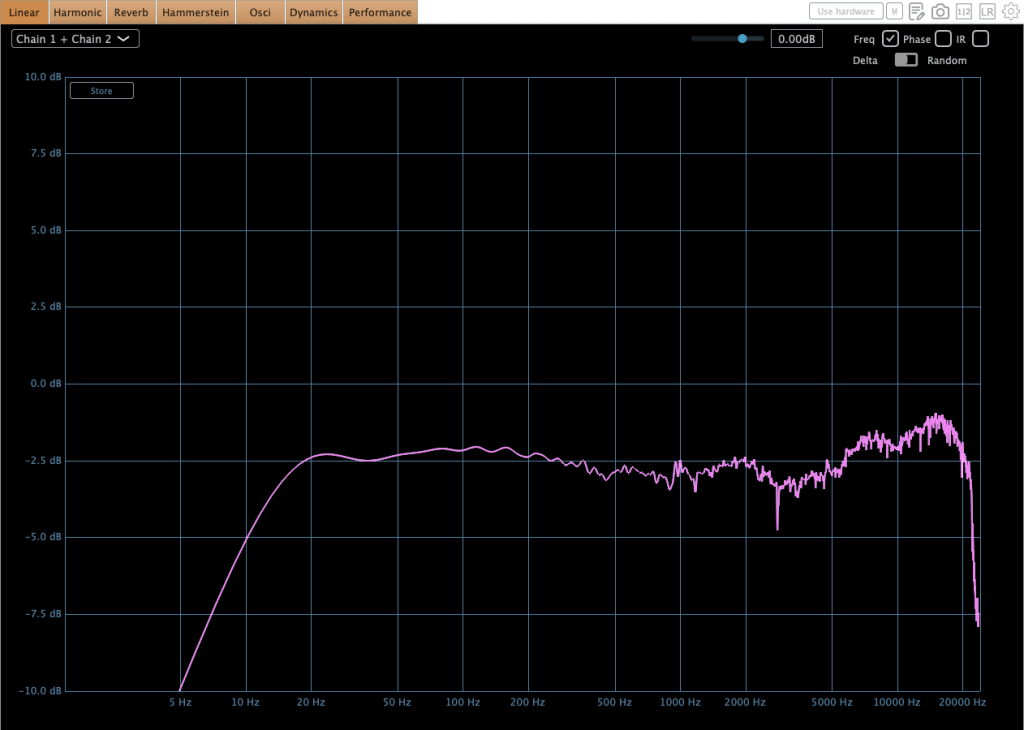
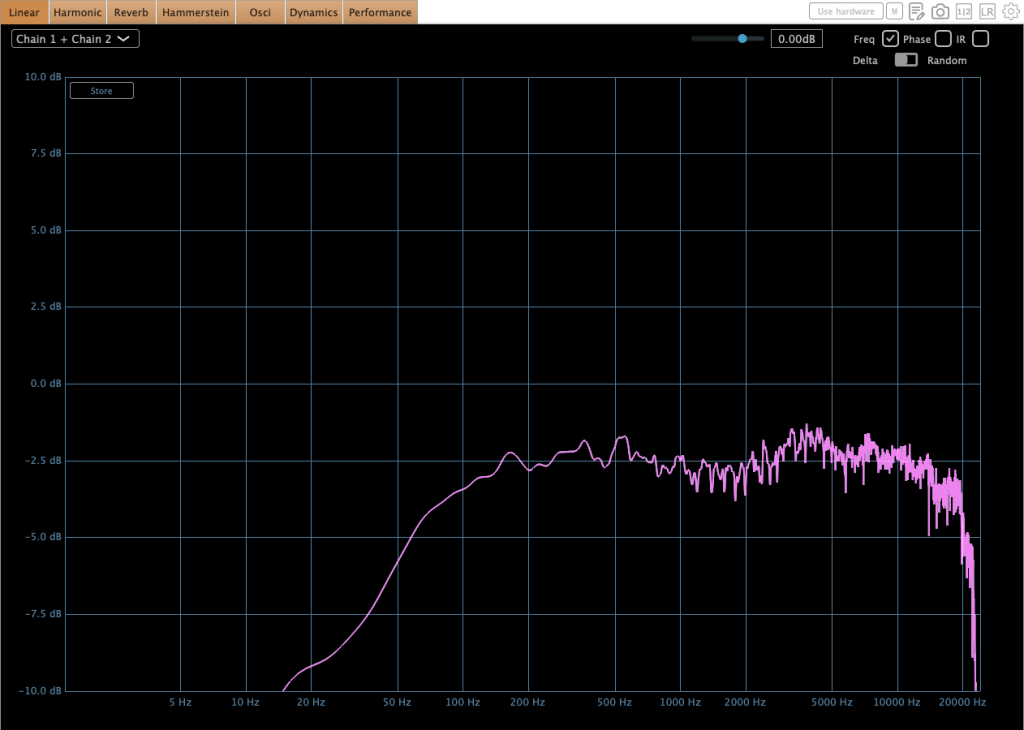
The top figure shows the default Frequency Response, and the bottom figure shows it with the Nuke function enabled.

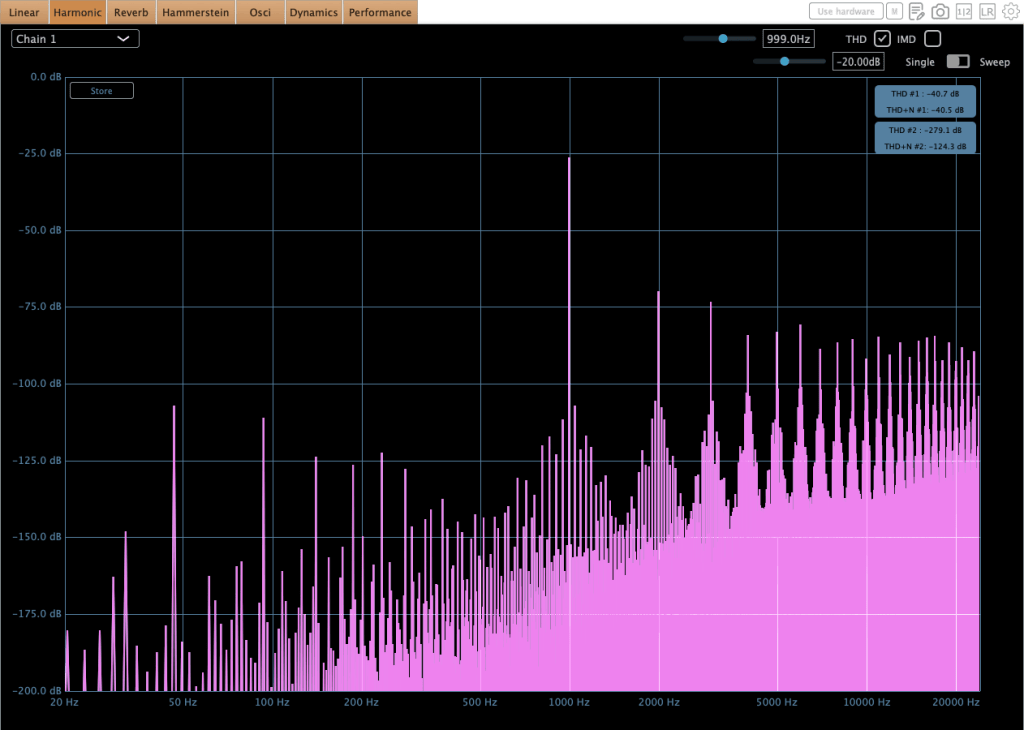
Similarly, the top figure is the default Harmonic Distortion, and the bottom figure is with Nuke activated.

The compression curve feels less like a natural, smooth knee and more like it has a slight two-step bend somewhere.

Personal Impressions

Describing sound in words is probably the hardest thing. Everyone hears and expresses things differently, so… ugh, it’s tough.

Still, here’s what I think:

Hardware
  1. Compared to the Stam 4000 mk2, the high frequencies feel more alive, which gives it a certain quality that feels worth its price.
  2. The center feels a bit prominent (maybe because of the transformers?).
  3. The knobs feel great to turn—probably because they used high-quality variable resistors—and the Threshold and Gain have a subtle stepped feel.
  4. For its full price, it feels just about right.
Plugin
  1. The Frequency Response shows better high-end response than the hardware, but that sparkly, satisfying vibe just isn’t there in the plugin.
  2. The center feels quite prominent. In other words, you might need to tweak it with a stereo imager or something.
  3. It’s got a lot of character. So, when using it on a bus, you really need to pay attention to how it affects the balance.

Looking back, it sounds like I was pretty harsh on the plugin, but it’s actually good! Diode bridge compressor plugins aren’t exactly common (think UAD Neve 33609C or Arturia Diode 609), so it’s a solid new option to consider.

The hardware? Yeah, it’s great! I wish the highs sparkled just a bit more, but it’s plenty good as is.

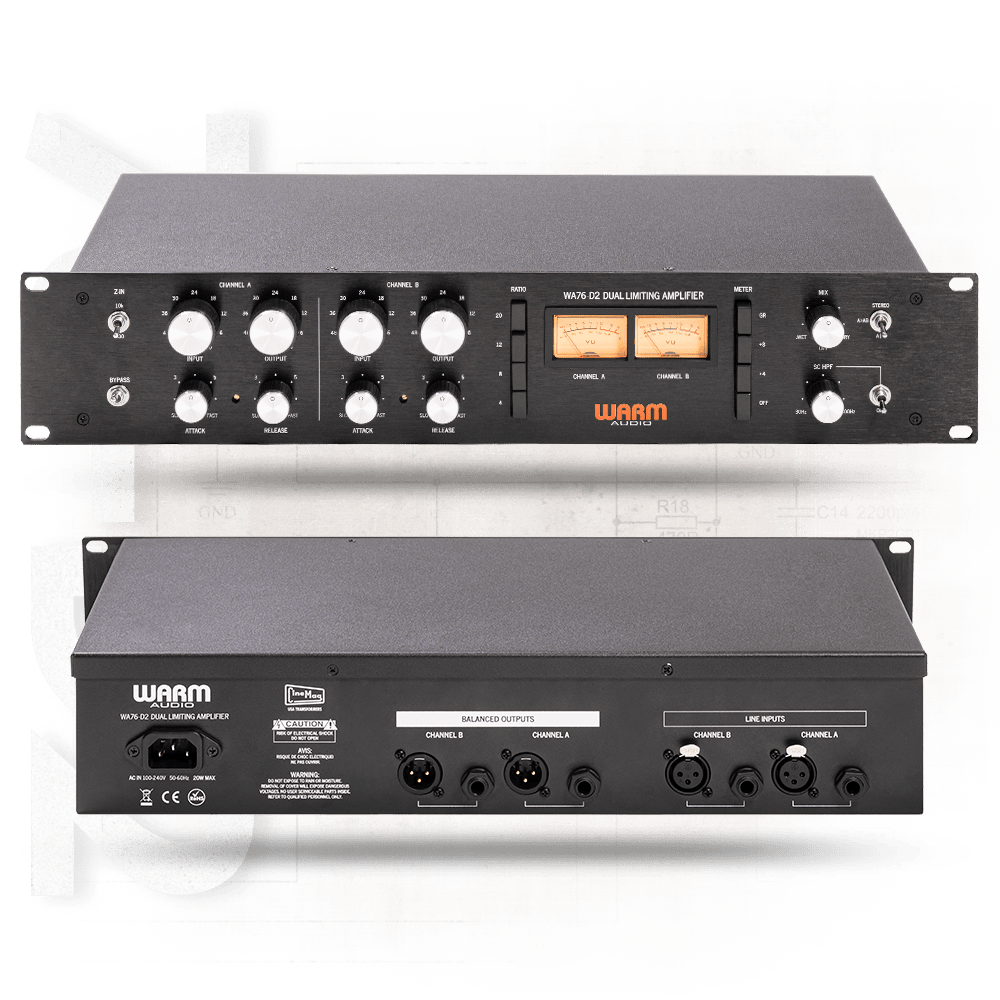
Next up, I’m eyeing the Warm Audio WA76-D2 for a FET compressor. The audio samples sound amazing, but, as always, the biggest hurdle is money… sigh. If a broken one pops up on the secondhand market, I’m jumping on it.

I sometimes wonder if my reviews lean too technical or analytical, but hey, there’s gotta be at least one person out there reviewing stuff like this, right? Haha.

That’s it for today! See you in next post 🙂

Scaler EQ and Scaler 2 on Sale (Free Scaler 3 Update with Scaler 2 Purchase, Until 3/31)

Hey there! I’m Jooyoung Kim, an engineer and music producer.

Today, I want to talk about two standout plugins from Plugin Boutique that are currently on sale: Scaler EQ and Scaler 2. I’ve been lucky enough to receive these plugins as NFR (Not for Resale) copies from Plugin Boutique. Also, if you purchase through the links in this post, I’ll earn a small commission that really helps me keep going—so thanks in advance for the support! 😊

Let’s dive in!


Scaler EQ

Scaler EQ is one of the flagship plugins from Scaler Music, distributed by Plugin Boutique. Sure, it has all the standard EQ features you’d expect, but what sets it apart are these three unique tricks up its sleeve:

  1. Key-Based Boosting and Cutting: It can boost sounds that fit the song’s key while reducing those that don’t.
  2. Magic Shelf Bands with Mid/Side Control: Adjust frequency responses using Mid/Side processing for a wider or more focused sound.
  3. Dynamic Control: Fine-tune the loudness with built-in dynamics processing.

Let’s take a closer look at how it works.

Play your track and hit the Detect Key button—it’ll automatically figure out the key of your song. You can also manually pick a key by clicking the middle key selection button. The Global button applies that key across all EQ bands.

In Scale Lock Mode, the In Scale setting boosts notes within the key when using Harmonic Peak mode (highlighted in white on the piano roll). Turn it off, and it’ll boost whatever notes you’ve selected instead.

The Flip Harmonics option comes into play when the gain is negative in Harmonic Peak mode—it cuts notes outside the key. Disable it, and it’ll cut the in-key notes instead.

The Dynamics section feels pretty standard for a dynamic EQ, but the real stars here are Harmonic Peak, Harmonic Peak +/-, and Magic Low/High Shelf.

  • Harmonic Peak: Emphasizes notes within your chosen key.
  • Harmonic Peak +/-: Boosts in-key notes and cuts out-of-key ones at the same time.
  • Magic Low Shelf: Highlights the Mid over the Side for a punchier low end.
  • Magic High Shelf: Boosts the Side over the Mid for a wider, airier top end.

These features might sound simple, but when used well, they can bring out the harmonics of your key in totally unique ways, adding fresh colors to your sound.

As far as I know, Scaler EQ is the only EQ out there that adjusts sound based on musical scales like this. It’s a rare gem, and with it on sale, now’s a great time to grab it! 😊


Scaler 2

Scaler 2 is a versatile tool packed with features to help you create music. Here’s the core of what it does:

  1. Extract Chord Progressions: Pull chords from MIDI or audio files.
  2. Rearrange or Reharmonize: Tweak and transform those chords however you like.
  3. Choose Presets: Pick lines or voicings from its built-in instruments.
  4. Export as MIDI: Capture everything and drag it into your DAW.

When you download Scaler 2, you’ll get three versions:

  • Scaler2: The virtual instrument version.
  • ScalerAudio2: An effect version tailored for analyzing audio tracks.
  • ScalerControl2: An AU MIDI plugin, perfect for controlling external instruments in DAWs like Logic Pro.

You could take chords from a song you love and use them to build something entirely new. Or start fresh with over 400 genre-based chord sets and 200+ artist chord sets included as presets.

Personally, I think it’s a lifesaver when you’ve got a rough chord progression but can’t figure out the bass, melody, or guitar lines. It’s also great for nailing piano or guitar voicings if those feel tricky. Plus, it’s a handy tool for studying music—perfect for copying and analyzing songs you admire.

It might look overwhelming with all its features, but spend about 30 minutes messing around, and it’s not hard to get the hang of it. On the left, under SRC, you’ll see three options: MIDI, AUDIO, and OPEN AUDIO FILE. MIDI and AUDIO let you record in real-time to extract chords, while OPEN AUDIO FILE pulls them straight from an audio file. Once you do that, chords pop up alongside the detected scale, like in the image above.

Chords in blue are within the detected scale, while those in gray are outside it. You can drag these chords down to create a pattern.

Once you’ve got a pattern, head to the top right where you’ll find Perform, Keys-Lock, Voice Grouping, and Humanize. These let you tweak the MIDI patterns—think arpeggios, strumming, or natural timing variations.

The catch? You can only preview sounds using Scaler 2’s built-in virtual instruments. That said, there’s a decent variety, so you can get a rough idea of how it’ll sit in your track.

When you’re happy with everything, hit the MIDI CAPTURE button at the bottom right, play it back, and record the pattern as MIDI.

Then, drag the DRAG button into your DAW’s MIDI channel, and boom—your pattern’s ready to go!

Beyond that, Scaler 2 can suggest modulation paths (like where and how to change keys) and even hook up external instruments via MIDI routing—though that’s a bit trickier to set up.

Having used it myself, I can say it’s a super useful tool in tons of ways. It’s especially awesome for beginners learning to compose—it takes the intimidation factor out of chord progressions and music theory.


Bundle Deal and Final Thoughts

The sale runs until March 31st, and bundling Scaler 2 and Scaler EQ together gets you an even better deal. Plus, if you buy Scaler 2 now, you’ll get the upcoming Scaler 3 update (slated for this month) for free. It’s a steal at this price, so I’d highly recommend jumping on it while it lasts.

That’s it for now—hope to see you in the next post! 😊