Hey everyone! I’m Jooyoung Kim, an engineer and music producer.
[link: https://www.pluginboutique.com/manufacturers/445/?a_aid=622ea9ee9160c]
TC Electronic has just joined forces with Plugin Boutique, kicking things off with an awesome intro sale! When I think of TC, reverb and delay instantly come to mind—they’re legends in the world of spatial effects. Now that they’re under Music Tribe (the parent company of Behringer), those iconic algorithms are finally hitting the plugin scene.
Funny thing, though—back in 2018 when stuff like the TC8210 first dropped, there wasn’t a standalone Native version. It was tied to hardware controllers, so unless you snagged one cheap early on, it kinda faded into the background. Music Tribe’s website wasn’t exactly user-friendly either…
But this time, I got some NFR (Not for Resale) codes from Plugin Boutique to test these out, and wow—they’ve nailed the spatial plugin game. So, I figured I’d share my thoughts with you all!
Oh, and if you buy through the links in this post, I’ll earn a small commission that really..really helps me keep going—thanks a ton for the support! 😊
Let’s dive in!
TC Electronic Sale Plugins Overview
(Note: PolyTune and LM2 are exclusive to the TC Studio Elite Collection bundle.)
Here’s a quick rundown of what’s on offer, sorted by type:
| Role | Plugin Name | Description |
|---|---|---|
| Reverb | VSS4 HD | An upgraded System 6000 reverb algorithm—smooth and modern. |
| VSS3 | The classic System 6000 reverb algorithm—timeless and pristine. | |
| NONLIN2 | A creative reverb for warped, nonlinear sounds—perfect for sound design. | |
| DVR 250 | A vintage digital reverb inspired by the EMT 250. | |
| TC 8210 | A clean, classic digital reverb with a nod to vintage vibes. | |
| Delay | TC 2290 | A recreation of the TC 2290 digital delay with tons of modulation options. |
| Modulation | TC 1210 | Combines stereo expander with chorus, flanger, and vibrato effects. |
| Dynamics | MD4 HD | An upgraded System 6000 multiband compressor with extra bells and whistles. |
| MD3 | The original System 6000 multiband compressor—still a beast. | |
| DYN 3000 | A clean digital compressor based on Midas Heritage consoles. | |
| MASTER X HD | A modern take on the Powercore-era 3-band compressor. | |
| BRICKWALL HD | A True-Peak limiter built on System 6000 tech—mastering-ready. | |
| EQ | PEQ 3000 | A 2×12-band parametric EQ inspired by Midas live consoles. |
| Analyzer | LM2 | A stereo loudness meter based on ITU-R BS.1770-3 standards. |
| Tuner | Polytune Native | The famous PolyTune guitar tuner, now in plugin form. |
| Pedals | Stereo Chorus Flanger | A chorus/flanger pedal with lush stereo effects. |
| Booster and Distortion | A volume boost and distortion pedal combo. | |
| XII Phaser | A classic phaser pedal for swirling tones. | |
| Dual Parametric EQ | A simple 2-band EQ pedal. | |
| Sustainer | A sustain pedal to keep your notes ringing. |
Phew, that’s a lot, right? Haha. Since there’s too much to cover in detail, I’ll group them by category and highlight the standouts.
(Click image to purchase plugins at plugin boutique)
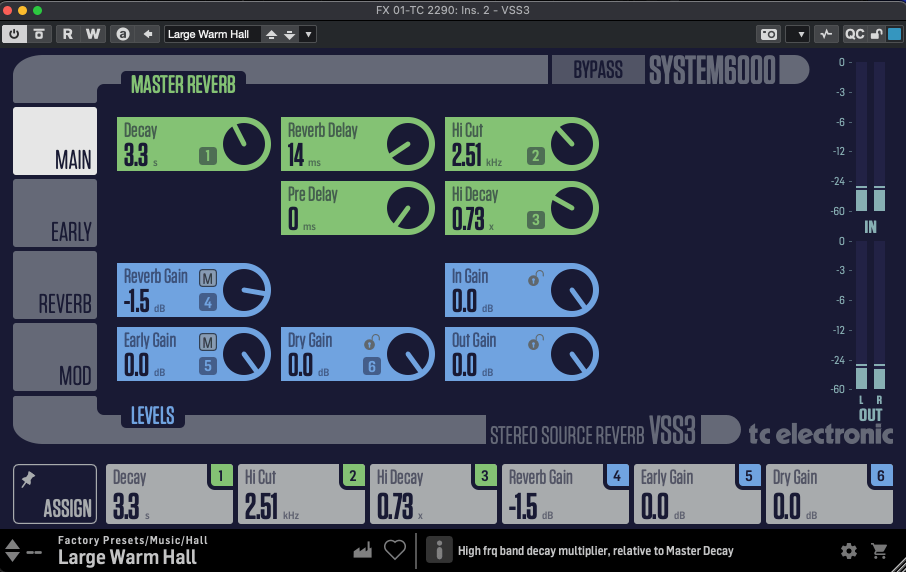
Reverb
VSS4 HD, VSS3, NONLIN2

[Bundle link: https://www.pluginboutique.com/product/81-Bundles/39-Effects-Bundles/14611-SYSTEM-6000-Native-Bundle/?a_aid=622ea9ee9160c]
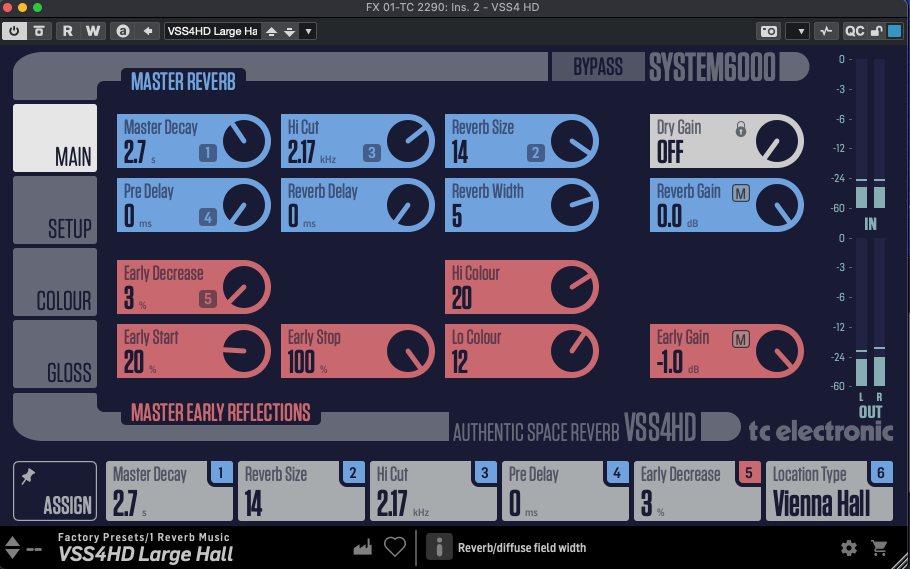
For me, TC Electronic’s reverbs are the heart of this lineup. The System 6000 plugins (VSS4 HD, VSS3, NONLIN2) have a slightly tricky UI at first—it’s not super intuitive. But once you dig into the parameters, they’re familiar to anyone who’s done some mixing. For beginners, it might feel overwhelming, but mastering these could level up your reverb game across any plugin.
These deliver that crisp, polished digital reverb sound we all expect from TC—VSS4 HD and VSS3 for lush spaces, NONLIN2 for wild, creative effects.
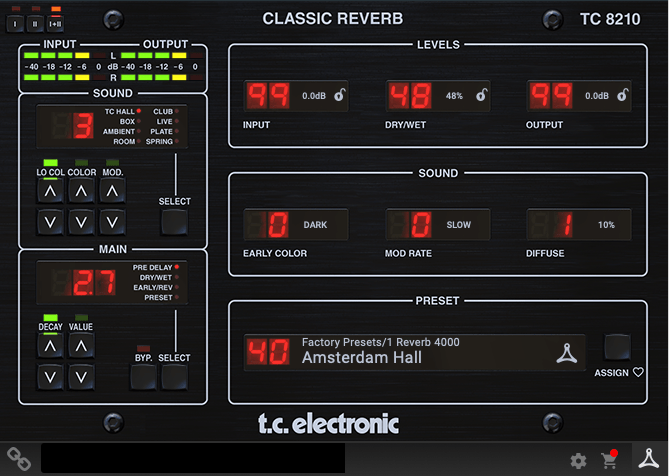
DVR 250, TC 8210

[Bundle link: https://www.pluginboutique.com/product/81-Bundles/39-Effects-Bundles/14613-Icon-Series-Legacy-Native-Bundle/?a_aid=622ea9ee9160c]
The DVR 250 nails that vintage EMT 250 vibe—think early digital reverb with a chopped-off ultra-high end due to sample rate limits. TC 8210 keeps things clean but tames the highs a bit to echo that retro feel, while still sounding unmistakably digital.
Delay & Modulation
[photo: TC 2290 or TC 1210 interface]
TC 2290, TC 1210
[link: https://www.pluginboutique.com/product/2-Effects/39-Reverb/11535-Icon-Series-Legacy-Native-Bundle]
These are just as iconic as the reverbs. The TC 2290 is a delay powerhouse—you can slap on chorus, flanger, pitch shifting, or auto-doubling, plus dynamic effects like tremolo, ducking, gating, and even auto-panning. It’s insanely versatile.
The TC 1210 blends a stereo expander with modulation—think chorus, vibrato, flanger, and more. Both shine on electric guitar or electric piano, but they’re also perfect for sparking creative ideas during songwriting.
Dynamics & EQ
MD4 HD, MD3

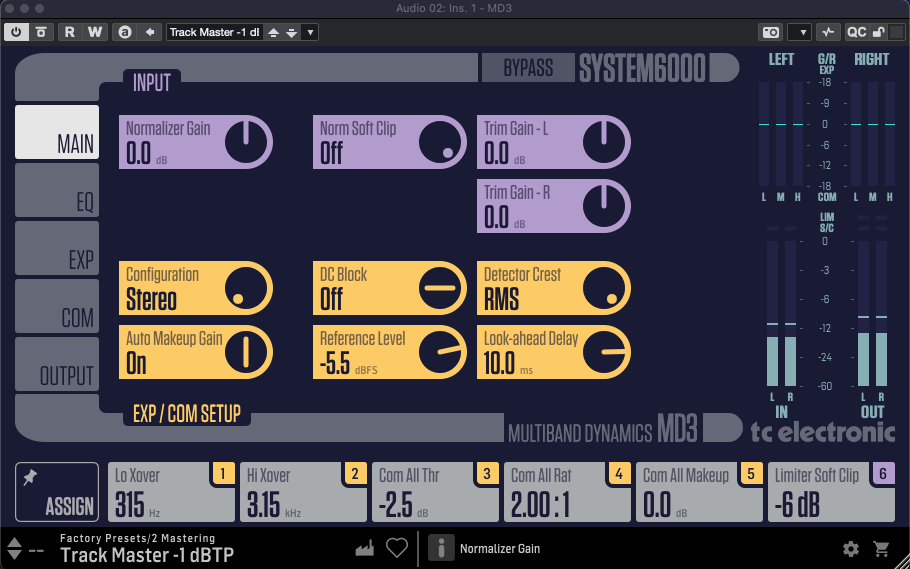
These System 6000-based multiband compressors are more than just compressors—they’re like channel strips with EQ, expanders, limiters, and soft clipping rolled in. No built-in analyzer, so they’re not the most beginner-friendly, but the controls are detailed and powerful.
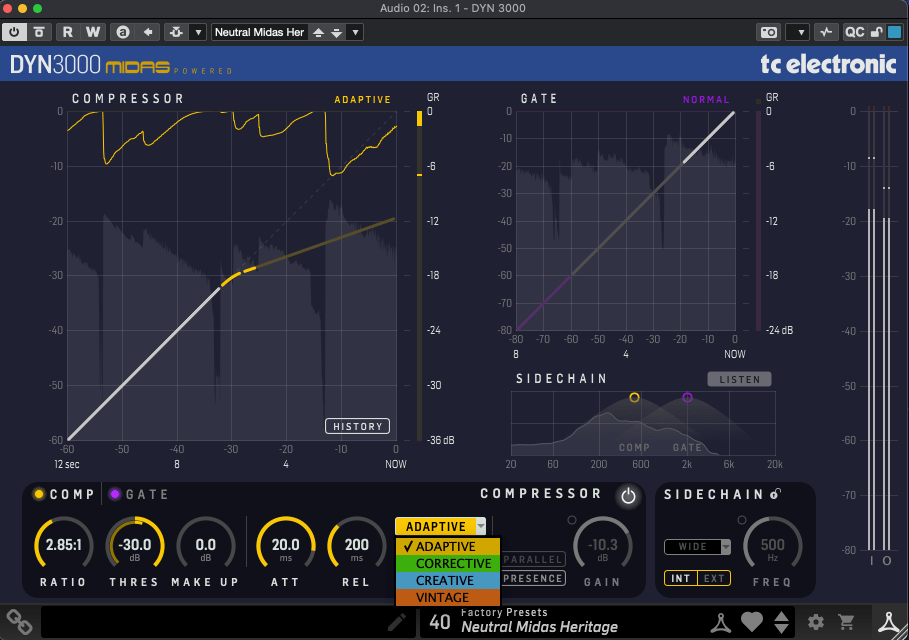
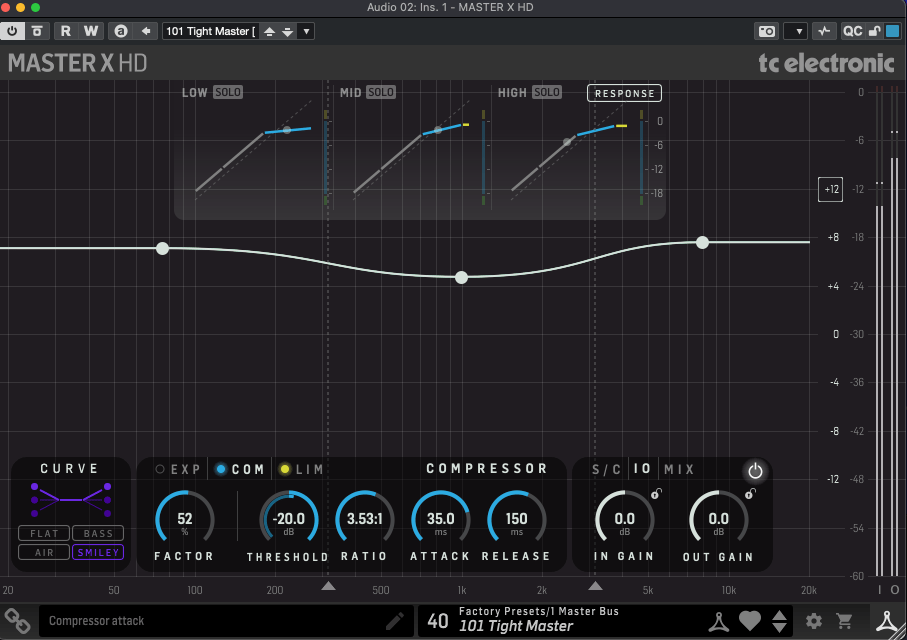
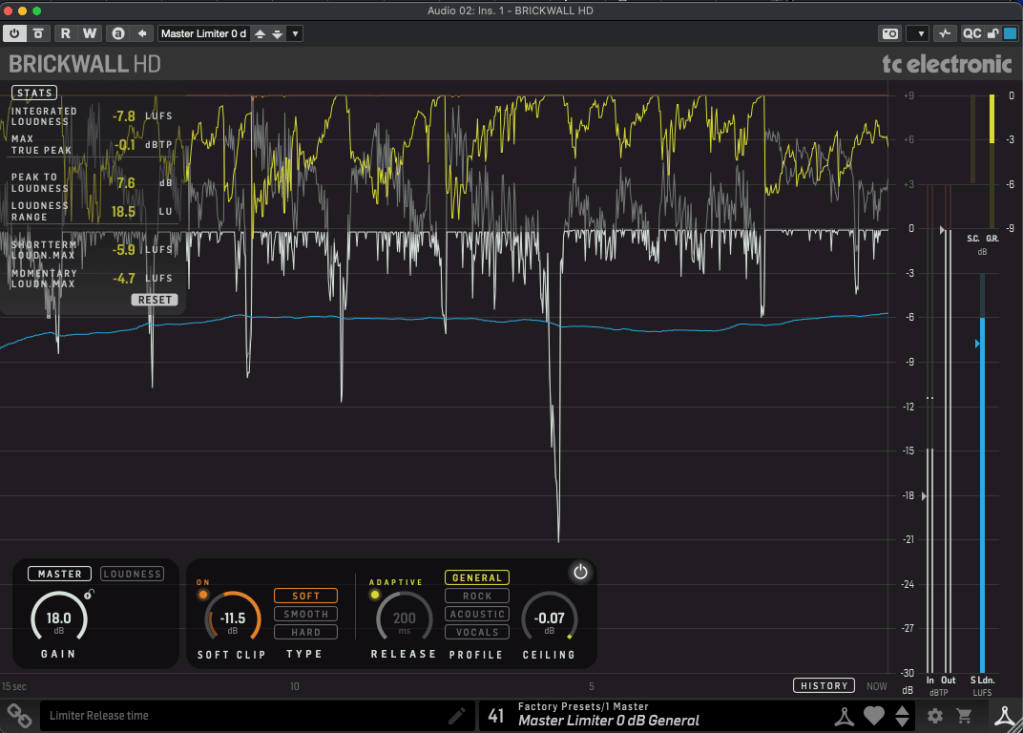
DYN 3000, Master X HD, Brickwall HD
[Bundle link: https://www.pluginboutique.com/product/81-Bundles/39-Effects-Bundles/14614-Mastering-HD-Native-Bundle/?a_aid=622ea9ee9160c]
These have friendlier UIs and feel more approachable. DYN 3000, based on Midas Heritage consoles, is a super-clean digital compressor—Adaptive mode keeps it pristine, while other settings add character. It’s got a gate, sidechain, and all the essentials.
Master X HD is a 3-band compressor with a cool twist: you can tweak the frequency curve directly. Brickwall HD, a mastering limiter, comes with a detailed analyzer (TC’s loudness expertise shines here) and soft clipping options.
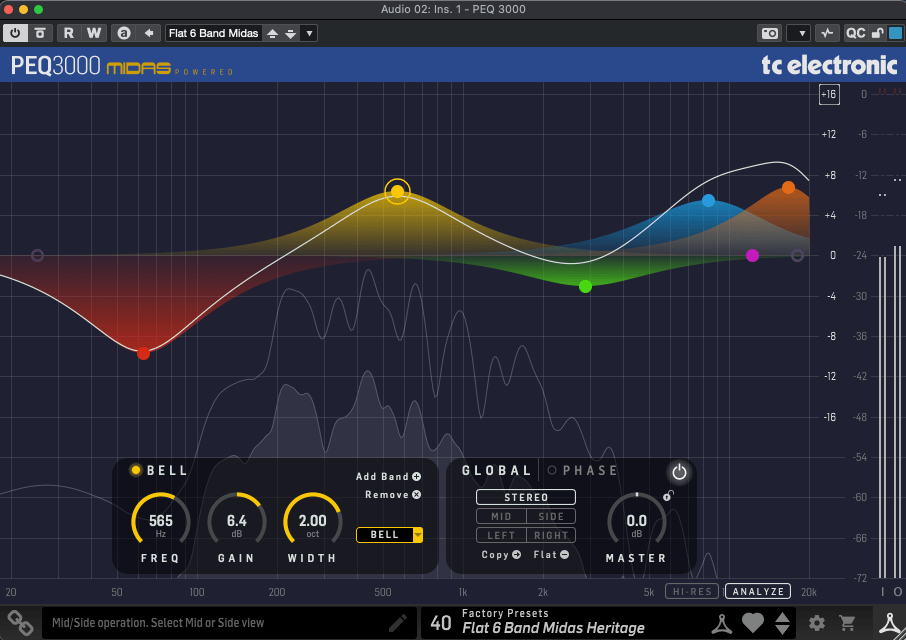
PEQ 3000
[Bundle link: https://www.pluginboutique.com/product/81-Bundles/39-Effects-Bundles/14615-Midas-Heritage-3000-Native-Bundle/?a_aid=622ea9ee9160c]
A Midas-inspired 2×12-band parametric EQ. It’s standard stuff mostly, but the ability to shift the phase up to 180 degrees is a neat trick.
Analyzer
LM2
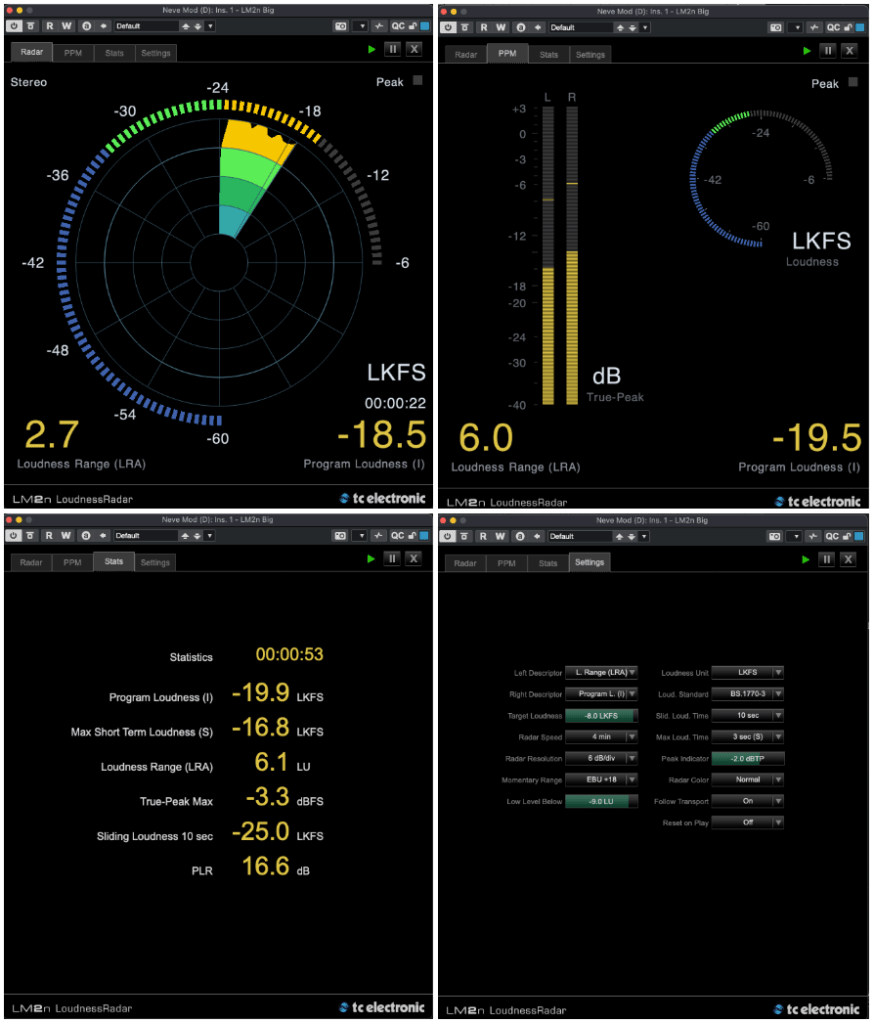
This loudness meter (based on ITU-R BS.1770-3) is the only analyzer I got to test—sorry, no scoop on the others! It measures LUFS/LKFS, True-Peak, and more with a sleek UI that lives up to TC’s metering reputation.
Tuner & Pedals
PolyTune Native
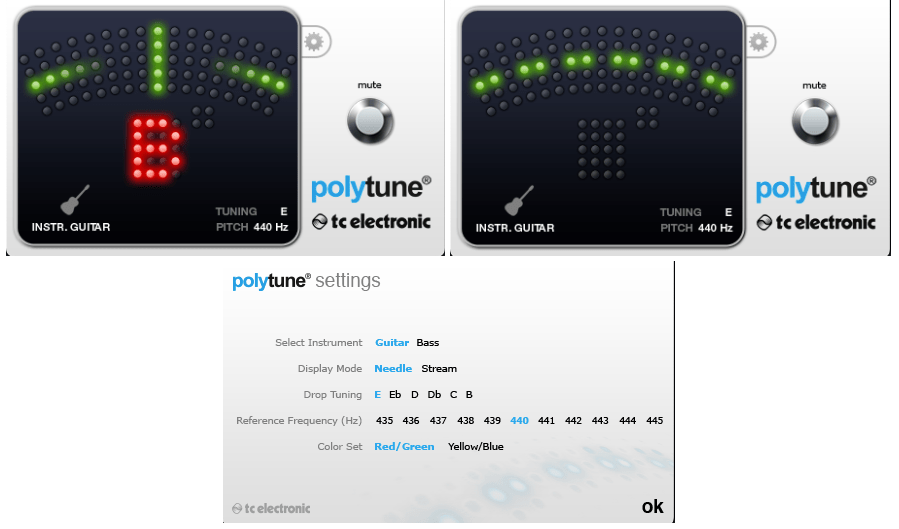
Guitarists know PolyTune—it’s a classic. I’ve got the clip-on version myself (though I dropped it once, and now the top’s cracked… oops). The plugin’s just as clean and reliable.
Stereo Chorus Flanger, Booster and Distortion, XII Phaser, Dual Parametric EQ, Sustainer

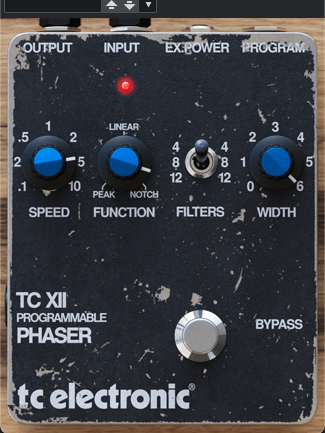
These are revamped versions of TC’s old Powercore-era Vintage Guitar Pedal bundle. Booster/Distortion comes from the discontinued VPD1 Pre-Drive pedal, and Stereo Chorus Flanger is based on the SCF pedal.

The others don’t tie directly to specific analog pedals but echo TC’s vintage series. They’ve got that retro flavor—great for electric guitar, electric piano, or synths.

These pedals scream “vintage” in the best way.
Final Thoughts
This was a long one, huh! The TC Studio Elite Collection bundle includes everything I’ve covered, but there are also smaller bundles and individual plugins up for grabs.
My favorites? The reverbs, delays, and modulation effects—TC’s spatial magic really shines there. The rest are solid too, and the pedals are a nice touch.
If any of these catch your eye, the sale runs until April 14th—perfect time to snag a deal! Catch you in the next post! 😊