Basics of Synthesizers (6) – Vector Synthesis & Wavetable Synthesis

Hey there! I’m Jooyoung Kim, a mixing engineer and music producer.

Ugh… English has been killing me lately. Seriously… 😭

I wish it would just sink into my brain step by step, but it feels like I’m cramming it in, and my head’s about to explode. Words, especially, are the worst. Haha.

Anyway, with my schedule being so tight, I’m finally getting around to writing this on the weekend.

It’s been a while, but I’m back with another post on synthesizer basics! 😊

Today, we’re diving into vector synthesis and wavetable synthesis.

Ready? Let’s get started!

(By the way, if you make a purchase through the links in this post, I may earn a small commission, which helps me keep the lights on and keep creating content!)


Vector Synthesis

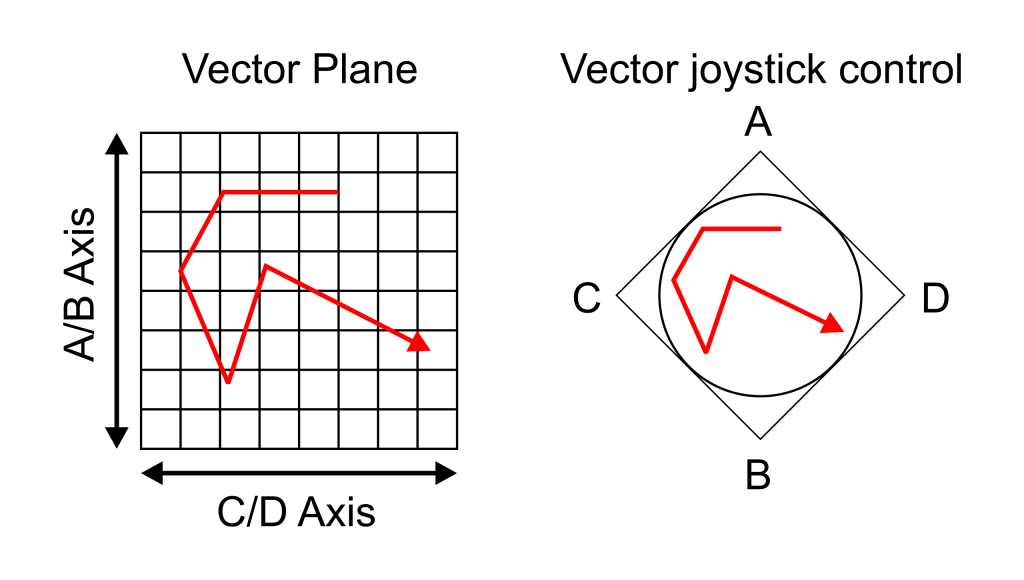
Vector synthesis was a fresh concept introduced by Sequential in the 1980s with their Prophet VS synthesizer.

Prophet VS synthesizer. You can see the joystick on the left.

This method assigns different sound timbres to the four corners of a square. Using a joystick, you can intuitively blend these sounds together! The resulting sound, created by mixing these four sources, can be represented as a single point on a coordinate plane using vectors—hence the name “vector synthesis.”

(If you took physics as an elective in high school, this concept might feel pretty familiar!)

Yamaha SY22
Korg Wavestation

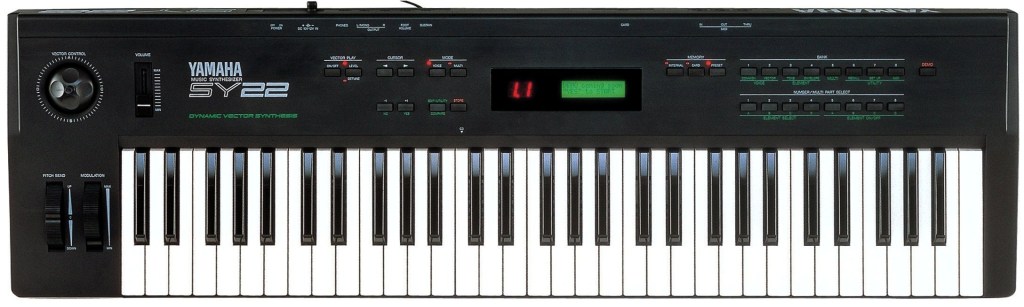
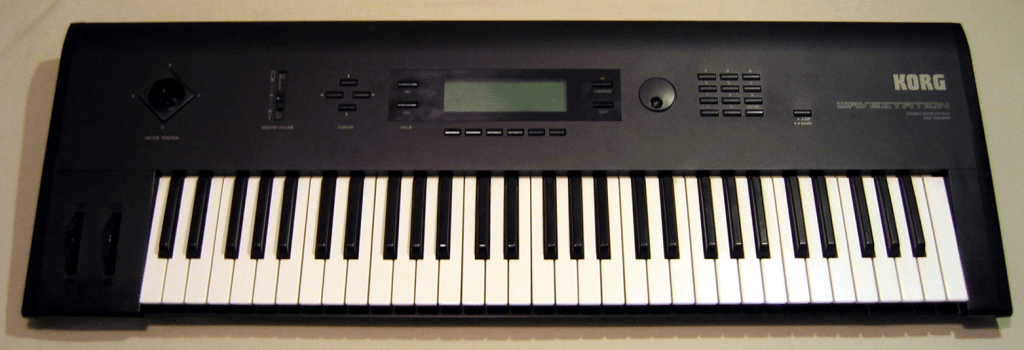
Later, Sequential was acquired by Yamaha, and the development team moved on to join Korg. This led to the release of two vector synthesizers: the Yamaha SY22 and the Korg Wavestation.

Arturia has a virtual instrument called Prophet-VS V.

Korg also released a virtual version of the Wavestation, bringing its advanced vector synthesis system to software.

If you’re curious about vector synthesizers, these are worth checking out!
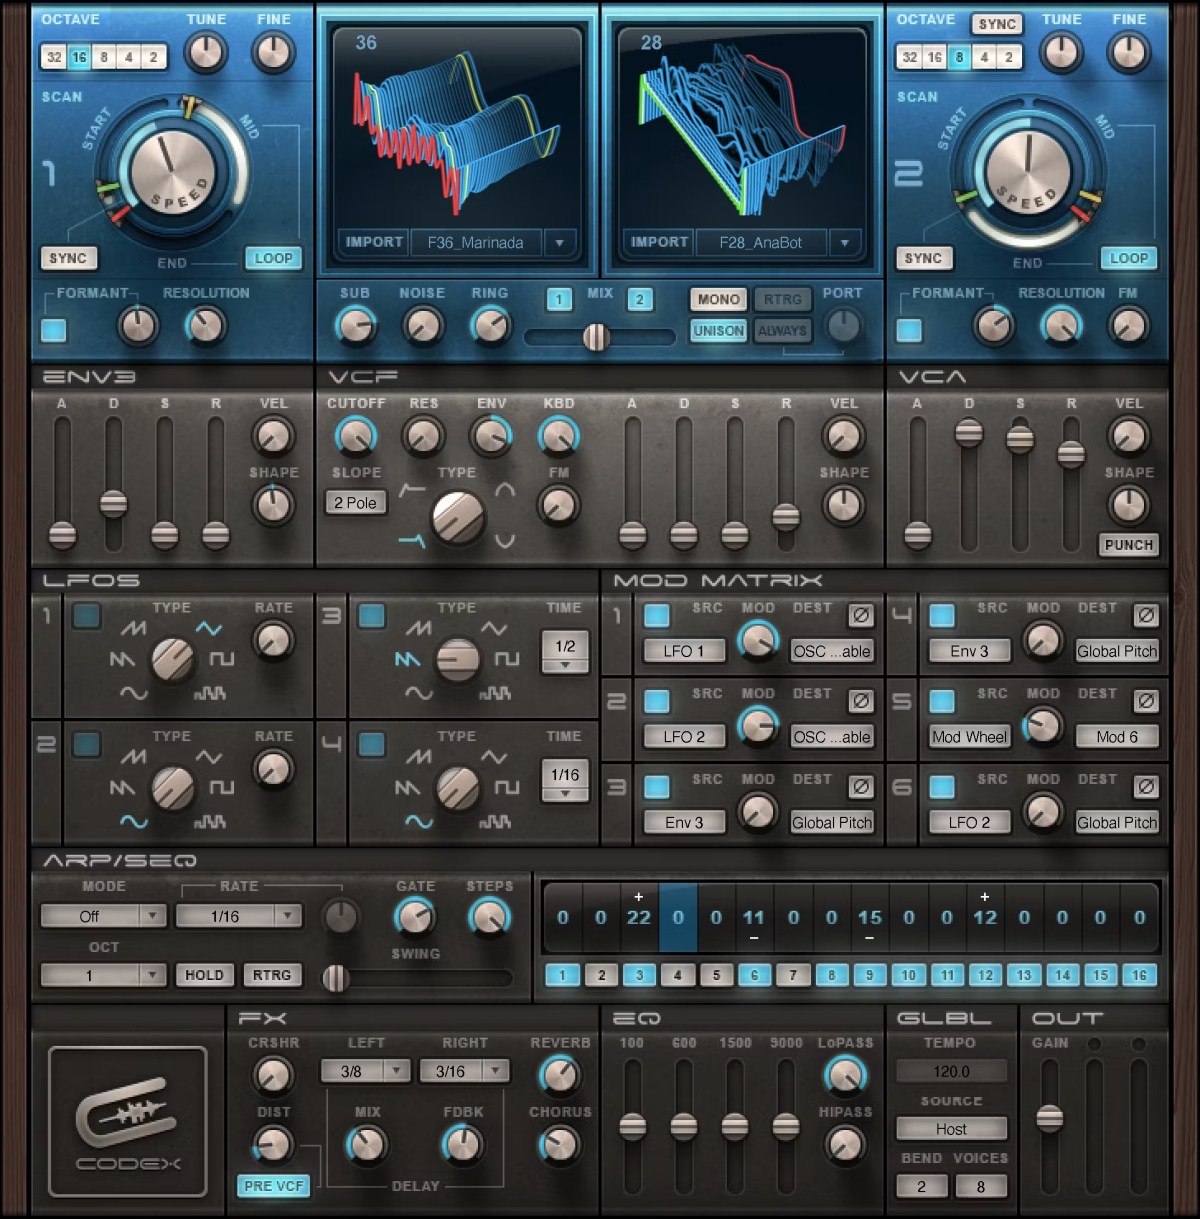

Wavetable Synthesis

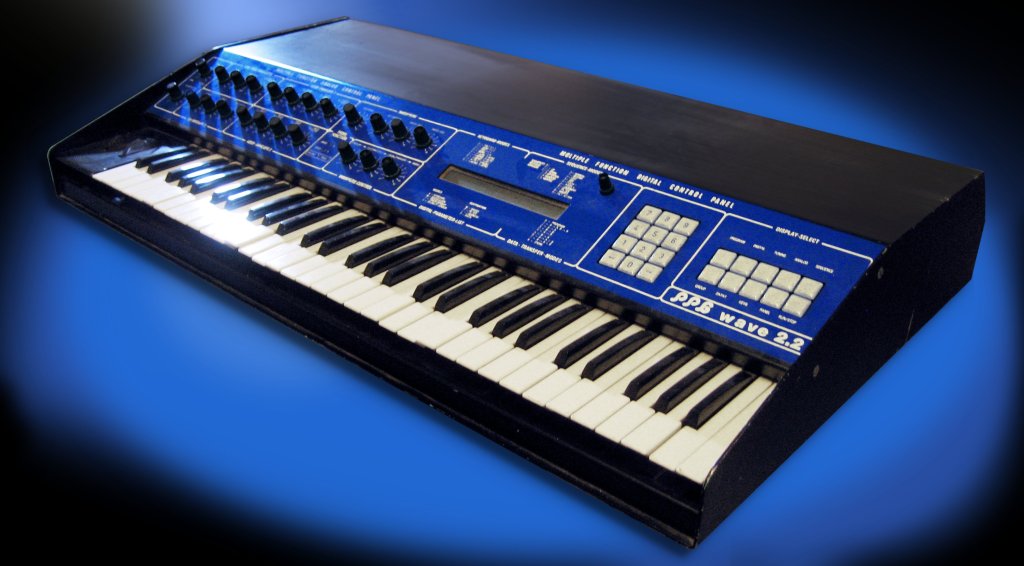
Wavetable synthesis actually predates vector synthesis by a bit. It was first utilized in MUSIC-II, a sound design program developed by Max Vernon Mathews in 1958. It was later commercialized by PPG with their Wavecomputer 360 in the late 1970s and the Wave series in the 1980s.

The concept? It’s about mixing different waveforms to create new sounds. It’s somewhat similar to vector synthesis, in that both methods interpolate between different timbres to generate a sound. That’s why I’m covering both in the same post! 😄

The key difference is this:

  • Vector synthesis calculates the volume balance between four sound sources based on their position in a coordinate plane.
  • Wavetable synthesis works within a single waveform cycle, calculating the amplitude ratios of different waveforms.

This distinction should help clarify how the two approaches differ.

Also, you might notice that both vector and wavetable synthesizers let you tweak the ADSR (Attack, Decay, Sustain, Release) parameters independently. If you’ve read my earlier post on subtractive synthesis, you’ll know I mentioned that these parameters are pretty universal across synthesis methods.

If you’re feeling a bit lost, check out that post for a primer on using something like a Minimoog. Most synths don’t stray too far from that foundation, and trust me, you’ll end up using a Minimoog sound in a track at least once in your life! 😄

Waldorf has recreated the PPG Wave as a virtual instrument, bringing back its iconic 80s sound.

There are tons of wavetable synths out there—Serum, Waves, the free Vital, and LANDR Synth X, to name a few. My personal recommendation? Go with Serum. It’s got a huge user base, which means tons of presets and a great community. Plus, it’s just well-designed.


A Few Final Thoughts

The thing about vector and wavetable synthesis is that you can’t pin down their sound to something specific like sine, triangle, square, or saw waves. Throw in a bunch of different sounds, and the output changes dramatically. Unlike FM synthesis or analog subtractive synthesis, it’s hard to describe the “typical” sound of these methods. 😅

Personally, I love messing around with synthesizers to craft the perfect sound, but it can be a time sink. My advice? Start with a preset that’s close to what you’re after. (If you familiarize yourself with basic waveforms like sine, saw, triangle, and square, it’ll be easier to figure out which category your desired sound falls into.) Build your track first, then tweak the sound later to get it just right.


That’s it for today! Thanks for reading, and I’ll catch you in the next post! 😊

iZotope Ozone 12 Release and Upgrade Sale (Until October 6)

Below is a natural, precise, and professional English translation of your blog post, tailored for an English-speaking audience. It maintains the conversational yet technically accurate tone of the original, avoiding any awkward phrasing or overly casual language that could undermine its credibility. The [Link] placeholders are included as requested, and the table is preserved in a clear, readable format. The translation is crafted to feel engaging and authentic for an international audio engineering audience.


iZotope Ozone 12 Release and Upgrade Sale (Until October 6)

Hello! I’m Jooyoung Kim, an engineer and music producer.

I’ve been meaning to continue my synthesizer explanation series, but I’ve been swamped with studying English lately… time is slipping away! ^^;;

Instead… well, not quite “instead,” but iZotope recently released Ozone 12, and to celebrate, Plugin Boutique is holding a sale. So, I thought I’d dive in and review it.

I received Ozone 12 as an NFR (Not for Resale) copy for this review. If you purchase through the links in this post, I’ll earn a small commission, which helps keep the lights on!

Let’s take a closer look, shall we?

Plugin/Module Overview

Plugin/Module NameDescriptionElementsStandardAdvanced
Stem EQIndependently EQ vocals, bass, drums, or instruments in a stereo file
Bass ControlAdjusts low frequencies
UnlimiterRestores overly compressed transients (powered by machine learning)
ClarityCreates smooth masters (seems like high-frequency enhancement)
MaximizerLimiter
EqualizerTraditional EQ
ImpactFine-tunes dynamics
StabilizerAdaptive mastering EQ
ImagerStereo imager (free to use!)
Match EQMatches frequency characteristics to a reference track
Master RebalanceAdjusts stem volumes at the mastering stage
Low End FocusLow-frequency specialized processor
Spectral ShaperFrequency-specific shaper
Dynamic EQDynamic EQ
ExciterExciter (think saturator, with 7 types)
DynamicsCompressor/limiter
Vintage TapeTape emulation
Vintage CompressorVintage-inspired compressor
Vintage LimiterVintage-inspired limiter
Vintage EQVintage-inspired EQ
Other Features
Master Assistant: Custom FlowCreates a customized mastering chain
Master Assistant ViewVisualizes the mastering process in Ozone 12
Stem FocusPrecise stem separation
Track ReferencingManages reference tracks
Transient/Sustain ModesEmphasizes transients or sustain
Assistive Vocal BalanceAdjusts vocal clarity and balance
DitherDithering
Codec PreviewTests compressed formats like MP3/AAC
Additional Plugins
AudiolensAudio analysis and reference tool
iZotope RelayLightweight channel strip for communication between iZotope plugins
Tonal Balance Control 2Frequency balance analyzer

Wow, that’s a lot, isn’t it? 🙂

The Elements version doesn’t include individual plugins and is limited to a streamlined version of the integrated plugin (number 5 in the list). Since there’s so much to cover, I’ll focus on the key plugins and the new additions in Ozone 12.

1) Stem EQ

I’ve never been a huge fan of stem separation tools in the past, but the technology has come a long way.

It’s not perfect, but it doesn’t sound unnaturally detached either. The way EQ is applied to stems feels impressively natural.

Compared to the older Master Rebalance, Stem EQ is much more precise. The sound is noticeably different, suggesting they’ve updated the algorithm.

This isn’t just for mastering engineers—it’s versatile enough to significantly alter the feel of the source material, making it a useful tool for many users.

2) Bass Control

This one’s a winner! iZotope plugins are known for their intuitive interfaces, clearly showing what you’re adjusting. Bass Control is no exception, displaying only the low-frequency waveform to give you a clear sense of whether the sound feels light, heavy, or punchy.

3) Unlimiter

Think of Unlimiter as an attack shaper. It doesn’t fully restore the original transients, but it does a great job of naturally enhancing them.

4) Impact

This is a fun one. Impact lets you emphasize or reduce transients on a per-frequency basis. It’s another reminder of how critical transients are in both mixing and mastering!

Applying it lightly to the low end can group the kick and bass together, creating a cohesive, groovy feel. Pretty cool!

5) Ozone

This is the core of it all, right? One-click mastering!

Personally, I’m not a huge fan of one-click solutions, and after testing it on a few projects, it feels like there’s still room for improvement.

That said, unlike older versions that relied solely on one-click mastering, you can now pick and choose effects to create a custom chain. Starting with suggestions for EQ, limiter, and imager can be a great jumping-off point! 😊

The other plugins are fairly well-known, so I’ll skip the deep dive there.

Both iZotope and Acon Digital have made it possible to perform stem mixing at the mastering stage using just a stereo track. It’s wild how far we’ve come!

Oh, and among the Advanced version’s additional plugins, I highly recommend Tonal Balance Control 2. When my ears feel off (like when I’m under the weather), this plugin always reveals something’s slightly amiss.

It’s also fantastic for studying other tracks and establishing your own reference point. Definitely give it a try!

Ozone comes in three versions: Elements, Standard, and Advanced. The table above details which plugins are included in each, so check it out to find the one that suits your needs.

Personally, I love Low End Focus, Stem EQ, Bass Control, and Impact, so I’d recommend Advanced. Standard is a solid choice too, but Elements might feel a bit limiting.

You can try the demo to see for yourself. I hope you find it useful!

Until next time! 😊


I Earned the Stage Sound Engineer Level 3 Certification

Hello, this is Jooyoung Kim—sound engineer and music producer.

In Korea, there is a government-issued certification called Stage Sound Engineer (Level 3, 3 is the first (or beginner) level, followed by 2 and 1.).
It doesn’t have a direct equivalent in the US, UK, or Canada, but you can think of it as something like a formal audio engineering license, proving both practical and theoretical knowledge in live sound.

As I’ve been working in the audio field, I realized that while practical skills are essential, having an official certification also helps when listing credentials on a résumé. For a long time, I wasn’t sure if it was worth pursuing—but I figured if I didn’t get it this year, it would only become harder later. So, I decided to take the exam.


Studying for the Written Exam

I had already bought some textbooks back when I ambitiously wanted to “master all of audio engineering.”
Unfortunately, the exam content had been updated recently, which meant my older materials were out of date.

At first, I tried to get by without buying the new edition, but after checking last year’s exam questions, I realized too many things had changed. So, I finally bought the updated books just two days before the exam and studied them intensely.

In total, I prepared for about ten days—definitely a crash course. The audio-related parts were manageable thanks to my background, but the legal regulations and stage-specific terminology were quite difficult. Memorization has never been my strong suit (even in English vocabulary study these days, I struggle a lot!).

I didn’t go through the entire book cover to cover, but I solved past exams one set per day and focused on reviewing the parts I got wrong. It was a very “efficient cramming” strategy.


The Practical Exam

Since much of the practical portion overlapped with my usual work, I didn’t need to prepare too heavily.

The main part was a listening test: adjusting pink noise with a 15-band graphic EQ to balance different frequency ranges, and identifying test tones across the EQ bands.

Because I couldn’t find a simple 15-band graphic EQ plugin anywhere, I actually built one myself as a VST3 and AU plugin. If anyone needs it, I uploaded it here:

🔗 GitHub – JYKlabs/15-Band-Graphic-EQ

Mac users can simply extract the files and place them in /Library/Audio/Plug-Ins/VST3 and /Library/Audio/Plug-Ins/Components.

Windows users can place the VST3 file in their VST3 plugin directory. (Since I only built it on Mac, I haven’t tested it on Windows yet.)

The plugin is extremely minimal—no extra features, just a straightforward EQ.

During the actual exam, there were 10 listening questions in total. The first five (identifying effects) were fairly easy, but the last five (detecting EQ adjustments applied to music or noise) were much harder. Since the exam environment was different from my usual studio setup, I struggled a bit.

Also, I tend to think of EQ in terms of musical intervals, but the test was structured entirely in octave relationships, which threw me off at first.

Still, since passing only required 6 correct answers out of 10, I managed to make it through. Thankfully, my hearing was in decent condition that day (sometimes ear fatigue can really mess me up).


Final Thoughts

Unlike in South Korea, many Western countries don’t offer official government-issued certifications specifically for live or stage sound engineering. Instead, recognition and credibility often come from trusted industry certifications, educational credentials, or portfolio evidence.

For example, the Certified Audio Engineer (CEA) credential from the Society of Broadcast Engineers (SBE) is well-regarded and requires both experience and passing a technical exam. For those focused on live sound, programs like Berklee’s Live Events Sound Engineering Professional Certificate offer structured, practical training.

Even if you already have solid skills, it can sometimes be difficult to secure projects or convince clients without something official to show. That’s where certifications and structured programs help: they provide a clear, external validation of your abilities and open doors that pure experience alone may not.

At the end of the day, audio work is unpredictable: sometimes you’re mixing in a studio, other times you’re troubleshooting live sound under pressure. The more prepared you are, the easier it is to adapt.

Thanks for reading, and I’ll see you in the next post!

How to Set the Subwoofer Crossover Frequency?

Hello, I’m Jooyoung Kim, an engineer and music producer.

In my previous post, I mentioned that I had written a paper on subwoofers, right? On August 12, my paper, Group Delay-Driven Crossover Optimization for Subwoofer Satellite Systems at Listening Position, was officially published.

I had planned to write about it as soon as the paper was out, but time has been tight lately… ^^;;

This post is about how to set the crossover frequency for subwoofers.

The motivation behind this was pretty straightforward. Not only studios but also many individual users incorporate subwoofers into their setups. However, there’s surprisingly little guidance out there on how to properly set the crossover frequency.

I myself use two subwoofers!

From a perceptual perspective, there are papers suggesting that humans don’t easily perceive directionality below a certain frequency (say, a few Hz), so the crossover should be set below that threshold. But when it comes to numerical analysis, the only paper I could find was Dr. Bharitkar’s Automatic Crossover Frequency Selection for Multichannel Home-Theater Applications.

In that paper, the claim was that a flatter frequency response in the low-frequency range is ideal. However, dips in very narrow frequency bands often don’t show up clearly in numerical calculations of variance.

I was convinced there had to be a better approach. So last summer, I bought a measurement microphone and started taking measurements without a clear plan.

By experimenting with different crossover frequencies, I collected a ton of data and made an initial discovery: there’s a correlation between Group Delay (or Excess Group Delay) and the frequency response.

After trying various configurations, I found that Excess Group Delay wasn’t as strongly correlated, but peaks in the Group Delay (whether positive or negative) corresponded to dips in the frequency response. Moreover, the smaller the absolute value of the Group Delay, the less pronounced those dips became.

I conducted experiments in a university classroom and my own workspace, using a Finite Element (FE) model to demonstrate this correlation. My conclusion was that the crossover frequency should be chosen to minimize the maximum absolute value of the Group Delay in the low-frequency range.

Here’s the mathematical expression for it:

Looks a bit daunting, doesn’t it? ^^ Let me break down the terms:

  1. ω_oc: The optimal crossover frequency (frequency is typically denoted by ω).
  2. ω_LC: The lower bound of the crossover frequency (Low Crossover).
  3. ω_HC: The upper bound of the crossover frequency (High Crossover).
  4. GD(ω_i): The Group Delay value at frequency ω_i.
  5. α, β: Correction factors for the low-frequency range.

I included α and β because I noticed that Group Delay can vary significantly outside the adjustable crossover frequency range. These correction factors help account for that.

Setting the crossover frequency this way not only benefits phase response (since Group Delay is the rate of change of phase) but also improves the frequency response. (For those diving deeper: this is trivial in minimum-phase systems, but real-world systems aren’t always minimum-phase, which makes this approach meaningful.)

Additionally, I applied 4th-order Linkwitz-Riley filters to both the satellite speakers (the main speakers in a subwoofer-satellite system are often called “satellite speakers”) and the subwoofer, while carefully aligning timing and phase. These conditions are critical for the approach to work.

I was working on a tool to automatically measure and output audio based on this method, but analyzing the data to select the optimal crossover frequency turned out to be quite time-consuming. With other papers and projects piling up, I’ve had to put it on hold for now.

If I get some free time, I’d love to revisit it. It’d be amazing if a company like Genelec saw this and added it as a feature… haha. And if they wanted to sponsor me, that’d be even better… ^^;;

I tried to explain this in a straightforward way, but the topic itself isn’t exactly simple, so I hope I got the point across clearly! 😅

If you’re curious about the detailed setup or experimental process, feel free to check out the paper or reach out to me directly.

Until next time! 😊