DIY Audio Project #1 | Tube Saturator with Baxandall EQ (Part 1): Concept and Implementation in Digital

Hi! This is Jooyoung Kim, a mixing engineer and music producer. In the previous post, ‘Wrapping Up 2025‘, I mentioned that I was developing circuits for my personal audio hardware.

Now that the circuit design and simulation are finished and the components and PCBs have been ordered, I am writing this post to record the process—including the failures and successes along the way. To be honest, since the build isn’t finished yet, I can’t guarantee it will be a 100% success.

However, I thought it would be a great opportunity to share what is actually needed for the design process, starting from scratch. I want to explain things in a way that anyone, even those with zero prior knowledge, can easily follow along.

Let’s start!


Concepts

I really love the analog “tube” sounds. However, I don’t have any stereo tube saturator hardware. Also, I don’t have an EQ that can be used for mastering either.

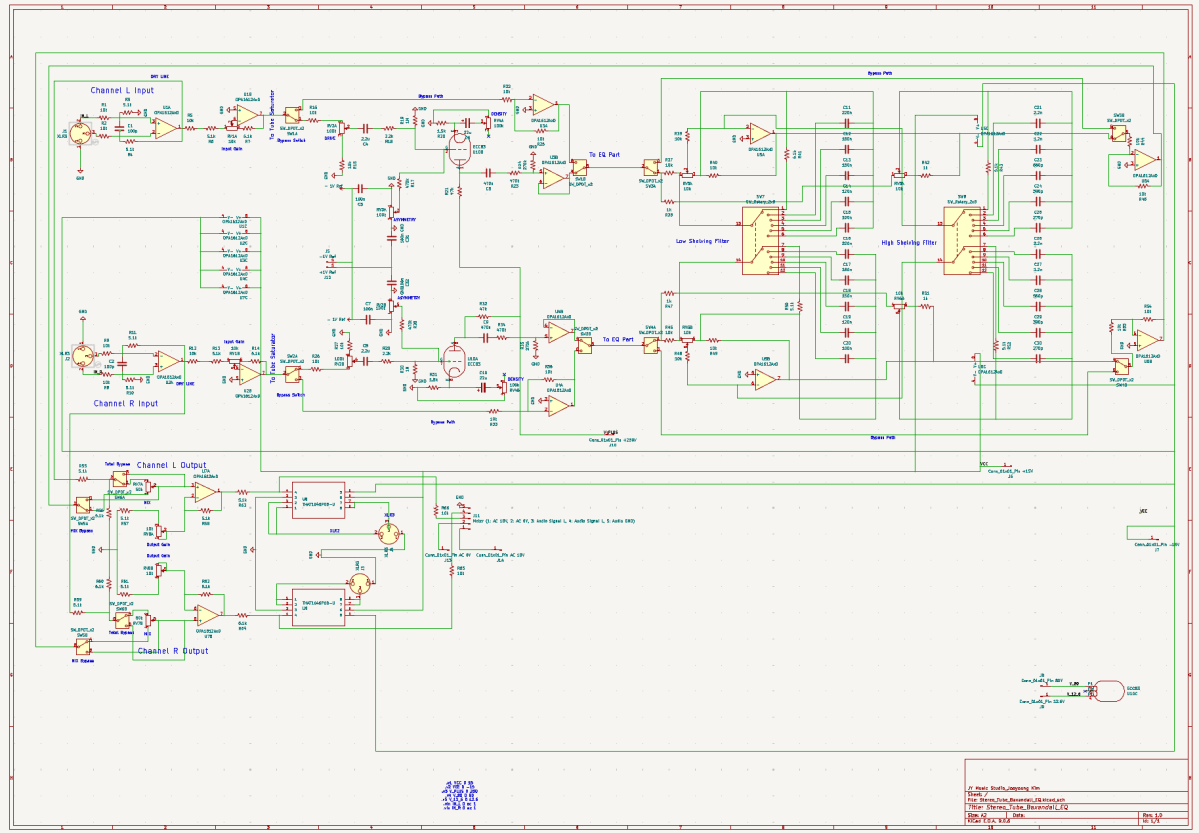
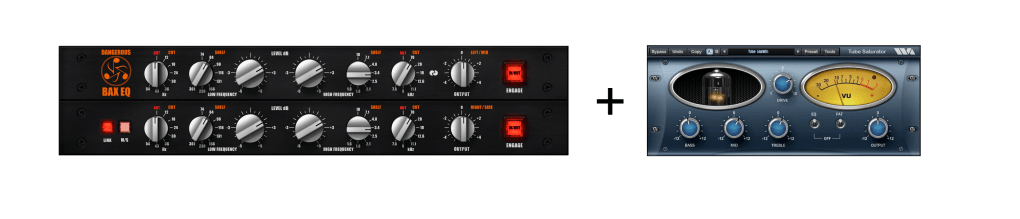
Therefore, I decided to make a stereo tube saturator with Baxandall EQ!

I used KiCad for this project. I highly recommend it because it allows you to seamlessly transition from circuit design to simulation, and finally to PCB layout. But that also means… once you’re done with the circuit, you still have two massive tasks waiting for you (hahaha…). I honestly had no idea what I was getting into until I finished the initial design!


Tube Parts

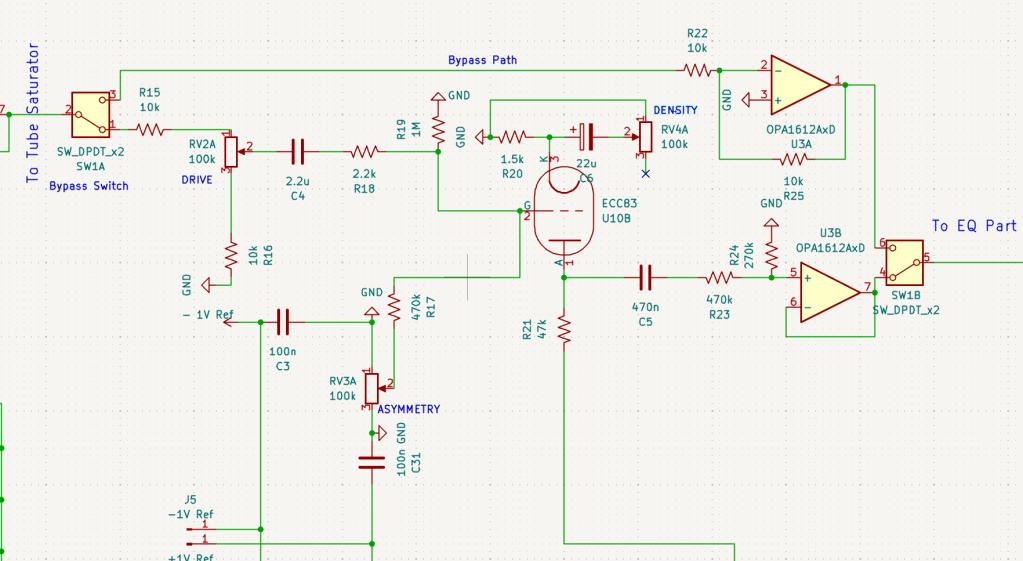
I already have two tubes (JJ Electronics’ ECC83) that were replaced from my Stam Audio SA-2A, so I wanted to use them for this project. Since I intend to use this gear in the mastering process, I decided to use just a single tube to drive the gain after the input stage.

I also designed the tube stage with adjustable ‘ASYMMETRY’ and ‘DENSITY’ parameters.

ASYMMETRY (Bias Adjustment) parameter controls the grid bias (+/-1V spans in my circuit)) of the vacuum tube. By shifting the bias point, it allows the waveform to clip asymmetrically, which generates even-order harmonics.

DENSITY (Saturation & Body) parameter adjusts the amount of feedback at the cathode stage. By controlling the effectiveness of the bypass capacitor, it pushes the tube to hit its saturation point harder or softer.

To develop this parts, I utilized Gemini (the free version) and referenced the manual of the Wave Arts Tube Saturator Vintage plugin for inspiration. Even though I majored in physics, it’s a field of pure science focused on fundamental principles, so I didn’t really cover practical applications like circuit design. As I mentioned, I actually had very little in-depth knowledge of electronic circuits starting out. But those tools were a huge help! Seriously, use AI tools—they can bridge the gap!


Baxandall EQ Parts

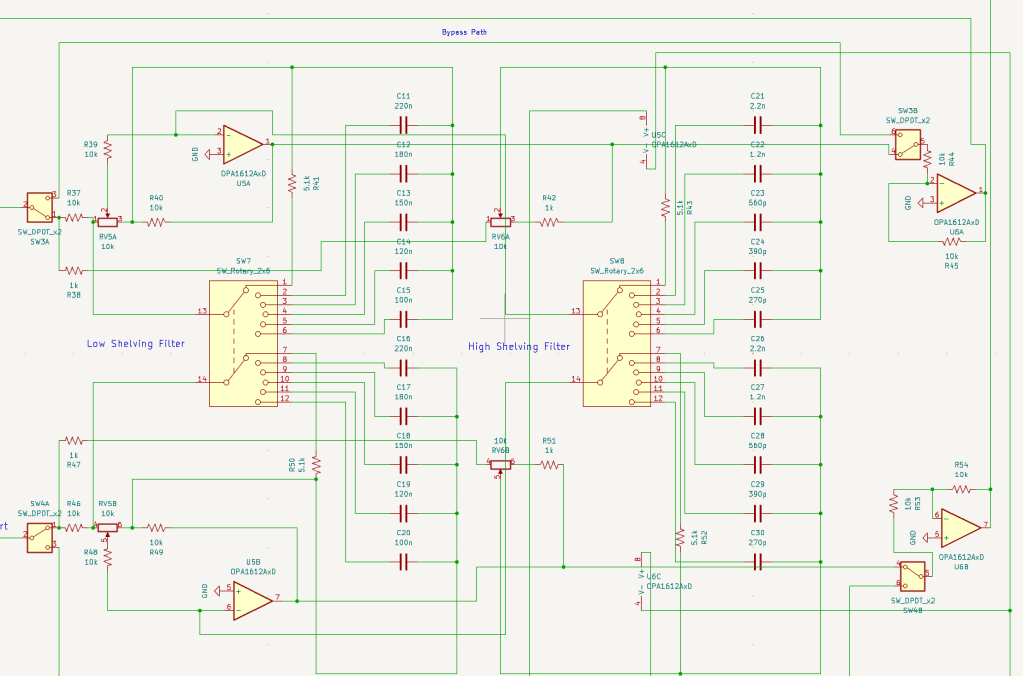
The EQ design is straightforward, consisting of two sections: Low and High. While the gain is continuously adjustable, I made the frequency switchable using rotary switches, allowing for precise and repeatable settings.

Baxandall EQ circuits are quite simple and well-documented, so you can easily find various schematics online to use as a reference.


Input & Output Parts

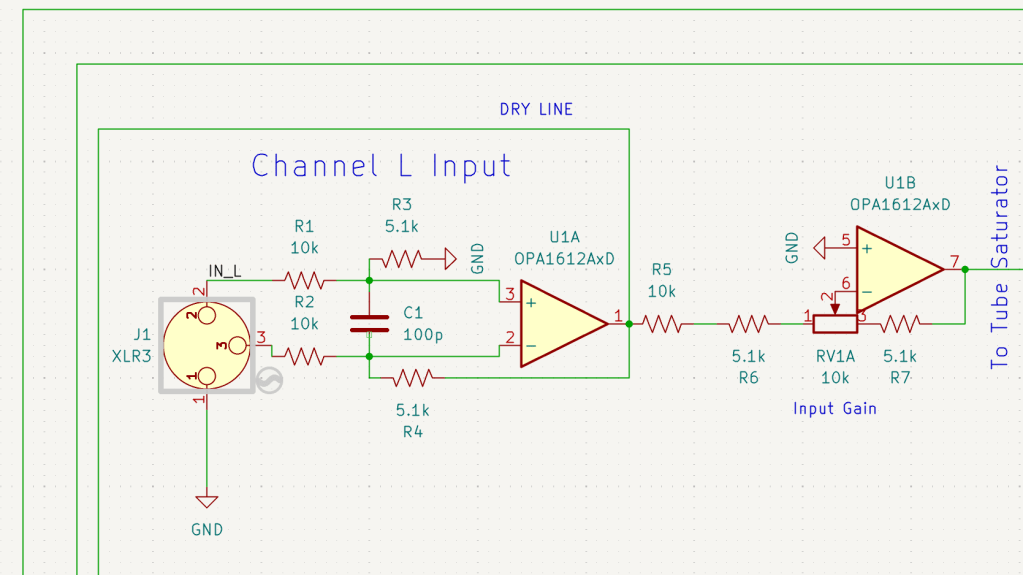
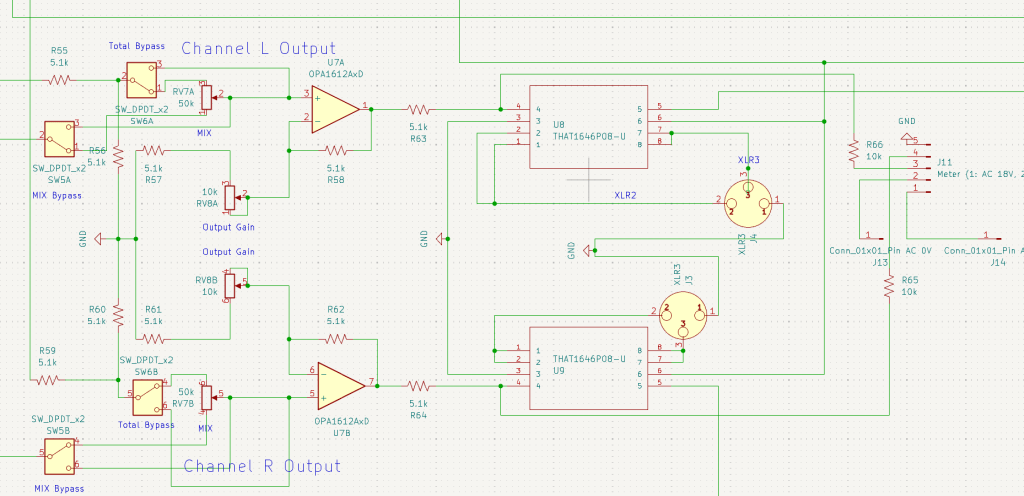
The input stage was simple enough, but the output stage was a total ambush. I wanted to include a Mix knob, a Mix Bypass switch, a Total Bypass switch, and an Output Gain knob. Trying to integrate all these features into the signal path turned into a bit of a mess!

After completing the overall design, I realized a crucial detail: every single stage had to be in the same phase! If the phases didn’t match, the Mix knob would be useless. So, I had to go back and triple-check the phase of every section after all the work was seemingly ‘done.’ I’ll talk more about this in my next post about the simulation process.


Power Parts

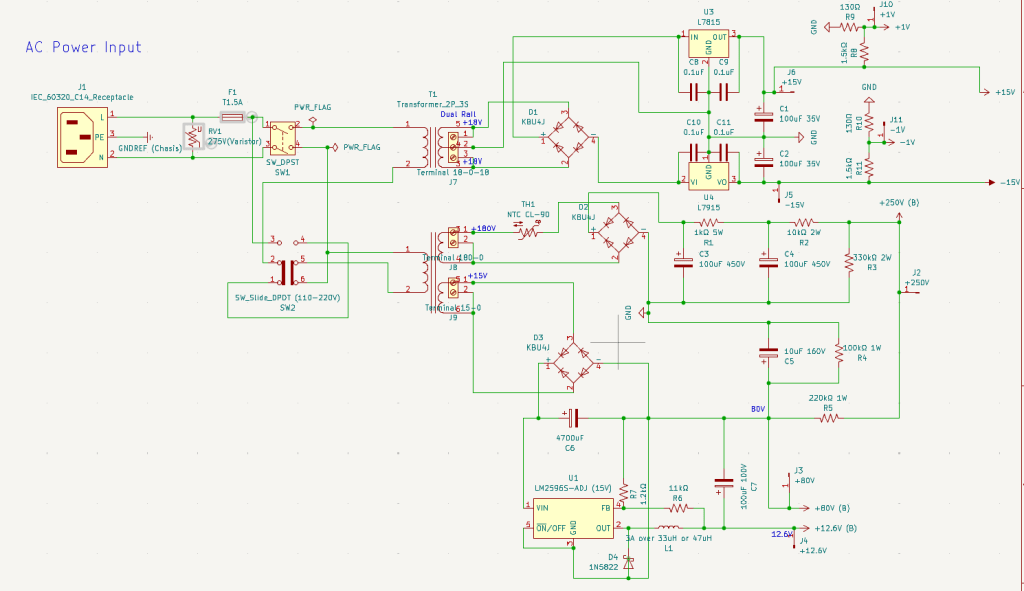
To ensure this hardware works in various environments, I included an adjustable voltage switch(220V-110V) in the power circuit. Since the design requires multiple voltage rails—250V, ±15V, +80V, +12.6V, and ±1V—I had to use a complex, custom-spec toroidal transformer. Managing all these different power requirements in one unit was quite a challenge!

Heat dissipation was a major concern for this build. I basically tortured Gemini with endless questions, forcing it to crunch the numbers until I was sure every component could handle the thermal load.

I’d like to dive deeper into the phase issues and buffers that need to be considered in the simulation, but it would make this post way too long. So, I’ll cover those in the next one.

See you then!

AI Vocal Timbre Transformation Plugin VocalNet Launch Sale (~Oct 5)

Hey there! I’m Jooyoung Kim, a mixing engineer and music producer.

Lately, AI-driven tools are popping up everywhere in music production, and they’re hitting the market as full-fledged products.

If you dig into research papers, you’ll find that voice-related tech has been around for a while. Back in 2016, a paper titled Phonetic Posteriorgrams for Many-to-One Voice Conversion Without Parallel Data Training introduced PPG (Phonetic PosteriorGrams)-based voice conversion. This technology laid the groundwork by separating the content and timbre of a voice, allowing timbre transformation even with limited recorded data.

Today, we’re checking out VocalNet, an AI-powered vocal timbre transformation plugin that builds on this tech with deep learning to create some seriously cool vocal effects.

Full disclosure: I received this plugin as an NFR from Plugin Boutique. If you purchase through the links in this post, I may earn a small commission, which helps me keep creating content and, you know, survive!


What’s VocalNet All About?

VocalNet is a plugin for real-time or drag-and-drop file-based timbre adjustment. And let me tell you, it’s super easy to use.

When you hover over the corners of the triangle in the interface, you’ll see a concentric circle and a file icon. The circle lets you select factory preset timbres, while the file icon lets you import your own audio file to use its timbre.

  • Load one file, and the sound transforms to match that timbre.
  • Load 2-3 files, and you can tweak the central concentric circle to blend their ratios.

So, how does it sound?

Well… maybe it’s because I’m still dealing with an itchy throat from COVID aftereffects, but I wouldn’t say it’s mind-blowingly amazing. That said, it’s solid enough to use for vocal harmonies or background vocals. One downside? Korean pronunciation felt a bit off, even when using the “World” setting. (I tested it with the Airy Japanese Soprano preset since there’s no Korean-specific option.)

English, on the other hand, works pretty darn well.


How It Works

For file-based use, you upload the audio you want to transform, hit the share button, and VocalNet saves a new file with the altered timbre based on your settings.

Real-time use, however, can be a bit of a CPU hog, so I’d recommend rendering the transformed audio for actual production work.


When Would You Use VocalNet?

Here are a few scenarios where I think VocalNet shines:

  1. Need a female vocal guide for a song but only have a male vocalist (or vice versa)?
  2. Want to add mixed-gender harmonies or different timbres for background vocals but don’t have the budget to hire extra singers?
  3. Need to gender-swap a voice for a video or creative project? (Okay, maybe a niche use case, but still cool!)

The standout feature compared to traditional voice changers is that you can pick and apply specific timbres. No more manually tweaking formants or slaving over pitch adjustments like we used to. The world’s changed a lot, hasn’t it?


Try It Out!

You can test VocalNet with a 2-week demo by visiting their website, so I’d recommend giving it a spin to see if it fits your workflow.

That’s it for now! Catch you in the next post! 😊

Where’s the Future of Virtual Instruments and Performers Headed? Meet Melisma AI Strings & Woodwinds

Hey there! I’m Jooyoung Kim, an engineer and music producer.

AI-generated music has been making waves in the media for a while now, with research and commercial applications popping up left and right. But there are still some lesser-known AI projects in the music world—especially those leveraging unique learning methods—that deserve more attention.

Today, I want to introduce you to what I think is the most composer-friendly AI music tool I’ve come across lately. (No, this isn’t sponsored… haha!)

[link: https://kagura-music.jp/melisma]

Developed single-handedly by a creator in Japan, Melisma is seriously impressive—give it a listen, and you’ll be floored. This is still beta-stage audio, mind you. I first stumbled across it last year during its beta phase, and even then, it blew me away.


What’s Melisma All About?

Melisma takes sheet music in MusicXML format, sorted by instrument parts, and spits out incredibly natural-sounding audio. The quality hinges a lot on how well you write the articulations—those little details can totally change the vibe.

It’s got a list of supported and unsupported articulations, but even with that in mind… wow. It’s way cheaper than hiring real musicians and sounds so much more authentic than your average virtual instrument. I couldn’t help but wonder: are live performers, virtual instrument makers, and even string-focused studios in real danger now?

This got me thinking about my own future as a musician… 😢 I’ve actually started dabbling in AI learning research myself lately, but as a music creator, it’s a bittersweet feeling.


Mind-Blowing Realism

It’s not just strings either—check out the demo sounds, and you’ll hear woodwinds with breath noises so lifelike it’s insane. It almost feels like we’re entering a new era of score-writing. When I first heard it, I was hit with a wave of mixed emotions—excitement, awe, and a little dread.

They’ve got vocal synthesis too, but honestly, that part still feels a bit rough around the edges… haha. It’s not quite there yet.

What really shocked me, though? The price. The standalone version (Windows-only for now) is just 15,000 yen per instrument—about the cost of a single virtual instrument plugin. Could this be the future of virtual instruments? I’m starting to think so.


Trying It Out

I mixed Melisma with some traditional string virtual instruments in an unreleased track of mine, and the results were pretty darn good. That said, every now and then, you get some odd, glitchy sounds popping up. It’s not perfect—sometimes you’ve got to tweak and regenerate to get it just right.

The developer, by the way, has a fascinating background—used to play recorder, composes a ton, and has a pretty unique resume. You can read more about them here: [link: http://nakasako.jp/about].


Recognition and Reflections

Last year, Melisma won the Best Presentation Award in the Best Application category at the Music and Computer (MUS) Research Group’s session during Japan’s Information Processing Society conference. That’s some serious cred!

It’s a reminder that the world doesn’t reward just one kind of obsession anymore. Old jobs fade, new ones emerge—it’s bittersweet to watch, but there’s no fighting the tide. That’s why I think it’s worth diving into all sorts of skills and studies; you never know what’ll come in handy.

Even I’m struggling to make ends meet sometimes, but to all my fellow musicians out there—let’s keep pushing forward!


Closing Thoughts

Melisma’s potential has me both excited and a little nervous about where music creation is headed. It’s a tool that could shake up how we think about virtual instruments and live performance—and at a price that’s hard to argue with.

That’s it for now—see you in the next post! 😊