Basics of Synthesizers (3) – Additive Synthesis

Hey there! I’m Jooyoung Kim, a mixing engineer and music producer.

Lately, I’ve been drowning in code.
The program I mentioned in my last update? Yeah, I totally messed up the THD measurement part by mixing it up with the standard crosstalk measurement method. So, I had to scrap everything, re-measure the data, and start over. It’s been taking way longer than expected, and I’m exhausted, haha.

Because of this, my blog posts have been delayed quite a bit.
Thankfully, I wrapped up the measurements this morning, so now I can just tinker with the program whenever I have some spare time.

Anyway, today I want to dive into additive synthesis, continuing our series on synthesizer basics after covering subtractive synthesis last time.

Just a heads-up: the virtual instrument links I recommend throughout this post are affiliated with Plugin Boutique. If you purchase through those links, I earn a small commission, which really helps me keep the lights on. Thanks for the support! 🙂

Let’s get started!


Additive synthesis, as the name suggests, is all about combining sounds to create something new.
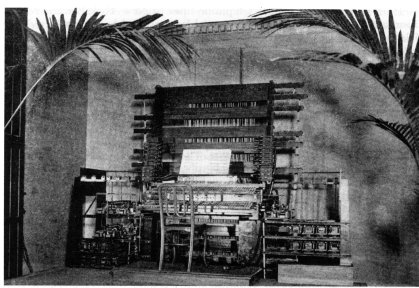
The earliest instruments to use this method were the Telharmonium and the Hammond Organ.

These instruments had built-in tone generators called tone wheels, designed to produce specific sounds when you pressed a key.

If you’ve ever seen a Hammond Organ, you’ve probably noticed its drawbars. These let you control how loud or soft the fundamental tone and its harmonics are played. By adjusting them, you could mix the sounds from multiple tone wheels to create a wide range of timbres.

In a way, you could call the Hammond Organ an early mechanical analog synthesizer based on additive synthesis. That said, it’s a bit different from the subtractive synthesis we typically talk about today, right?

When it comes to virtual Hammond Organ plugins, I think IK Multimedia’s Hammond B-3X and Arturia’s B-3 V are the top dogs.
During this summer sale, IK Multimedia’s Total VI MAX bundle, which includes Hammond B-3X, is an absolute steal. Honestly, if you’re thinking about getting just the Hammond B-3X, you might as well grab the whole bundle—it’s super versatile and worth it.


Now, let’s get a bit technical for a moment.

According to the Fourier Series, any periodic signal (like a sound wave) can be expressed as a sum of sine waves:

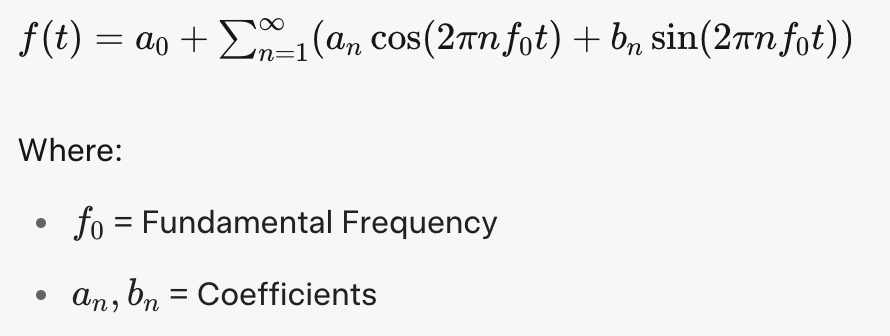
The Fourier Transform takes this further, allowing even non-periodic signals to be represented as a sum of sine waves:

In theory, this means you can recreate any sound just by combining sine waves.

Sounds like a ton of manual work, right?

Back in the day, not only were these calculations a nightmare, but even playing multiple sounds simultaneously through sampling was a challenge for early computers. That’s why additive synthesis evolved alongside advancements in computing power.


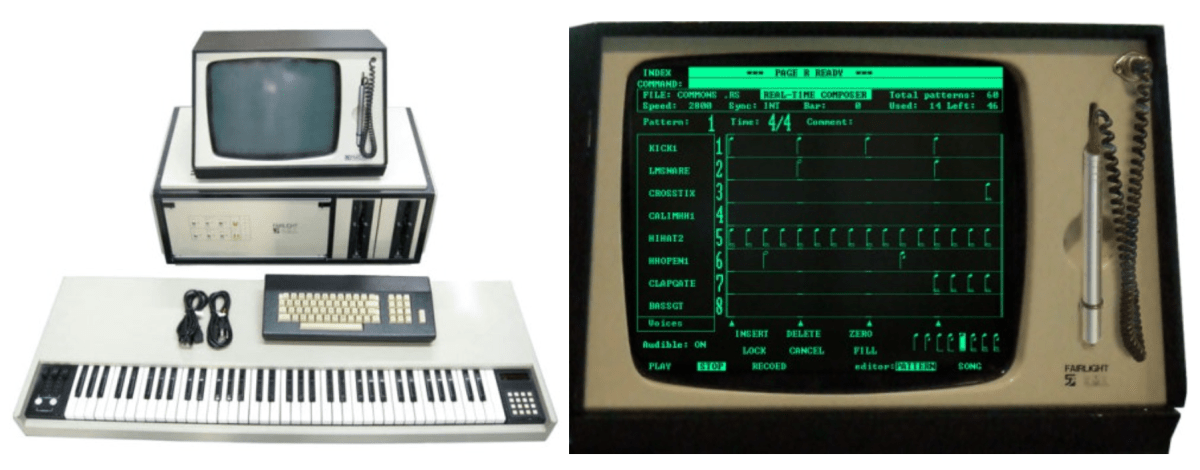
A standout product from this transitional period is the Fairlight CMI.
This beast wasn’t just an additive synthesis synthesizer—it was also a DAW and a sampler.

The panel on the right in the photo is the DAW interface, complete with a stylus for tapping out rhythms on the screen. Pretty cool, right?

One of the Fairlight CMI’s built-in samples, called Orchestra Hit, became iconic in pop and hip-hop. It’s a short orchestral tutti sound from Stravinsky’s The Firebird. Using it in a track instantly gives off that classic 80s–90s old-school vibe.

Arturia’s CMI V plugin does an incredible job of recreating the Fairlight CMI’s interface, complete with its early DAW and mixer windows. It’s a lot of fun to play around with!

Another notable instrument from this era is New England Digital’s Synclavier, which combined FM synthesis and additive synthesis while also functioning as a DAW and sampler. Originally licensed by Yamaha for FM synthesis, by version II, it basically became a full-fledged computer, haha.

Arturia’s got a plugin for this one too. They’re really out here trying to recreate every classic synthesizer as a plugin, aren’t they?


You might’ve noticed by now that additive synthesis is deeply tied to samplers and DAWs. After all, when you layer different sounds at the same time in a modern DAW, you’re essentially using it as a sampler and an additive synthesis synthesizer.

As technology progressed, synthesizers started incorporating wavetable synthesis, allowing for even more precise and varied sound design.

Explaining how to use a specific additive synthesis synthesizer is a bit tricky because it’s really just about layering sounds, using samplers, and working in a DAW. So, I hope this brief history gives you a good sense of it!

That’s all for now—see you in the next post!

What is ADSR? – Envelope Generator

Hello! I’m Jooyoung Kim, a mixing engineer and music producer.

While working on the next post in my synthesizer basics series yesterday, I realized I’ve never covered the concept of ADSR on my blog. So, today, let’s dive into what ADSR is all about.

I’ve included a plugin link below, and if you purchase through it, I earn a small commission that really helps me keep going. Thank you for your support!

Let’s get started!

Envelope Generator

A single oscillator produces a steady sound, like a sine wave, square wave, or triangle wave, at a specific frequency. But these sounds can feel flat or even harsh on the ears.

To address this, Robert Moog, the founder of Moog, developed the Envelope Generator to make simple oscillators mimic real-world sounds by varying their amplitude over time.

The 911 module in the center is the Envelope Generator.

Early envelope modules were labeled with terms like T1 (Attack), T2 (Decay), T3 (Release), and ESUS (Sustain). Later, the ARP 2500 synthesizer used Attack, Initial Decay, Sustain, and Final Decay, and the ARP Odyssey replaced Final Decay with Release. This standardized the envelope as ADSR (Attack, Decay, Sustain, Release).

So, what exactly is ADSR?

ADSR Explained

  1. Attack: The time it takes for the sound to reach its maximum volume after being triggered.
  2. Decay: The time it takes for the sound to drop from its maximum volume to the sustain level.
  3. Sustain: The volume level maintained while the key is held down.
  4. Release: The time it takes for the sound to fade to silence after the key is released.

Pretty straightforward, right?

The Envelope in the Casio CZ-1

However, Envelope Generators aren’t limited to just ADSR. For example, the Korg MS-20 includes a Hold parameter, which lets you set how long the sound stays at its maximum amplitude after the attack. This could be represented as AHDSR.

The Casio CZ-1 has a particularly unique envelope design.

Transient Shaper

SPL Transient Designer

With the development of the Envelope Follower, which tracks changes in an audio signal, it became possible to apply ADSR-like changes to real audio signals. The pioneer of this concept is the SPL Transient Designer, part of a category called Transient Shapers.

There are tons of these plugins out there. The link above takes you to Plugin Boutique’s dedicated Transient Shaper category, where my blog is affiliated.

I own several myself, like Native Instruments’ Transient Master, SPL Transient Designer Plus, Waves Smack Attack, and Oxford TransMod. Personally, I find Oxford TransMod to be the best of the bunch.

Modern music production uses these tools to meticulously sculpt and refine sounds, almost like crafting a fine piece of art.

That wraps up my explanation of ADSR. See you in the next post! 😊

Diving into the Basics of Synthesizers…

Hello! I’m Jooyoung Kim, a mixing engineer and music producer.

It’s been a while since my last post, hasn’t it?

After getting rejected by AES for the second time, I was like, “Alright, let’s fix this research!” So, I scrapped my experiments, started over, re-collected all the data, and reformatted everything for submission elsewhere. Time just flew by in the process… haha.

I’m really hoping this one gets accepted before I graduate. Fingers crossed this time…

Lately, I’ve been working on recreating hardware compressors using deep learning. I trained the model with test signals, but when I fed it guitar sounds, all I got was white noise and sine sweeps… That took about two weeks of work.

So, I’ve spent the past few days coding from scratch, preparing new training data, and running the training process again. Here’s hoping the results turn out well, but man, it’s exhausting…

I’d love to own a Yamaha DX7 in real life

On another note, I recently wrapped up a year-long series on the basics of mixing, and I was wondering what to write about next. Then it hit me: why not talk about using synthesizers?

Even though my music style doesn’t heavily rely on synths, understanding how different synthesizers work can definitely broaden the creative spectrum for writing music. From an engineer’s perspective, learning about filter techniques and the unique sound characteristics of various synths can spark a ton of new ideas.

That said, I’m still organizing my research on this topic, and with some recent worries about making ends meet, it’s been tough to write as quickly as I’d like… Still, I’ll do my best to keep the posts consistent.

The content will likely follow a simple structure:
“Sound synthesis methods and their history -> Iconic synthesizers”

That’s the plan. Looking forward to catching you in the next post!

Basics of Mixing (End) – 14.5 The Codecs of Music Files

Hello? This is Jooyoung Kim, a mixing engineer and music producer. Today, I’ll talk about the music file codecs, final article of basics of mixing series. Those posts are based on my book, Basics of Mixing, published in South Korea.

Let’s dive in!


Codec

The term codec stands for coder-decoder—a hardware or software that encodes and decodes digital signals. There are three main types of codecs:

  1. Non-compression: WAV, AIFF, PDM(DSD), PAM
  2. Lossless Compression: FLAC, ALAC, WMAL
  3. Lossy Compression: WMA, MP3, AAC

Non-compression codecs retain 100% of the original audio data with no compression applied.

Lossless compression codecs reduce file size while preserving all original data. This means they sound identical to uncompressed formats like WAV.

Lossy compression codecs remove some audio data to achieve a much smaller file size, which can affect sound quality depending on the compression level.

In the music industry, WAV, MP3, and FLAC are the most commonly used formats for mastering and distribution.


How is file size determined?

For WAV files, size is determined by sample rate and bit depth. How about mp3 and FLAC?

MP3 files use bitrate, rather than sample rate and bit depth. You’ve probably seen MP3 files labeled 256kbps or 320kbps. This means 256,000 bits or 320,000 bits of audio data are processed per second. Higher bitrates result in better sound quality but larger file sizes.

FLAC files use compression level to control file size. A higher compression level takes longer to encode but results in a smaller file. However, since FLAC is lossless, the sound quality remains unchanged regardless of the compression level.

If you want to compare how different codecs affect sound quality, you can use tools like Sonnox Codec Toolbox or Fraunhofer Pro-Codec.


This is the last article for the ‘Basics of Mixing’ series. Time is really quick..haha.

I hope these posts have helped expand your knowledge and improve your mixing skills.

Thanks for reading, and I’ll see you in the next post!