Hello, I’m Jooyoung Kim, an audio engineer and music producer.
Today, we’ll explore the use of EQ for different purposes. EQ is generally categorized into two types: Tone Shaping and Surgical.
1) Tone Shaping EQ
Tone Shaping EQ is used for:
Altering the tone of instruments
Changing the tone of instruments through the saturation provided by the EQ itself
Adjusting the vertical position of instruments within the stereo image
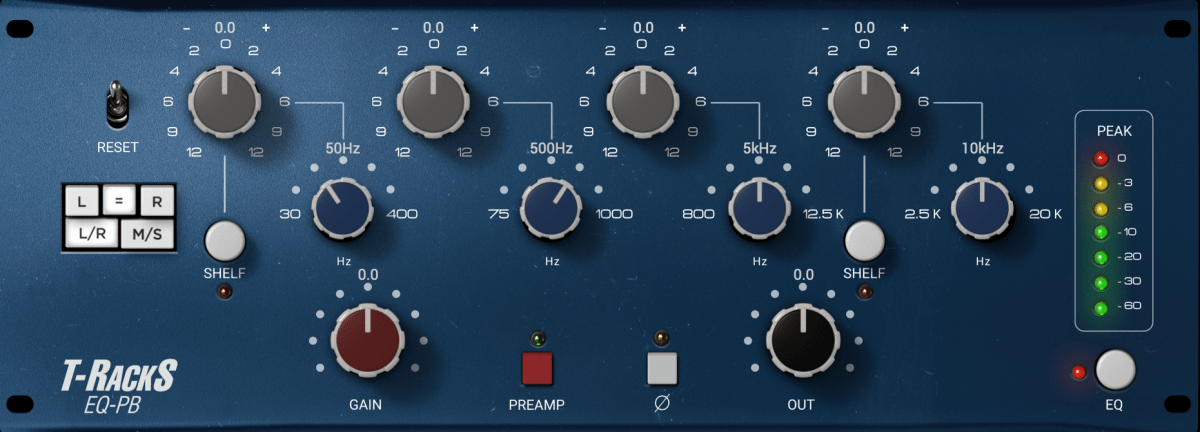
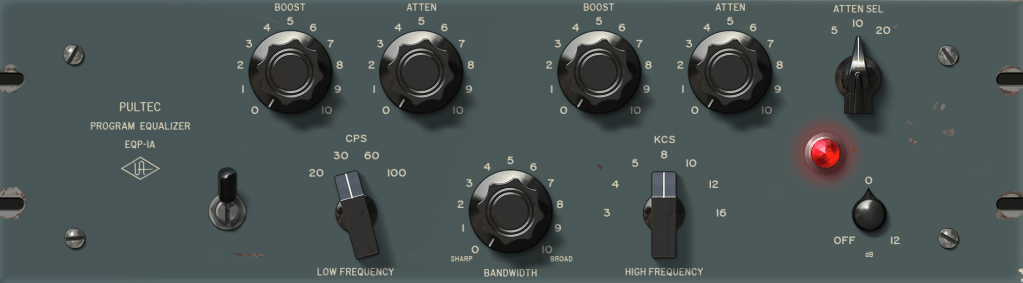
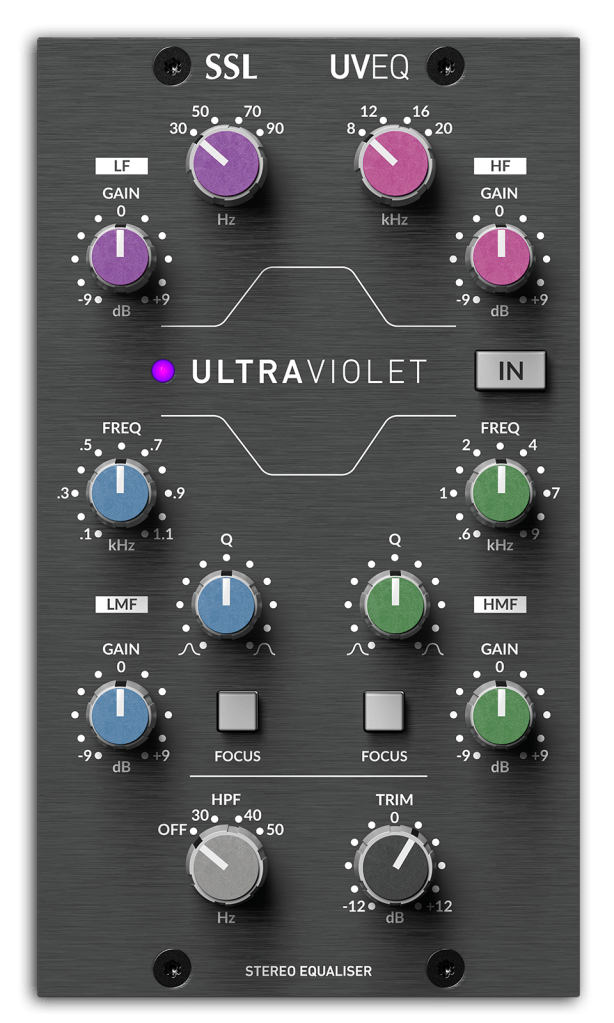
Examples of Tone Shaping EQs include the Pultec EQ,
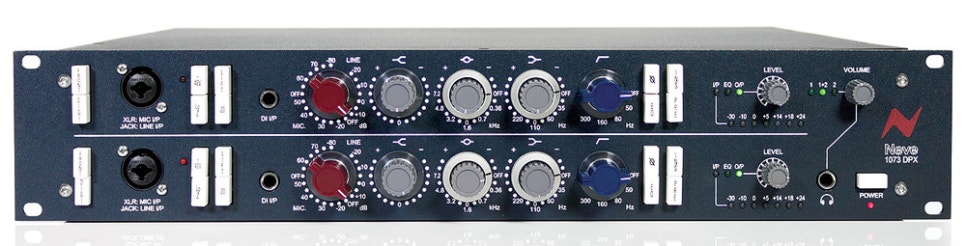
The renowned Neve 1073,
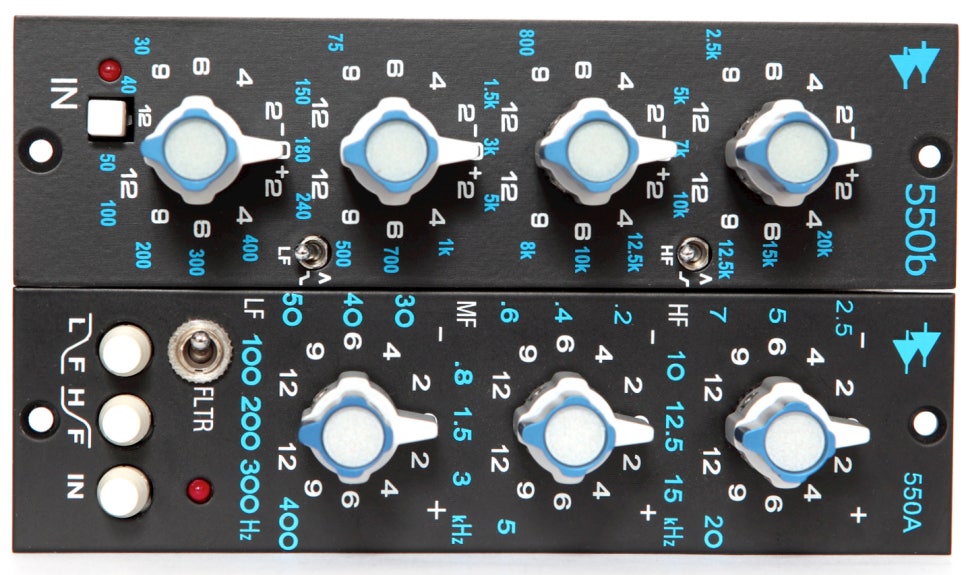
And the API 550 and 560 EQs.
Digital EQs like the Pro Q3 can also be used for Tone Shaping, though they lack saturation.
2) Surgical EQ
Surgical EQ is used to solve problems in the audio source. It’s used for addressing proximity effects, resonances, sibilance (often handled by a de-esser but sometimes with EQ), and various other unpleasant sounds that can occur during recording.
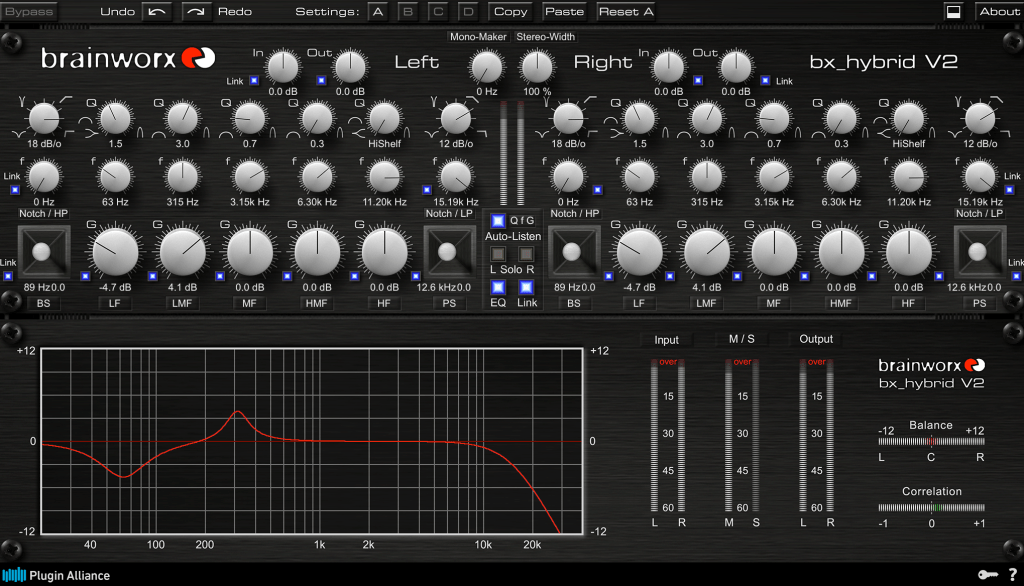
For these tasks, EQs without inherent coloration are preferred, typically with a high Q factor (narrow bandwidth). It’s beneficial to use EQs with an internal sidechain function (often labeled as an audition feature) that allows you to listen to the affected frequencies in isolation.
I mainly use the bx_hybrid V2 because I’m familiar with it, but most modern digital EQs come with an internal sidechain function, so any of them should work fine.
Conclusion
Using Tone Shaping EQ effectively requires an understanding of stereo imaging and tonal concepts. Surgical EQ, on the other hand, necessitates the ability to identify problems by ear. Ultimately, it takes practical experience to develop these skills.
I’m not claiming to be a highly experienced or notable expert, but I’ve found that there’s a significant difference between knowing these concepts in theory and applying them in practice.
Hello, I’m Jooyoung Kim, an audio engineer and music producer.
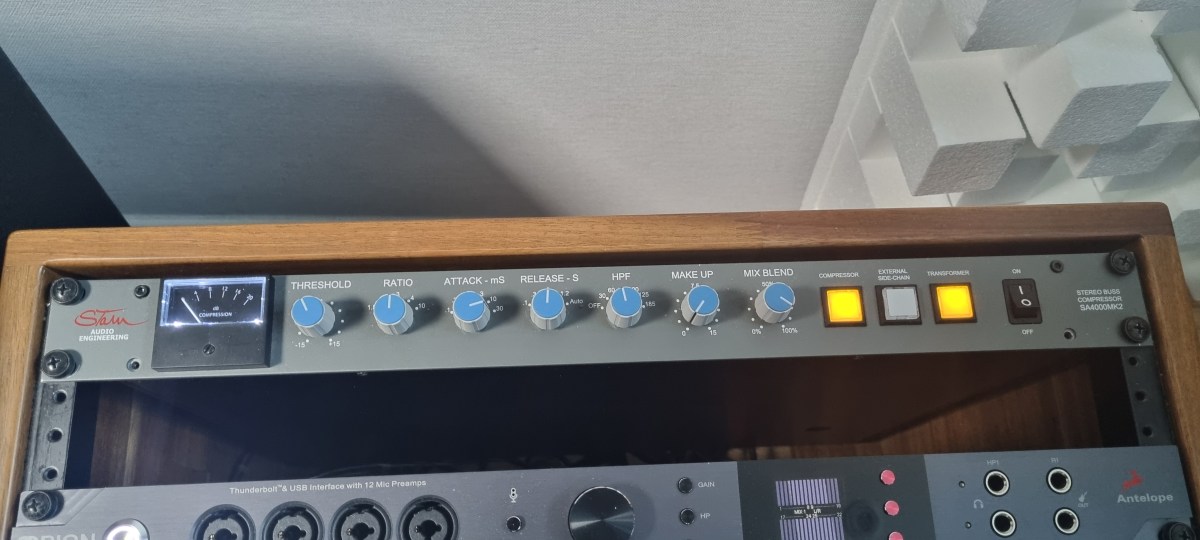
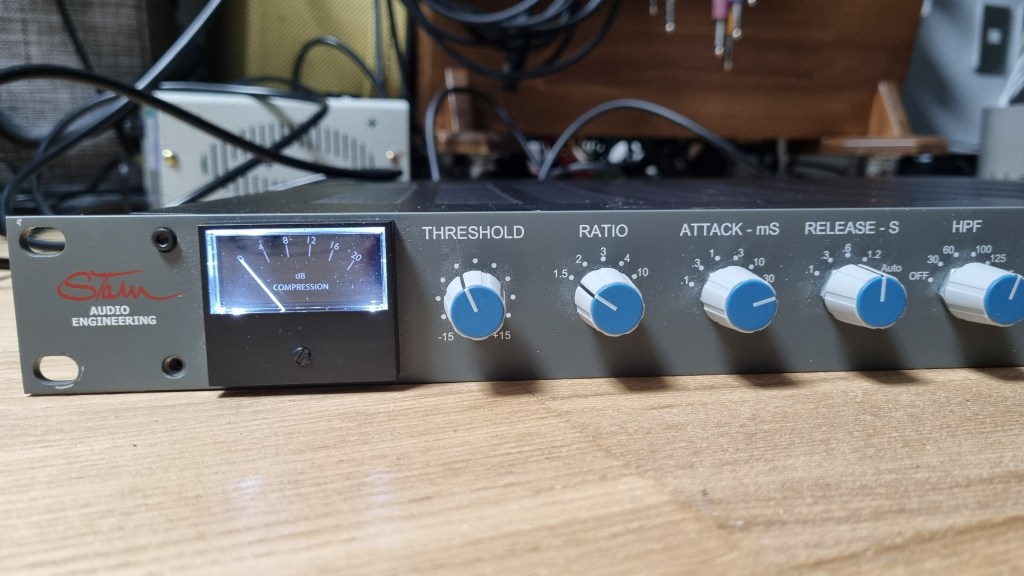
Today, I’d like to share my thoughts after using the SA4000 mk2 compressor for a couple of months.
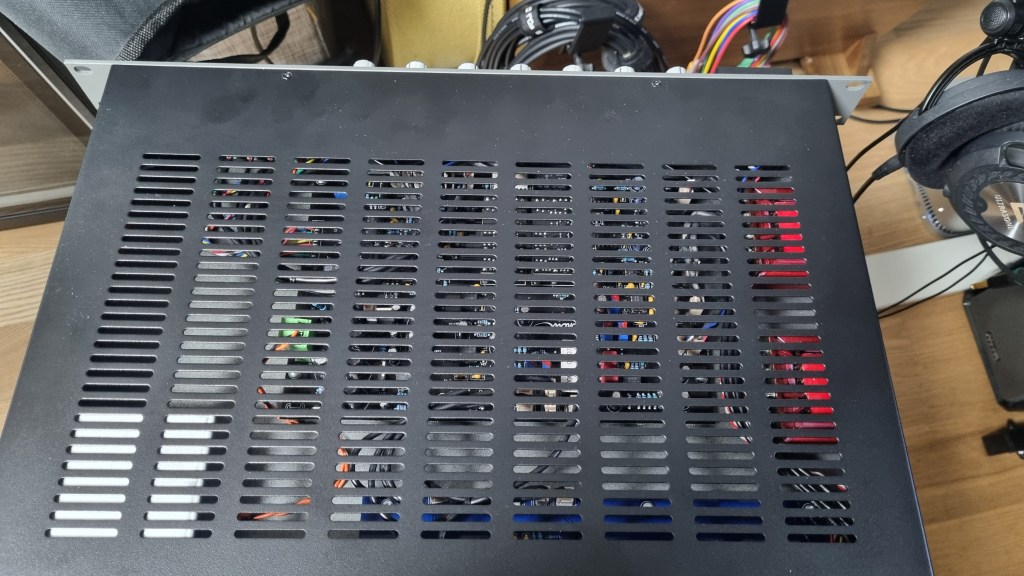
Appearance
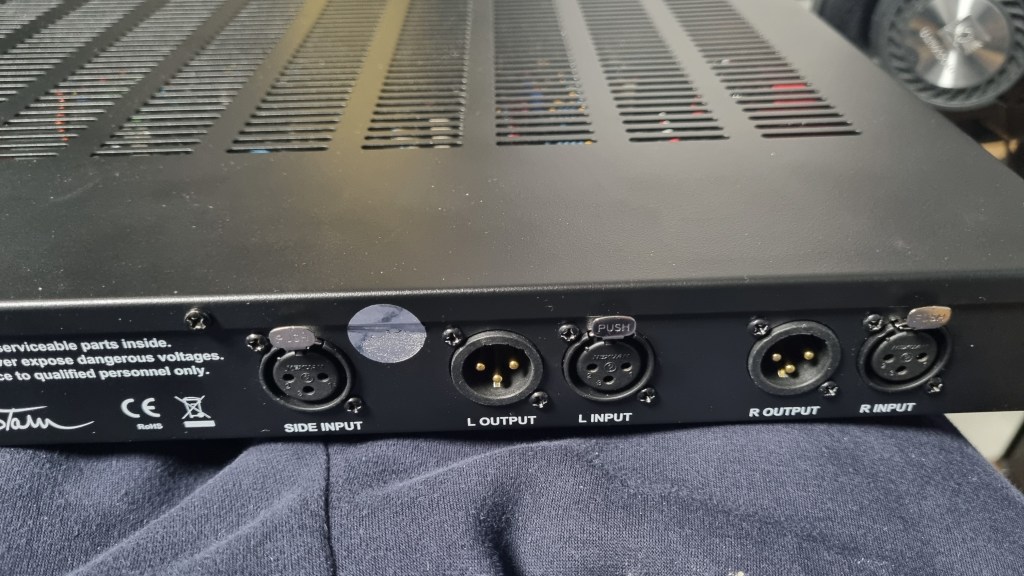
The back panel is equipped with XLR connectors throughout, and the sidechain input is a stereo unbalanced connection via XLR.
The exterior is quite standard for rack equipment, with a solid and heavy build. It’s a 1U unit and features a British Mod, noticeable by the two red Carnhill transformers on the right side.
The unit is relatively deep, so I had to connect a right-angled power cable to mount it properly.
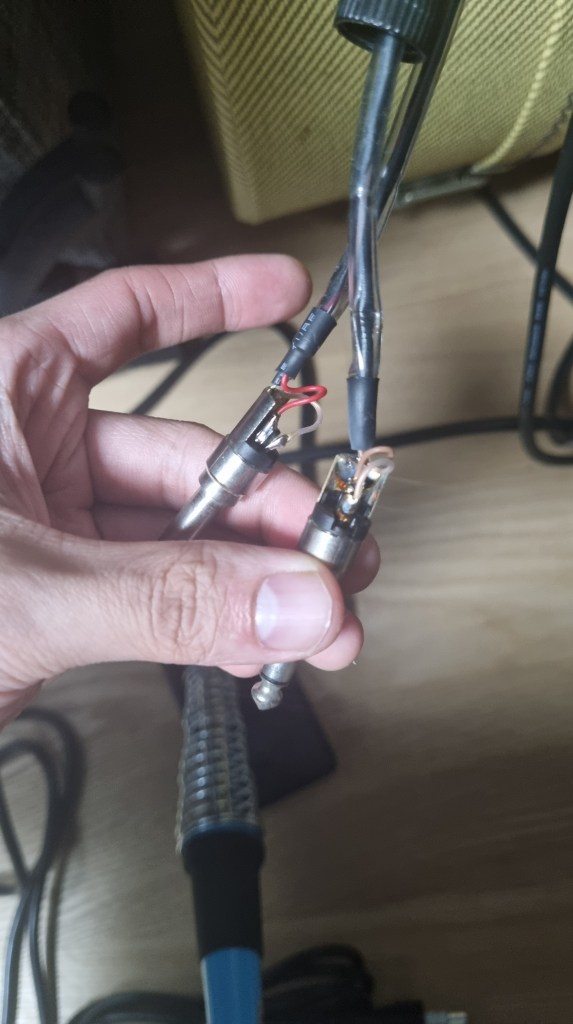
For the sidechain, I used my Send Return TRS to TS cable, converting the TRS to XLR to create an unbalanced stereo XLR to TS cable.
Usage
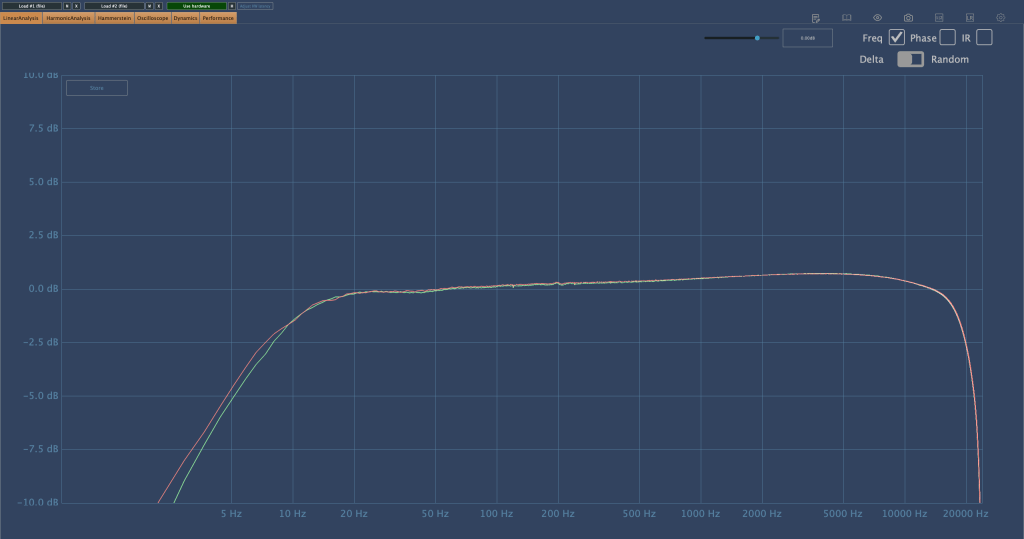
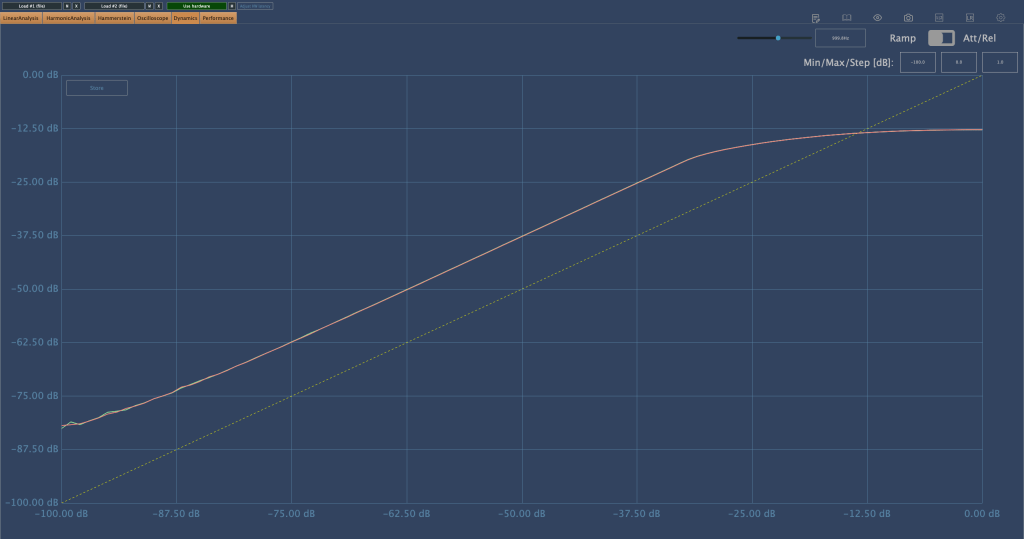
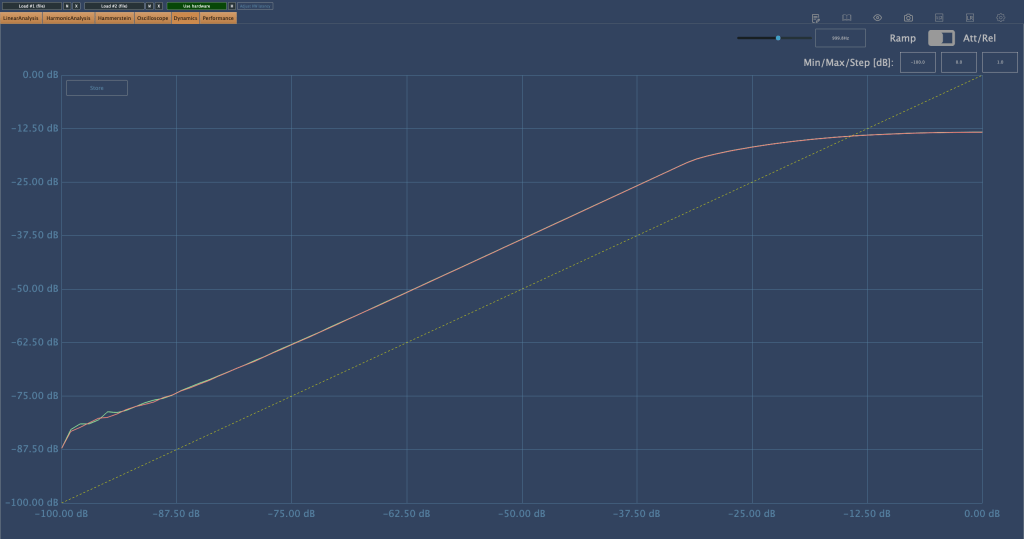
The left side shows the frequency response without the transformers, and the right side shows it with the transformers.
The difference isn’t drastic; the transformers slightly reduce the low frequencies and overall volume.
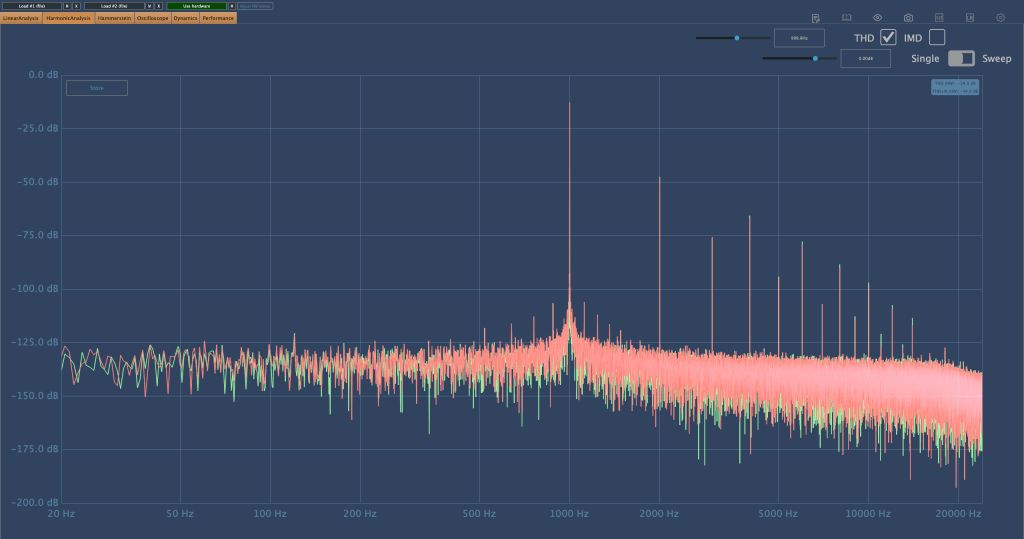
In terms of harmonics, there isn’t a significant difference except for the volume change. Again, the left side is without the transformers, and the right side is with them.
I examined the Ratio settings for any peculiarities and found that the Knee is slightly softer. The primary difference with and without transformers seems to be the volume.
In practical use, I noticed:
The high frequencies are considerably tamed, making it suitable for use as a bus compressor on harsh hi-hats.
Recording with the transformers engaged reduces the high frequencies, which isn’t to my taste.
When gain-matched, the version with the transformers engaged sounds slightly more pronounced.
These are the main points I’ve gathered.
Among the SSL clone compressor plugins I’m familiar with, I’ve never encountered one with this specific frequency response. It has a unique character.
In particular, I find it effective with BFD drums, where overheads or hi-hats often have excessive high frequencies. Using this compressor effectively tames those troublesome areas. It would also work well on a master bus for retro-style tracks, preserving that vintage feel.
Conclusion
Using hardware can be cumbersome. You need to prepare recall sheets for future mix adjustments, carefully manage equipment routing, and more. Despite these hassles, hardware is employed to capture its unique color and character.
This compressor, with its distinct features, has become a regular part of my setup. I’m using it frequently.
However, I don’t want to suggest that hardware is inherently superior. Both plugins and hardware are merely tools. As long as they suit your purpose and deliver the desired tone, it doesn’t matter whether it’s a plugin or hardware.
In that sense, I’m very keen on getting a tube preamp. I’ve been eyeing Oz Design, but it’s a little-known brand, so reselling might be challenging.
That’s all for today. See you in the next post!
I’m always open to reviewing hardware products! If you’d like me to review a product, please feel free to reach out at joe1346@naver.com.
Today, I will continue discussing the types of EQ from the previous post, focusing on Parametric EQ, Dynamic EQ, and Baxandall EQ.
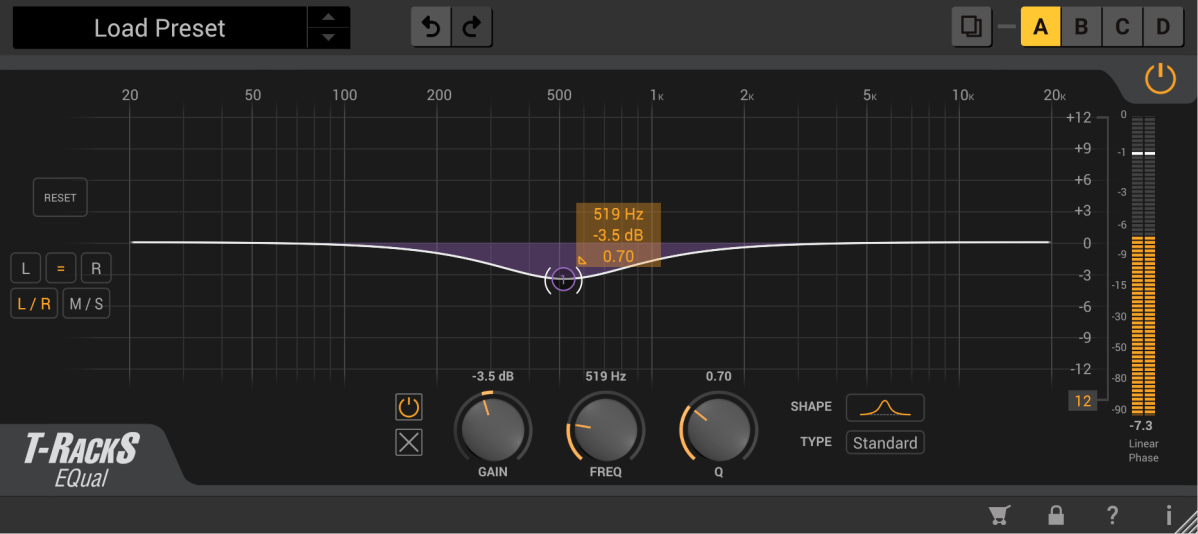
5) Parametric EQ
Parametric EQ was designed by the renowned engineer George Massenburg. It is commonly found as a built-in EQ in DAWs.
This type of EQ allows you to select the frequency you want to adjust and set the Q Factor, which determines the bandwidth of the adjustment.
These are examples of Parametric EQs!
Parametric EQ is used not only for musical purposes but also for addressing issues with sound sources. It can handle problems such as proximity effect from microphones, Singer’s Formant (a specific resonance found in vocalists), room resonance, and high-pitched squeaking noises from strings.
6) Dynamic EQ
Dynamic EQ combines the functions of a compressor with an EQ. It works similarly to a multiband compressor but with slight differences in how bands are set and how it operates.
A multiband compressor uses cut filters to define bands, while a Dynamic EQ defines bands according to the EQ settings.
As mentioned in the previous post, cut filters cause a phase shift of π/2 for every 6dB/oct. This means that multiband compressors can alter the sound due to phase changes even without any settings.
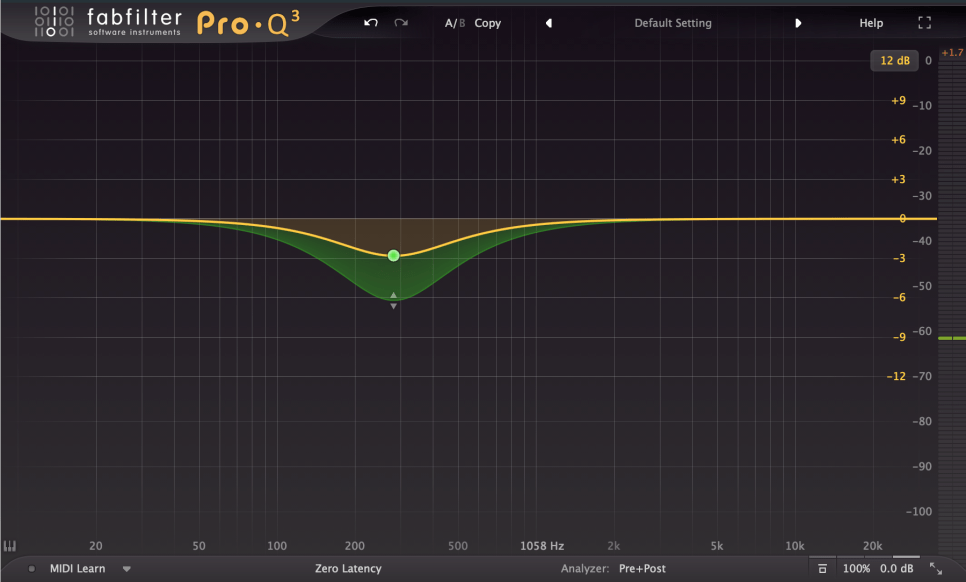
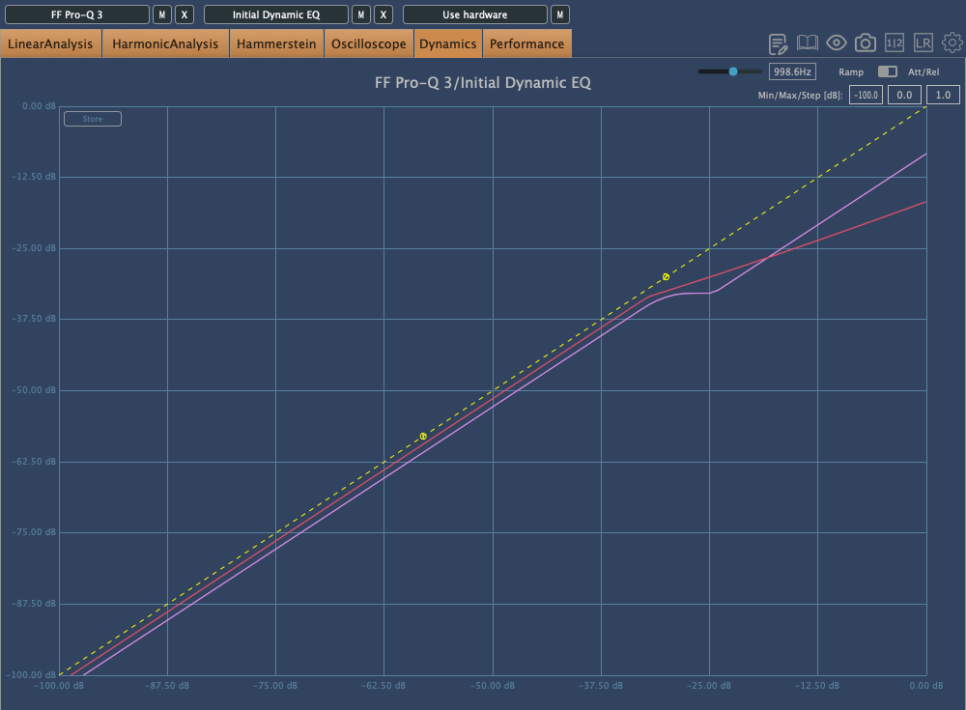
Depending on the Dynamic EQ, most do not allow you to set the ratio, attack, and decay like a compressor does. Typically, you can only set the threshold and the amount of volume reduction or increase.
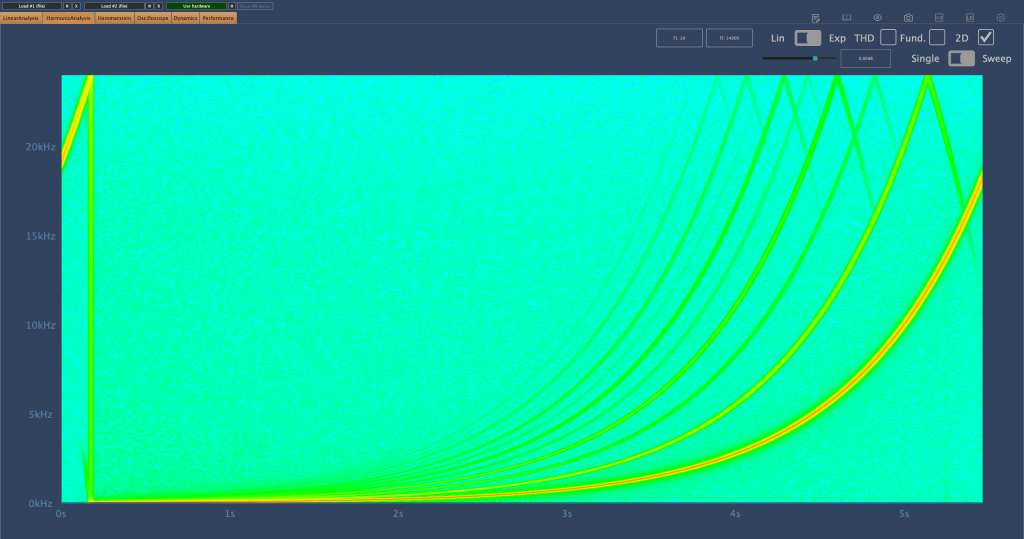
Because of this, the compression curve of a Dynamic EQ can appear different. The pink curve is from Fabfilter’s Pro-Q3, and the red curve is from Initial Audio’s Dynamic EQ. Although both are Dynamic EQs, their behavior is quite different.
Interpreting Fabfilter’s unique curve, it seems to compress the sound up to a certain point, after which it stops compressing and simply reduces the volume of the sound.
In simpler terms, for Pro-Q3, if the sound exceeds a certain level, it follows the dynamic curve (green) rather than the set yellow curve, acting more like a simple EQ.
However, their usage is generally similar. Dynamic EQs are often used when you want to reduce specific frequency bands. You can choose based on your preference.
7) Baxandall EQ
Baxandall EQ was introduced by Mr. Baxandall in 1952 through Wireless World magazine without royalties, making it widely used.
Due to its minimal phase issues, it is frequently used in mastering. It’s effective for adjusting broad frequency ranges, such as lifting high or low frequencies.
Examples include Tilt EQ and Dangerous’s Bax EQ.
This concludes the overview of various types of EQ. Besides these functional classifications, there are also categories like Zero Latency/Linear Phase/Normal EQs, and whether they are used for musical (Tone Shaping) or technical (Surgical) purposes.
I will continue with these topics in the next post.
Hello, this is Jooyoung Kim, an engineer and music producer.
There are numerous types of EQs available.
Today, I will describe some of these EQs.
Cut Filter, Band Pass Filter
Shelving EQ
Notch Filter
Graphic EQ
That’s it for today.
Parametric EQ
Dynamic EQ
Baxandall EQ
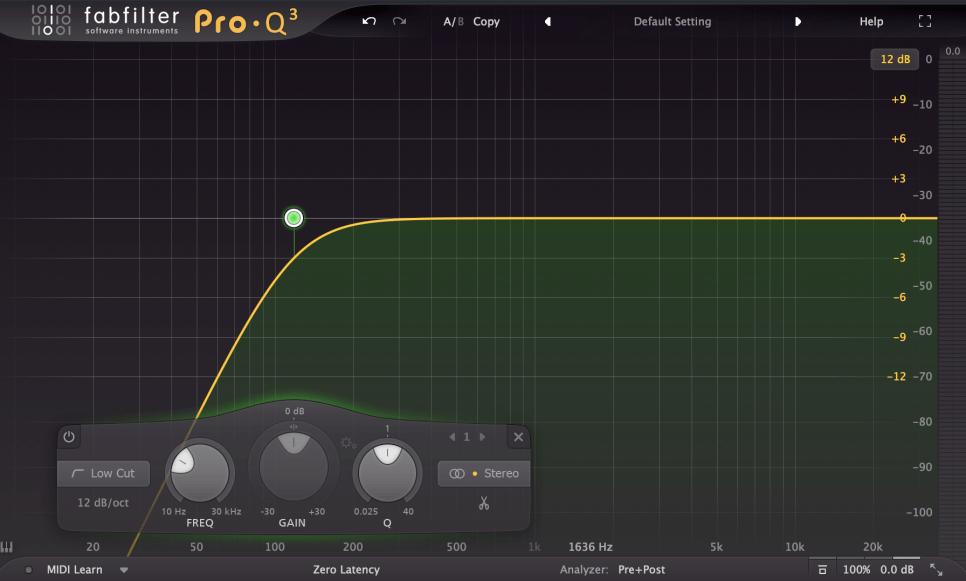
1) Cut Filter, Band Pass Filter
Cut filters are quite common and widely used. Low Cut and High Cut filters are frequently applied.
Low Cut filters are used to reduce low-frequency noises like vibrations from the floor or other low-frequency disturbances.
High Cut filters reduce high frequencies to create a lo-fi sound or to achieve a specific sound characteristic.
Low Cut filters are also known as High Pass filters because they let higher frequencies pass through. Similarly, High Cut filters are known as Low Pass filters.
The amount of reduction is often labeled as -6dB per octave (-6dB/oct) or Pole (with 1 Pole equating to -6dB/oct). Typical values include -6dB/oct, -12dB/oct, -18dB/oct, -24dB/oct, and so on.
While not exactly the same, a Band Pass filter can be thought of as a combination of these two filters.
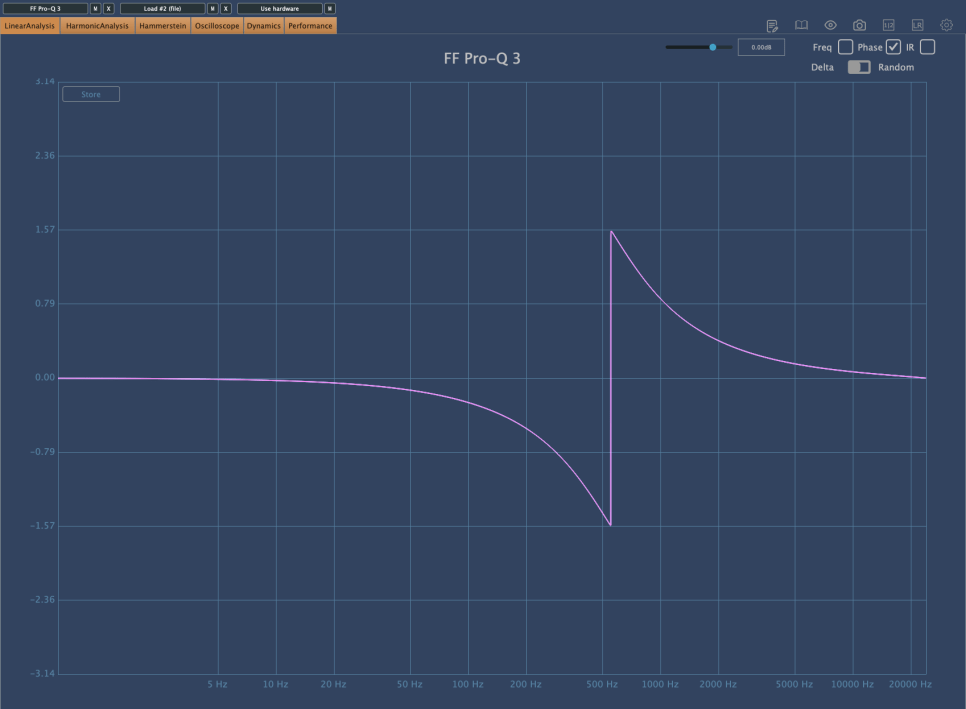
These filters significantly alter the phase.
The phase shift graph above shows the phase change when a -12dB/oct Low Cut filter is applied. You can see a phase shift of π (3.14) in the low-frequency range.
Comparing this with other phase graphs, you will realize that this is quite a significant phase shift. A large phase shift means that the sound will be quite different from the original. Therefore, using Cut filters indiscriminately can result in a sound that is far from the intended one.
I have previously discussed issues caused by phase cancellation.
Each Pole causes a phase shift of π/2. Using a steep Low Cut filter like -24dB/oct can result in a phase shift of up to 2π, so it’s generally not recommended to use it excessively.
However, use it when necessary.
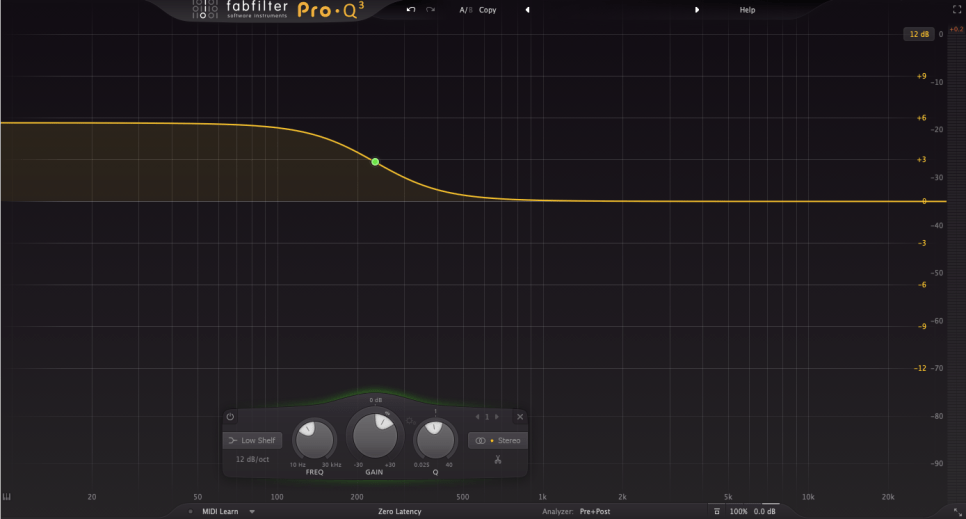
2) Shelving EQ
Shelving EQ, also known as Shelving Filter, adjusts the volume of frequencies in a shelf-like shape, as the name suggests.
It is used to lift or lower an entire frequency band.
As shown in the image above, Shelving EQs cause less phase shift, making them a good alternative to Cut filters.
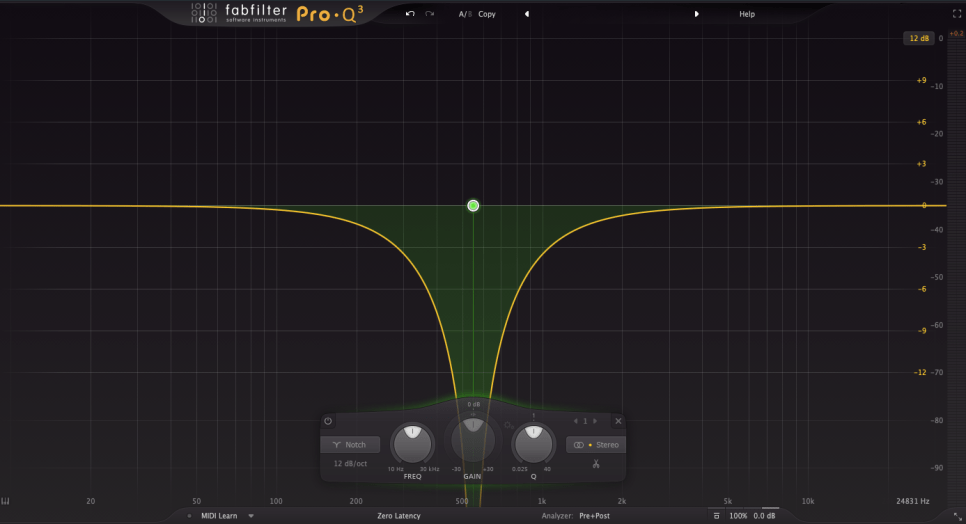
3) Notch Filter
Notch filters can be used to eliminate resonances that are difficult to control with other EQs or to create specific musical effects.
It is quite rare to use Notch filters in mixing. They are typically used for problematic sources that are hard to manage otherwise. I personally use them perhaps once a year in mixing.
In music production, Notch filters can be used on synthesizers to create interesting effects by modulating frequencies over time with an LFO.
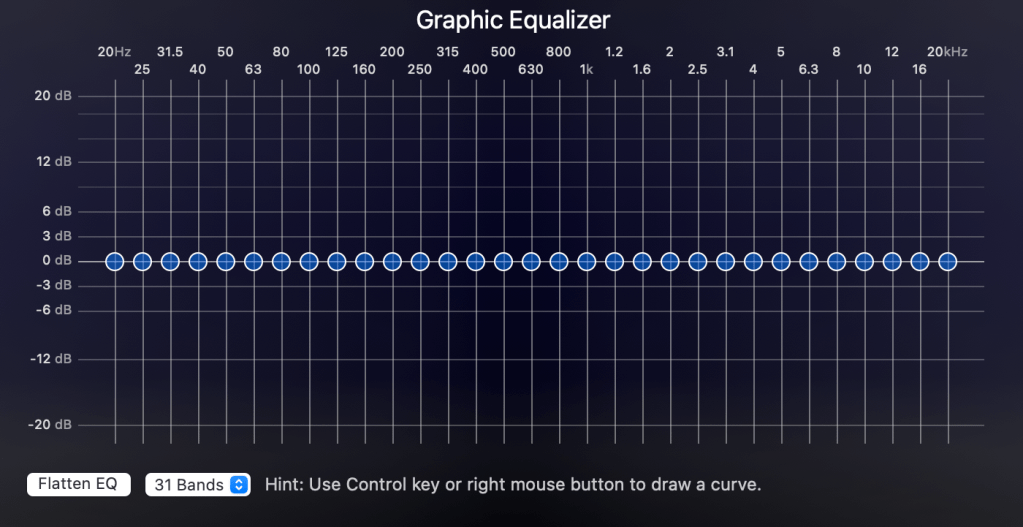
4) Graphic EQ
With a Constant Q setting, the Q value remains the same as the volume changes. With a Variable (Non-Constant) Q setting, the Q value changes with the volume adjustments.
These internal settings are usually described in the manual, so it’s best to read it for proper usage.
The phase shift is minimal. The common Bell-type Parametric EQ, which I will explain next time, also changes phase in a similar way.
In studio mixing, Graphic EQs are rarely used due to convenience. However, knowing these theories might be useful, especially if you also do live mixing.
Describing Parametric EQ, Dynamic EQ, and Baxandall EQ would make this post too long, so I will continue in the next article.
The main point I wanted to convey today is the importance of considering phase changes when using EQs.
If the sound is different from what you intended after adjusting the frequencies, it is often due to phase changes.
If it sounds good to your ears, that’s what matters. However, understanding what to watch out for and why can lead to more efficient and faster decision-making.