Orchestration Basics – Strings (3)

This article was written on August 6, 2022.

Hello? This is engineer and singer-songwriter Jooyoung Kim.

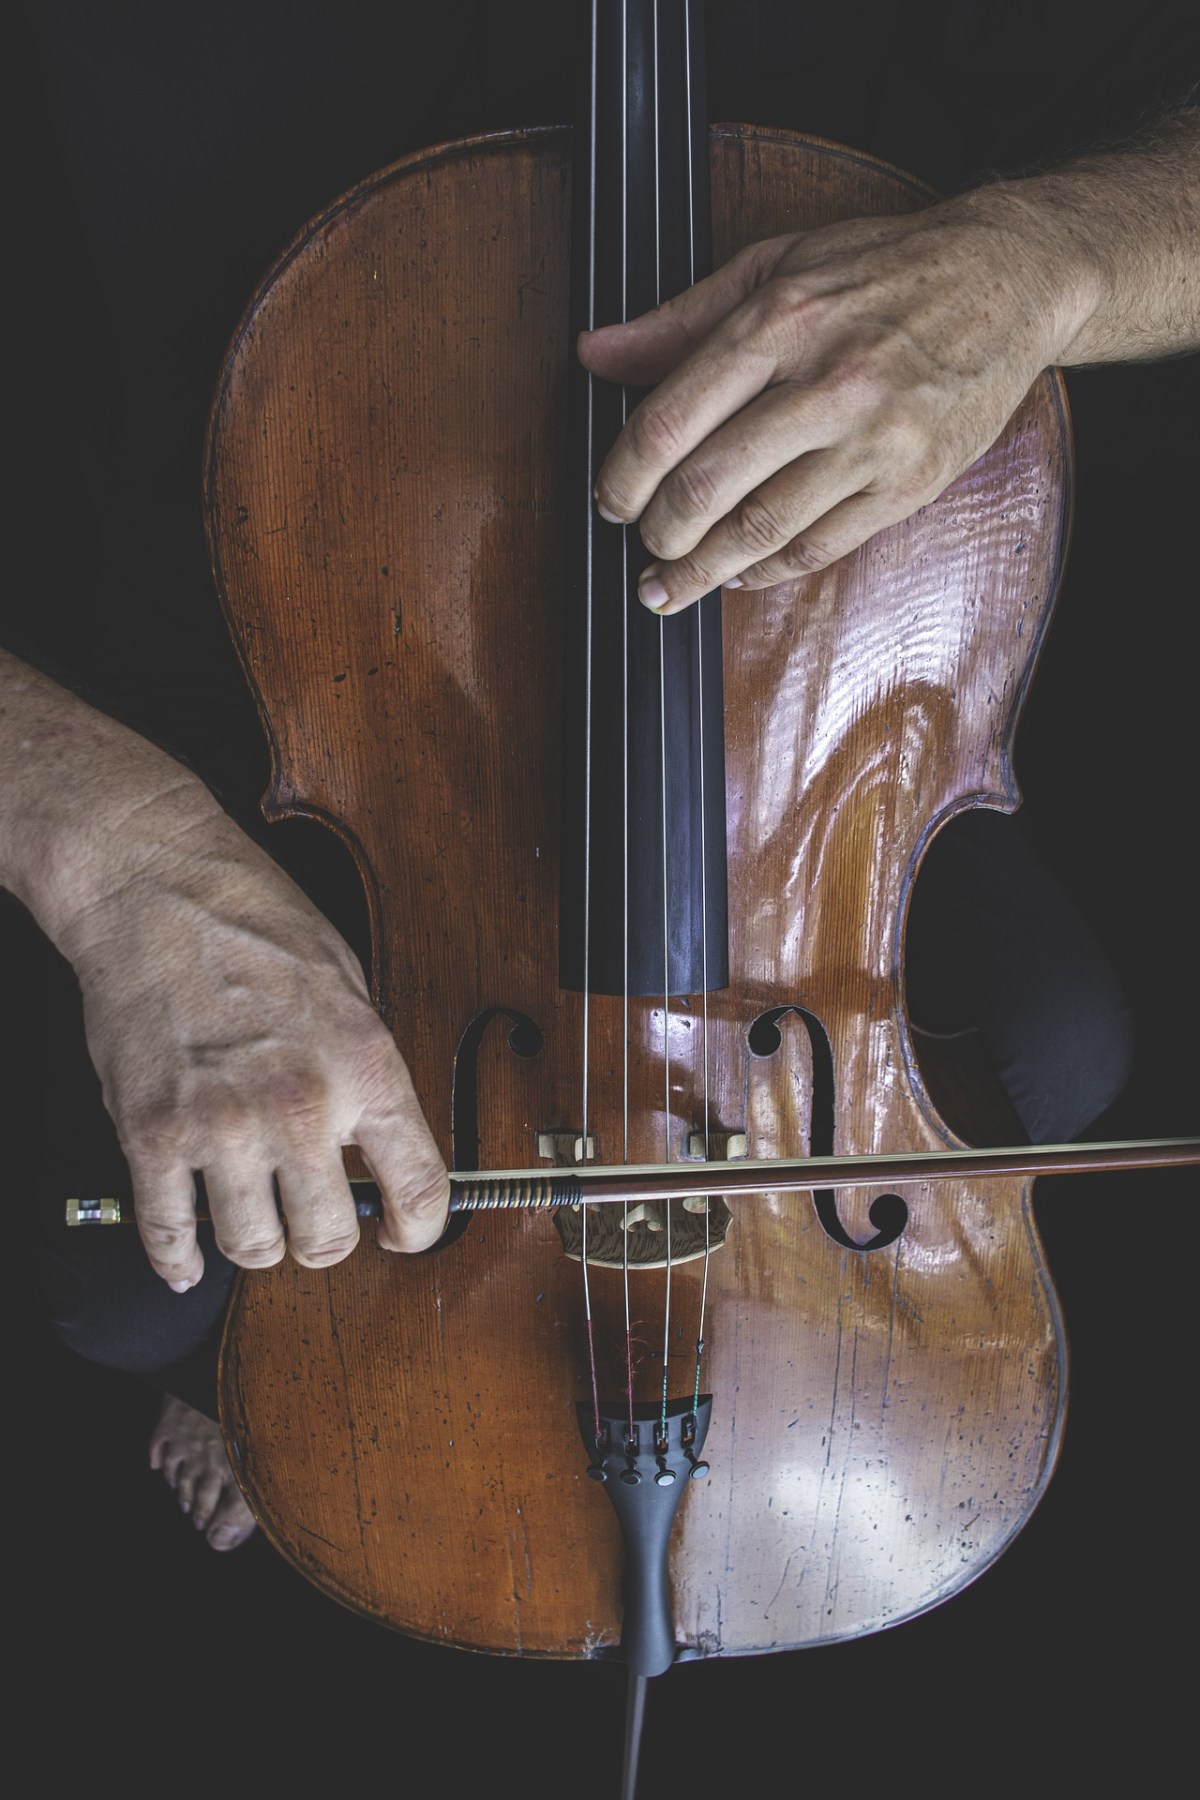
Continuing from the last article, today we will learn about bowing, a string technique.

Bowing can be broadly divided into two playing techniques: whether the bow falls off the string or not.

– On the String: Legato, Staccato, Detache, Marcato (Martele), Portato
– Off the string: Spiccato, Jete (Ricochet), Tremolo

​This is the classification done by the teacher who taught me, but as the teacher told me, the classification is not particularly important. Let’s look at them in order.
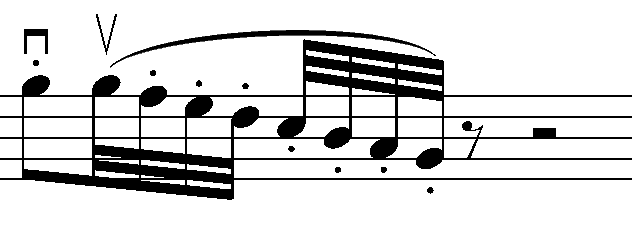
  • Legato

Legato is a playing technique in which the notes are played continuously without interruption. Therefore, whether it is Down Bow, where the bow is drawn downward, or Up Bow, where the bow is drawn upward, it is played all at once with one bow.

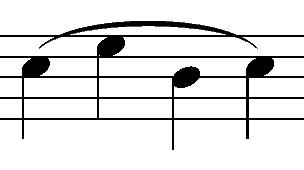
In sheet music, it is written as Slur as shown in the picture above, and it is the default playing method in most virtual instruments.

  • Staccato

This is a playing technique where you play briefly, with the string attached to the bow, at about 1/2 the original beat. Usually, in a virtual instrument, if there is only Legato or Sustain and no Sforzando playing technique, a mixture of playing such as Staccato with a strong attack nuance is used.

(I’d like to buy the Vienna Symphonic Library with Sforzando, but it’s too expensive…)

  • Detaché

Detaché, unlike Legato, is played with each bow. You might think it’s similar to Staccato, but this one is different in that it plays all the notes.

If you start from the tip (upper part) of the bow, it is marked At the Point, and if you start from the Frog (hand side) of the bow, it is marked At the Frog.

  • Marcato(Martelé)

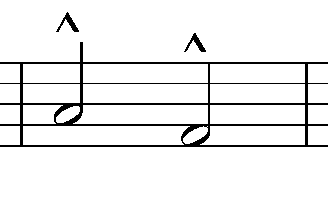
Marcato is derived from the Italian word Martellato, meaning hammer. It means to play hard and hard like a hammer, and is written in the shape of the letter Λ above the note.

Be careful because it is different from the Accent symbol, and unless it is a cheap virtual instrument, it is a common playing method, so it is good to use it actively.
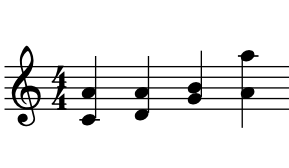
  • Portato

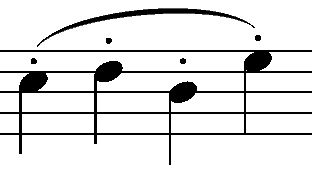
Portato is played somewhere between Legato and Detache. It is played with a continuous Down Bow or Up Bow, and is written as Slur Staccato as shown in the photo above.

Since the notation is the same as Spiccato, it must be written separately as Portato or the performer must interpret it independently by looking at the BPM and the length of the note.
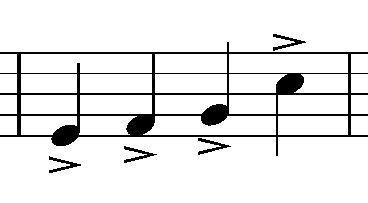
  • Spiccato

Spiccato is mainly used in the middle part of the bow and is a playing technique used in the fast section. It is common to use notations such as Spiccato or Portato, and write Spiccato below.

Like Detaché, because it is played with each bow, the attack is clearly audible, so this friend is also good to use as a layer when you want to express strong legato or sustain in a virtual instrument.

  • Jete(Jeté, Ricochet)

Jete means ‘to throw away’ and is a technique in which the bow is thrown away and thrown away. Because the notation is Slur Staccato, the notation of the four playing methods, Staccato, Spiccato, Portato, and Jete, is very confusing.

Let’s write well in the sheet..!
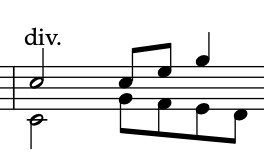
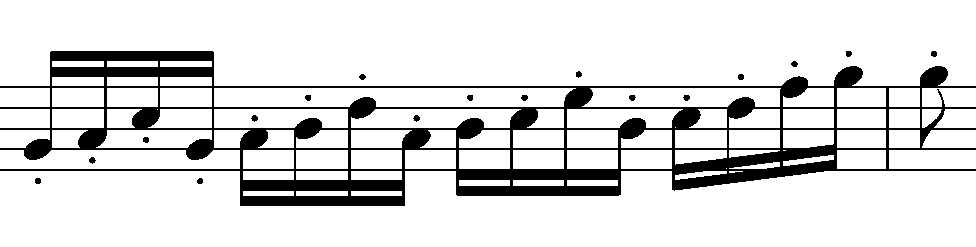
  • Tremolo
Tremolo (a)
Tremolo (b)

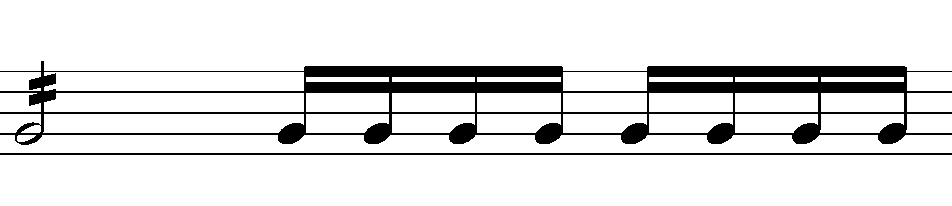
Tremolo is written as above, and the beat is determined by the number of sticks drawn on the note. You can think of one as 8 minutes, two as 16 minutes, and three as 32 minutes.

It is also divided into left-hand and right-hand Tremolo. (a) is the right-hand Tremolo, and (b) is the left-hand Tremolo.

Tremolo, which is played with the left hand, is often confused with Trill. Trill is generally played within a major 2nd, while Tremolo, where the note is moved, can be considered to be played over just a 3rd.

Tremolo can be used really effectively as a virtual instrument, so if you actively use it when writing songs, you can create dramatic effects.

  • Conclusion

There are some playing techniques that can be played on virtual instruments and some that cannot. There are three things to check when writing a song with string virtual instruments:

1) Will you use actual string instruments recorded and mixed?
2) If you can’t, what playing techniques can you choose and express on a virtual instrument?
3) Your song requires playing techniques that virtual instruments cannot use, but is it possible to create them using some unique tips?

As for number 1, if you mix real strings, it doesn’t matter which playing method you use, but for us musicians who are always worried about money, we have to worry between numbers 2 and 3 every time…

Therefore, you should first check the techniques you can use and use them according to the situation. There are other techniques, and we will look at them together in the next article..^^

Orchestration Basics – Strings (2)

This article was written on August 2, 2022.

Hello? This is Jooyoung Kim, a mixing engineer and singer-songwriter.

In the last article, we covered understanding basic string instruments. Today, we will continue with this and cover techniques mainly used in string instruments.

Shall we get started right away?

  • Vibrato

Vibrato can be used in 3 ways:

1) Finger Vibrato (using fingers)
2) Wirst Vibrato (using wrist)
3) Arm Vibrato (using the entire arm)

Depending on the player, it is used because it is easy to play and effective, but as far as I know, there is no virtual instrument that has been selected for this yet.

I think you just need to know that something like this exists.

  • Double Stop

Double Stop refers to playing intervals and chords. It simply means producing two notes at the same time. A triple stop means playing three notes, and a quadruple stop means playing four notes at the same time. When playing multiple notes at the same time, you need to think about their positions.

In the last article, I said there was a formula for double stop, right?

When the upper note is played down a perfect 5th, it is possible as long as the difference from the lower note does not exceed an augmented 4th. For the viola, it is possible as long as it does not exceed a perfect 4th, and for the cello, it is a major 3rd.

In addition, simple features include

1) It is difficult to establish a major 3rd degree relationship, and a perfect 5th degree or more is desirable.
2) Since double stopping with distant strings is impossible, it is composed of adjacent strings.
3) Good effects are also observed for intervals between the 3rd and 6th (perfect 4th) or intervals between the 5th and 8th (perfect 4th).
4) In the case of Triple Stop or Quadruple Stop, Secco (sound made all at once at the same time) is not possible due to the curvature of the fingerboard.

Depending on the virtual instrument or the playing method of the instrument, Double Stop may or may not be possible. This is a playing method that you must carefully read the manual of the virtual instrument you plan to use.

  • Division

Division is a technique that can be used because it is an orchestra. In Double Stop, each person plays all the notes, while in Division, the notes are played separately by each person.

A double stop would be two groups, a triple stop would be three groups, and a quadruple stop would be four groups, right?

Abbreviated as Div. Alternatively, it is written in the score as Division. Some of these playing techniques are performed automatically depending on the virtual instrument.

A representative example is LASS (LA Scoring Strings).

  • Unision & Doubling

In classical music, unification refers to a technique in which different instruments produce exactly the same sound, and doubling refers to a technique in which sounds are produced in an octave relationship. This should not be confused with what we say about recording doubling in pop.

Violoncello and Contrabass often form a doubling relationship, and in many cases, doubling is done by placing an additional high string on top of Violin 1. When playing loudly and strongly, Violin 1 and Violin 2 sometimes unify.

  • Scordatura

Scordatura means anomalous coordination.

If you play guitar, you may have done this often, but string instruments often use irregular tuning depending on the song.

However, virtual instruments often do not support irregular tuning, so unless it is particularly necessary, it is more convenient to just use the original tuning and write the song.

In this way, we learned about external(?) techniques rather than how to play with a bow. In the next article, we will look at bowing, which is determined by how you play the bow.

Dangerous 2Bus Review

This article was written on August 9, 2023.

Hello? This is engineer and singer-songwriter Jooyoung Kim.

Today I’m going to review the old Dangerous 2Bus that I purchased a few months ago. Well, shall we begin?

  • Appearance

The highlight is the slightly old-fashioned purple color. It’s a little more dull purple than the product photo above, but it reminded me of the Evangelion animation.

Each channel is grouped in stereo, and when you press the mono button, you can use each of the two linked channels in mono.

Additionally, there is a function that can increase 6dB for each channel through the 6dB button. The final volume can be adjusted with the front step knob.

There are two outputs at the back, Main and Monitor, which can be used for different input sources.

REM/EXP is a terminal that expands the channel by connecting an additional Dangerous summing mixer via a D-Sub cable. A separate external power source is used for power.

  • Measurement

Basically, this is the frequency response graph that can be seen when the In Out volume is adjusted.

If the volume is low,

the frequency response appears like this. You can see that the low range is slightly emphasized and the high range is cut.

It’s a simple drum sound with BFD3 and guitar with bass and power chords. The sound is deteriorated because it’s Sound Cloud, but it would be good to see how it changes.

Harmonic distortion was almost non-existent.

The basic noise floor was also small.

​Another feature is that if you use the stereo channel without pressing the mono button, the sound is reduced by about 6dB. That’s why I thought they made a 6dB button.

This time, I gained some understanding of the equipment while using it in the mix, and it has its pros and cons. I like it, but I think it might not be good for people who like a lot of high-pitched sounds.

Still, it seems to be worth the price of a used product.

I hope you enjoy my review.
See you again in the next article..:)

I’m always open to reviewing hardware products! If you’d like me to review a product, please feel free to reach out at joe1346@naver.com.

Arturia FX Collection 2 Plug-In Review (Part 7, Phaser BI-Tron)

※This article is a review written on July 21, 2021 after being selected for the FX Collection 2 experience group run by ‘Samick’ and receiving product support for a certain period of time. I only received support for the product and wrote the rest myself.

Finally, the last plugin, Phaser BI-Tron.

This Phaser is a clone plug-in of a pedal effect called Mu-tron Bi Phase, released in 1974. It consists of two phasers, and the routing of these two phasers can be adjusted to provide various effects. It is said that many famous musicians such as Stevie Wonder, Grateful Dead, Smashing Pumpkins, and Lee Scratch Perry (dub) used it, and the Expression Pedal of the original hardware was also reproduced so that the amount could be adjusted.

Routing through Phaser can be intuitively understood at a glance. When you change routing within the plugin, it is also shown on the display.

Signal Flow may seem a bit difficult, but actually handling the plugin is not that difficult.

​Basically, BI-Tron Phaser uses an LFO called Sweep Generator to adjust the degree of the Phaser effect. This can be given by a pedal, or by using both a pedal and a sweep generator, and the above Signal Flow can be seen as showing that it can be adjusted with various parameters.

I think you can roughly understand the rest if you look at it. The Phaser BI-Tron plug-in has more parameters that can be adjusted than you might think, so it’s a bit confusing, so let’s take a look at them one by one.

  • Sweep Generators

BI-Tron Phaser has two LFOs. Adjusts the LFO that goes into Phaser A and B. As you can see, you can adjust the rate to sync or adjust it between 0.200 Hz and 20.0 Hz.

​In addition, only Sweep Generator 1 can control the LFO rate with a pedal, and Sweep Generator 2 cannot be adjusted with a pedal. There are three LFO shapes to choose from: Sine, Ramp, and Square.

  • Phaser

It’s quite ironic that the plugin name is Phaser, but the parameter name is Phasor, but anyway, there are two Phasors, A and B.

Depth 1 and 2 determine the extent to which Sweep Gen 1 and 2 enter, respectively. At 1, the LFO will not be used at all, and at 10, the LFO will be used at the highest amount.

Through Feedback, you can change the feel of the Comb Filter, and through the Sweep button, you can decide whether to give the LFO to the Phasor with Sweep Gen, control it with the Pedal, or use a combination of both.

The Norm/Rev switch on Phasor B is a switch that reverses the polarity of Phasor B. If you only invert the phase of Phasor B like this, the effect will be more noticeable.

Arturia’s manual tells you to use R.INV in Advanced Control to create a fun Stereo Phasing effect.

  • Manual & Envelope

Manual Mode is a mode for manual control using the pedal. You can select it by pressing the button labeled MAN at the bottom left, and you can adjust it by pressing it with automation or the mouse.

​Envelope mode is a mode that allows the pedal to operate according to the envelope of the audio signal. It will be easier to understand if you touch it a few times, but roughly speaking, you can think of it as trimming the envelope based on the input source and using it as a trigger for Phaser.

Right below the text that says Envelop Follower, there is a window where you can select the trigger source called SRC. Here, you can select the source that goes into A, the source that goes into B, a combination of both, or use Sidechain. You can also choose an external source.

You can see what these trigger sources sound like by clicking on the speaker shape on the right. However, what is a bit disappointing is that when you touch Comp, Input Gain, Attack Release, Delay, etc. below, you cannot hear the changing sound.

Delay is basically in ms units, but can be selected by beat through the Sync button, and the remaining units can be adjusted on a regular basis.

  • Advanced Control

Phaser BI-Tron’s Advanced Control includes controls for Hi Pass Filter and Phasor A and B.

​Hi Pass Filter is a 12dB/Oct filter. Filters the low range at the input stage so that only high frequencies are modulated. Arturia says it can be used to keep the low range of sounds with low registers stable, such as bass or kick.

The part written in Poles is a parameter for how much All-Pass-Filter will be used. The more you use, the stronger the Comb Filter effect will be and the less bandwidth it will require. It is said that the original hardware used 6 All-Pass-Filters.

Mix, like other plug-ins, is a parameter that determines the ratio of the dry/wet signal to be given, and R.INV is a switch that inverts the phase of LFO 1 and 2 entering Phasor A or B. If you press this switch, you can get a much wider stereo image.​

  • Samples

There are too many parameters in this, so it’s hard to know how to present it.

​Phasor A, B routing can be done differently, and whether Depth 1, 2, and Feedback of each Phasor can be controlled with a pedal or Sweep Gen. If controlled with Sweep Gen, how to set the LFO shape and rate, and adjust it with the pedal. Whether to control with the envelope, select the Pole and R.INV buttons, and even mix…

​Honestly, I think it would be very difficult to tell you about everything about the plug-in just by telling you a few of them. However, I can’t skip it without listening to the samples at all, so I’ll listen to one original track, one in the default state, and two that I’ve set up the way I want.

Honestly, I think it would be really difficult to judge based on this alone, and I also feel a bit disappointed, but I think it is an unavoidable limitation.

  • Phaser BI-TRON overall review

It’s not bad, honestly, it’s okay, but the plugin is too heavy. It’s a bit lighter than the Bus Force I mentioned in the previous article, but it’s still heavy.

​In particular, modulation-type plug-ins such as Phaser are mainly used for individual instruments or tracks, but the question arises as to whether this can be applied to individual instruments in a flashy way.

When you install one plug-in… Of course, adding 2-3 more doesn’t mean it will consume the CPU twice or triple, but I still think it’s a bit excessive.

Therefore, if I were to use it, I would probably use it with the feeling that it would only be used for one or two instruments, a bit like MSG.