Brainworx Mixing Month Plugin Sale (2): Black Box Analog Design HG-2 (~3/31, $31.90)

Hey there! I’m Jooyoung Kim, an engineer and music producer.

Today, I’m picking up where I left off to talk about more of the Brainworx plugins on sale this month:

  1. Shadow Hills Mastering Compressor – Compressor
  2. Shadow Hills Mastering Compressor Class A – Compressor
  3. Black Box Analog Design HG-2 – Saturator
  4. Black Box Analog Design HG-2MS – Saturator
  5. Mäag Audio EQ4 – EQ
  6. SPL Transient Designer Plus – Transient Shaper

In this post, I’ll be diving into the Black Box Analog Design plugins from that list—specifically HG-2 and HG-2MS.

As I mentioned last time, I personally bought and have been using 1, 3, and 5. For this round, I received NFR (Not for Resale) licenses for 2, 4, and 6 from Brainworx via Plugin Boutique.

Also, if you purchase through the links in this blog, I’ll earn a small commission, which really helps me keep going—so thank you in advance! ㅜㅠ

Ready? Let’s get started!


3 & 4) Black Box Analog Design HG-2 and HG-2MS

Click image to purchase Black Box Analog Design HG-2Ms

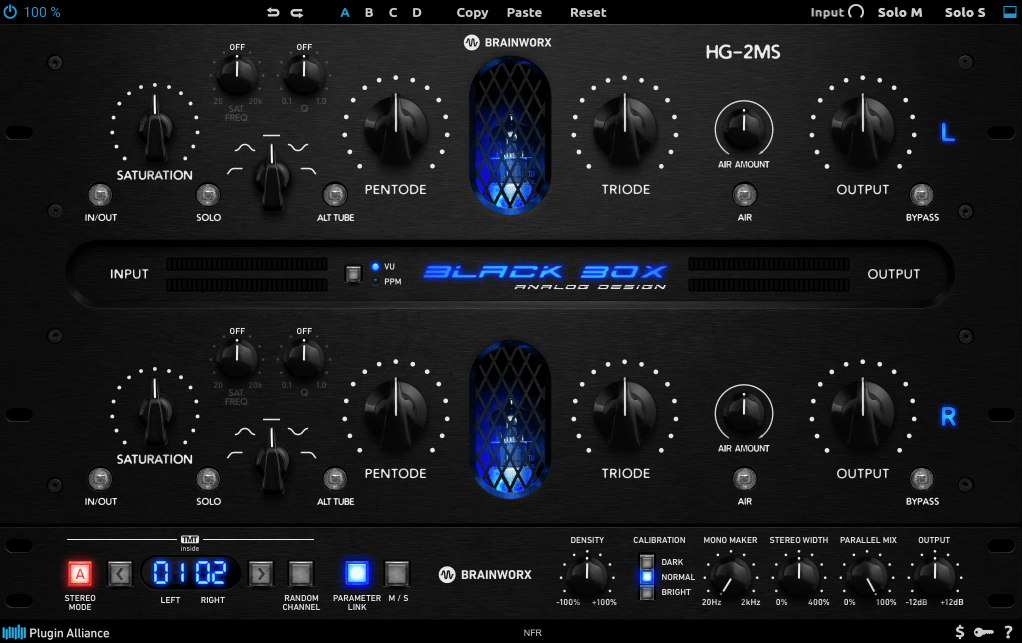
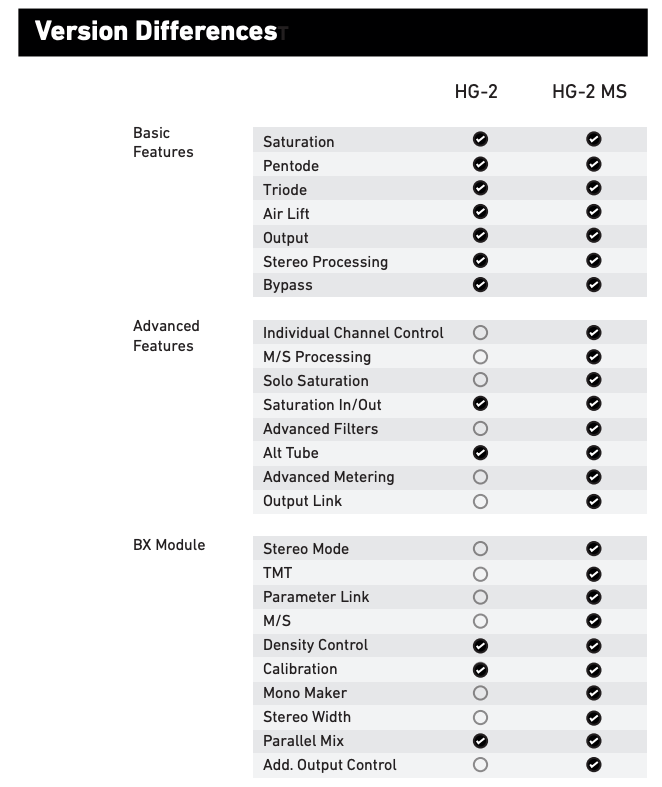
When I tested these two, I noticed that with the same parameter settings, their responses are pretty much identical. The differences are outlined in the manual, but since they’re so similar, I’ll explain them together using the HG-2MS as the reference point.

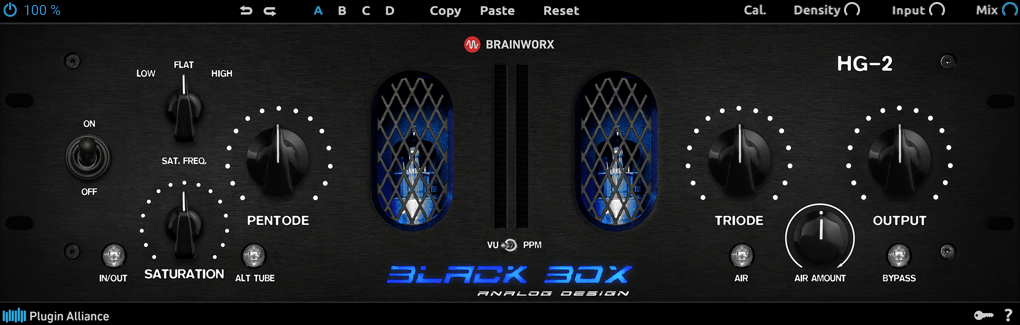
First off, these plugins are recreations of the HG-2 hardware from Black Box Analog Design. As you’d expect, it’s all about those glorious vacuum tubes front and center. The HG-2 uses a combination of pentode and triode tubes, running your signal through both for that signature tube saturation—that’s the core of what this hardware (and plugin) is about.

It also has an extra triode tube you can blend in. The original hardware’s signal routing looks something like this:

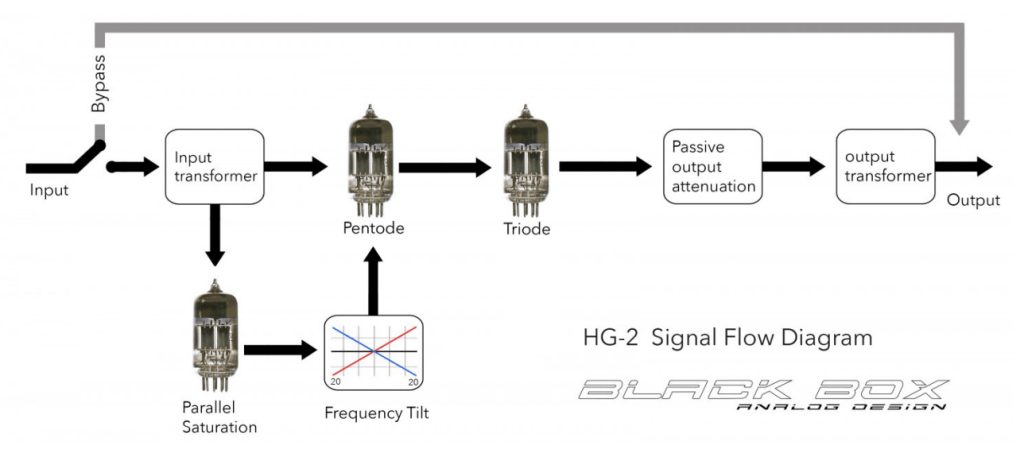
The output stage features a Sinemag transformer, while the parallel saturation path uses a pair of 12AX7 triode tubes.

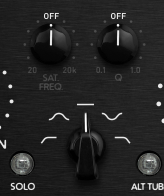
Looking at the parameters, the “Saturation” knob on the far left controls the amount of parallel saturation. The IN/OUT button toggles whether this parallel processing is active, and the ALT TUBE button switches the tube manufacturer for the parallel saturation path, altering the harmonic distortion character.

Even if you turn off the Saturation knob, the signal still passes through the pentode and triode tubes in series, so this is a piece of gear (or plugin) that’s inherently heavy on saturation. That means if you set either Pentode or Triode to 0%, you’ll get no sound at all.

Let’s break down how it works:

Photo: Frequency response—Default state, Saturation In, Alt Tube pressed, from top to bottom

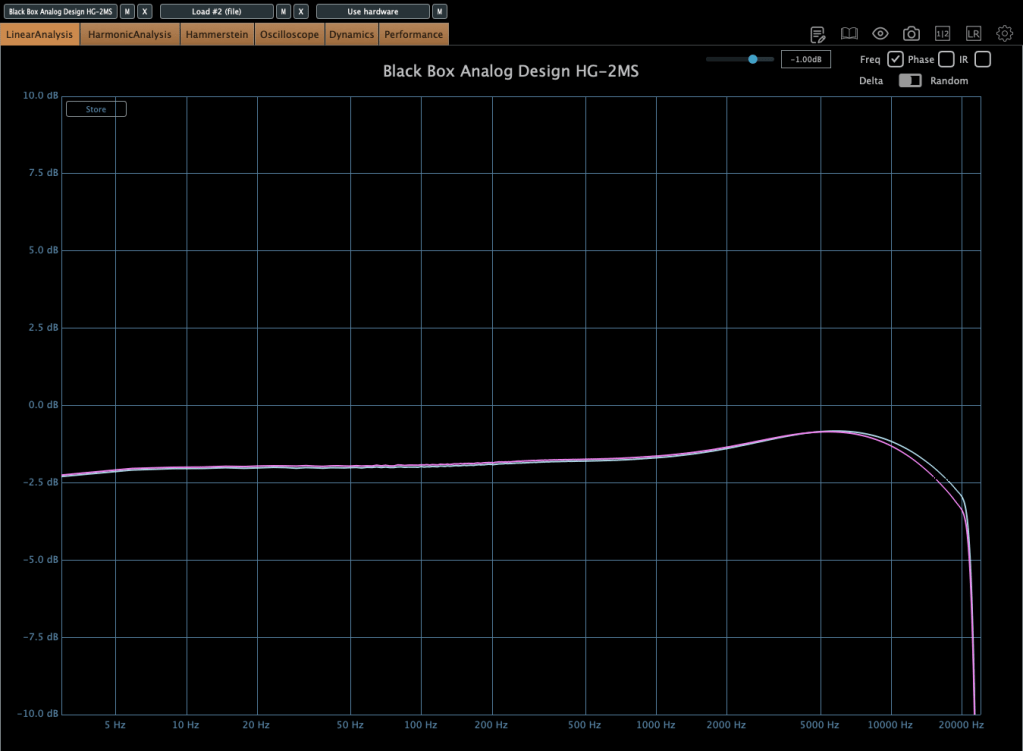
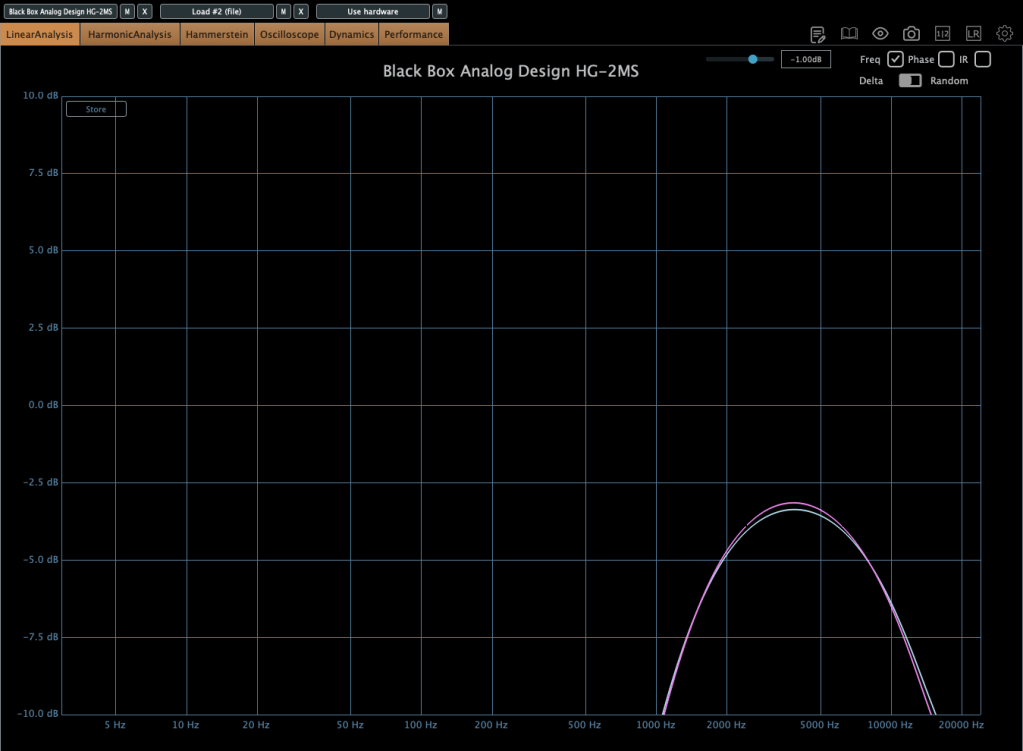
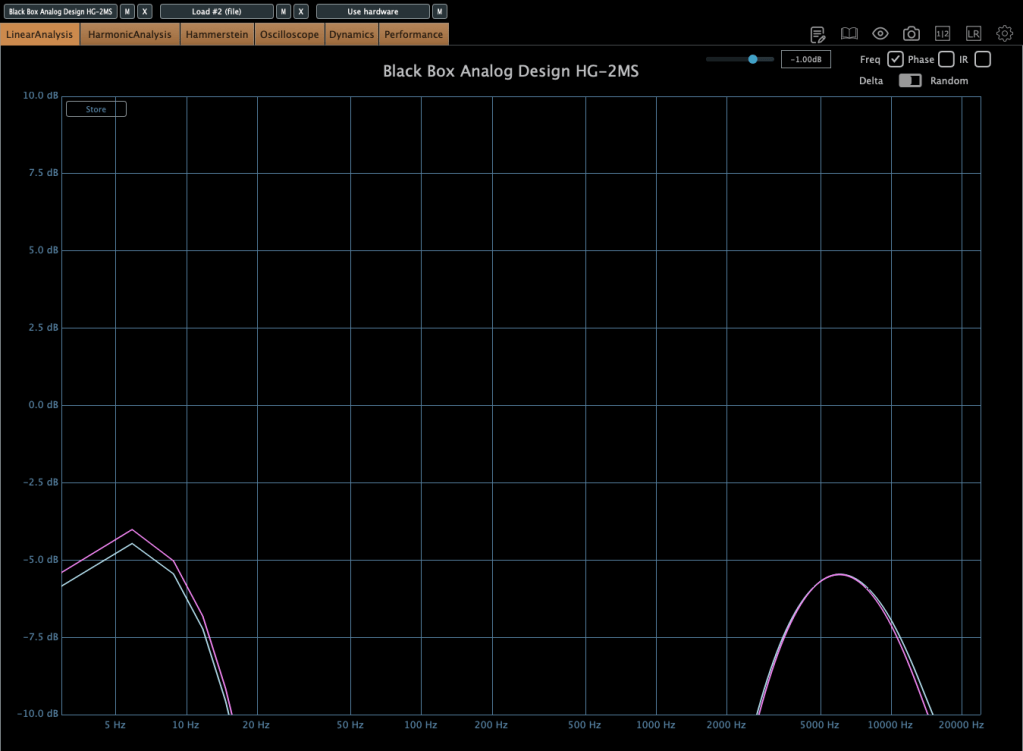
This shows the frequency response in the default state, with Saturation turned on, and with Alt Tube engaged.

Photo: Frequency response—Dark vs. Bright calibration, from right bottom

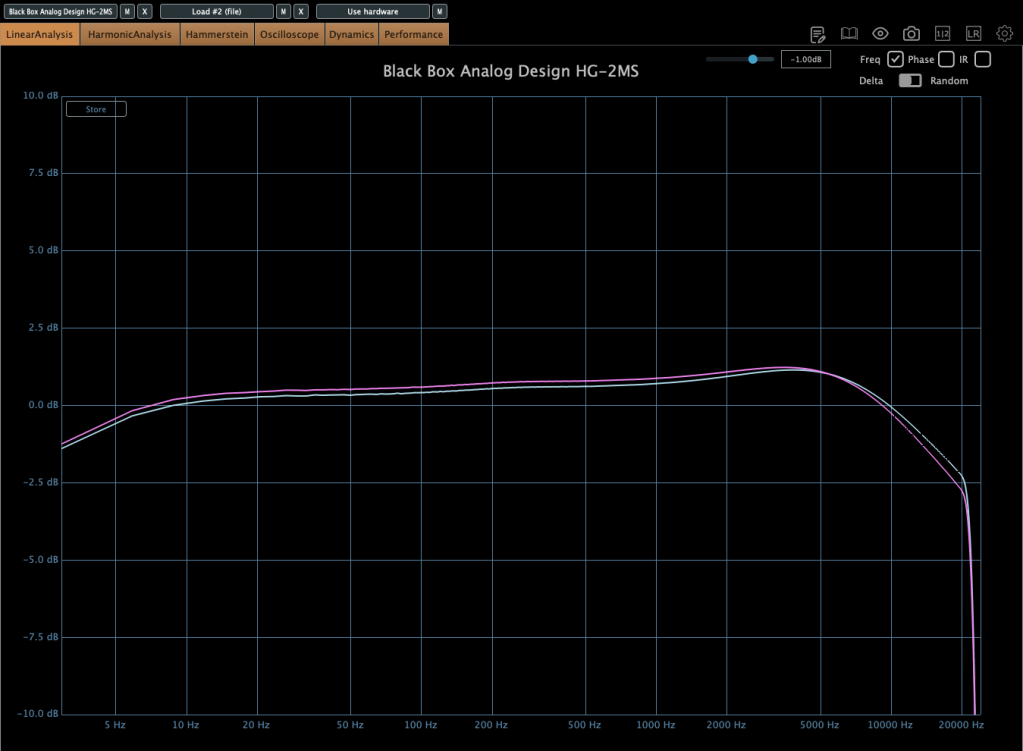
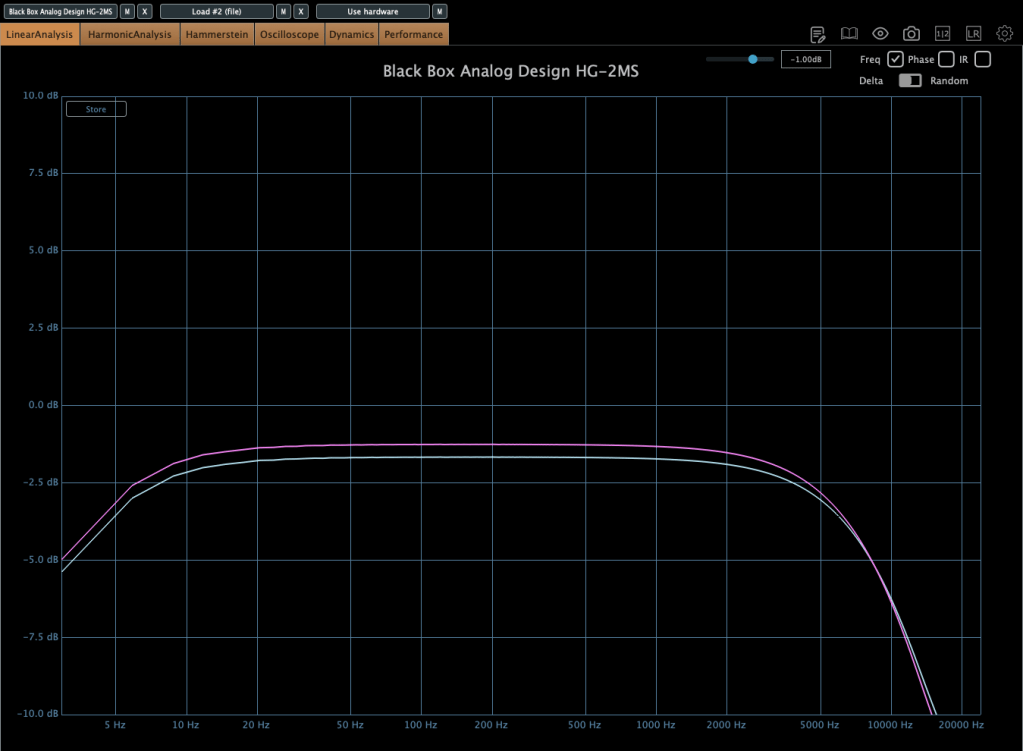
Here’s the response with the Calibration knob set to Dark and then Bright.

Photo: Frequency response—Air Amount at 100%

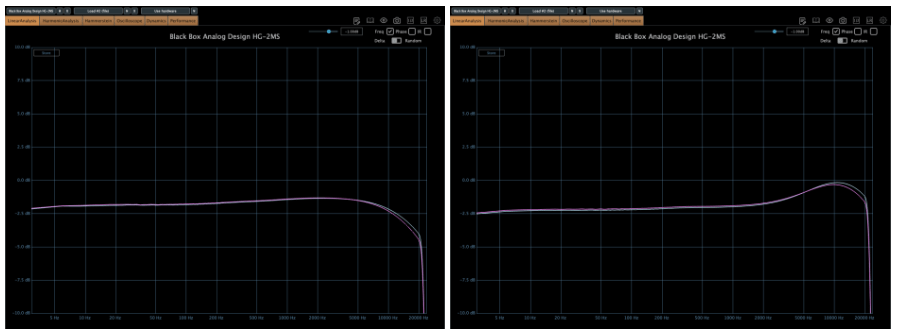
This is with the Air Amount cranked to 100%.

Photo: Harmonic distortion—Default state, Saturation In, Alt Tube pressed, from top to bottom

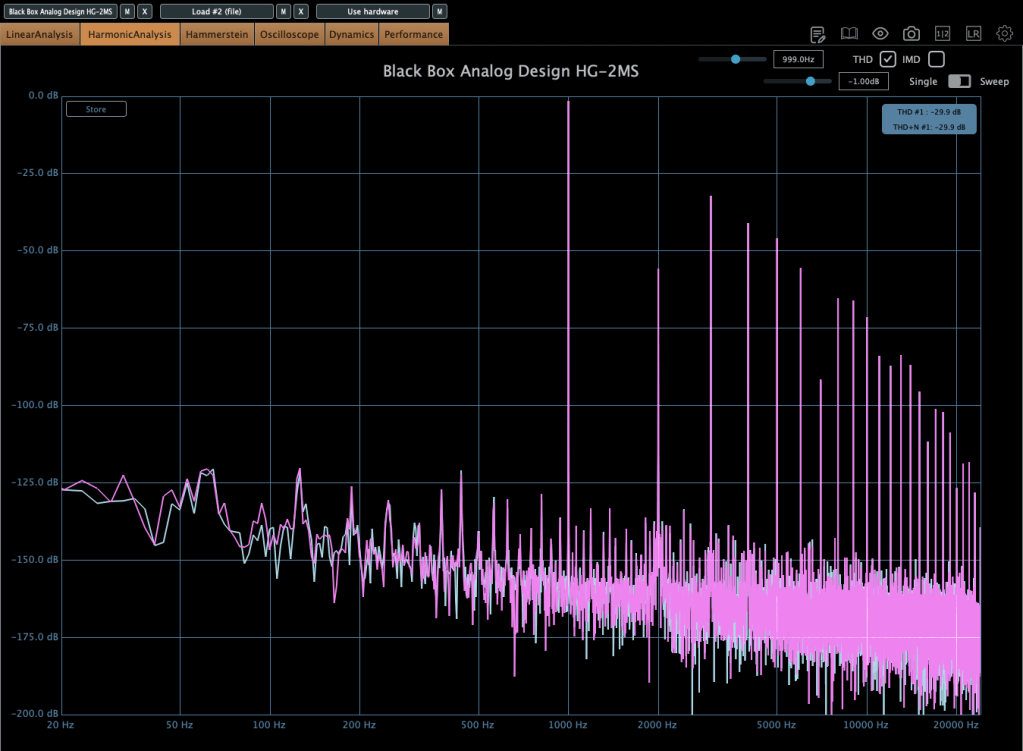
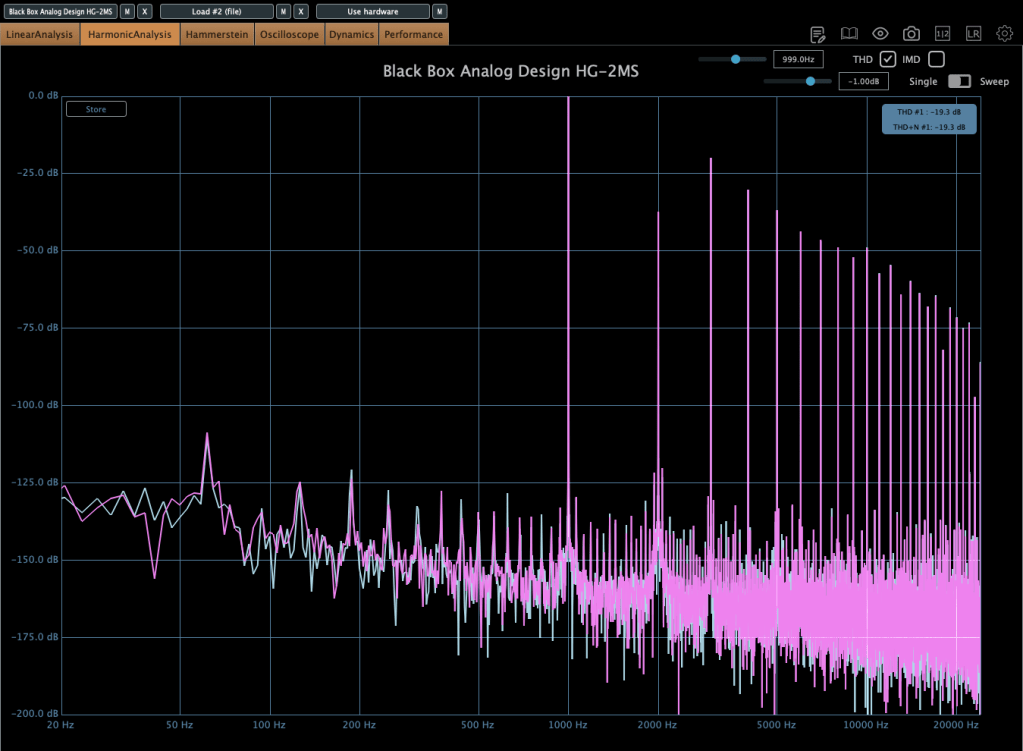
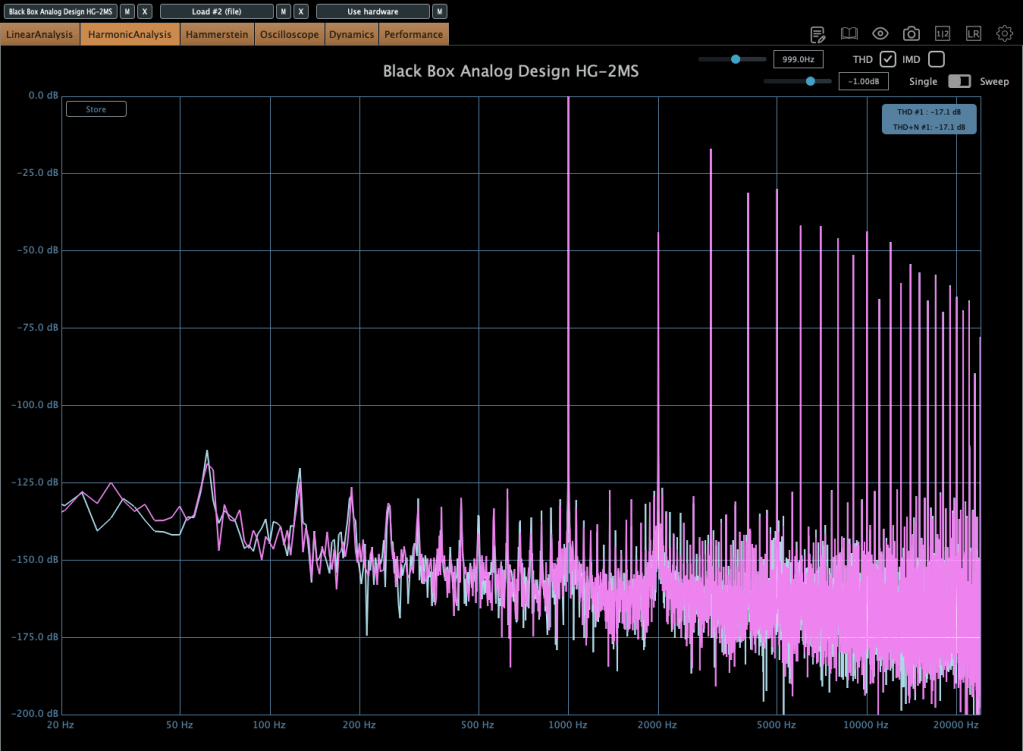
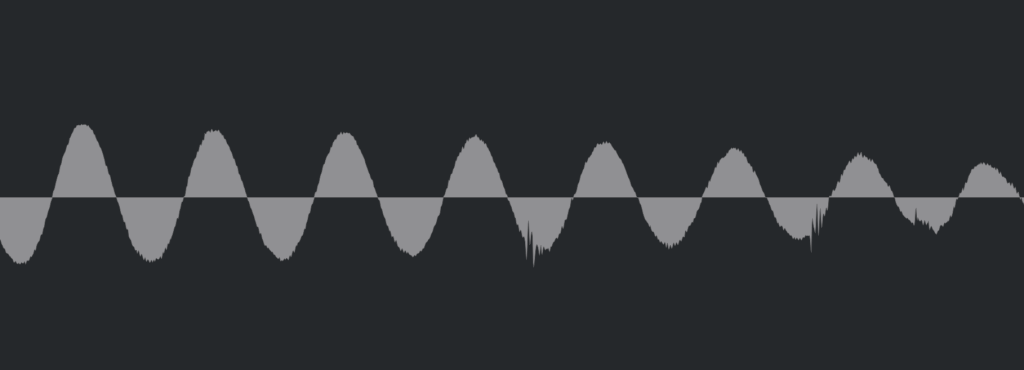
These show harmonic distortion in the default state, with Saturation on, and with Alt Tube pressed. You can see the distortion really jumps when you add parallel saturation—it’s noticeable in the harmonics, and you can hear it too; the overtones come alive.

Photo: Default state vs. Saturation In, left and right

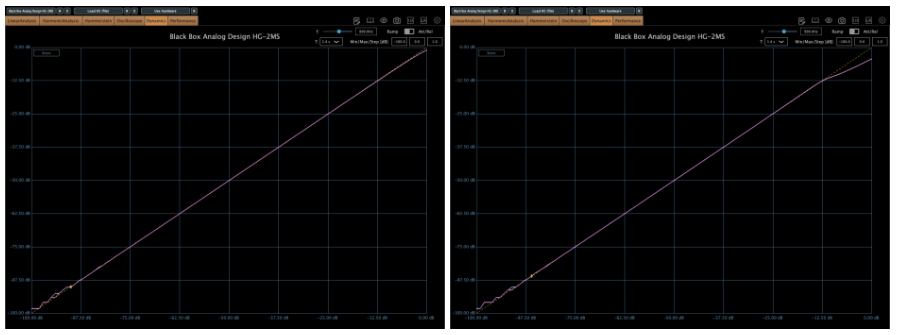
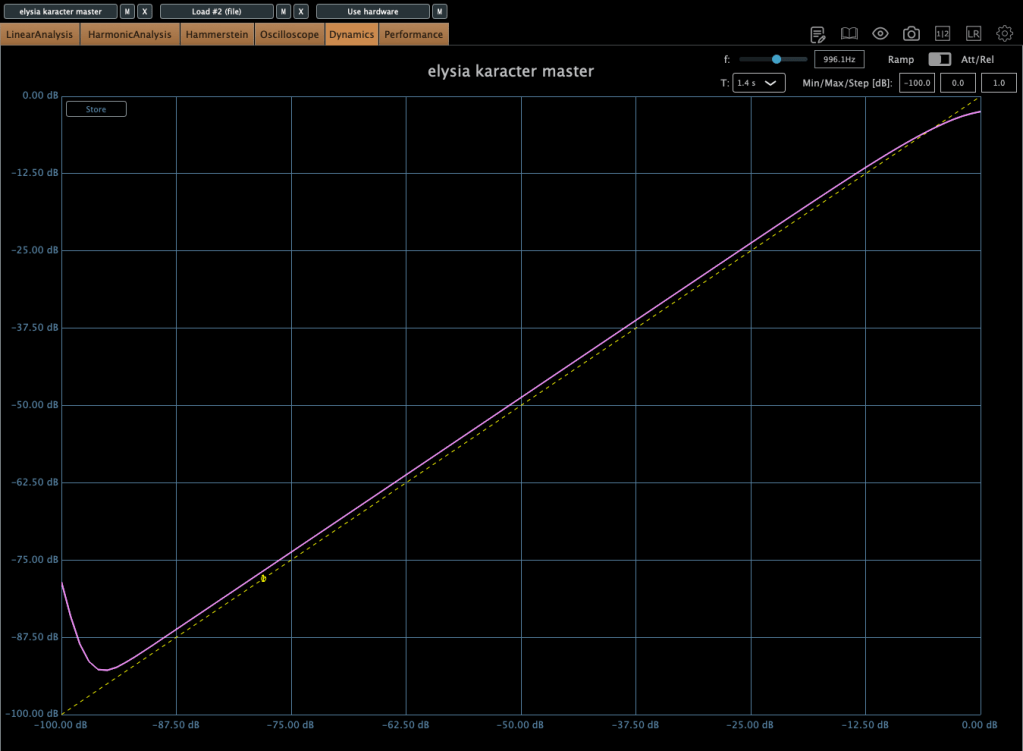
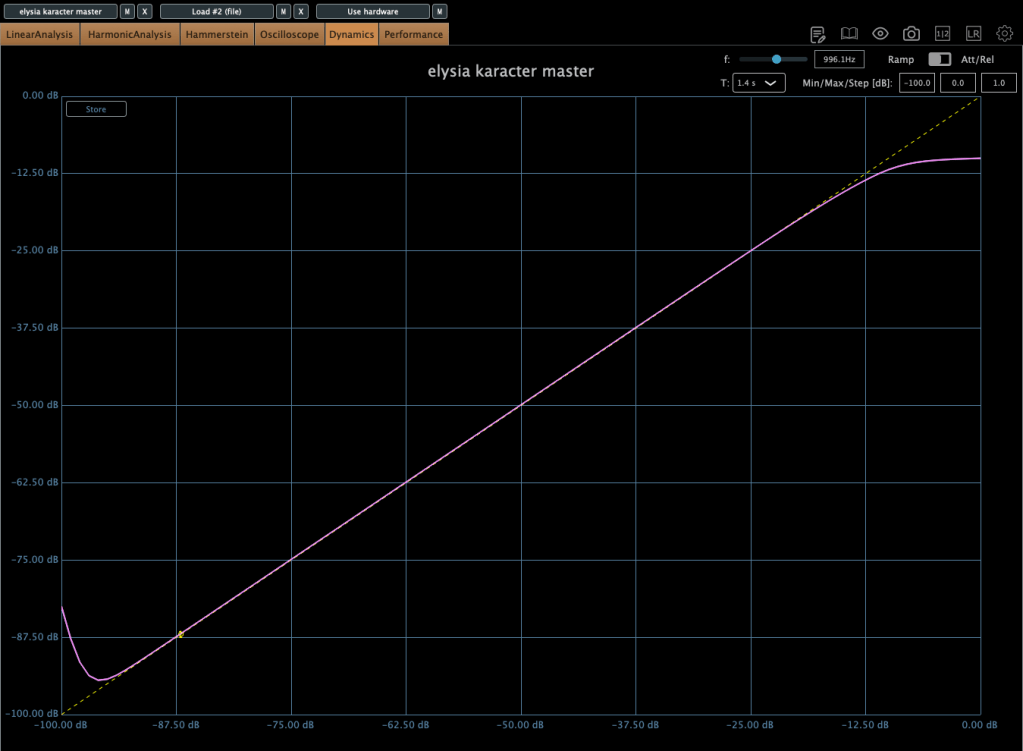
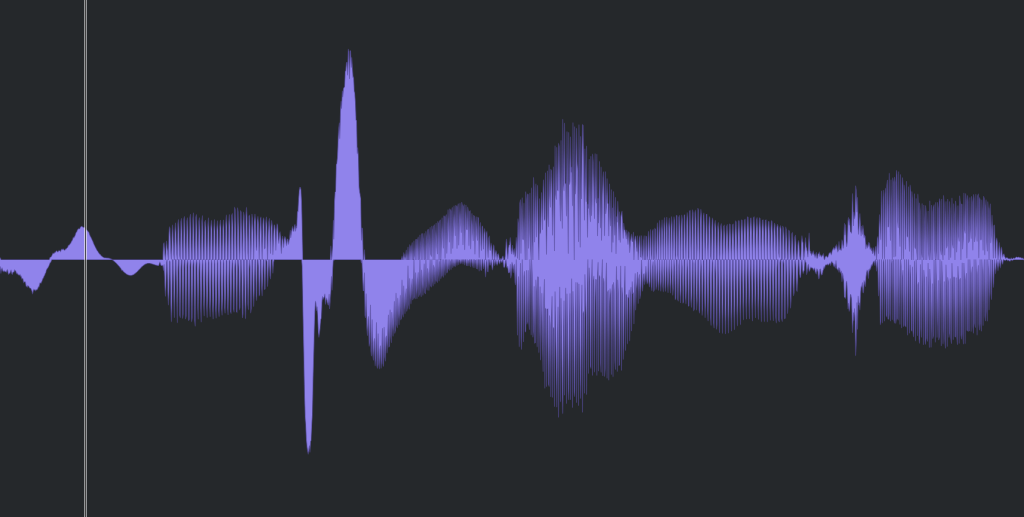
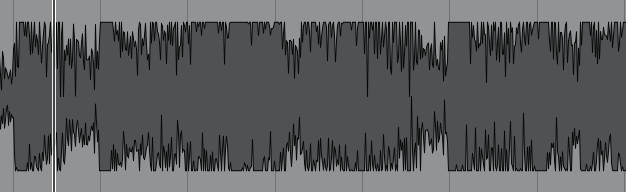
Interestingly, even though this isn’t a compressor, it starts to subtly compress when the input gets loud enough. The left is the default state, and the right is with parallel saturation active.

Now, these parameters let you shape how the parallel saturation sounds. Hit the Solo button, and you can isolate just the parallel saturation signal.

Photo: Frequency response by parameter—High Pass, Band Pass, Flat, Band Stop, Low Pass, from up to down

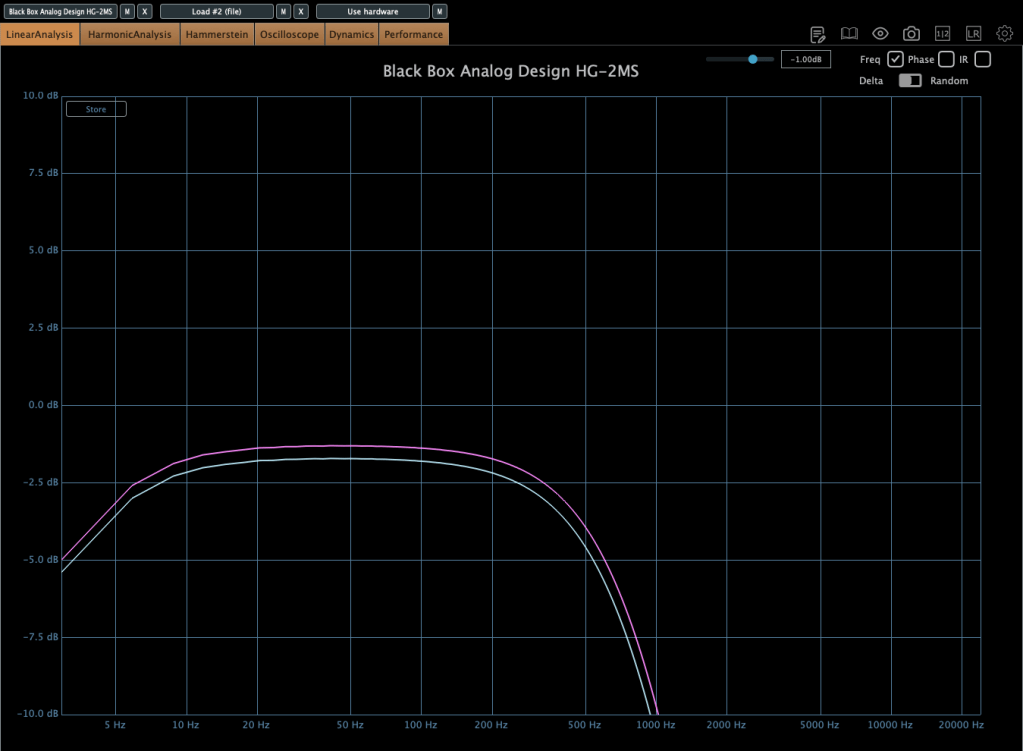
I measured the frequency response for each setting to show which frequency bands they affect—High Pass, Band Pass, Flat, Band Stop, and Low Pass.


Add colorful, frequency-selective tube saturation with M/S processing. Made by Brainworx, this is your mix bus’ best friend. Celebrated mix engineers like Dave Pensado, Bob Horn, and Jack Douglas rely on the sweet tubes and creamy-sounding transformers of the HG-2.

Personally, I like setting the Saturation to Flat, dialing back the Pentode a bit, and boosting the Triode. It gives a really nice sound—perfect for adding a touch of saturation at the final stage, like a sweet seasoning for your track.

If you’ve been thinking about a tube saturation plugin, this is a great chance to snag one at a discount.

That’s it for now—see you in the next post!

Brainworx Saturators Overview & Sale (SPL Machine Head, SPL Vitalizer MK2-T, Elysia Karacter)

Hello everyone! I’m Jooyoung Kim, a mixing engineer and music producer.

Recently, Brainworx released a plugin emulation of the SPL Machine Head, a classic saturation device. Since it’s currently on sale, I thought it would be a great opportunity to introduce not only this plugin but also two other renowned Brainworx saturators: SPL Vitalizer MK2-T and Elysia Karacter.

I received an NFR (Not for Resale) copy of this plugin from Plugin Boutique for review. If you purchase through the links in this blog, I receive a small commission, which helps me continue my work. Your support is greatly appreciated!


SPL Machine Head

The SPL Machine Head was originally released in 1997 as a tape machine saturation simulator. Unlike traditional analog tape machines, this hardware version was fully digital, eliminating wow, flutter, and noise while allowing precise control over the saturation process.

Brainworx has faithfully recreated this in plugin form, bringing its unique sonic characteristics to the digital domain.

Controls Overview:

  • The Original version has 4 knobs, while the Ultimate version has 5.
  • Besides Input and Output levels, the main controls include Drive, High Frequency, and Low Frequency.
Left one is original, right one is ultimate

In the default state, it slightly boosts the high frequencies and enhances third-order harmonics.

Left one is original, right one is ultimate

When increasing the Tape Speed, an actual tape machine would typically alter the frequency response by rolling off both low and high frequencies. However, in this plugin, it seems to achieve a similar effect by adjusting volume and high-frequency slope.

Key Takeaways:

  • Functions as an EQ (HF knob boosts/cuts highs, LF knob boosts/cuts lows)
  • Adds third-order harmonics for natural saturation
  • Slight compression effect at higher input levels

Compared to other saturators I’ve used, the effect is subtle and very natural. I find it particularly useful for enhancing high frequencies, similar to the Maag EQ4 or Baxandall EQ.

🔹 On Sale Until April 22 🔹

Plugin Alliance plugins typically see deeper discounts about a year after release, so if you’re not in a rush, you can wait for an even better deal.

🔹 Recommended Master Bus Settings: 🔹

  1. Ultimate mode
  2. Drive at 0.5
  3. High Tape Speed On (30 IPS)

SPL Vitalizer MK2-T

The SPL Vitalizer MK2-T is a tube-based saturator with versatile tone-shaping capabilities.

I once debated whether to buy this hardware unit or another compressor. I went with the compressor, but the Vitalizer remains an incredibly flexible tool.

The SPL Vitalizer offers four main processing areas:

  1. Drive
  2. Bass & High-Frequency Control
  3. LC (Inductor-Capacitor) Filter-based High Shelf EQ
  4. Stereo Expander

Control Breakdown:

  • Drive: Determines how much effect is applied, not just input gain.
  • Bass (Soft <0> Tight):
    • Soft: Boosts overall bass
    • Tight: Slightly reduces overall levels while enhancing only the bass region.
  • Compression: Works only on the bass frequencies, with automatic Threshold, Attack, and Release settings. The Compression knob adjusts the ratio.
  • Mid-Hi Tune: A shelving EQ for the mid-to-high range.
  • Process: Controls the overall amount of bass, compression, and mid-high tuning applied.
  • LC-EQ: A high-shelf EQ using LC circuits.
  • Stereo Expander: A stereo enhancement tool.

Initially, the controls may feel unfamiliar, but once you get used to them, you’ll find many creative applications.

This plugin goes on sale frequently, so check out the demo before purchasing!


Elysia Karacter

The Elysia Karacter is a highly regarded hardware saturator, now available as a plugin.

It features automatic oversampling:

  • 4x oversampling for sample rates below 50kHz
  • 2x oversampling for sample rates below 100kHz
  • No oversampling for rates 100kHz and above

It also includes MS mode, Turbo Boost mode, and FET Shred mode.

On the left, we have the default settings, while the right shows the FET mode, which emulates the classic “Smile EQ” curve.

⚠️ Caution:

  • If driven too hard, it automatically compresses the signal.
  • This isn’t standard compression but rather an emulation of analog clipping.

Increasing the Drive lowers the compression Threshold, so careful gain staging is crucial.

Color Knob:

  • Turn left: Boosts ultra-low frequencies (5–50Hz)
  • Turn right: Boosts overall low frequencies (below 100Hz)

I love the saturation in FET mode, but due to its aggressive nature, I recommend placing gain plugins before and after it to control input and output levels.

This plugin also goes on sale frequently, so keep an eye out!


Plugin Alliance vs. Plugin Boutique Pricing

Recently, Plugin Alliance started adding a 10% tax at checkout. Because of this, Plugin Boutique often offers a better deal, especially considering their loyalty points and free plugins.


That’s it for today’s review! Hope this helps you decide which saturator fits your needs.

See you in the next post!

SSL X-EQ 2 and DeEss Plugin Overview + 90% Off Sale (Ends 1/29)

Hello! I’m Juyoung Kim, a mixing engineer and music producer.

It’s been a while since I shared plugin sale news, hasn’t it?
Over the holiday season and into early January, my manager was on vacation, and most major sales wrapped up at the start of the year. So, I didn’t have much to share.

One notable ongoing deal is IK Multimedia’s Total Studio 4 MAX sale.

That said, I recently came across SSL’s sale on X-EQ 2 and DeEss, and I couldn’t wait to share it with you!

Disclosure

This product was provided as an NFR (Not for Resale) through Plugin Boutique. If you make a purchase using the links in this post, I’ll earn a small commission, which helps me keep doing what I do.

Let’s dive in!


SSL X-EQ 2

The SSL X-EQ 2 is a feature-packed EQ plugin. These days, DAW-native EQs are so powerful that standalone EQ plugins need to have a competitive edge to stand out—and X-EQ 2 delivers.

Key features include:

  • Mid/Side processing
  • Presets to remove 50Hz and 60Hz hum (ideal for handling electrical noise)

You can double-click to create points and adjust EQ type, frequency (Hz), bandwidth (Q), and gain (dB) with ease.

A particularly fun feature is the knob-like interface—select a parameter (Hz, dB, Q) and adjust it by dragging your mouse, mimicking the feel of turning a physical knob.

It also includes an analyzer (activated via the top-right button) and lets you choose between parallel or serial processing from the top-left menu.

Additionally, you can activate Phase Analysis to see phase shifts (dotted lines) or enable Step Response Mode to view how signals evolve over time after passing through the EQ.

Heaviside Step Function

For those unfamiliar with Step Response:
The Step Response of a system refers to how the system reacts over time to a sudden change in input, specifically when the input shifts instantaneously from 0 to 1 (a Heaviside Step function). It demonstrates:

  1. The system’s transient behavior, showing how it initially reacts to the input change.
  2. The steady-state behavior, revealing how the system settles after the transient phase.
  3. The time it takes to stabilize, which indicates the system’s responsiveness.

In the context of EQs, a longer Step Response often correlates with ringing artifacts, where the EQ introduces unintended resonances that make the sound linger beyond its natural decay. This visualization helps engineers fine-tune the EQ to minimize these artifacts.

I love all the features, but the only downside is that the window size can’t be adjusted. But if you see the price, it could be convinced!


DeEss Plugin

The DeEss plugin offers highly detailed sibilance control.

Key features:

  • Adjustable target range: 1kHz to 20kHz
  • Mid/Side processing
  • Compression intensity and Brighten (high-shelving EQ) controls
  • Lookahead capability for precise processing

A standout feature is the Auto Listen mode, which allows you to hear both the filtered signal and the original detection, making adjustments much easier.

This DeEss plugin is one of the most versatile I’ve come across, and it’s surprisingly lightweight unless oversampling is applied. If you don’t already have a dedicated de-esser, this is an excellent choice.


Bonus: Free Plugin Offer

If you purchase any plugin from Plugin Boutique this month, you’ll receive Klevgrand’s Richter Compressor Plugin for free. Don’t forget to claim it when checking out!


Final Thoughts

Both the SSL X-EQ 2 and DeEss plugins are incredibly versatile and user-friendly tools for mixing and production. The 90% discount makes this deal even sweeter—don’t miss out before the sale ends on January 29!

Feel free to reach out if you have any questions. Until next time!

Basics of Mixing – 12.1 How to Solve The Problems of Recording Source

Hello! This is Jooyoung Kim, a mixing engineer and music producer.

Today, I’d like to say about the problem of recording source and how to solve. This article is based on my book “Basics of Mixing” released at South Korea.

Let’s dive in!


1) Noise Floor

If you use analog hardware, electricity causes certain noise across all frequency range. We call this “Noise Floor”.

So if you recording with microphone pre-amplifier or use outboards, you have to recognize and keep in mind it. Although you can’t hear the noise in mixing step, but it could make problem in mastering step .

This matter could be fixed with plug-ins like iZotope’s RX bundles(Spectral De-Noise). But when the source processed, you will hear High Frequency & Low Frequency loss. So I don’t use it often until have no choice.


2) Popping Noise

Popping Noise, A.K.A pop noise, is caused by popping sound. If you look closely upper picture, could understand it’s usually belong low frequency. So it could solved with low cut(high pass) filter.

However when you record voice, use pop filter is best method to prevent popping noise.


3) Sibilance

Sibilance is hissing sound when you pronounce like “S”. This high frequency sound can be perceived as louder than other frequencies due to the equal loudness contour.

You able to use De-Esser plug-ins or EQ to solve this problems. Another method involves cutting the sibilant peaks and adjusting the gain of the affected clip.


4) Click Noise

When you check the records, you could find click sounds frequently. In vocal records, lips make those noise. Drawing waves with pencil tools will solve this problem.

There have another way, use De-Click plug-ins. However I don’t like this method. It makes high frequency loss.


5) Clipped Noise, Distortion

If the recording is distorted like this from the beginning, the best solution is simply to re-record it.

You might want to ask the client to double-check their export/bounce to see if the distortion originated there.

If the recording is distorted and re-recording is impossible, you can try to fix it with plugins like De-Clip, although you’ll have to sacrifice some audio quality.


6) Ambience

In the past, there was no way to fix recorded ambience. However, nowadays, there are many plugins that remove reverb and ambience from companies like Waves, UAD, and Izotope, so it’s not as big of a problem anymore..


7) Ambience

You can consider most other issues beyond these as unresolvable. If noise is caused by electrical issues and is consistently present, you can address it by dealing with the noise floor. However, if it appears intermittently, it’s impossible to fix.

Similarly, if a problem occurs consistently, there’s a good chance it can be fixed. But things like construction noise from nearby or the ticking of a clock are difficult to remove.


In this post, we discussed various problems with recorded audio and how to solve them.

The next chapter was originally going to be about groove and sidechaining. However, This is one of the key topics in my book, so I’ve decided not to cover it on the blog.. I don’t want to give away all the content for free and be unfair to those who purchase the book. I hope you understand.

From the next post onwards, I’ll be talking about outboard gear.

See you in next post! 🙂