Hello? This is Jooyoung Kim, a mixing engineer and music producer. Today, I’ll talk about the music file codecs, final article of basics of mixing series. Those posts are based on my book, Basics of Mixing, published in South Korea.
Let’s dive in!
Codec
The term codec stands for coder-decoder—a hardware or software that encodes and decodes digital signals. There are three main types of codecs:
Non-compression: WAV, AIFF, PDM(DSD), PAM
Lossless Compression: FLAC, ALAC, WMAL
Lossy Compression: WMA, MP3, AAC
Non-compression codecs retain 100% of the original audio data with no compression applied.
Lossless compression codecs reduce file size while preserving all original data. This means they sound identical to uncompressed formats like WAV.
Lossy compression codecs remove some audio data to achieve a much smaller file size, which can affect sound quality depending on the compression level.
In the music industry, WAV, MP3, and FLAC are the most commonly used formats for mastering and distribution.
How is file size determined?
For WAV files, size is determined by sample rate and bit depth. How about mp3 and FLAC?
MP3 files use bitrate, rather than sample rate and bit depth. You’ve probably seen MP3 files labeled 256kbps or 320kbps. This means 256,000 bits or 320,000 bits of audio data are processed per second. Higher bitrates result in better sound quality but larger file sizes.
FLAC files use compression level to control file size. A higher compression level takes longer to encode but results in a smaller file. However, since FLAC is lossless, the sound quality remains unchanged regardless of the compression level.
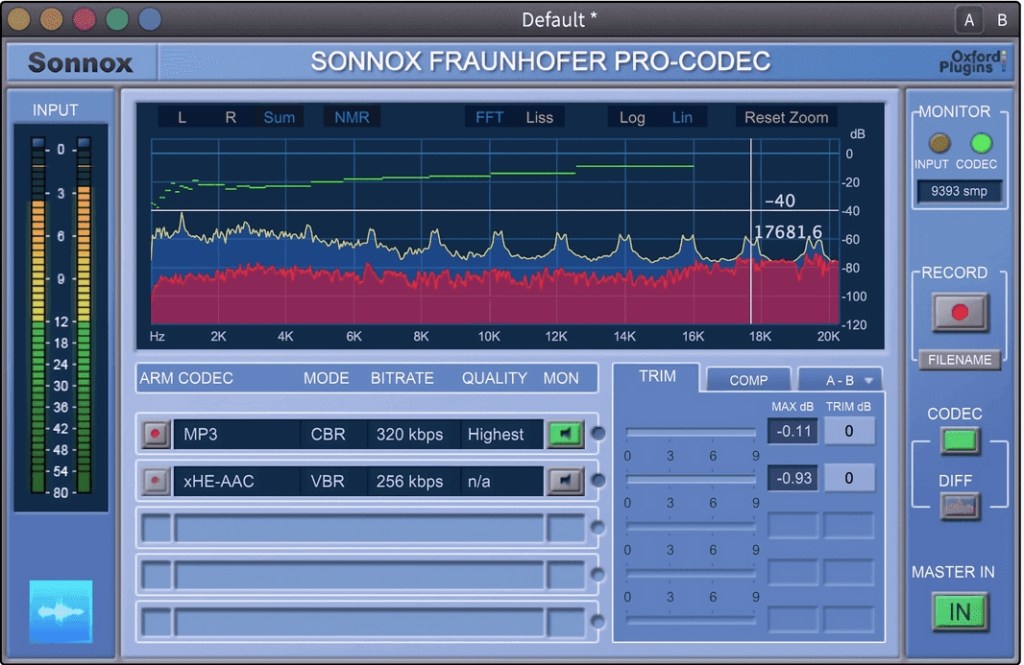
If you want to compare how different codecs affect sound quality, you can use tools like Sonnox Codec Toolbox or Fraunhofer Pro-Codec.
This is the last article for the ‘Basics of Mixing’ series. Time is really quick..haha.
I hope these posts have helped expand your knowledge and improve your mixing skills.
Thanks for reading, and I’ll see you in the next post!
This month, Brainworx is holding their Mixing Month sale, featuring six plugins at a discount:
Shadow Hills Mastering Compressor – Compressor
Shadow Hills Mastering Compressor Class A – Compressor
Black Box Analog Design HG-2 – Saturator
Black Box Analog Design HG-2MS – Saturator
Mäag Audio EQ4 – EQ
SPL Transient Designer Plus – Transient Shaper
Following my last post, today I’ll be introducing the Mäag Audio EQ4 and SPL Transient Designer Plus.
As I’ve mentioned before, I personally bought and use 1, 3, and 5. For this round, I received NFR (Not for Resale) licenses for 2, 4, and 6 from Brainworx via Plugin Boutique.
If you purchase through the links in this blog, I’ll earn a small commission, which really helps me keep going—so thank you!
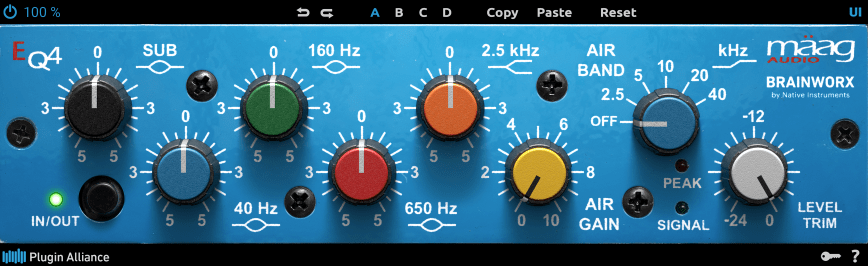
The Mäag Audio EQ4 is a plugin recreation of the iconic EQ4 hardware from Mäag Audio. I’ve mentioned this EQ a few times in my mixing basics series, and its standout feature is the AIR BAND.
Just loading the plugin already shapes the frequency response a bit—it’s slightly bumpy, right?
Here’s what happens when you nudge up the 20kHz band. This EQ excels at lifting those ultra-high frequencies to bring out a pleasing “air” in your mix.
I often choose between this Mäag EQ4 and Slate Digital’s Fresh Air when I want to give vocals that shiny, polished feel—it depends on the track. There’s no harmonic distortion here, which keeps it clean and super easy to tweak. That’s why I highly recommend it. Honestly, I love this vibe so much I keep thinking about getting the hardware version too… haha! If you grab it during this sale, I’m sure you’ll find plenty of uses for it.
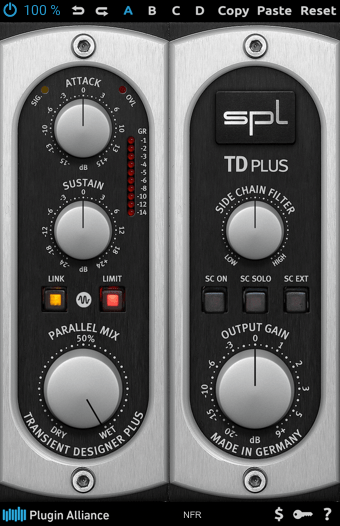
The SPL Transient Designer Plus is a plugin inspired by the TD (Transient Designer) module from the discontinued SPL RackPack, a 500-series rack format.
Photo: RackPack 8
It’s incredibly simple to use:
The Attack knob boosts or softens the attack phase, while the Sustain knob boosts or reduces the sustain phase. That’s it!
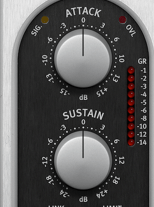
Below that, the Link button decides whether it processes stereo channels together or independently. The Limit button adds a limiter to prevent clipping if the attack gets too aggressive. And Parallel Mix? Well, that just blends the processed signal with the dry one.
The Side Chain Filter lets you use a sidechain signal to trigger changes in the original source’s transients—think of it like a compressor’s sidechain. Hit the SC ON button to activate it. By default, it uses an Internal Side Chain, copying the input signal and applying a filter. You can press SC SOLO to hear what’s being used as the trigger. The SC EXT button switches it to an external sidechain signal instead.
For composers or engineers like me, a transient-shaping plugin like this is a must-have. A great composition or mix depends on instruments locking together just right. You can’t always achieve that by simply sliding tracks around in your DAW.
I’ve got transient tools from Sonnox, Metric Halo, Native Instruments, SPL, iZotope, and more in my collection. This one’s another solid option—pick it up during the sale, and I bet you’ll use it all the time.
That wraps up my coverage of this month’s Brainworx sale. See you in the next post!
Today, I’m picking up where I left off to talk about more of the Brainworx plugins on sale this month:
Shadow Hills Mastering Compressor – Compressor
Shadow Hills Mastering Compressor Class A – Compressor
Black Box Analog Design HG-2 – Saturator
Black Box Analog Design HG-2MS – Saturator
Mäag Audio EQ4 – EQ
SPL Transient Designer Plus – Transient Shaper
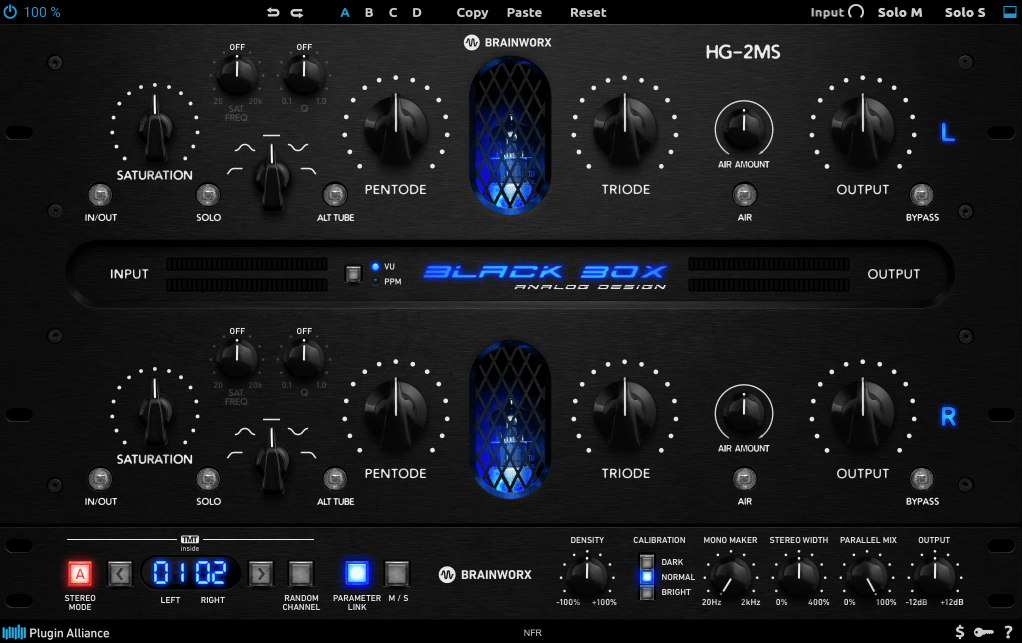
In this post, I’ll be diving into the Black Box Analog Design plugins from that list—specifically HG-2 and HG-2MS.
As I mentioned last time, I personally bought and have been using 1, 3, and 5. For this round, I received NFR (Not for Resale) licenses for 2, 4, and 6 from Brainworx via Plugin Boutique.
Also, if you purchase through the links in this blog, I’ll earn a small commission, which really helps me keep going—so thank you in advance! ㅜㅠ
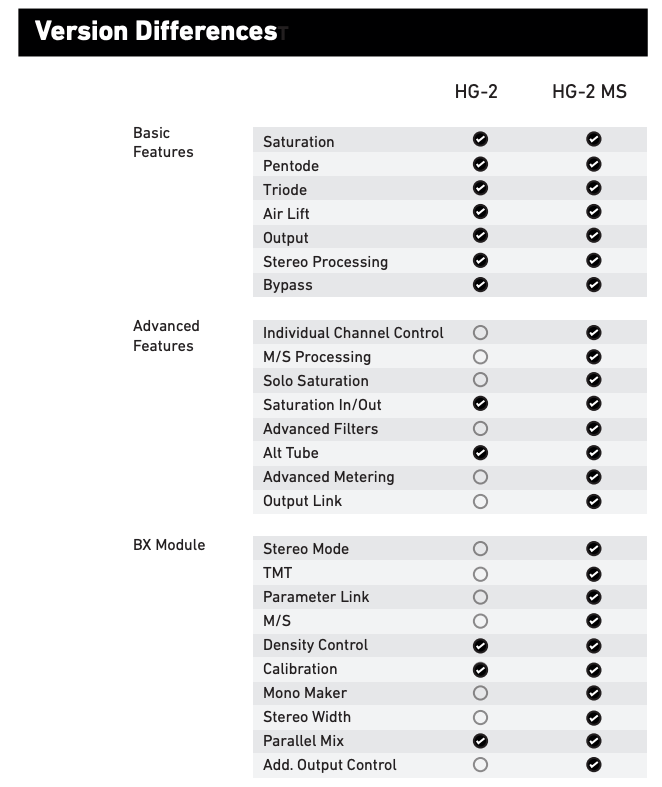
When I tested these two, I noticed that with the same parameter settings, their responses are pretty much identical. The differences are outlined in the manual, but since they’re so similar, I’ll explain them together using the HG-2MS as the reference point.
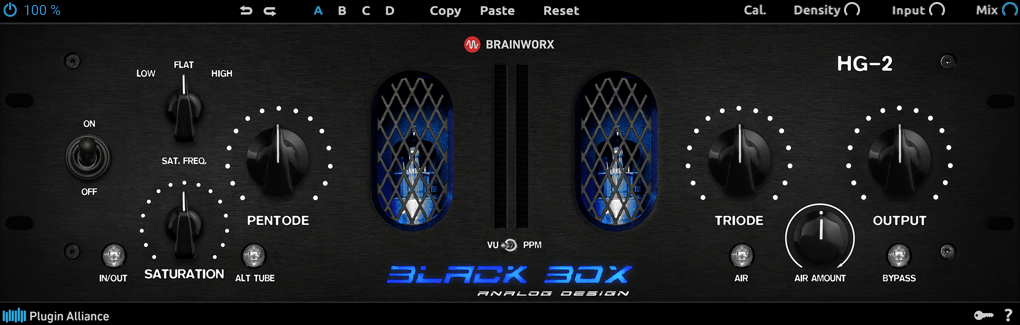
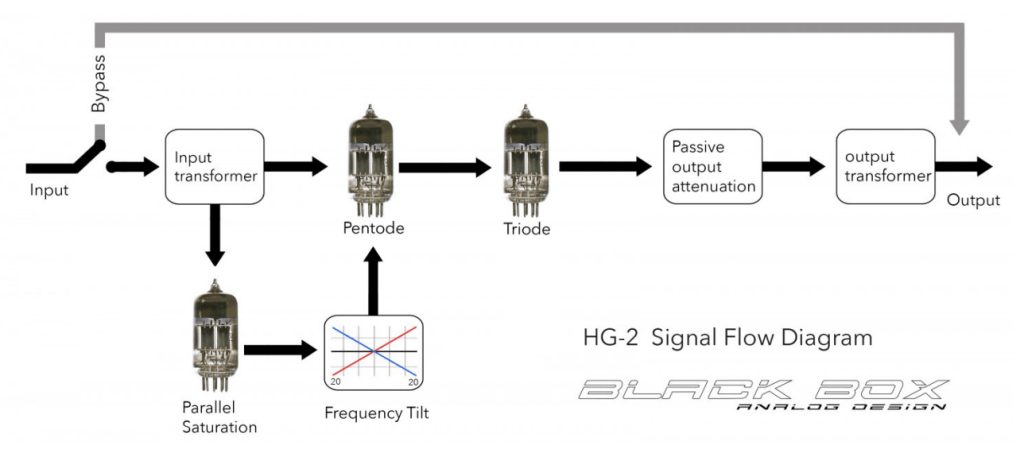
First off, these plugins are recreations of the HG-2 hardware from Black Box Analog Design. As you’d expect, it’s all about those glorious vacuum tubes front and center. The HG-2 uses a combination of pentode and triode tubes, running your signal through both for that signature tube saturation—that’s the core of what this hardware (and plugin) is about.
It also has an extra triode tube you can blend in. The original hardware’s signal routing looks something like this:
The output stage features a Sinemag transformer, while the parallel saturation path uses a pair of 12AX7 triode tubes.
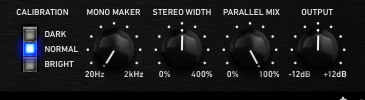
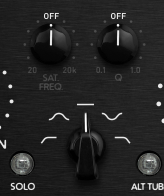
Looking at the parameters, the “Saturation” knob on the far left controls the amount of parallel saturation. The IN/OUT button toggles whether this parallel processing is active, and the ALT TUBE button switches the tube manufacturer for the parallel saturation path, altering the harmonic distortion character.
Even if you turn off the Saturation knob, the signal still passes through the pentode and triode tubes in series, so this is a piece of gear (or plugin) that’s inherently heavy on saturation. That means if you set either Pentode or Triode to 0%, you’ll get no sound at all.
Let’s break down how it works:
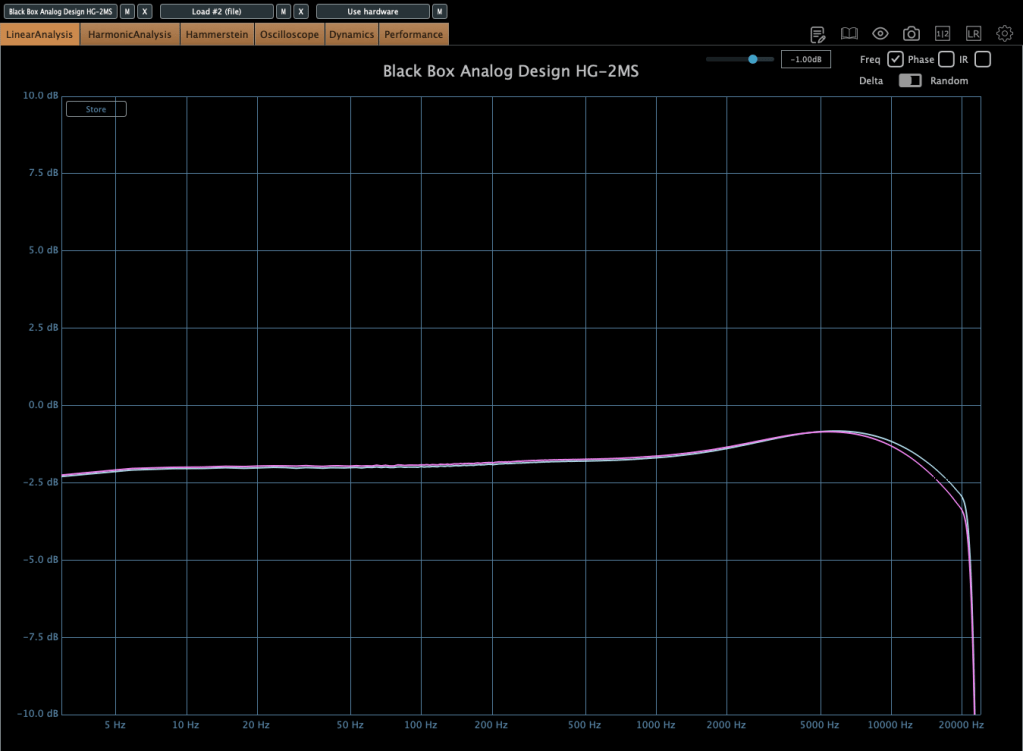
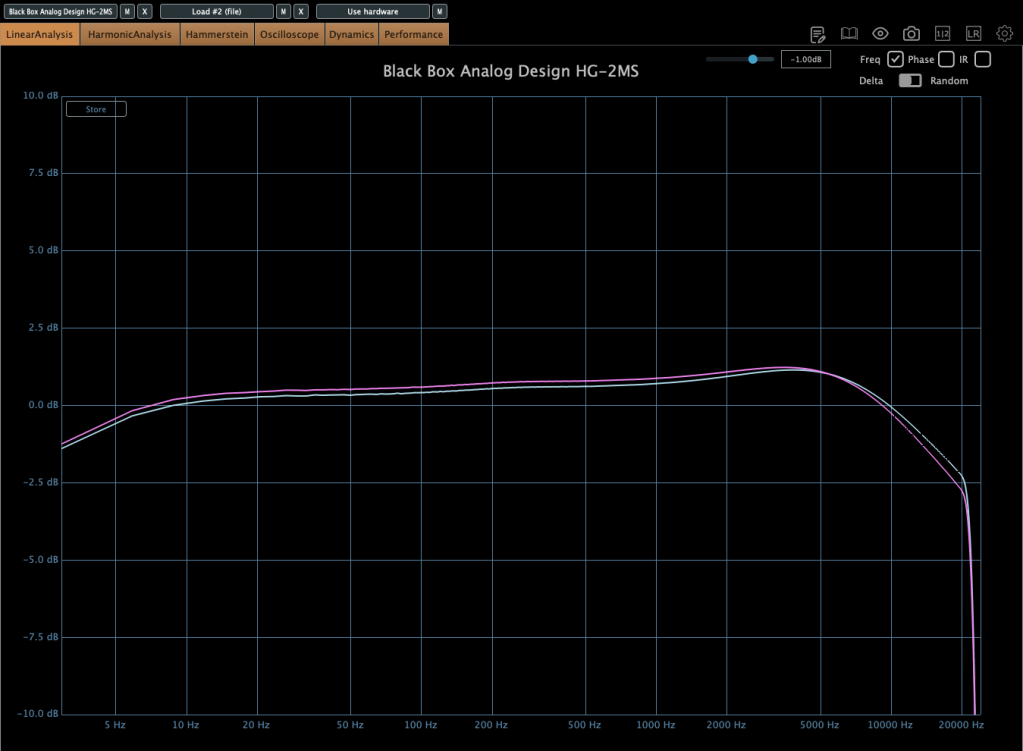
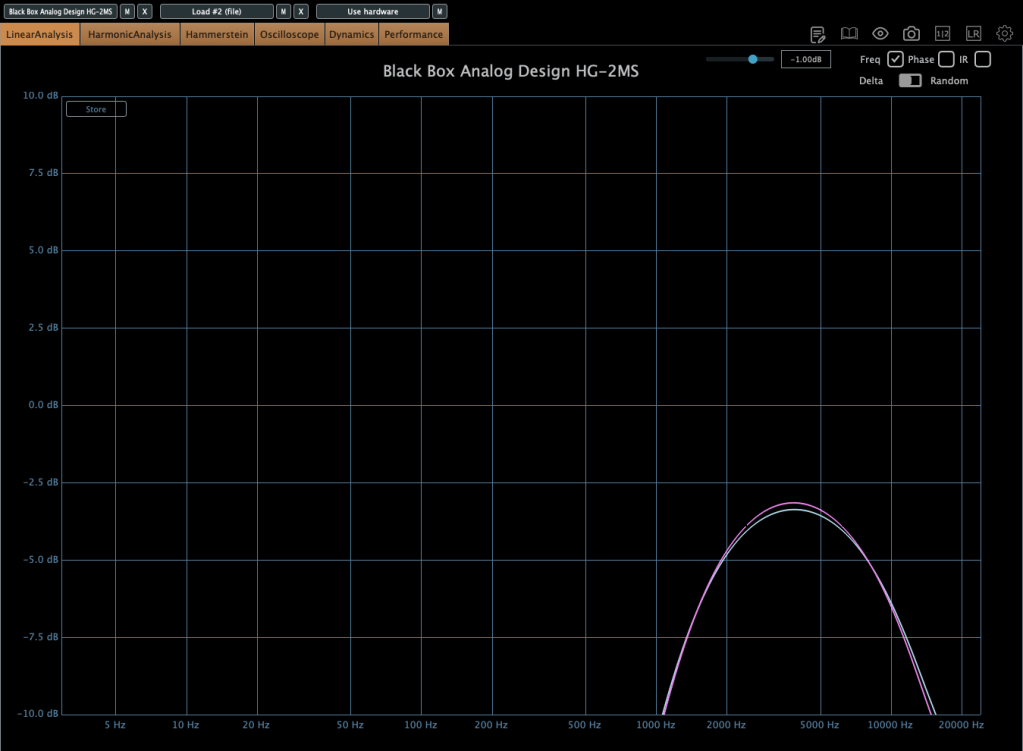
Photo: Frequency response—Default state, Saturation In, Alt Tube pressed, from top to bottom
This shows the frequency response in the default state, with Saturation turned on, and with Alt Tube engaged.
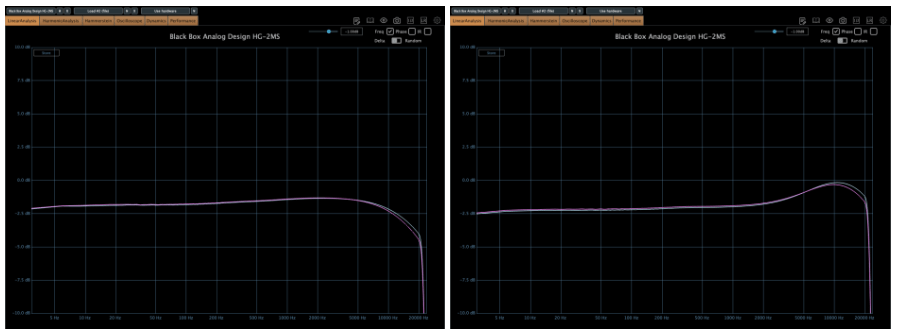
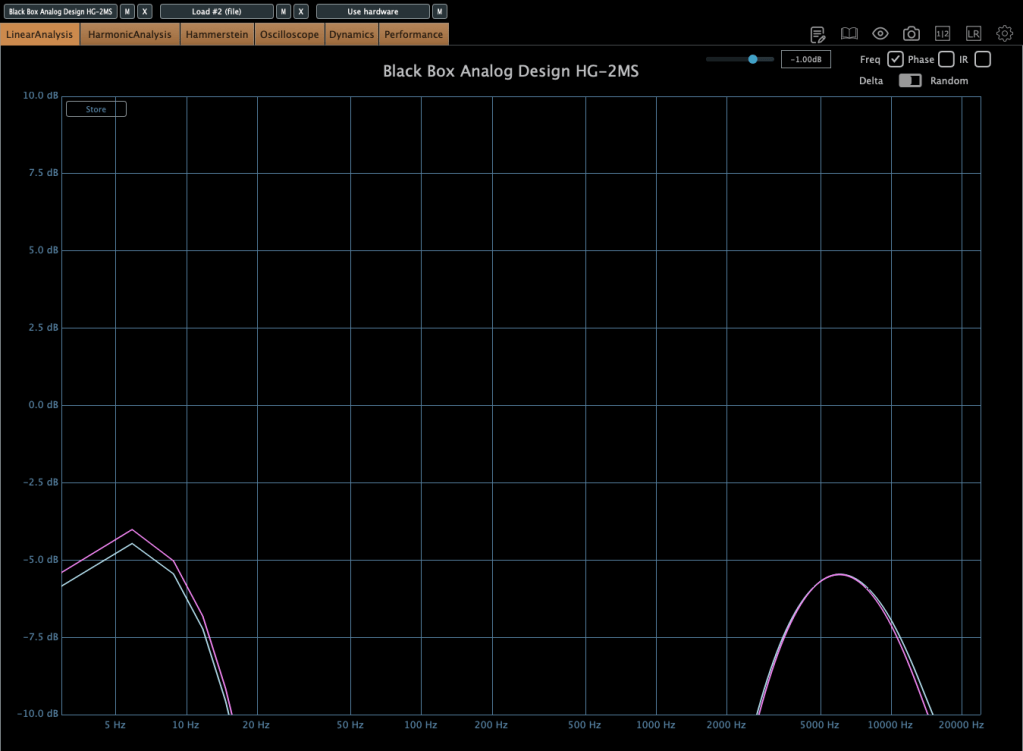
Photo: Frequency response—Dark vs. Bright calibration, from right bottom
Here’s the response with the Calibration knob set to Dark and then Bright.
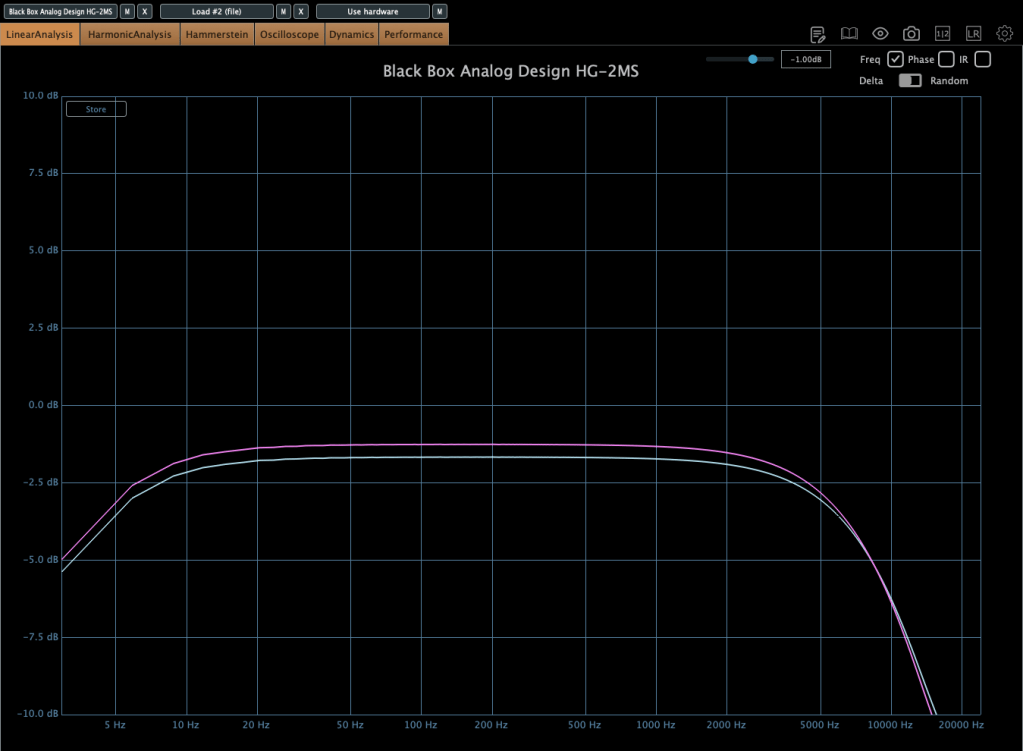
Photo: Frequency response—Air Amount at 100%
This is with the Air Amount cranked to 100%.
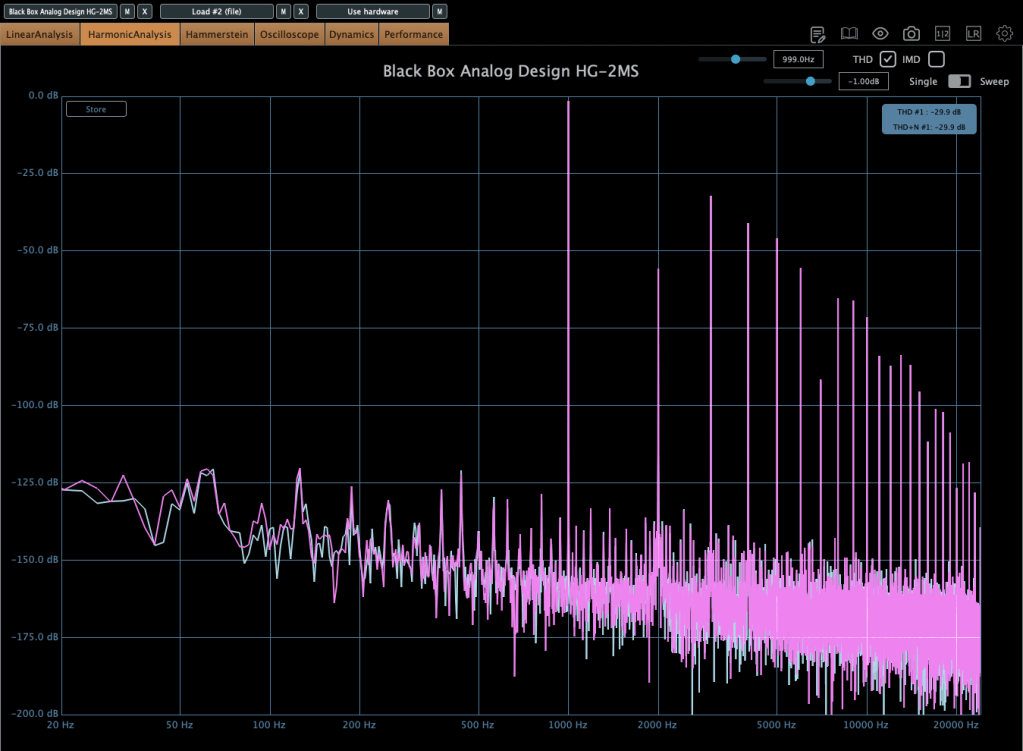
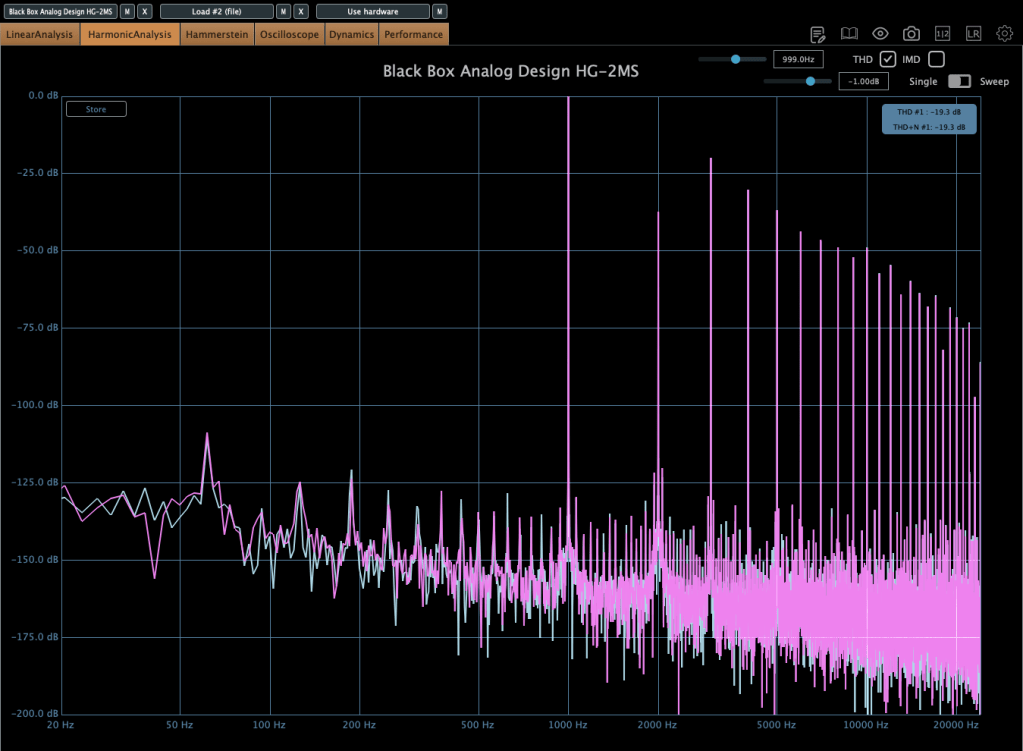
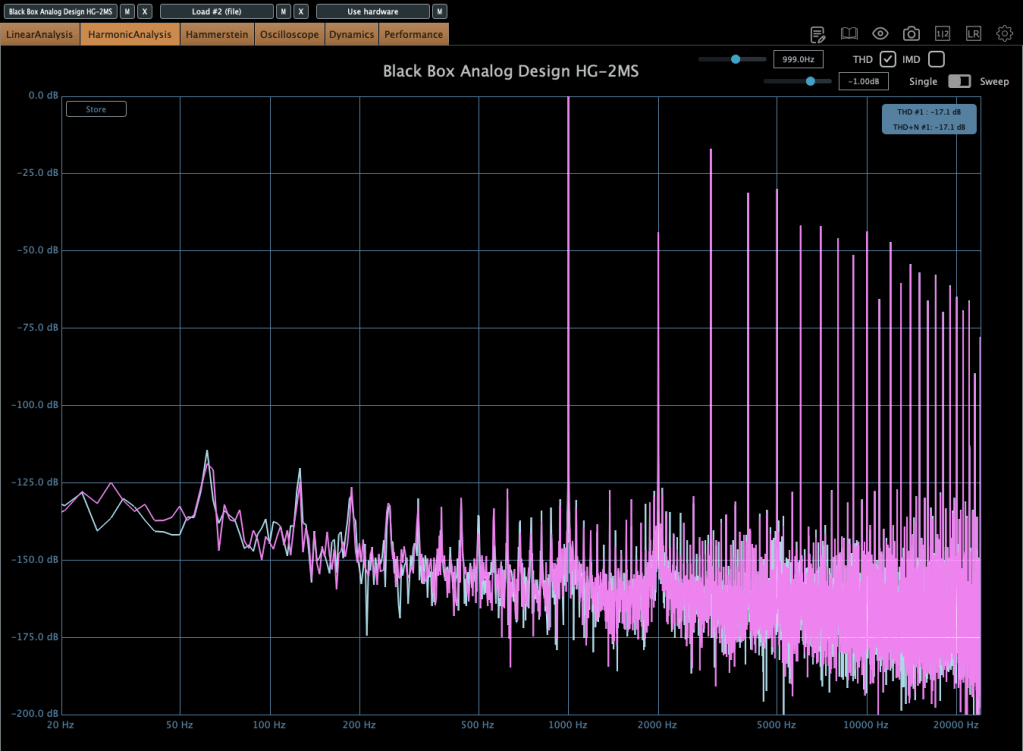
Photo: Harmonic distortion—Default state, Saturation In, Alt Tube pressed, from top to bottom
These show harmonic distortion in the default state, with Saturation on, and with Alt Tube pressed. You can see the distortion really jumps when you add parallel saturation—it’s noticeable in the harmonics, and you can hear it too; the overtones come alive.
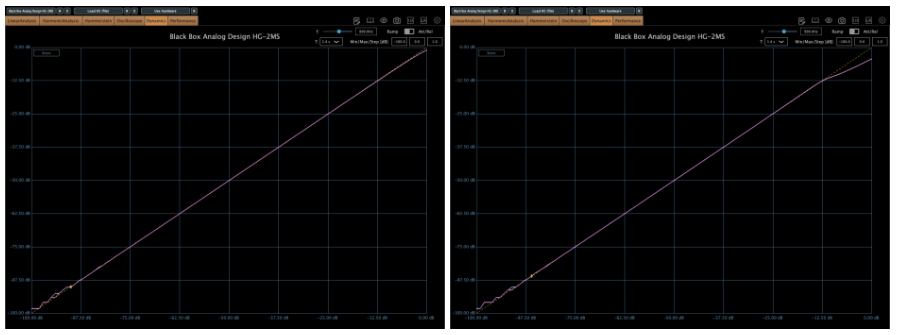
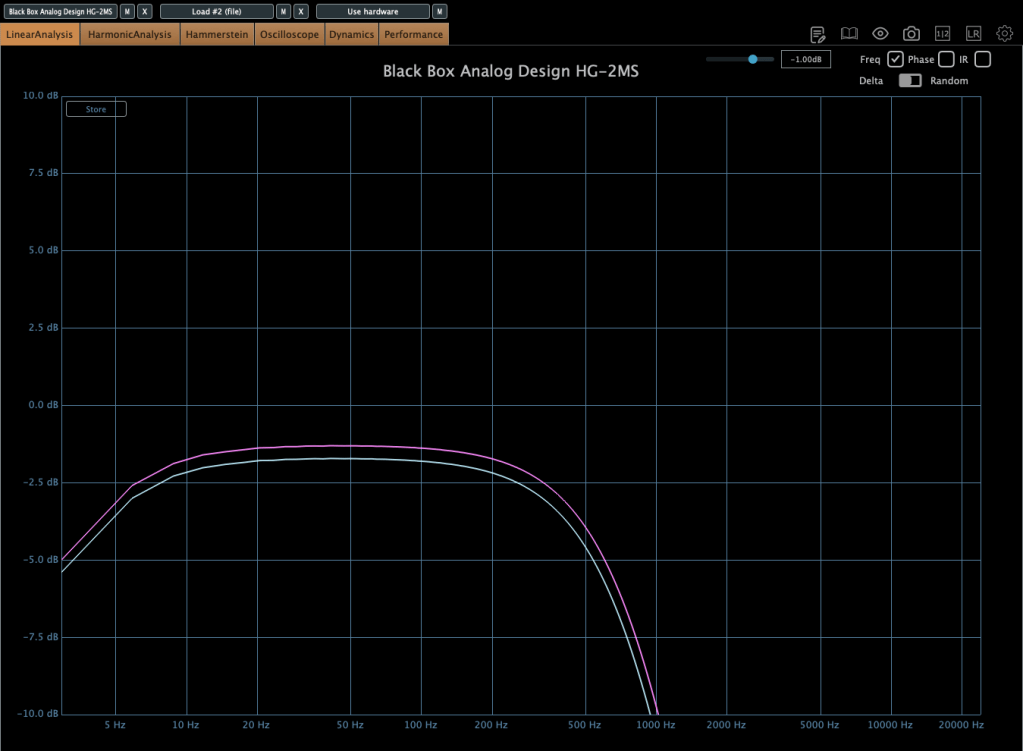
Photo: Default state vs. Saturation In, left and right
Interestingly, even though this isn’t a compressor, it starts to subtly compress when the input gets loud enough. The left is the default state, and the right is with parallel saturation active.
Now, these parameters let you shape how the parallel saturation sounds. Hit the Solo button, and you can isolate just the parallel saturation signal.
Photo: Frequency response by parameter—High Pass, Band Pass, Flat, Band Stop, Low Pass, from up to down
I measured the frequency response for each setting to show which frequency bands they affect—High Pass, Band Pass, Flat, Band Stop, and Low Pass.
Add colorful, frequency-selective tube saturation with M/S processing. Made by Brainworx, this is your mix bus’ best friend. Celebrated mix engineers like Dave Pensado, Bob Horn, and Jack Douglas rely on the sweet tubes and creamy-sounding transformers of the HG-2.
Personally, I like setting the Saturation to Flat, dialing back the Pentode a bit, and boosting the Triode. It gives a really nice sound—perfect for adding a touch of saturation at the final stage, like a sweet seasoning for your track.
If you’ve been thinking about a tube saturation plugin, this is a great chance to snag one at a discount.
Shadow Hills Mastering Compressor Class A – Compressor
Black Box Analog Design HG-2 – Saturator
Black Box Analog Design HG-2MS – Saturator
Mäag Audio EQ4 – EQ
SPL Transient Designer Plus – Transient Shaper
I originally bought and have been using plugins 1, 3, and 5 myself. For 2, 4, and 6, I requested NFR (Not for Resale) licenses from Brainworx through Plugin Boutique.
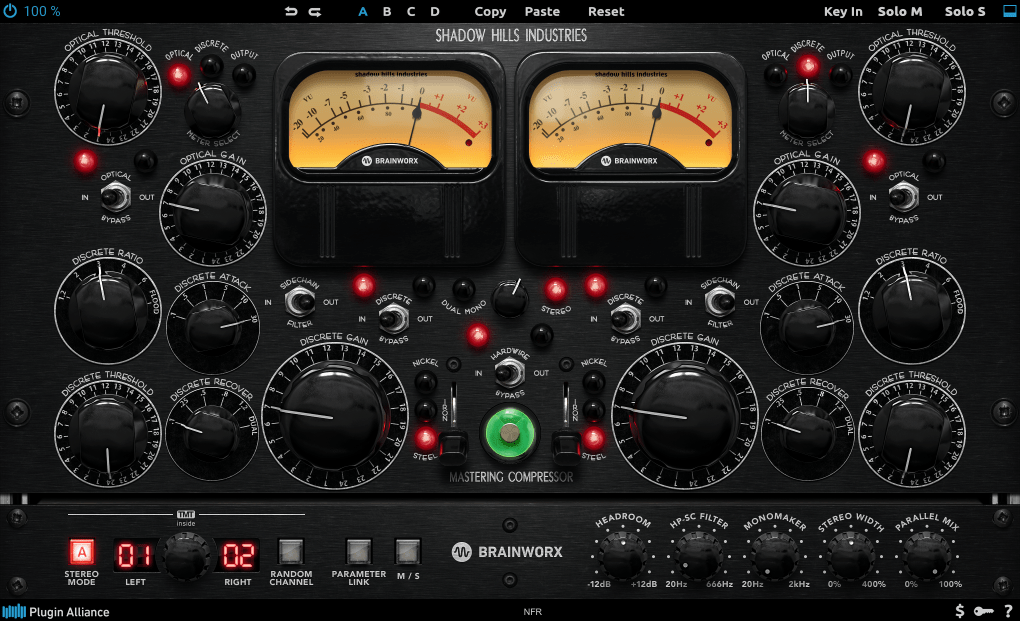
In this post, I’ll focus on introducing the Shadow Hills Mastering Compressor and its Class A version.
If you purchase through the links in this blog, I’ll earn a small commission, which really helps me keep doing what I love—so thank you in advance! ^^
Tame your dynamics with tremendous tone and precise control. Made by Brainworx, this is the supreme tycoon of master bus compression. Meticulously modeled after the instantly legendary hardware original, no details have been spared in crafting this digital version of one of the most musical and versatile compressors ever made.
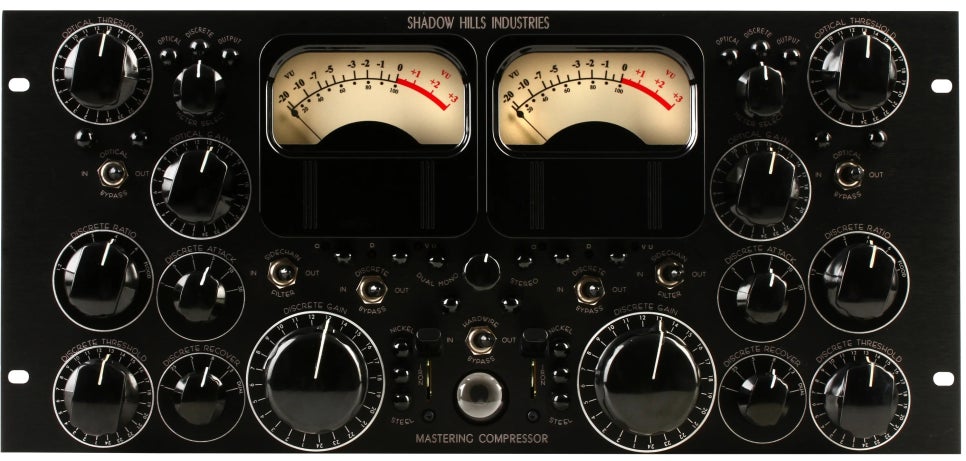
This plugin is a faithful recreation of the famous Shadow Hills Mastering Compressor.
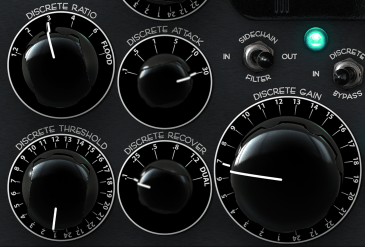
You’ve probably seen this pricey beast in mastering rooms. Back in the day, it cost around $10,000, but I hear it’s closer to $20,000 now—haha! Inside this compressor, you’ve got two flavors: an Opto compressor and a Discrete (VCA) compressor. Plus, it offers three output transformer options—Nickel, Iron, and Steel—for different tonal characters.
The Opto section uses a T4B cell, like the ones in the LA-2A or LA-3A, aiming to mimic that vibe. You can’t adjust the ratio, and it has a two-stage release (fast at first, slower later), much like the LA-2A.
The Discrete section is a VCA compressor with a bunch of tweakable parameters. They’re pretty straightforward once you look at them. For example, in the Ratio settings, “FLOOD” is around 20:1, and in Recovery, “Dual” means it follows a two-stage release like the Opto mode.
The transformer options are described in the manual like this (though I’d recommend checking frequency response and harmonic distortion tests too, with the compressors bypassed and just swapping transformers):
Nickel: The cleanest option with the least distortion. It subtly emphasizes ultra-high frequencies.
Iron: Adds a Class-A amplifier section for even-order harmonic distortion and a super musical low-end boost.
Steel: The most distorted option, delivering an ultra-tight low-end boost. Personally, I’m a fan of Steel—haha!
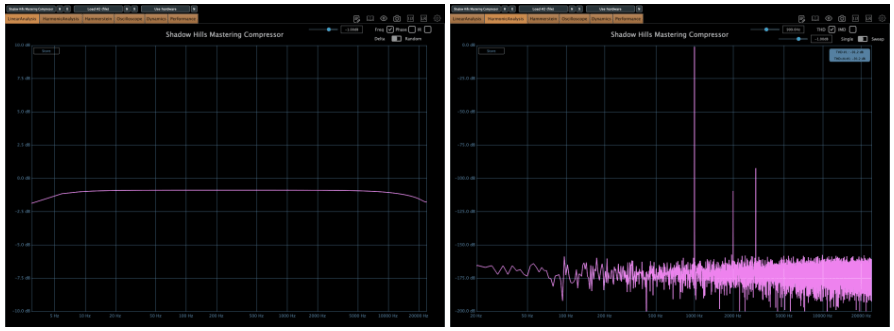
Left side Opto, right side Discrete
The Opto side adds some harmonic distortion, while the Discrete side is cleaner—both in Plugin Doctor measurements and by ear.
When I use this plugin, I tend to turn off the Opto and stick to the Discrete settings. It just feels cleaner that way, which suits my taste—I love crisp, clear sounds. The Class A version (up next) feels the same way to me… haha!
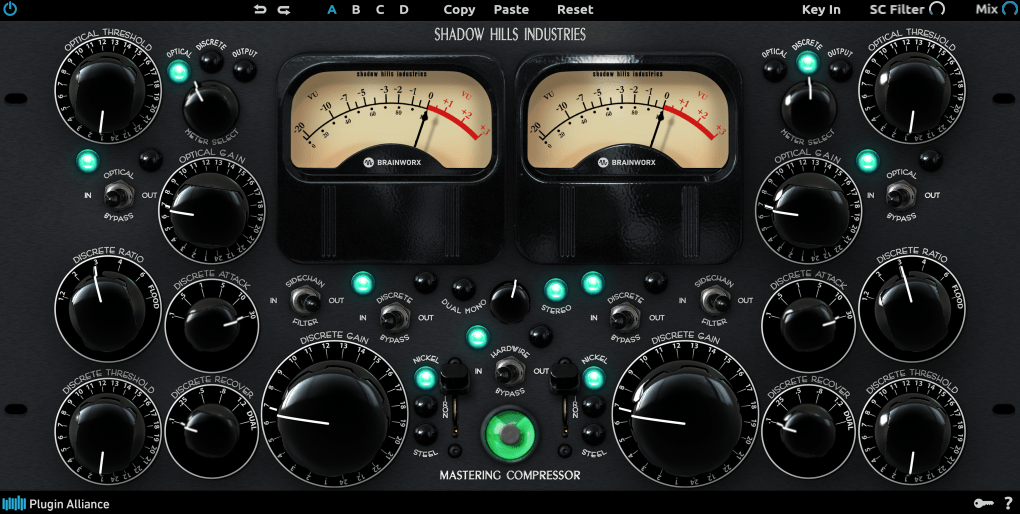
An even smoother-sounding version of the elite mastering compressor. Made by Brainworx, this upgrade to one of the most prestigious hardware compressors of today is enhanced with patented TMT modeling. The Shadow Hills Mastering Compressor Class A Limited Edition is one of the rarest and most powerful high-end compressors out there.
This one’s a plugin recreation of the Class A VK hardware—a limited-edition model from 2012, made in collaboration with Vintage King, with only 50 units ever produced.
Here’s what sets it apart:
The VCA compressor’s amplification stage is entirely Class A.
It uses a Lundahl input transformer, known for its clarity.
The internal wiring is handcrafted with Mogami cables.
It swaps the standard LEDs for red ones (a small but cool difference!).
Testing this out, I realized something: I own the regular Shadow Hills Mastering Compressor but rarely use it. The Class A version, though? The Discrete mode really clicked with me—I’ll definitely be reaching for it more often. The sound is just so clean and polished.
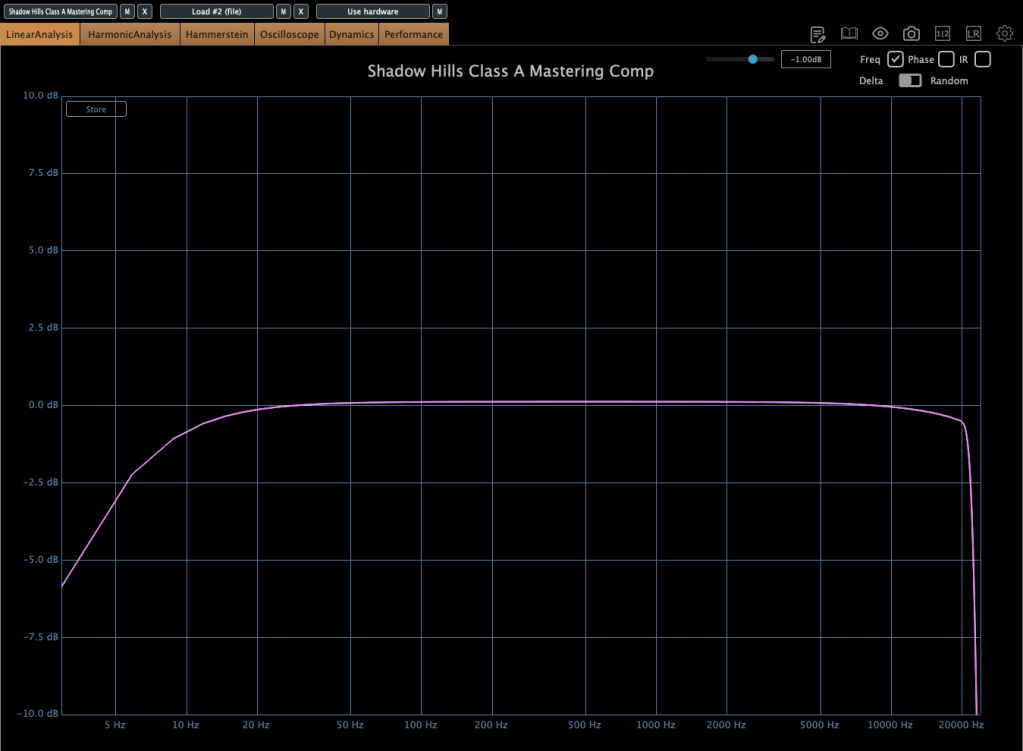
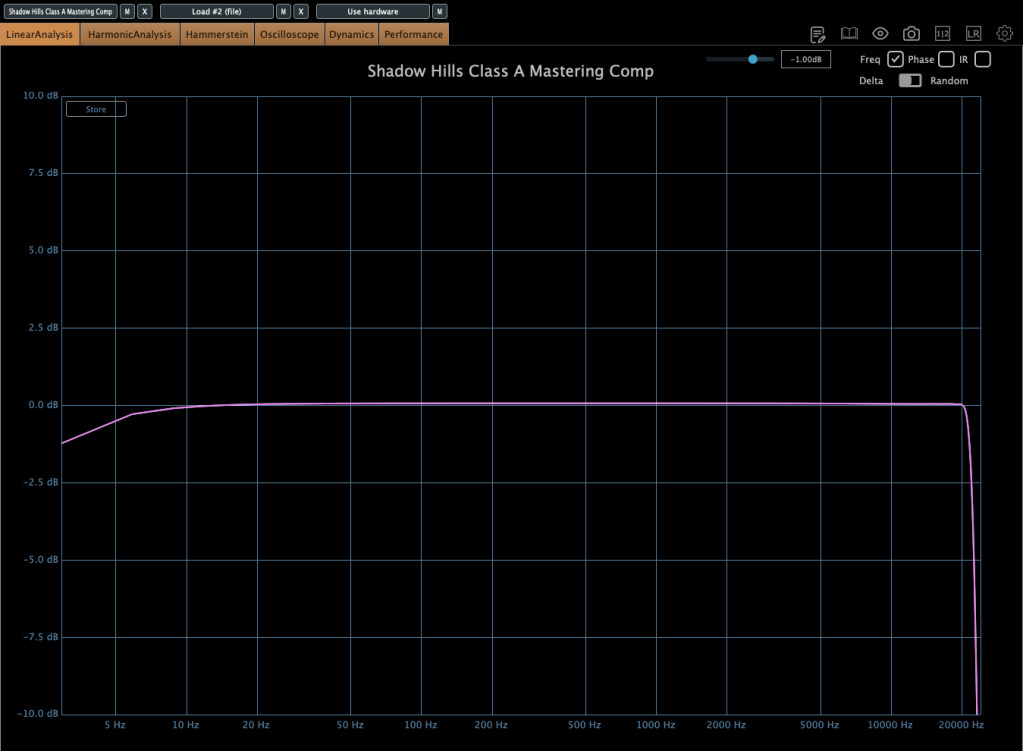
The workflow is the same as the original Shadow Hills Mastering Compressor, but the frequency response differs a bit.
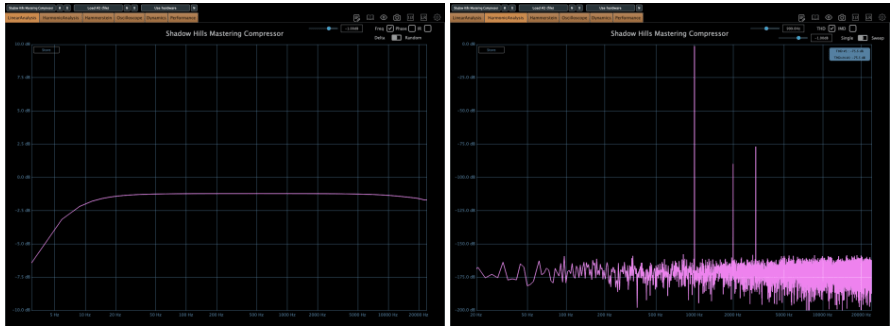
[Photo: Opto, Discrete bypassed, frequency response followed by Nickel, Iron, Steel]
Frequency Response with Opto
When using the Opto mode, the frequency response shows it cuts quite a bit of the high end. I’m a sucker for lively highs and ultra-highs, so it’s not my thing—but I know plenty of people who love that sound!
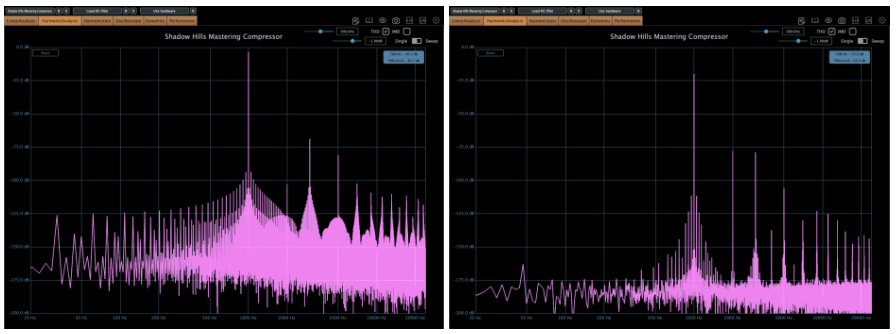
I wanted to show you the harmonic distortion too, but Plugin Doctor seems to glitch out and not display it properly… haha. Oh, and one more thing: in both the original and Class A versions, the Opto mode is Hard Knee, while Discrete is Soft Knee. Sometimes this shows up weirdly or doesn’t apply correctly—ugh, bugs!
Anyway, the Discrete section on this Class A version is fantastic. I’ve got it set to Steel and Discrete, and I’ll probably use that combo a lot. If you’re choosing between the original and this one, I’d recommend the Class A.
Wrapping Up
When you buy from Plugin Boutique, you get a free plugin with your purchase. This month, it’s either Audiomodern Freezr or Heavyocity MicroFX Refiner—don’t forget to grab one!
That’s it for today. I’ll pick up with the rest of the plugins in my next post—stay tuned! ^^