Hello? This is engineer and singer-songwriter Jooyoung Kim.
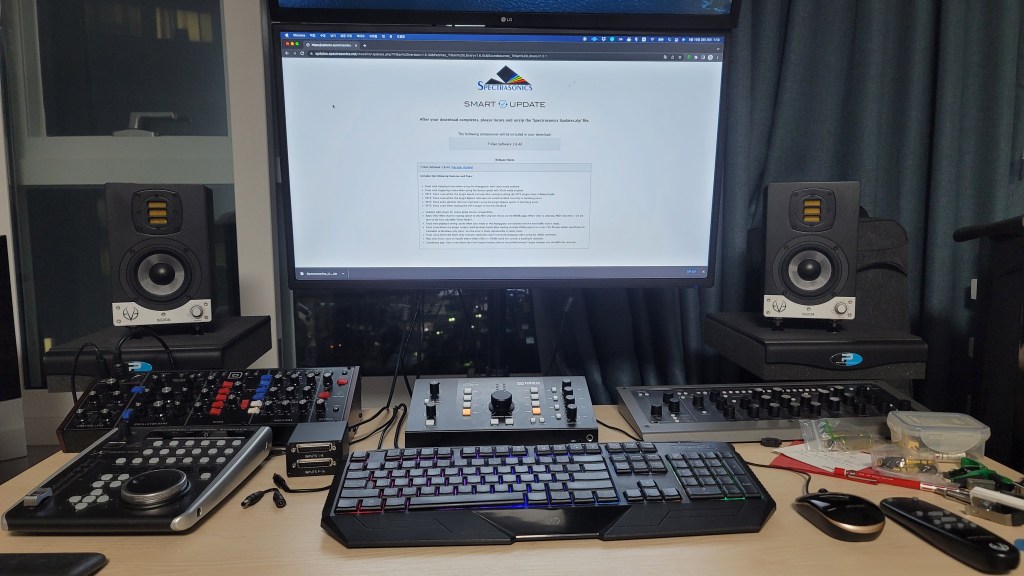
The volume knob was pushed to the side when I bought a rack the other day, so for convenience’s sake, I’m going to review the Audient Nero monitor controller I purchased a few weeks ago.
Appearance and Function
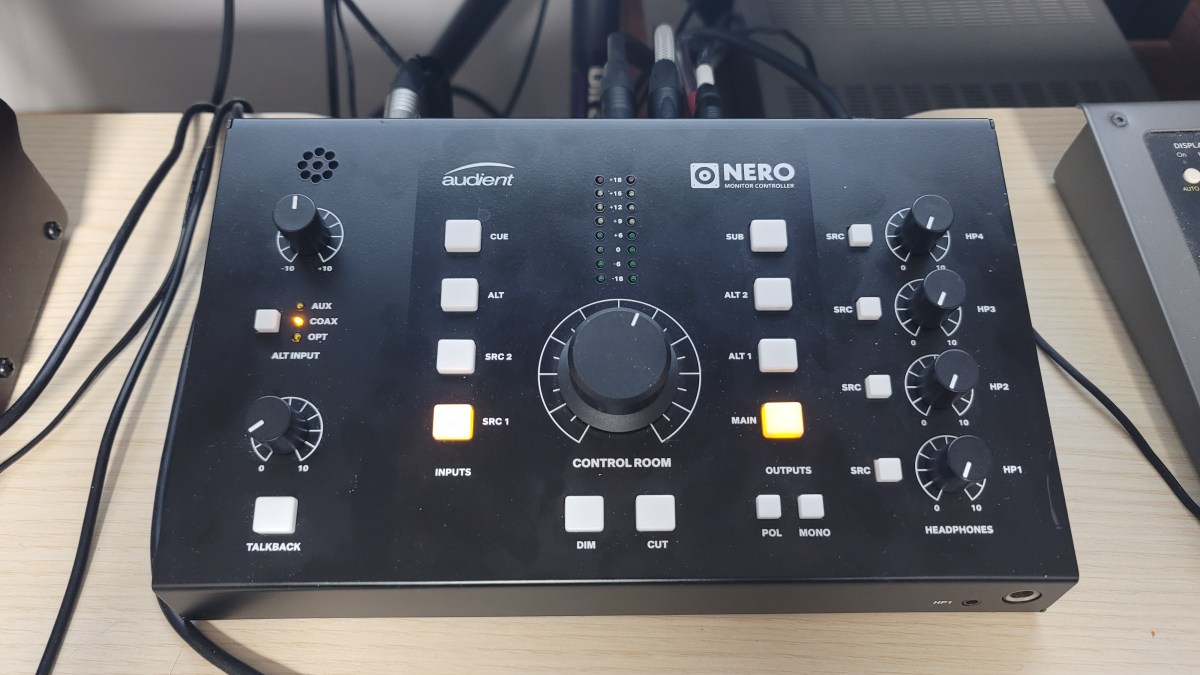
The exterior is just plain. It’s made of steel plate, so it doesn’t feel as light as plastic material, and the knob has a reasonable amount of resistance, so it’s just decent quality.
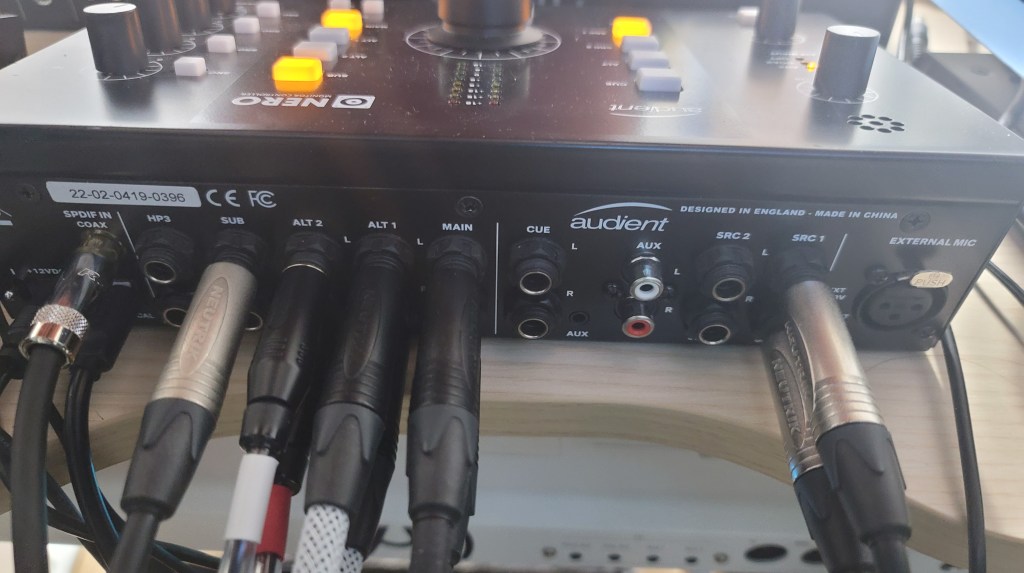
A total of 4 headphones can be connected. You can connect 1 headphone using the 1/8″ or 1/4″ jack on the front, and 3 headphones can be connected using the back.
A total of 4 inputs can be selected: Cue, Alt, Src1,2, and Alt Alt can also be selected separately from 3 types: Optical, Coaxial, and Aux.
There are three outputs: Main, Alt 1, and 2. you can connect a subwoofer using the Sub terminal button. What was a little disappointing was that you couldn’t select the crossover frequency when choosing a subwoofer. The crossover band was a bit low, so when I connected my 8-inch subwoofer, it didn’t come out as powerfully.
In addition, a talkback microphone can be used, the input source can be set differently for each headphone jack, and there are functions such as Dim, Cut (Mute), Pol, and Mono. It would have been nice to have L/R conversion, but it was a bit disappointing.
Measurement and Usage
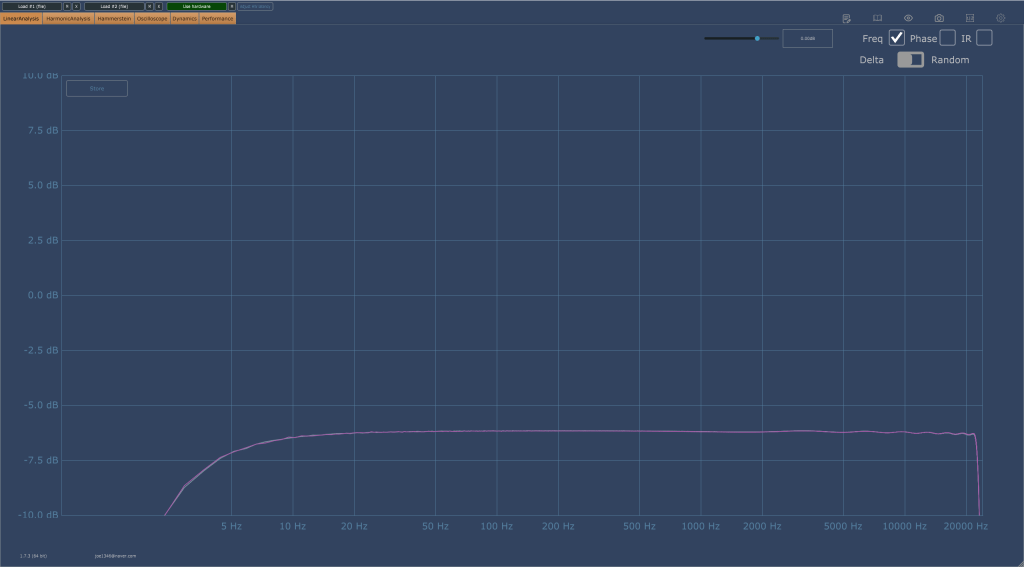
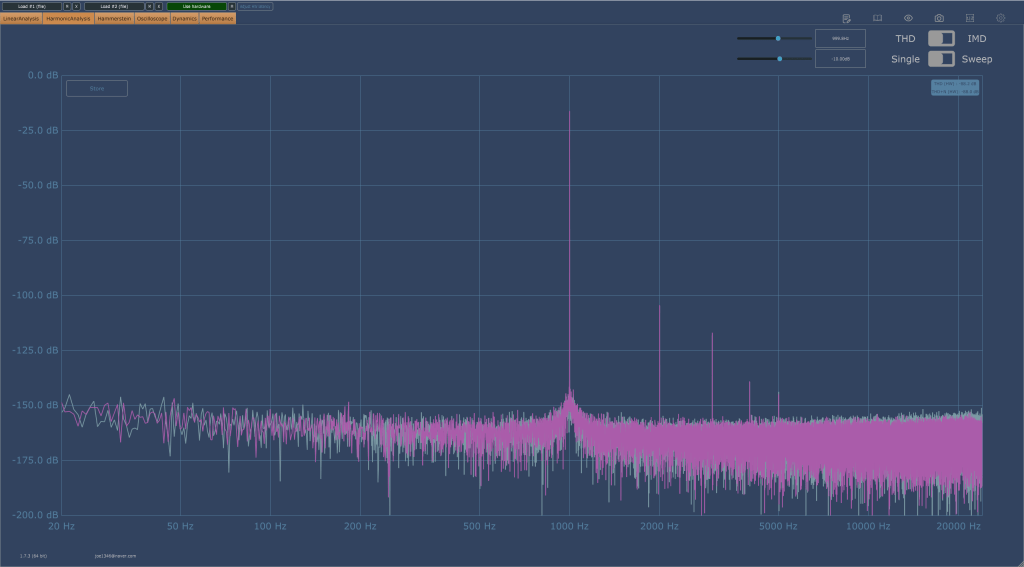
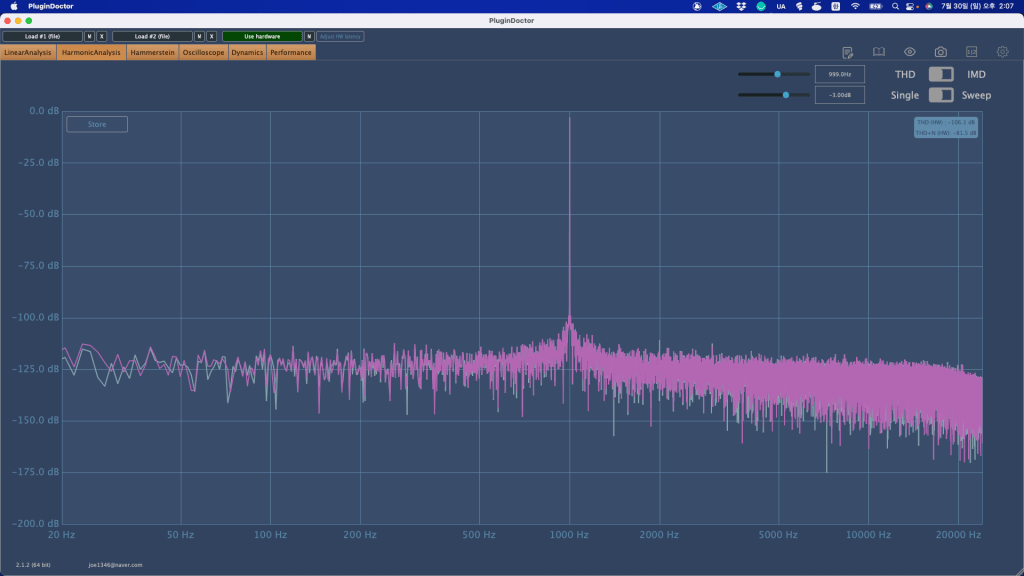
Once an analog connection is made, the output is basically reduced by about 6dB. And both in terms of listening and measurement, the high frequencies were slightly cut off.
Still, I was surprised by the fairly decent performance. Fortunately, I think it’s worth it for the sake of convenience.
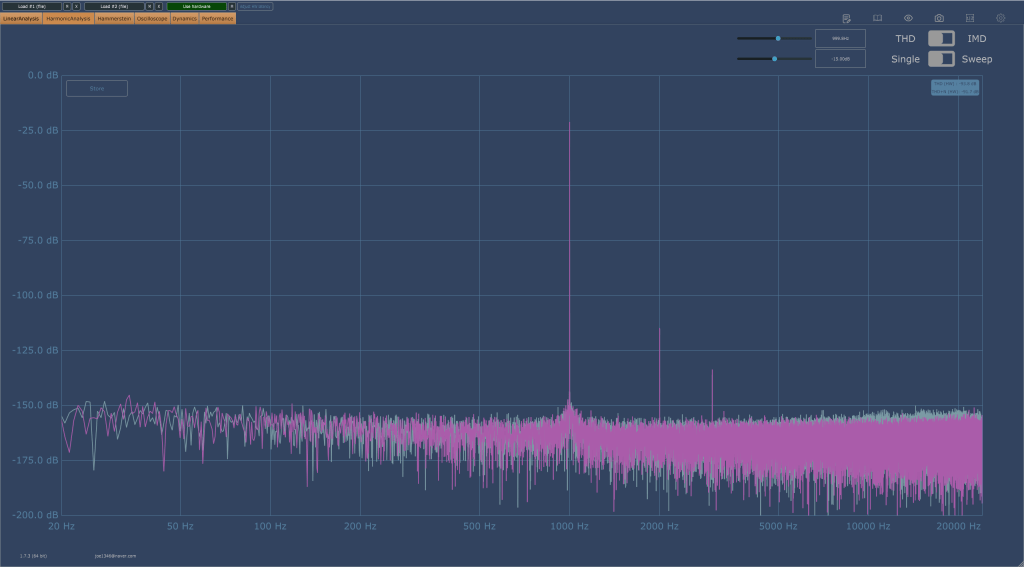
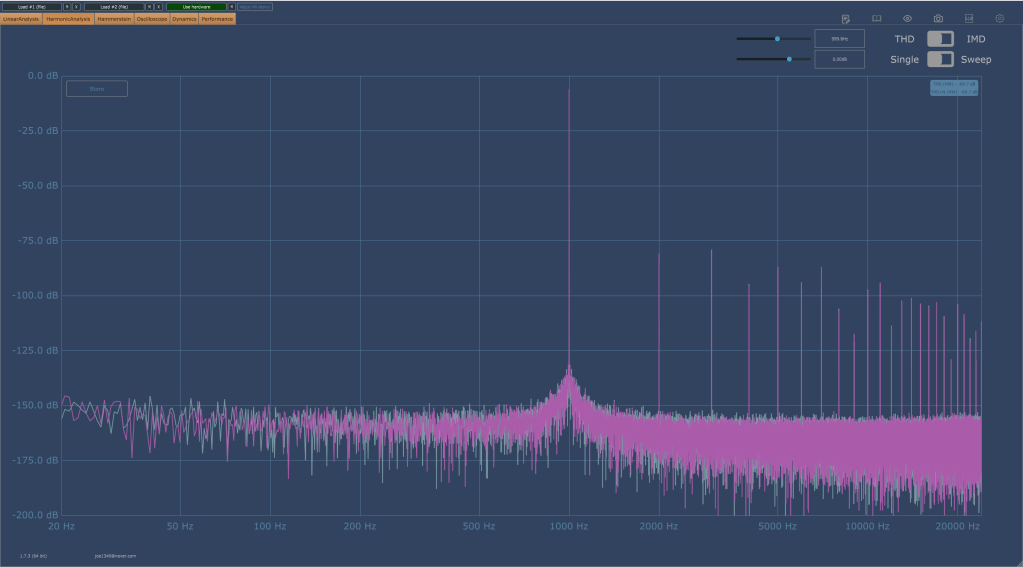
Also, basically, the overtones rise a little, but not to such a huge level. The picture on the right below shows that the headroom was exceeded and distortion occurred, so I thought it would be useful as long as it wasn’t in extreme situations.
I also wanted to measure Coaxial Digital, but an error occurred and measurement was not possible. However, basically, when you make a digital connection, the volume becomes lower than when you make an analog connection, and the analog connection sounds much more detailed than the digital connection.
I’m not sure because I haven’t disassembled it and looked inside, but I think it’s probably the DAC chip difference. To make a digital connection, you need to use Grace Design or Cranesong…^^;;
Conclusion
There are no particular inconveniences while using it. The number of ins and outs and performance are just satisfactory, and I don’t think I’ll even think about changing it if nothing happens.
I think I can say that he’s ‘a fairly good friend.’
hello? This is engineer and singer-songwriter Jooyoung Kim.
Today, I wanted to introduce Mixchecker Ultra, a higher version of Mixchecker, Audified’s representative plug-in, as it was released as Rent to Own at a plug-in boutique, so I requested an NFR (Not for Resell) code from the plug-in boutique and brought it.
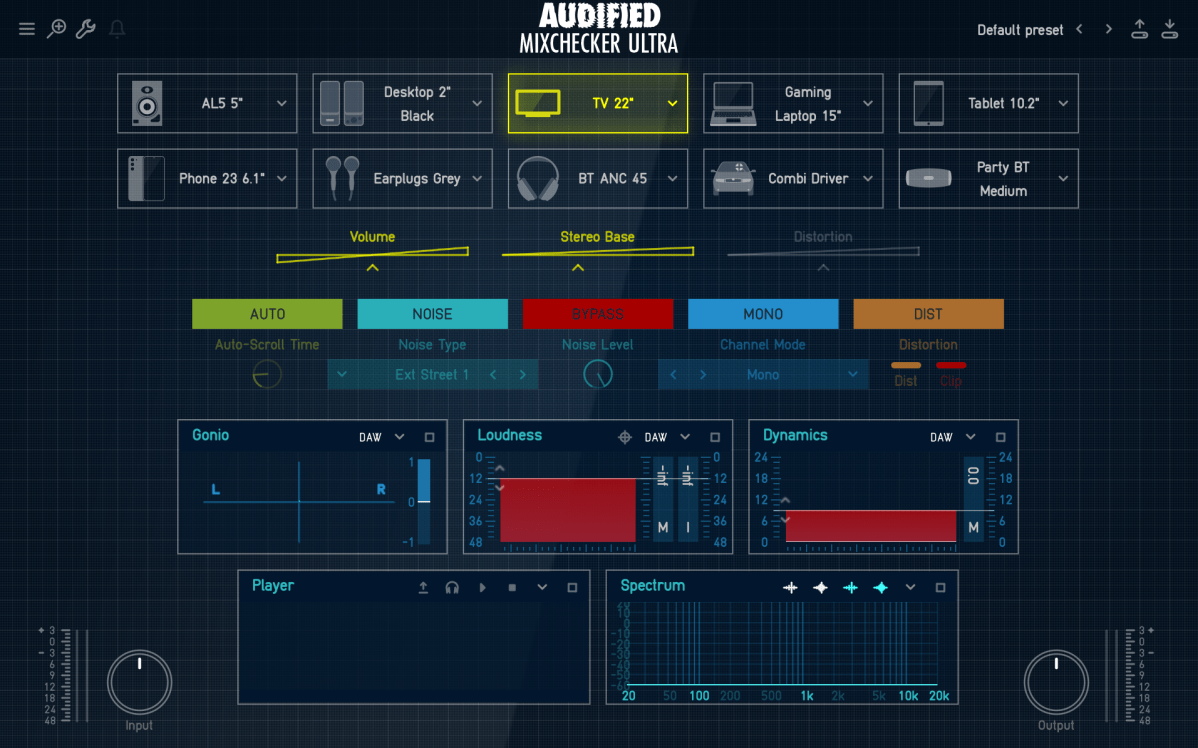
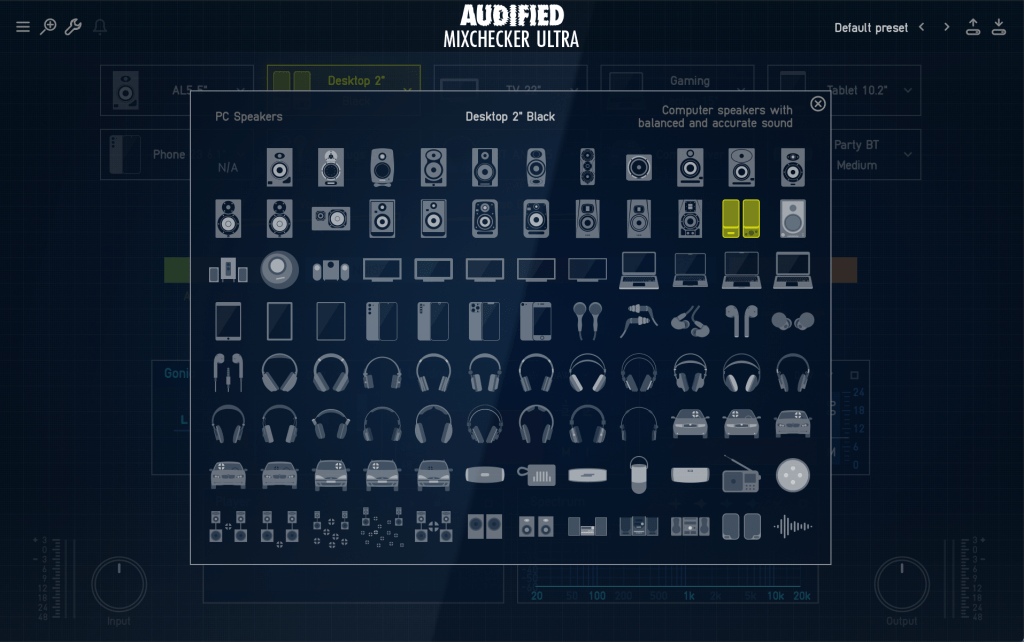
As its name suggests, Mixchecker, this plug-in can be useful for simply checking how something sounds in different environments.
It is a format derived from the IR of various speakers, and if you are interested in equipment or machines, you will be able to tell which product it is from just by looking at the shape of the speakers, cell phones, headphones, earphones, etc.
Even if you don’t know the product well, if you hover your mouse cursor over the icon, a name similar to the original product will appear in the center and a description will be written on the right, making it easy to find.
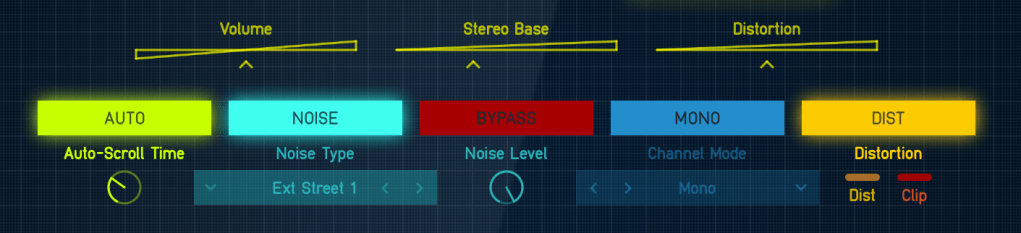
If you select Auto in the middle, the automatically set devices will play sequentially, and you can add noises from everyday life such as the street or subway through the Noise button and listen to them.
In addition, you can listen to various situations through functions such as Bypass, Mono, and Distortion.
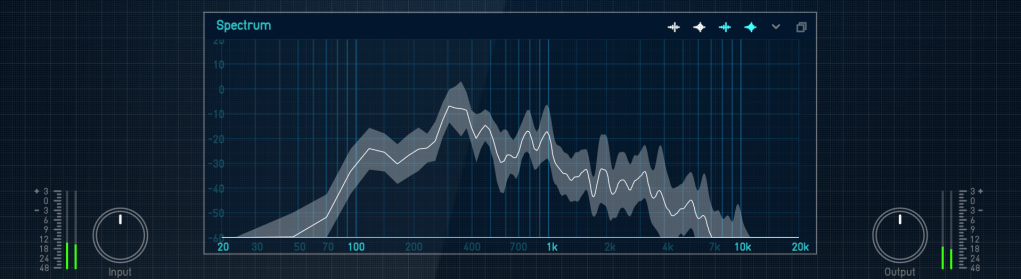
Analyzer functions are also included, and individual analyzers can be enlarged and viewed for easy visual inspection.
You can just use it to check the mix, but it can be fun to use for special effects, such as playing with earphones or in the car.
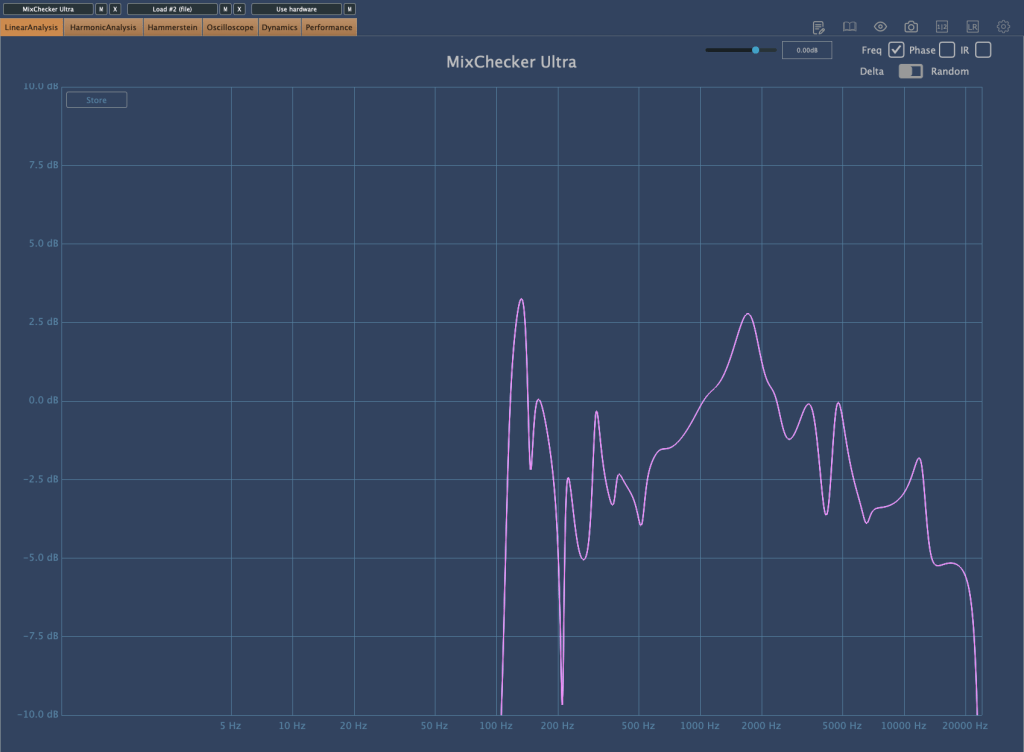
I measured Mixchecker’s NS-10M model using Plugin Doctor, and the Frequency Response came out interesting… haha.
In fact, it is absurd to reproduce the sound of another speaker through one speaker. First of all, if the woofer is small, the low frequency range is not physically produced, so a small woofer cannot reproduce the sound of a speaker with a large woofer. Nevertheless, devices other than speakers, such as earphones, laptops, and TVs, seem to be represented quite well.
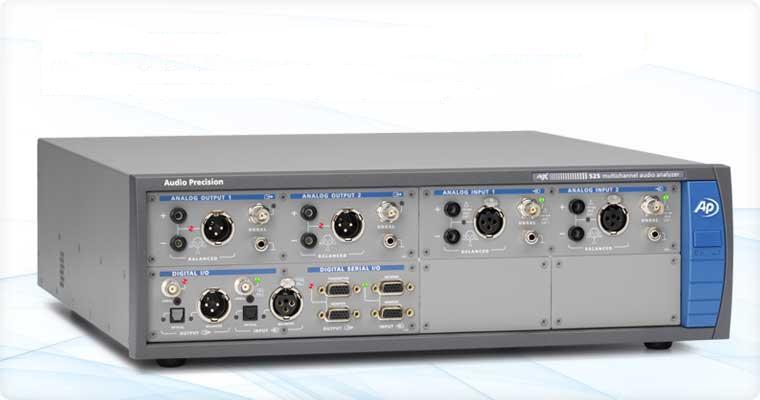
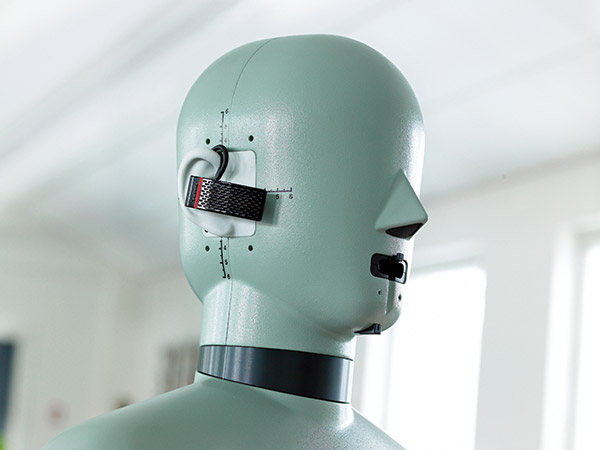
It is said that these speakers and various devices were measured and modeled in an anechoic chamber using an instrument called apx525 and B&K Type 4128-C.
Mixichecker Pro is Audified’s flagship product that has been purchased by many people, with more than 20,000 units sold worldwide since its launch.
The higher version, Mixchecker Ultra, contains many more features than the Pro version, so it would be a good idea for those who have been interested in mixing or mastering to take a look.
(If you purchase through the link above, I will receive a small commission, which greatly helps in running the blog)
If you purchase from the plugin boutique, you will receive a plugin for free.
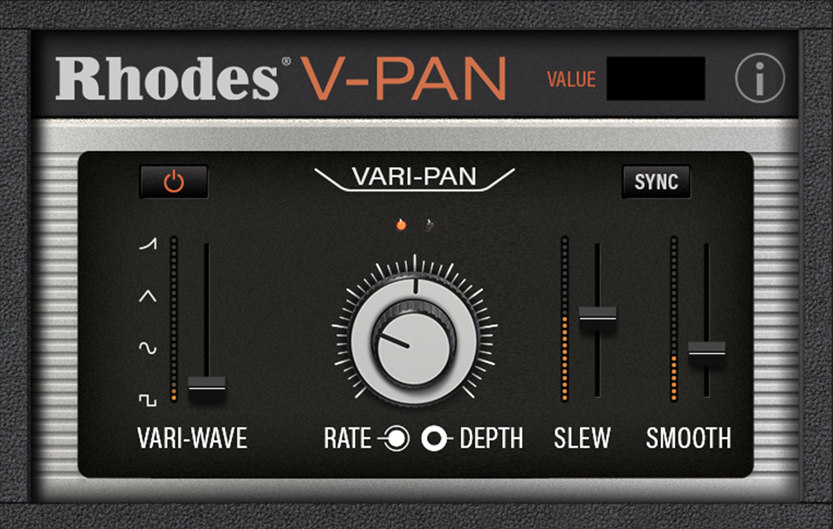
This month, they are giving away an autopan plugin called V-Pan from Rhodes, and a sound modulation plugin called Dehumaniser Simple Monsters from Krotos.
If you purchase it, I hope you will receive one. Well, see you again in the next article!
Hello? This is engineer and singer-songwriter Jooyoung Kim.
Today I’m going to review the old Dangerous 2Bus that I purchased a few months ago. Well, shall we begin?
Appearance
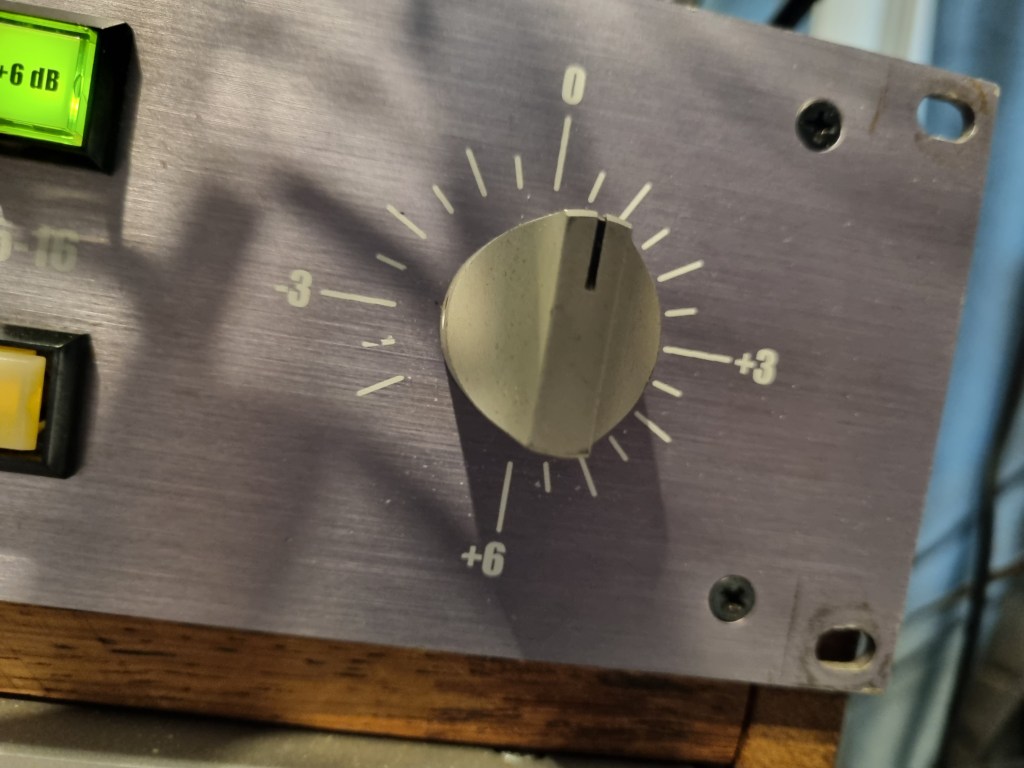
The highlight is the slightly old-fashioned purple color. It’s a little more dull purple than the product photo above, but it reminded me of the Evangelion animation.
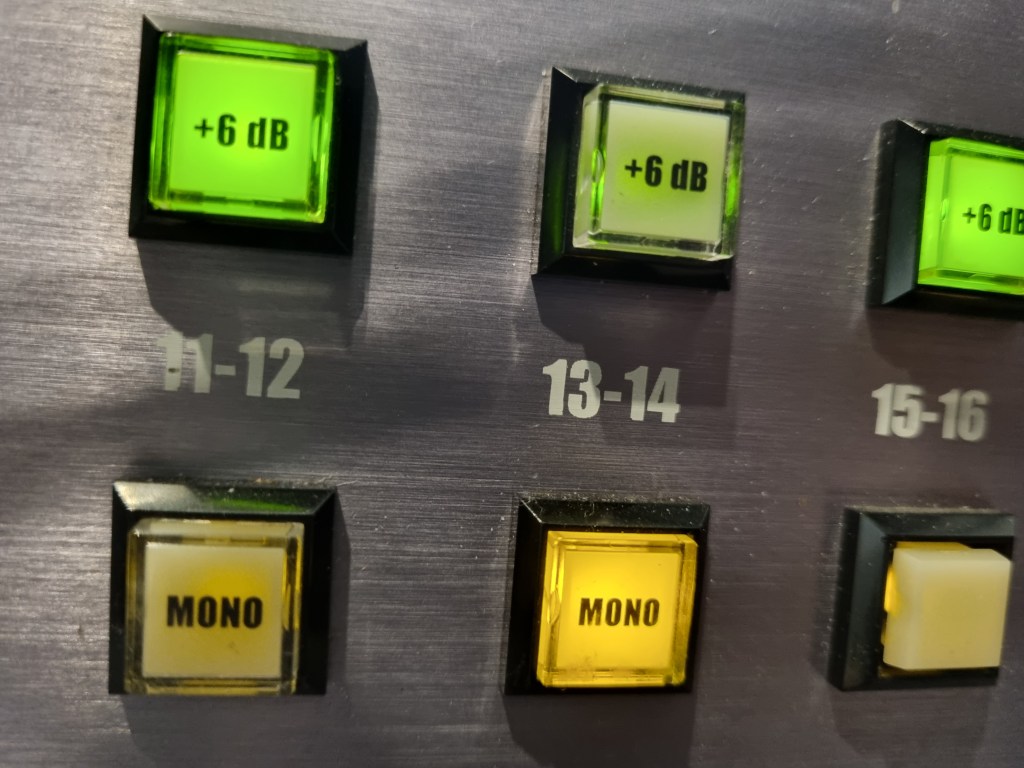
Each channel is grouped in stereo, and when you press the mono button, you can use each of the two linked channels in mono.
Additionally, there is a function that can increase 6dB for each channel through the 6dB button. The final volume can be adjusted with the front step knob.
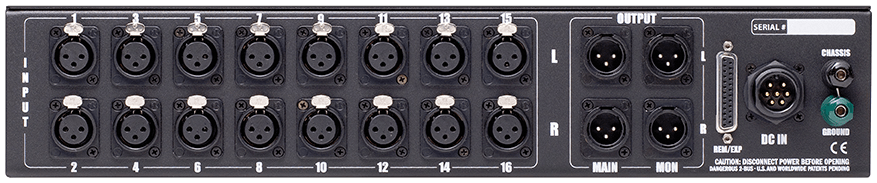
There are two outputs at the back, Main and Monitor, which can be used for different input sources.
REM/EXP is a terminal that expands the channel by connecting an additional Dangerous summing mixer via a D-Sub cable. A separate external power source is used for power.
Measurement
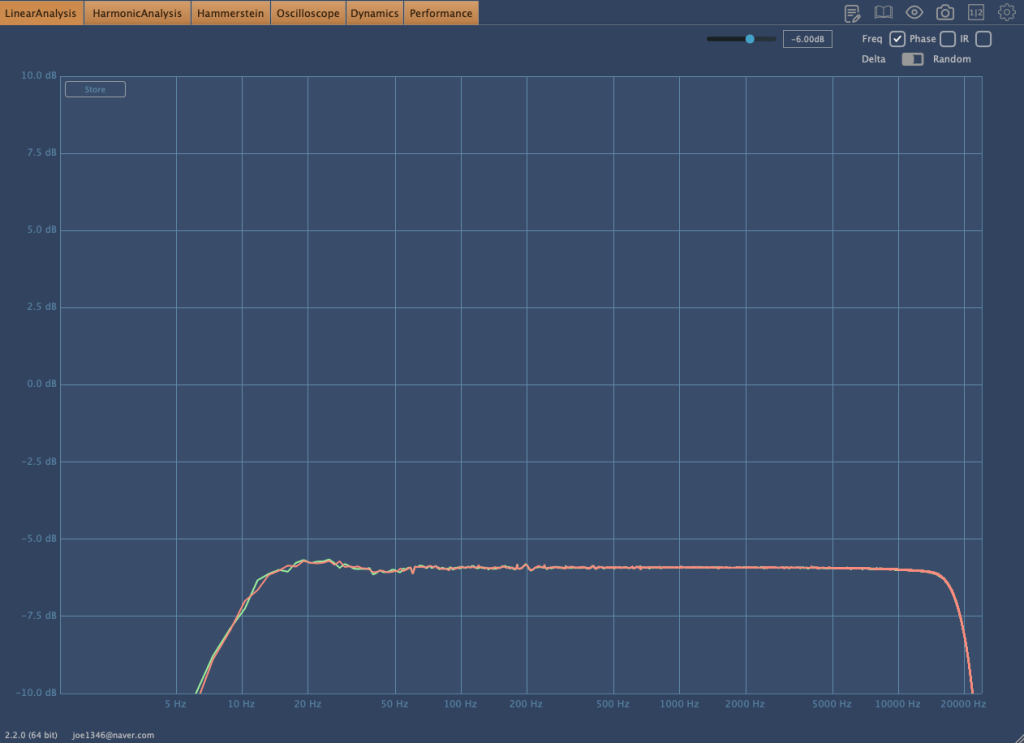
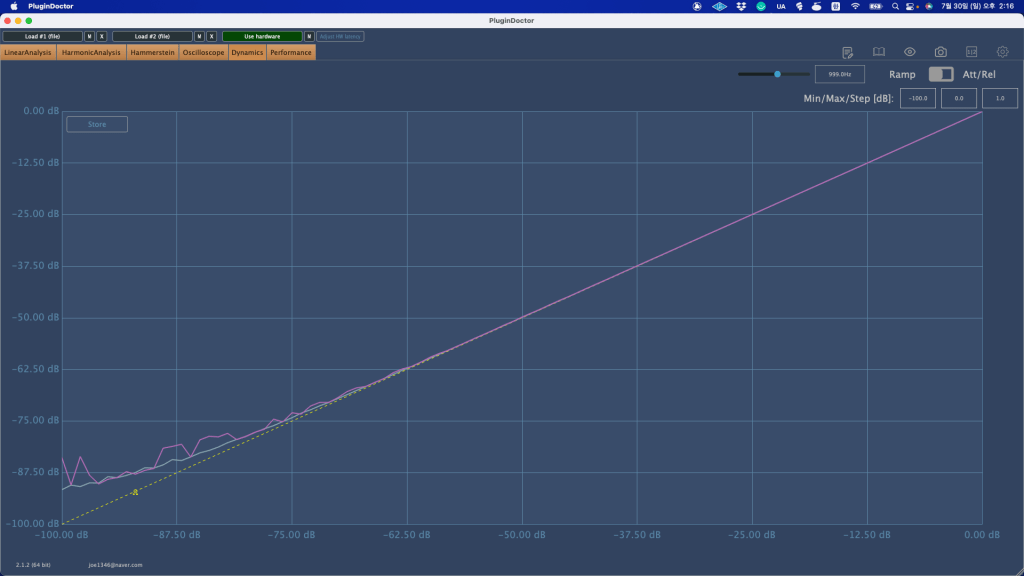
Basically, this is the frequency response graph that can be seen when the In Out volume is adjusted.
If the volume is low,
the frequency response appears like this. You can see that the low range is slightly emphasized and the high range is cut.
It’s a simple drum sound with BFD3 and guitar with bass and power chords. The sound is deteriorated because it’s Sound Cloud, but it would be good to see how it changes.
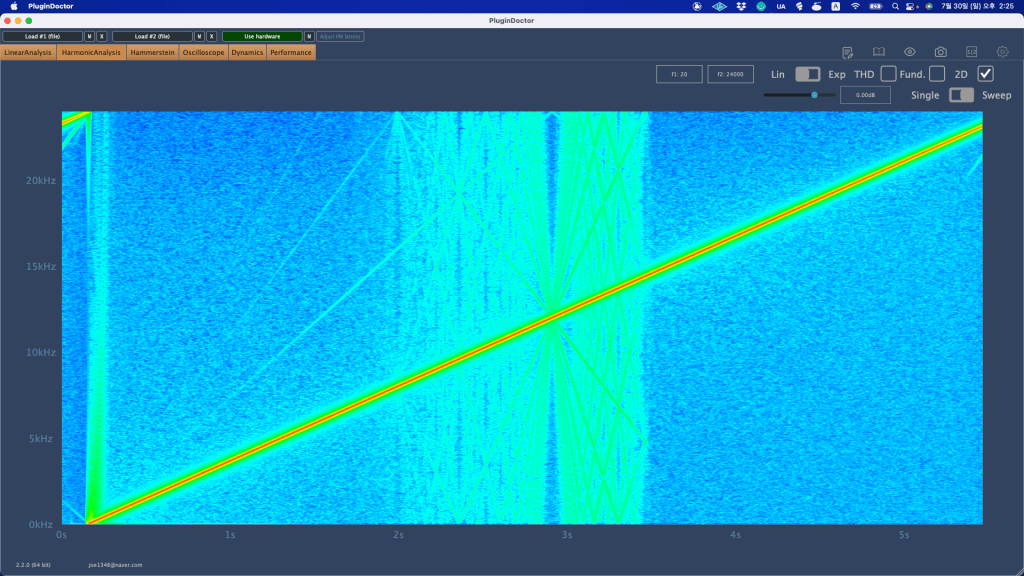
Harmonic distortion was almost non-existent.
The basic noise floor was also small.
Another feature is that if you use the stereo channel without pressing the mono button, the sound is reduced by about 6dB. That’s why I thought they made a 6dB button.
This time, I gained some understanding of the equipment while using it in the mix, and it has its pros and cons. I like it, but I think it might not be good for people who like a lot of high-pitched sounds.
Still, it seems to be worth the price of a used product.
I hope you enjoy my review. See you again in the next article..:)
I’m always open to reviewing hardware products! If you’d like me to review a product, please feel free to reach out at joe1346@naver.com.
※This article is a review written on July 21, 2021 after being selected for the FX Collection 2 experience group run by ‘Samick’ and receiving product support for a certain period of time. I only received support for the product and wrote the rest myself.
Finally, the last plugin, Phaser BI-Tron.
This Phaser is a clone plug-in of a pedal effect called Mu-tron Bi Phase, released in 1974. It consists of two phasers, and the routing of these two phasers can be adjusted to provide various effects. It is said that many famous musicians such as Stevie Wonder, Grateful Dead, Smashing Pumpkins, and Lee Scratch Perry (dub) used it, and the Expression Pedal of the original hardware was also reproduced so that the amount could be adjusted.
Routing through Phaser can be intuitively understood at a glance. When you change routing within the plugin, it is also shown on the display.
Signal Flow may seem a bit difficult, but actually handling the plugin is not that difficult.
Basically, BI-Tron Phaser uses an LFO called Sweep Generator to adjust the degree of the Phaser effect. This can be given by a pedal, or by using both a pedal and a sweep generator, and the above Signal Flow can be seen as showing that it can be adjusted with various parameters.
I think you can roughly understand the rest if you look at it. The Phaser BI-Tron plug-in has more parameters that can be adjusted than you might think, so it’s a bit confusing, so let’s take a look at them one by one.
Sweep Generators
BI-Tron Phaser has two LFOs. Adjusts the LFO that goes into Phaser A and B. As you can see, you can adjust the rate to sync or adjust it between 0.200 Hz and 20.0 Hz.
In addition, only Sweep Generator 1 can control the LFO rate with a pedal, and Sweep Generator 2 cannot be adjusted with a pedal. There are three LFO shapes to choose from: Sine, Ramp, and Square.
Phaser
It’s quite ironic that the plugin name is Phaser, but the parameter name is Phasor, but anyway, there are two Phasors, A and B.
Depth 1 and 2 determine the extent to which Sweep Gen 1 and 2 enter, respectively. At 1, the LFO will not be used at all, and at 10, the LFO will be used at the highest amount.
Through Feedback, you can change the feel of the Comb Filter, and through the Sweep button, you can decide whether to give the LFO to the Phasor with Sweep Gen, control it with the Pedal, or use a combination of both.
The Norm/Rev switch on Phasor B is a switch that reverses the polarity of Phasor B. If you only invert the phase of Phasor B like this, the effect will be more noticeable.
Arturia’s manual tells you to use R.INV in Advanced Control to create a fun Stereo Phasing effect.
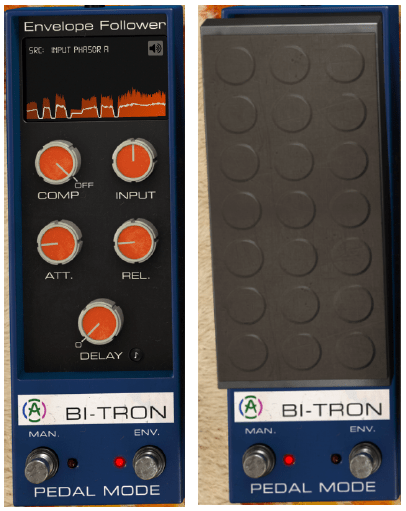
Manual & Envelope
Manual Mode is a mode for manual control using the pedal. You can select it by pressing the button labeled MAN at the bottom left, and you can adjust it by pressing it with automation or the mouse.
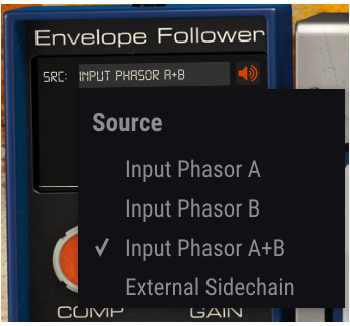
Envelope mode is a mode that allows the pedal to operate according to the envelope of the audio signal. It will be easier to understand if you touch it a few times, but roughly speaking, you can think of it as trimming the envelope based on the input source and using it as a trigger for Phaser.
Right below the text that says Envelop Follower, there is a window where you can select the trigger source called SRC. Here, you can select the source that goes into A, the source that goes into B, a combination of both, or use Sidechain. You can also choose an external source.
You can see what these trigger sources sound like by clicking on the speaker shape on the right. However, what is a bit disappointing is that when you touch Comp, Input Gain, Attack Release, Delay, etc. below, you cannot hear the changing sound.
Delay is basically in ms units, but can be selected by beat through the Sync button, and the remaining units can be adjusted on a regular basis.
Advanced Control
Phaser BI-Tron’s Advanced Control includes controls for Hi Pass Filter and Phasor A and B.
Hi Pass Filter is a 12dB/Oct filter. Filters the low range at the input stage so that only high frequencies are modulated. Arturia says it can be used to keep the low range of sounds with low registers stable, such as bass or kick.
The part written in Poles is a parameter for how much All-Pass-Filter will be used. The more you use, the stronger the Comb Filter effect will be and the less bandwidth it will require. It is said that the original hardware used 6 All-Pass-Filters.
Mix, like other plug-ins, is a parameter that determines the ratio of the dry/wet signal to be given, and R.INV is a switch that inverts the phase of LFO 1 and 2 entering Phasor A or B. If you press this switch, you can get a much wider stereo image.
Samples
There are too many parameters in this, so it’s hard to know how to present it.
Phasor A, B routing can be done differently, and whether Depth 1, 2, and Feedback of each Phasor can be controlled with a pedal or Sweep Gen. If controlled with Sweep Gen, how to set the LFO shape and rate, and adjust it with the pedal. Whether to control with the envelope, select the Pole and R.INV buttons, and even mix…
Honestly, I think it would be very difficult to tell you about everything about the plug-in just by telling you a few of them. However, I can’t skip it without listening to the samples at all, so I’ll listen to one original track, one in the default state, and two that I’ve set up the way I want.
Honestly, I think it would be really difficult to judge based on this alone, and I also feel a bit disappointed, but I think it is an unavoidable limitation.
Phaser BI-TRON overall review
It’s not bad, honestly, it’s okay, but the plugin is too heavy. It’s a bit lighter than the Bus Force I mentioned in the previous article, but it’s still heavy.
In particular, modulation-type plug-ins such as Phaser are mainly used for individual instruments or tracks, but the question arises as to whether this can be applied to individual instruments in a flashy way.
When you install one plug-in… Of course, adding 2-3 more doesn’t mean it will consume the CPU twice or triple, but I still think it’s a bit excessive.
Therefore, if I were to use it, I would probably use it with the feeling that it would only be used for one or two instruments, a bit like MSG.