Heritage Audio Successor Hardware & Plugin Review

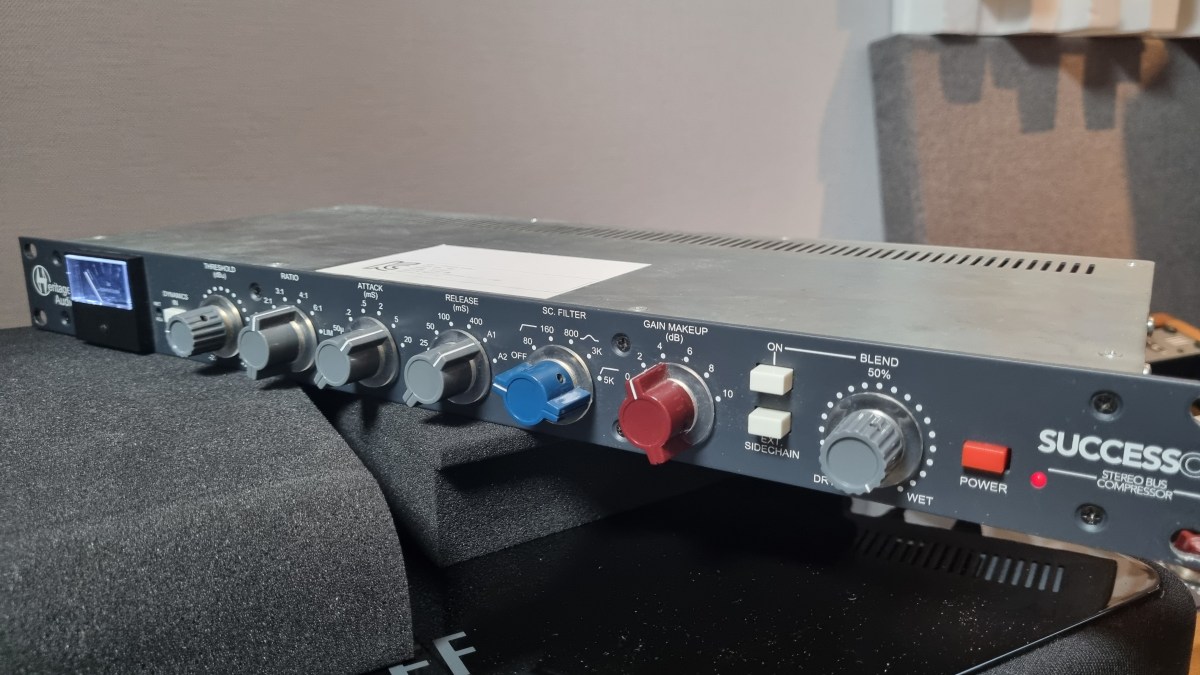
Hello, there! I’m Jooyoung Kim, a mixing engineer and music producer.

About half a year ago, I bought a Heritage Audio Successor that had some intermittent noise issues. I kept telling myself I’d write a review after getting it fixed… and, well, here I am finally getting around to it now, haha.

I didn’t originally have any burning desire to get this unit, like, “I have to own this thing!” It was just a good deal, even factoring in the repair costs, so my hand moved faster than my brain, lol.

I was initially eyeing the Behringer 369, but since this is also a diode bridge compressor, I figured why not. Plus, it’s a mastering compressor pushed by Heritage Audio, so I thought the channel balance would be decent enough, and it wouldn’t be a total gamble. So, I went for it.

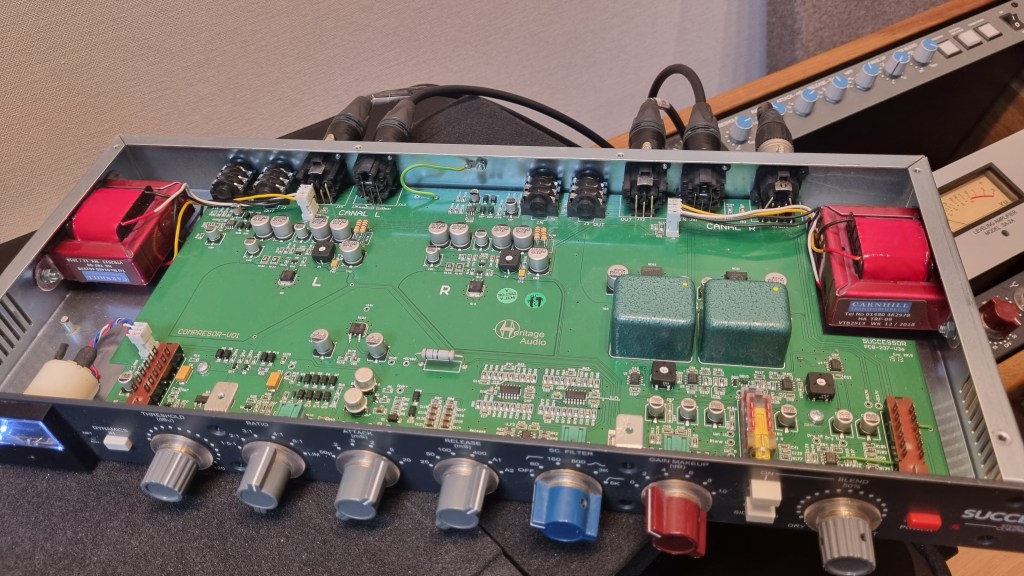
As expected, there was noise coming from the left channel, so I just dove in and opened it up without much thought. Usually, noise or low output points to a capacitor issue—something simple, right? Or so I thought…!

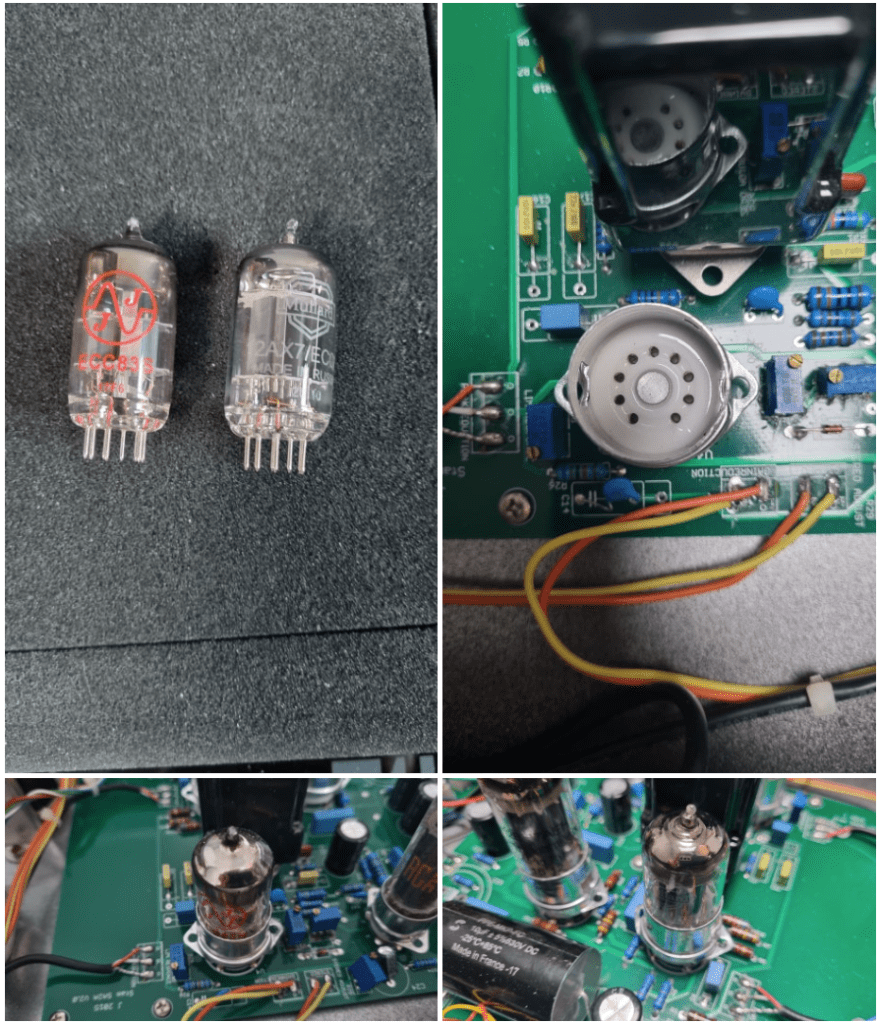
No matter how much I looked, it didn’t seem like a soldering issue or a blown capacitor. So, I detached the circuit board and swapped the left and right transformers, but the left channel was still the problem.

Testing every tiny component by buying replacements was, frankly, not humanly reasonable. So, I handed it over to the folks at MS Tech for repairs, explaining the tests I’d done and admitting I couldn’t pinpoint the issue.

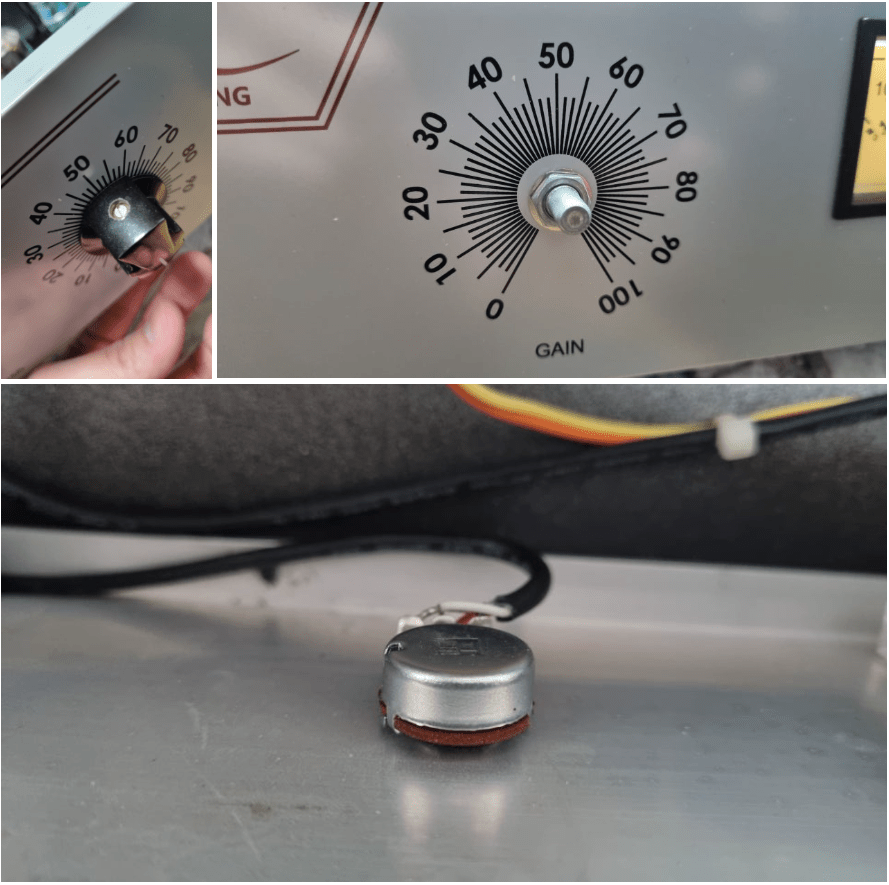
A few months later, I went to pick it up. When I asked the technician, he said he wasn’t entirely sure, but it seemed like the variable resistor in the left channel was the culprit. On the outside, the components looked fine, but something inside was faulty, haha.

Yeah, I probably underestimated the repair when I bought it. But, thankfully, it’s all fixed now, so no harm done.

And here’s something cool:

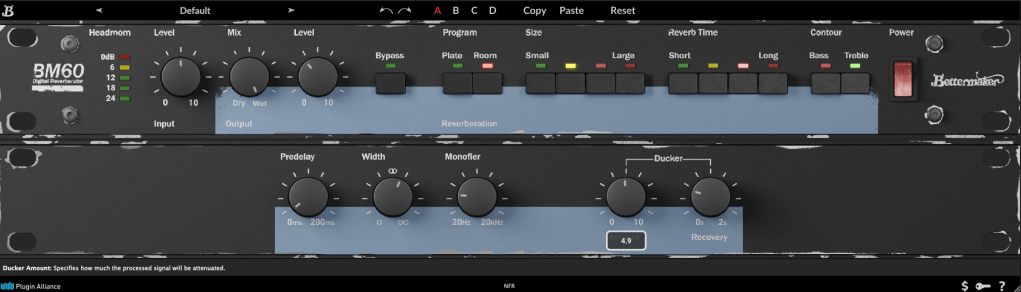
Even though I bought it secondhand, I reached out to Heritage Audio’s Support Center to ask if they could provide the plugin, and they happily gave it to me! The plugin is actually pretty solid, and I find myself using it quite a bit.

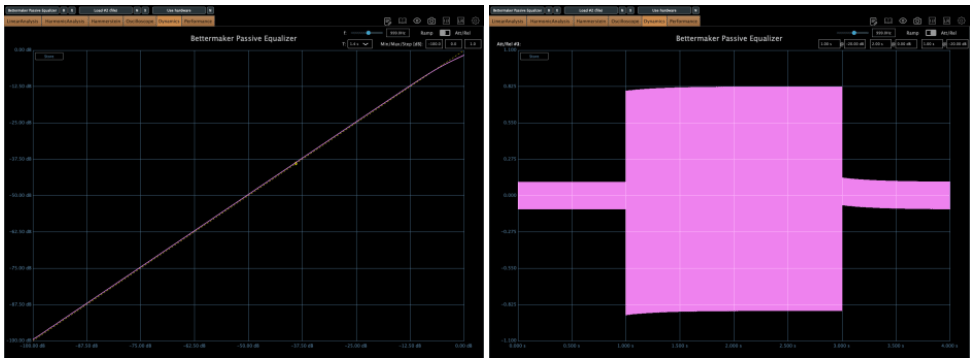
Hardware Measurements

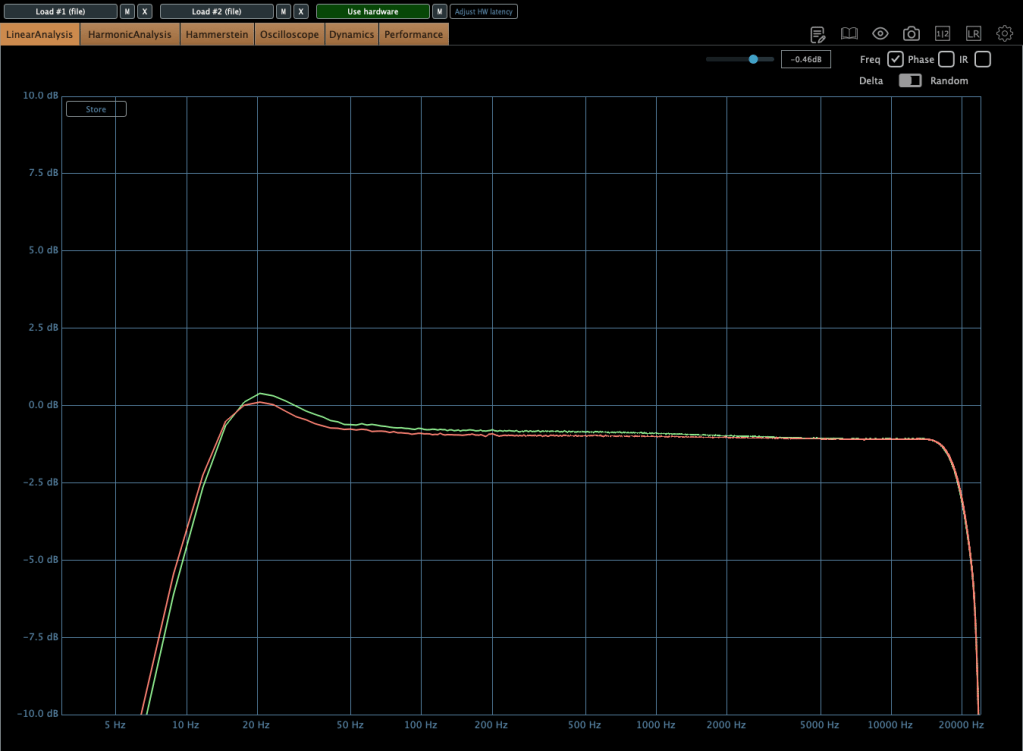
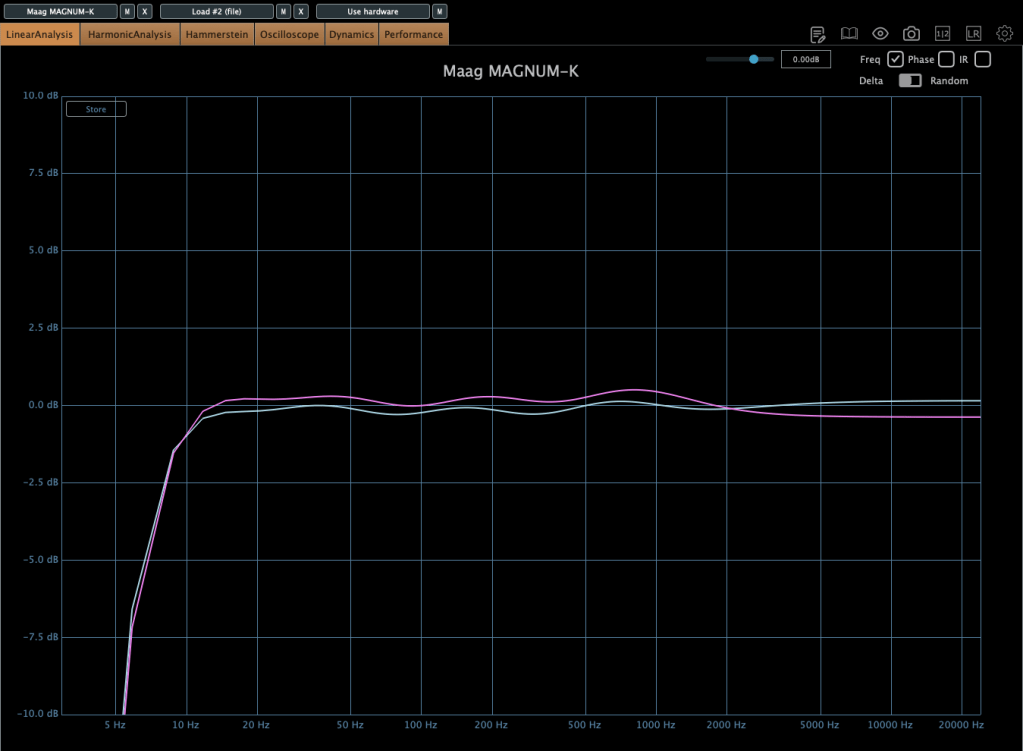
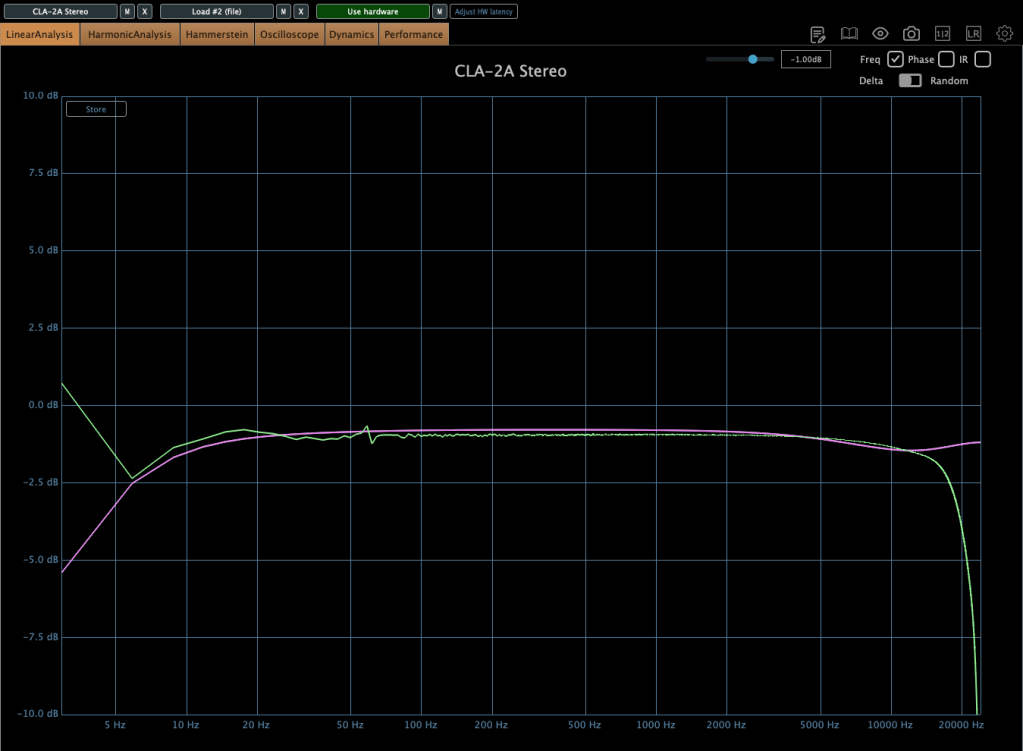
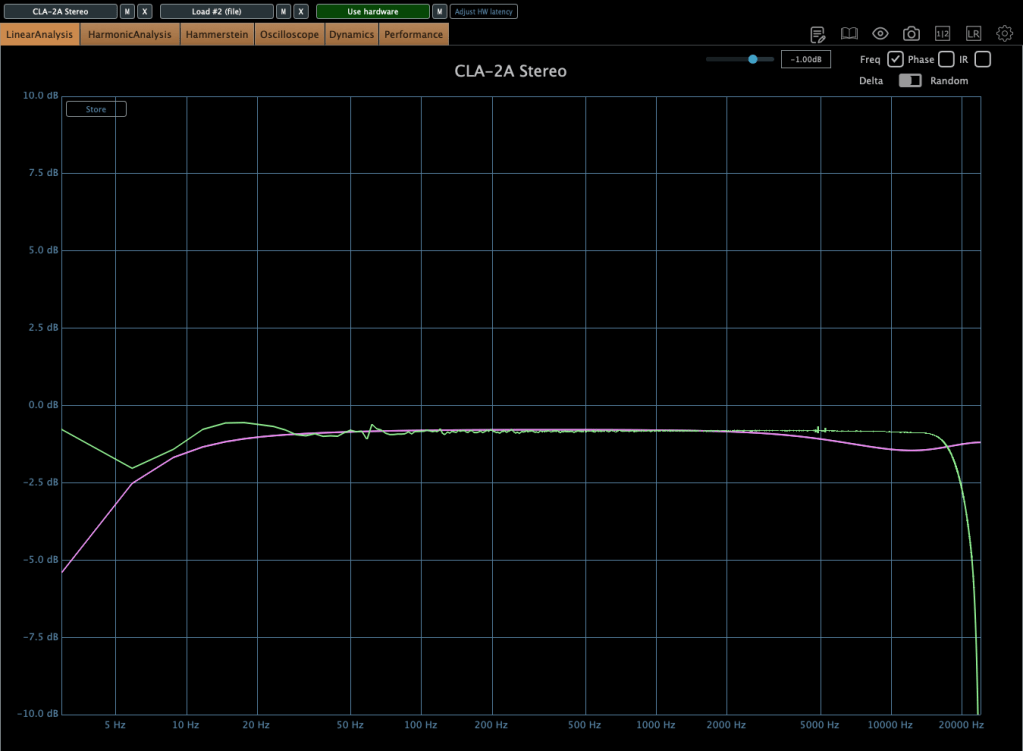
The channel balance is pretty tight, though, being analog, it’s not completely perfect. You might wonder if the repair changed anything, but even before the noise issue, the balance was about the same.

The extreme high frequencies are slightly boosted, and, like many hardware units, it looks like there’s a high cut around 20kHz. The low frequencies are boosted as well.

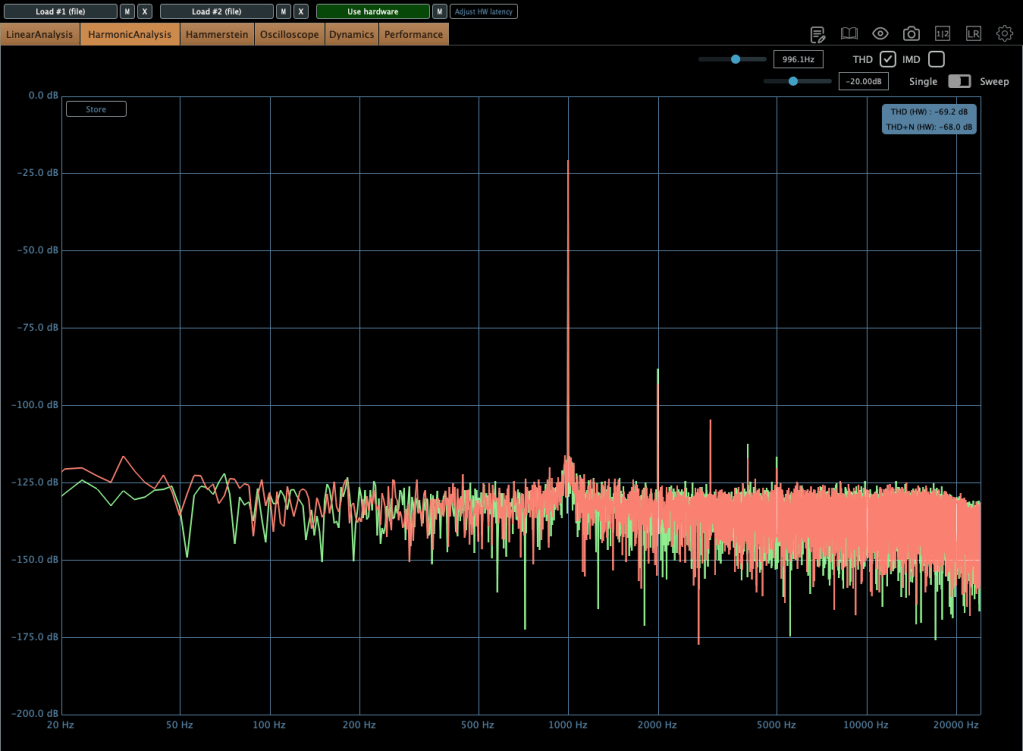
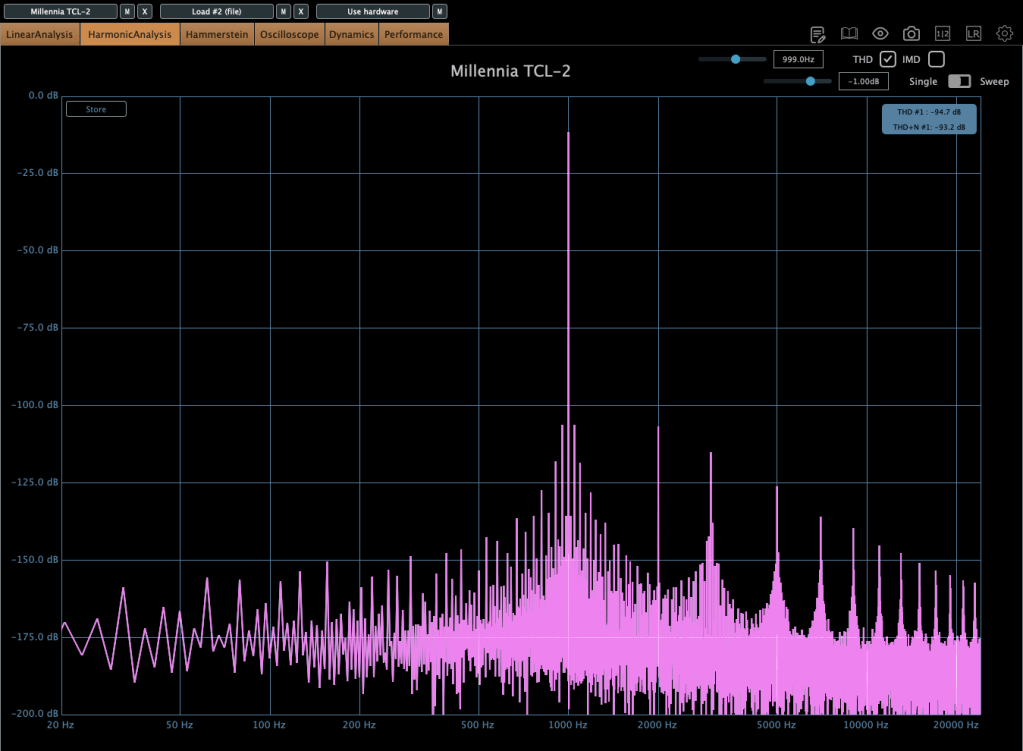
The THD looks clean, but it definitely has some character.

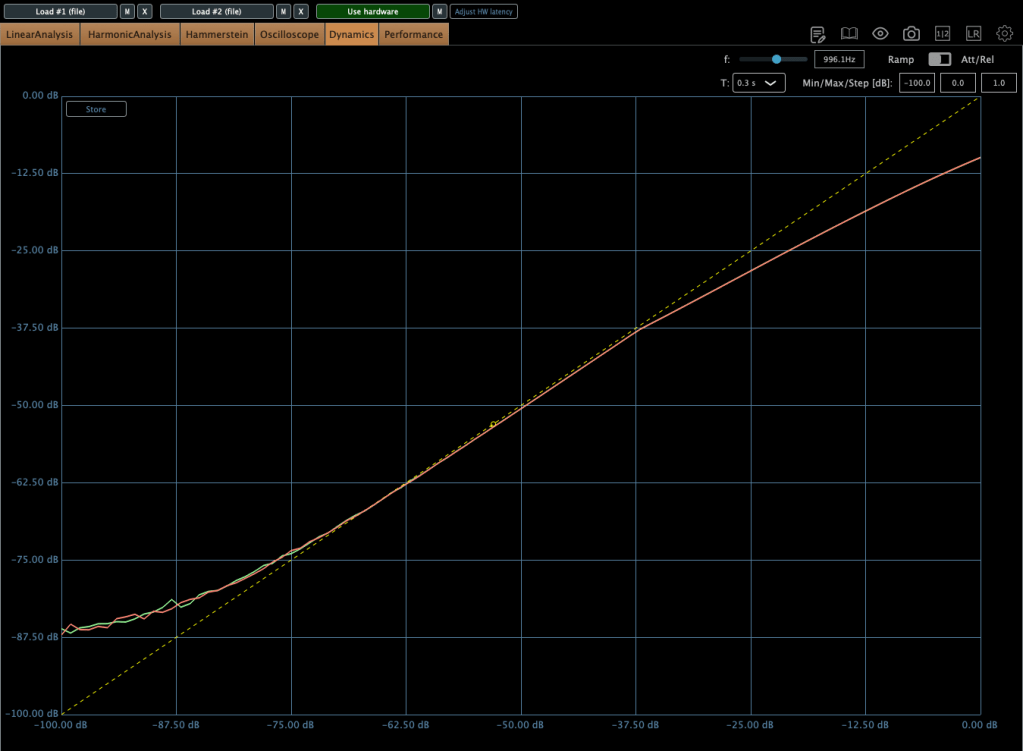
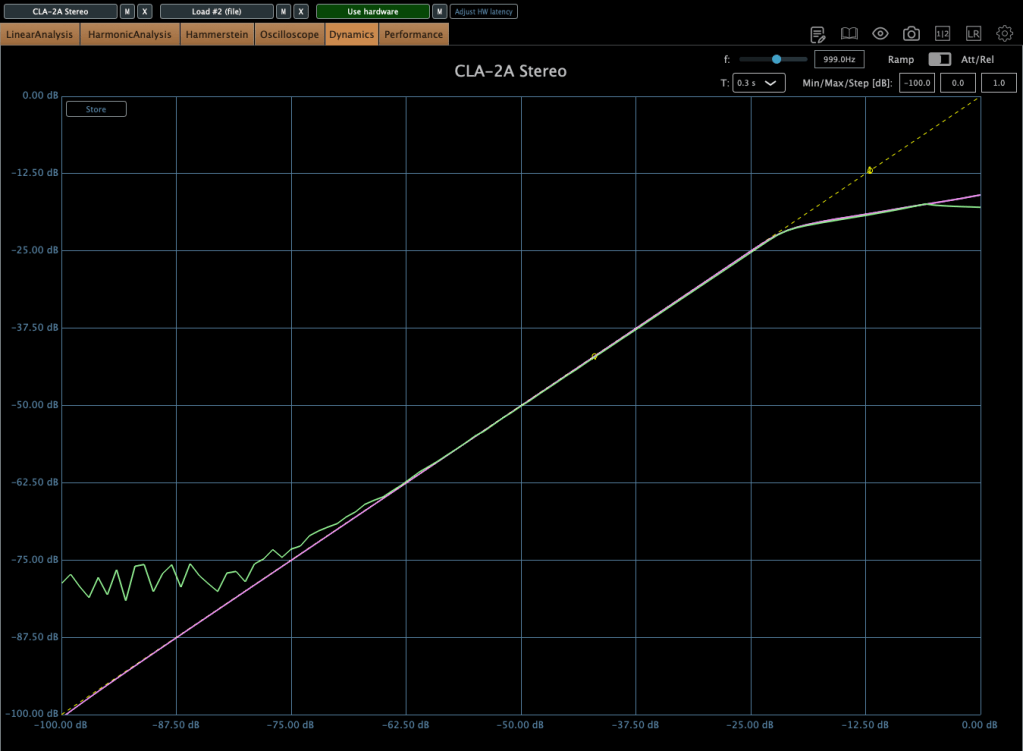
The compression curve shows a gentle knee.

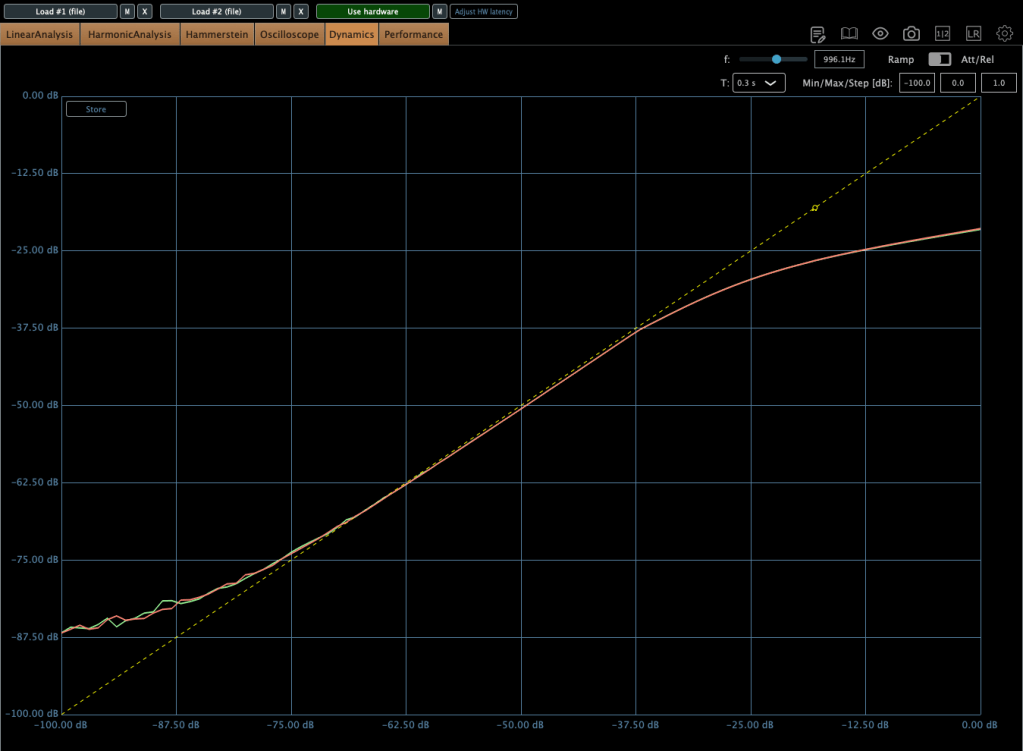
Even when limiting, it’s not a completely hard knee.

This unit has a max input of +22 dBu. Since pro audio typically works at +24 dBu, it’s a bit shy of that, but my interface operates at +20 dBu, so it’s plenty for my mixes or mix bus.

The max output is +26 dBu at 600 ohms, so as long as you manage the input carefully, it should work well for mastering too.
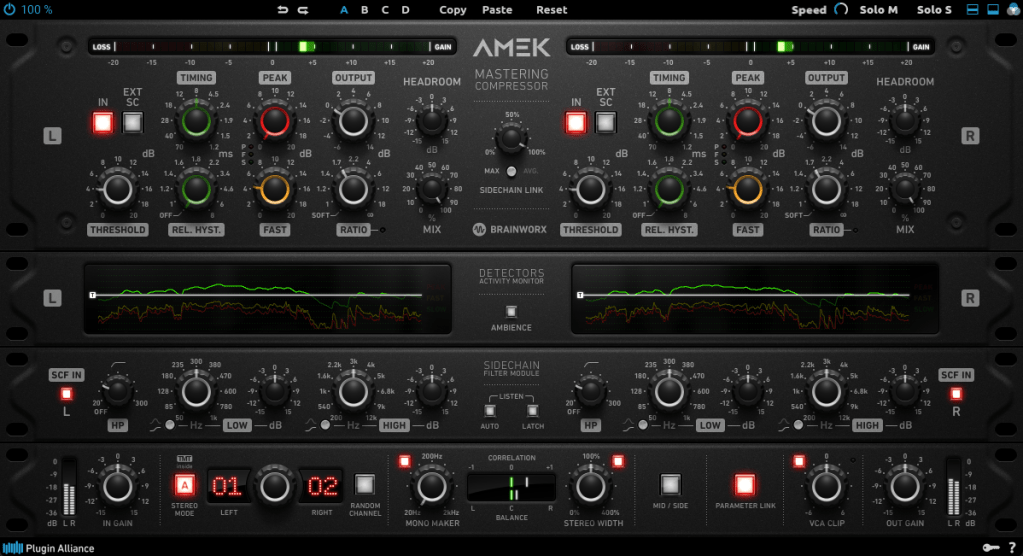
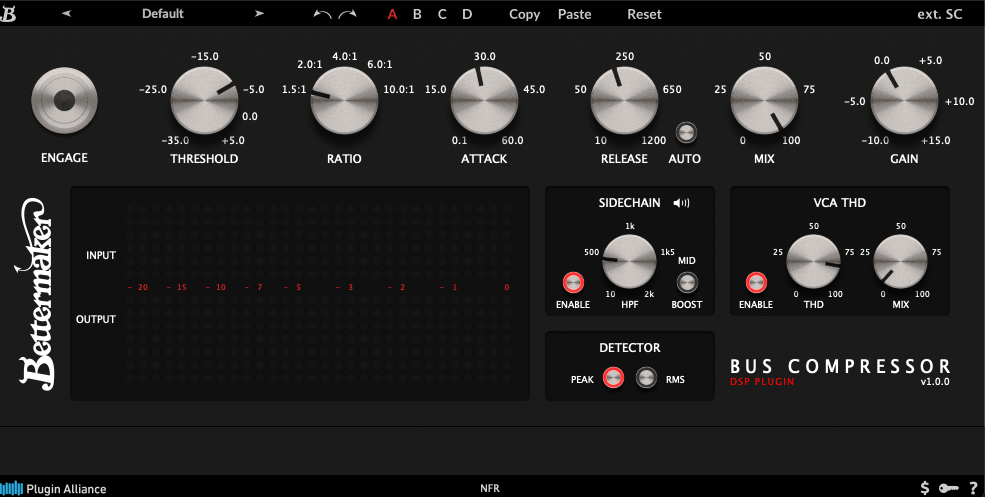
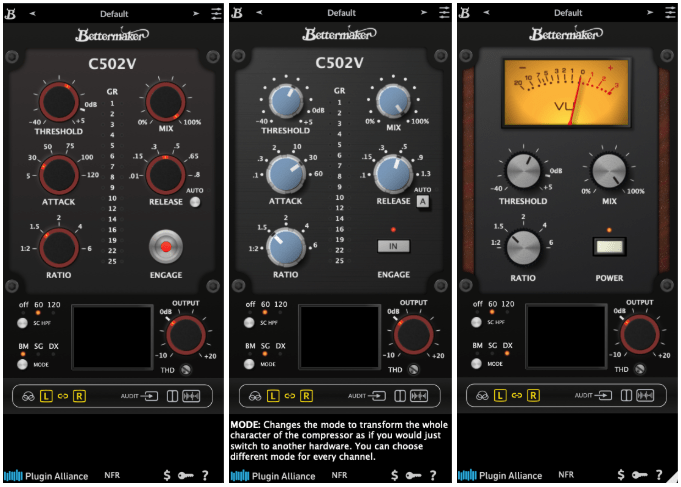
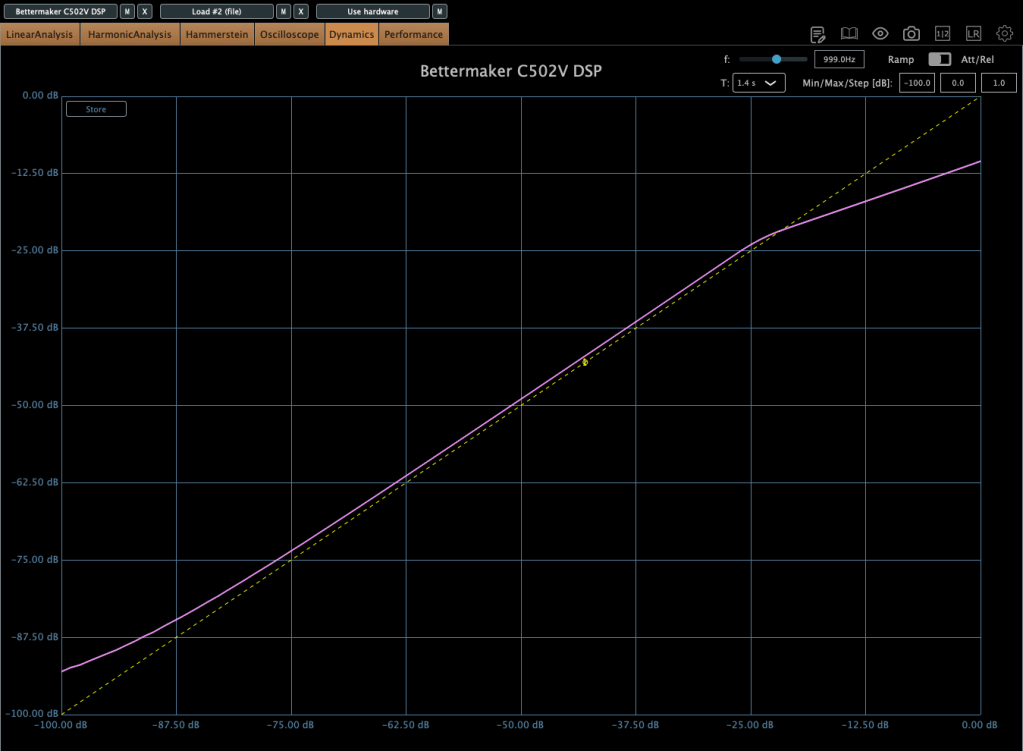
Plugin Measurements

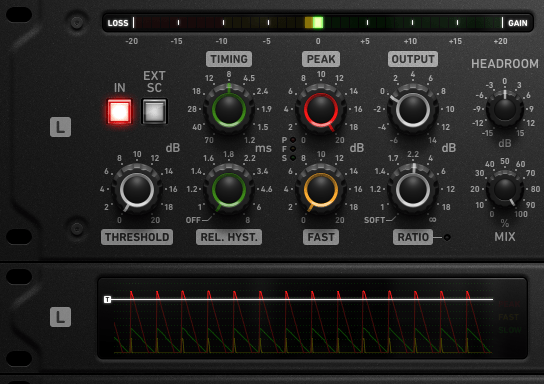
The plugin has a unique feature called “Nuke.” It pushes the input by 20 dB for some intense saturation.

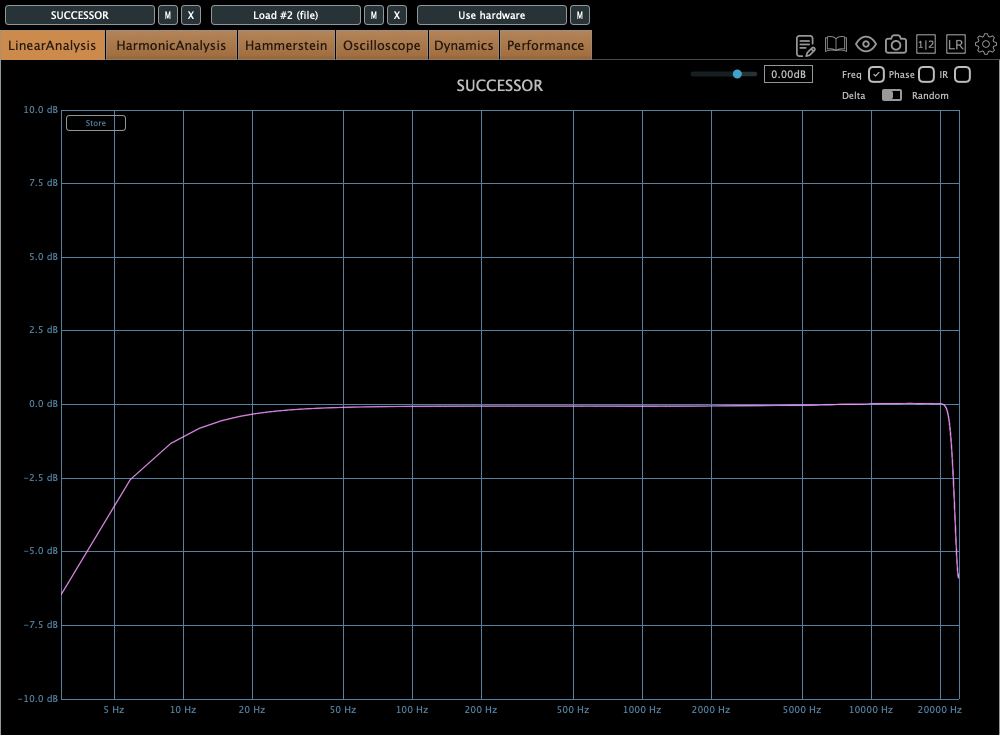
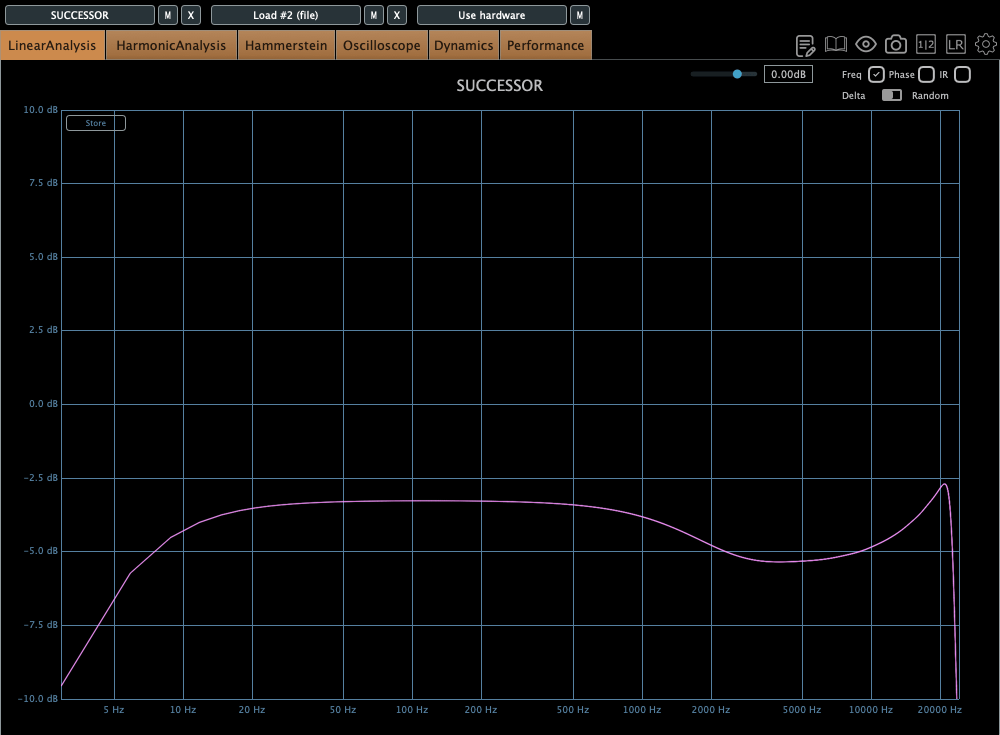
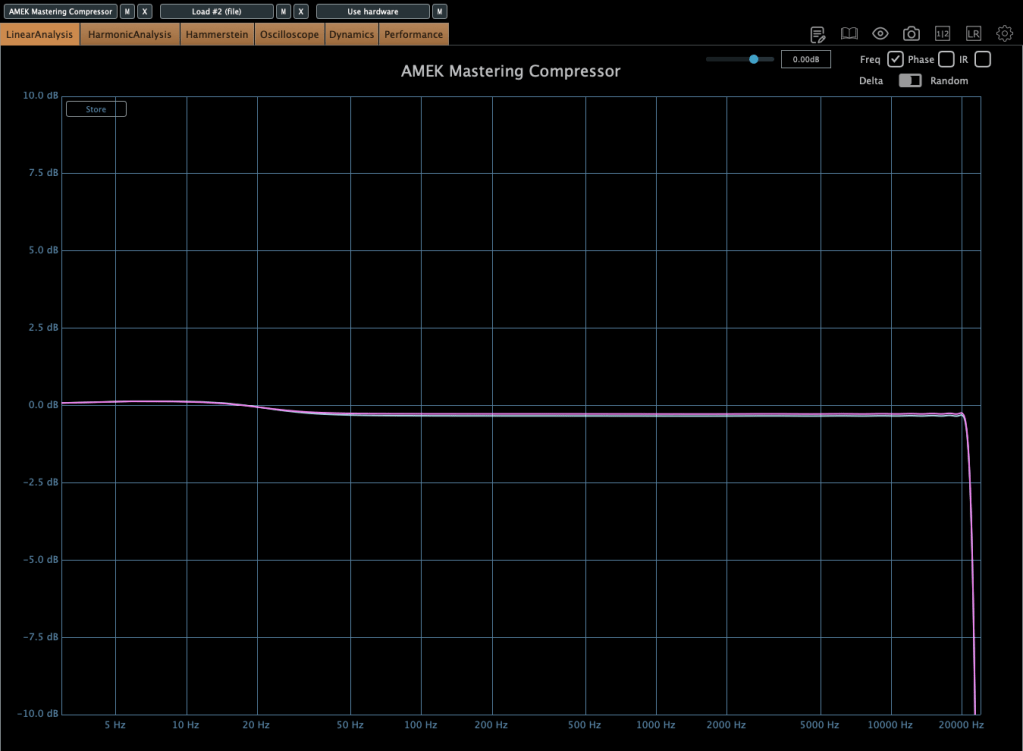
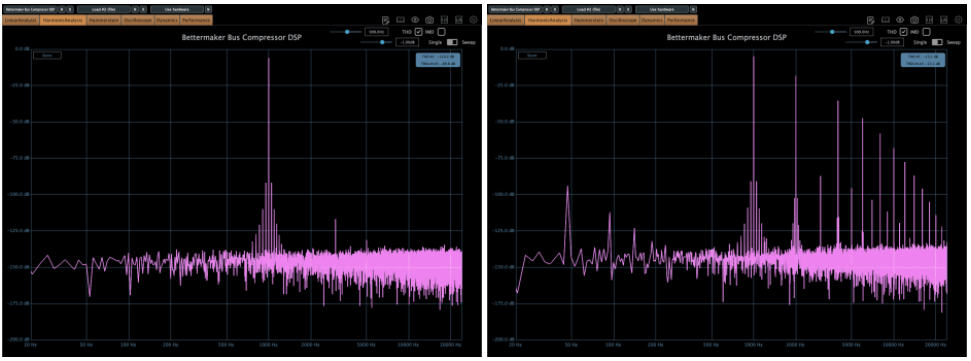
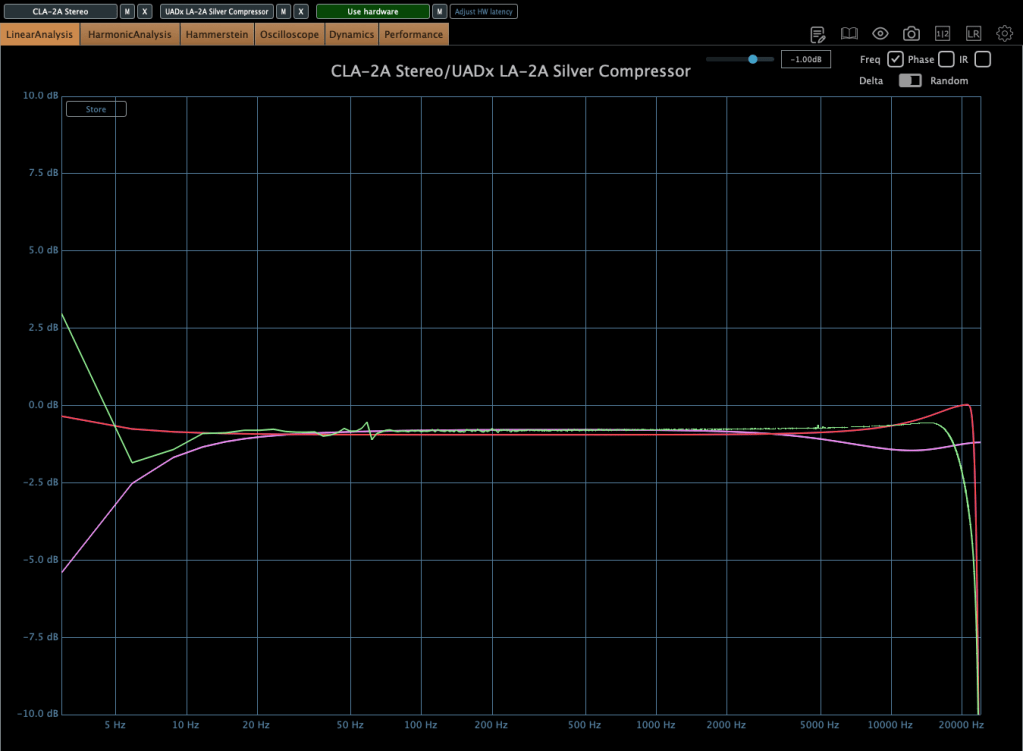
The top figure shows the default Frequency Response, and the bottom figure shows it with the Nuke function enabled.

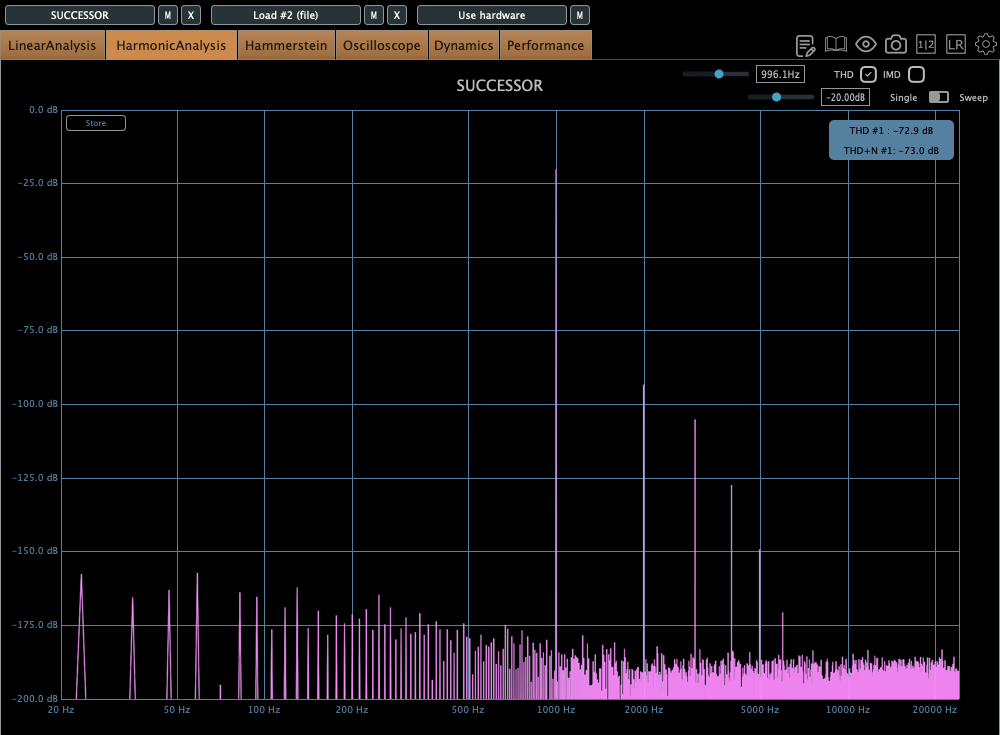
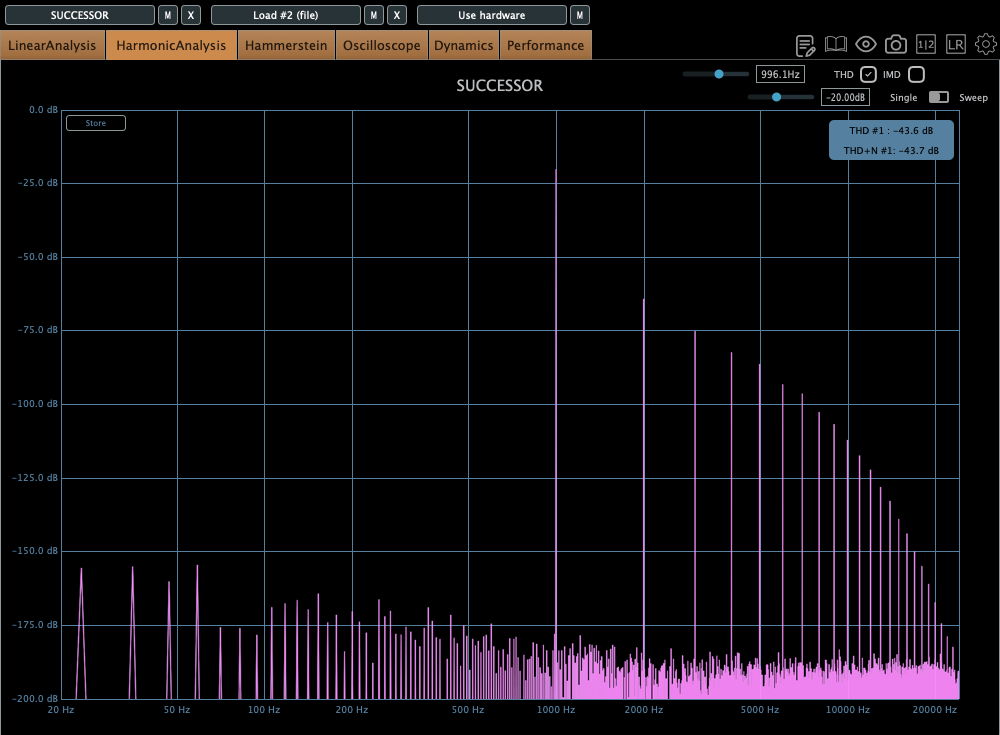
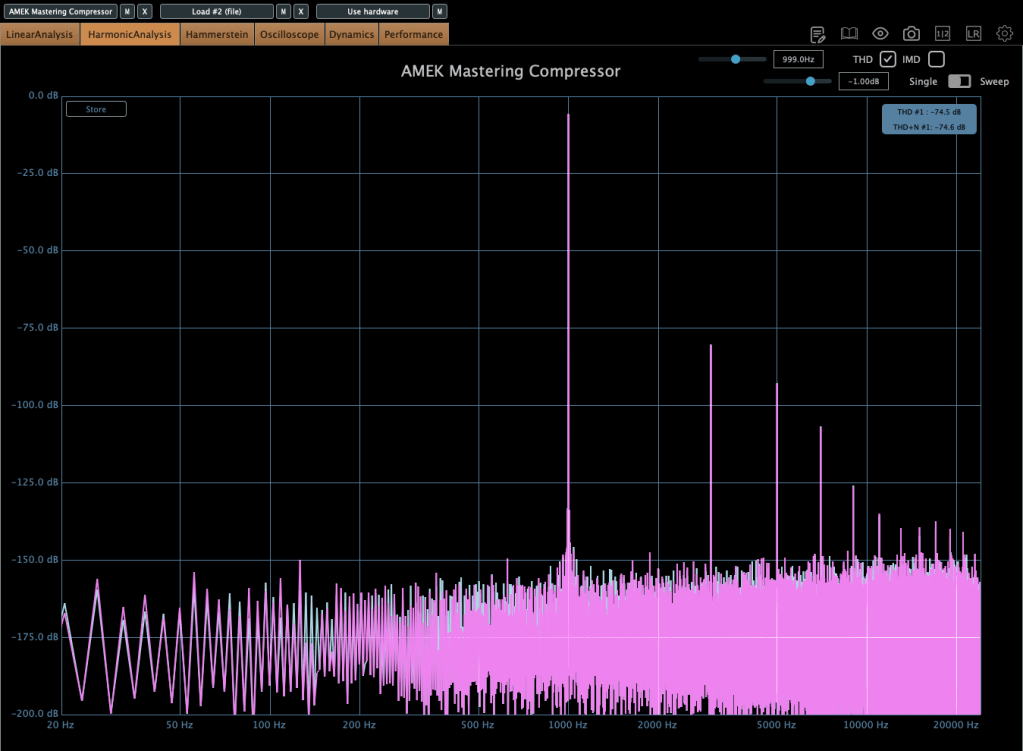
Similarly, the top figure is the default Harmonic Distortion, and the bottom figure is with Nuke activated.

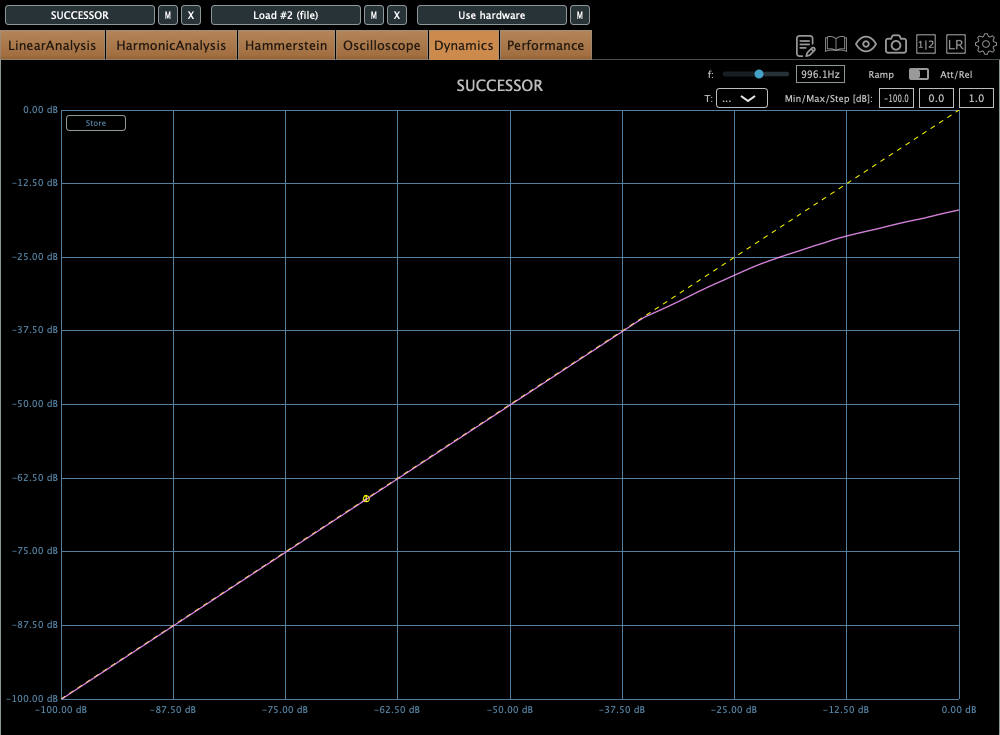
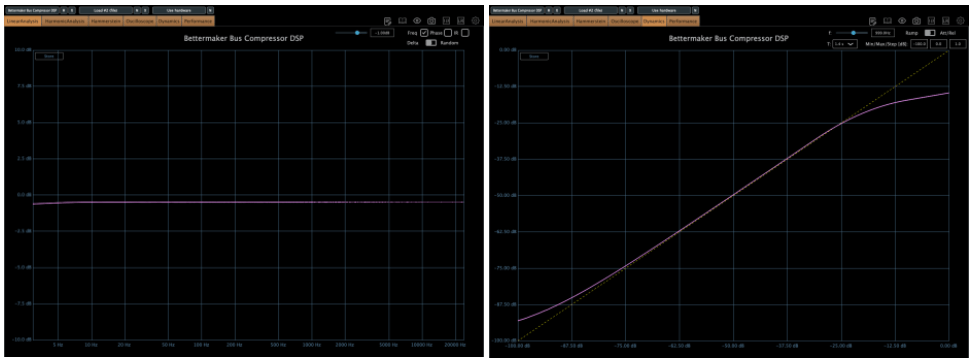
The compression curve feels less like a natural, smooth knee and more like it has a slight two-step bend somewhere.

Personal Impressions

Describing sound in words is probably the hardest thing. Everyone hears and expresses things differently, so… ugh, it’s tough.

Still, here’s what I think:

Hardware
  1. Compared to the Stam 4000 mk2, the high frequencies feel more alive, which gives it a certain quality that feels worth its price.
  2. The center feels a bit prominent (maybe because of the transformers?).
  3. The knobs feel great to turn—probably because they used high-quality variable resistors—and the Threshold and Gain have a subtle stepped feel.
  4. For its full price, it feels just about right.
Plugin
  1. The Frequency Response shows better high-end response than the hardware, but that sparkly, satisfying vibe just isn’t there in the plugin.
  2. The center feels quite prominent. In other words, you might need to tweak it with a stereo imager or something.
  3. It’s got a lot of character. So, when using it on a bus, you really need to pay attention to how it affects the balance.

Looking back, it sounds like I was pretty harsh on the plugin, but it’s actually good! Diode bridge compressor plugins aren’t exactly common (think UAD Neve 33609C or Arturia Diode 609), so it’s a solid new option to consider.

The hardware? Yeah, it’s great! I wish the highs sparkled just a bit more, but it’s plenty good as is.

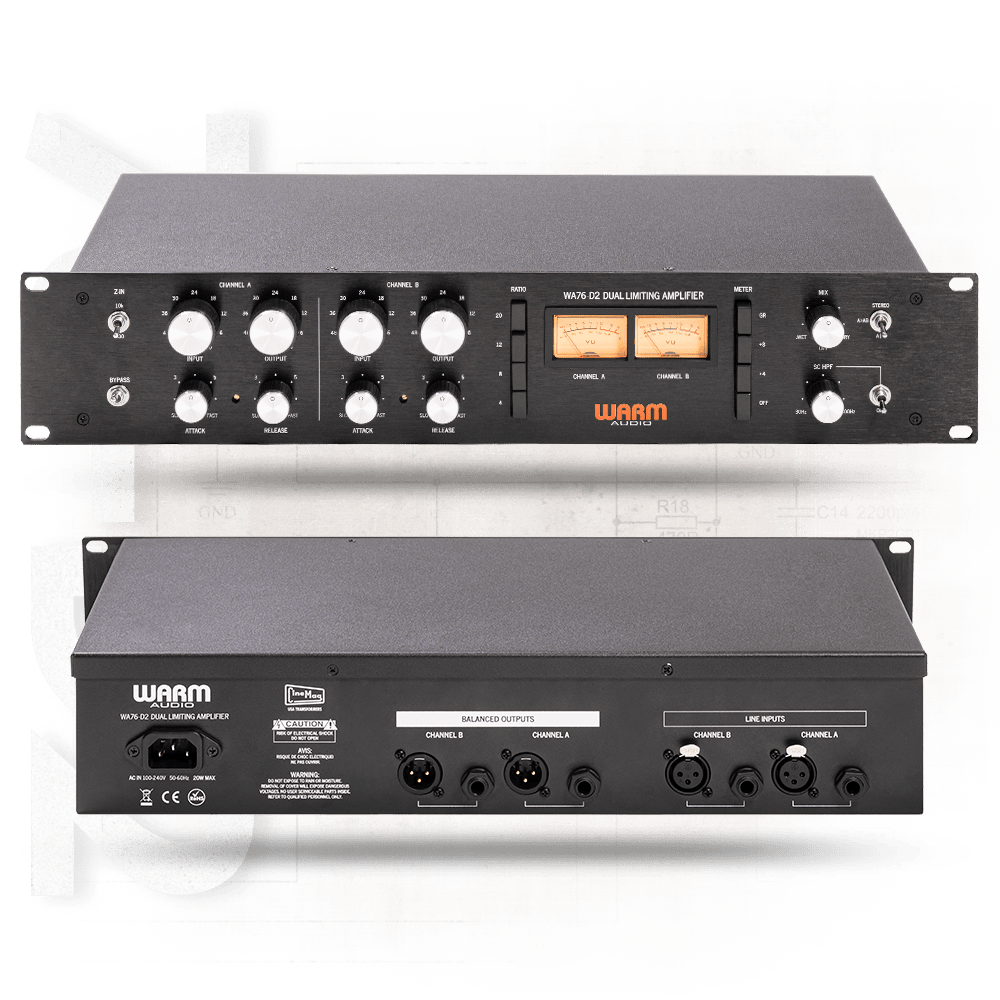
Next up, I’m eyeing the Warm Audio WA76-D2 for a FET compressor. The audio samples sound amazing, but, as always, the biggest hurdle is money… sigh. If a broken one pops up on the secondhand market, I’m jumping on it.

I sometimes wonder if my reviews lean too technical or analytical, but hey, there’s gotta be at least one person out there reviewing stuff like this, right? Haha.

That’s it for today! See you in next post 🙂

Brainworx May Sale (1) – Amek Mastering Compressor, Mäag Magnum-K, Millennia TCL-2 (Until May 31)

Hello! I’m Jooyoung Kim, a mixing engineer and music producer.

Plugin Alliance has started charging taxes for Korean buyers, making Plugin Boutique a more cost-effective choice. With Plugin Boutique, you can often get free plugins or collect points, even for the same products.

This month, Plugin Boutique is holding a big sale on several Brainworx plugins from Plugin Alliance, so I’m here to highlight a few.

In a previous post, I focused on Saturation and Bettermaker plugins. This time, I’ll dive into compressors: Amek Mastering Compressor, Mäag Magnum-K, and Millennia TCL-2.

Let’s get started!
(I numbered this post as (1) in case I cover more plugins later, but no promises… 😅)

AMEK Mastering Compressor

This compressor is inspired by the Amek 9098 console and compressor… or so they say. It’s probably best to think of it as Brainworx’s unique take on an Amek-based compressor.

Its standout features are:

  1. Multiple detector settings (Fast, Peak)
  2. Timing and Release Hysteresis parameters instead of traditional Attack and Release

These can be a bit confusing, so let’s break them down.

The Peak parameter enhances detection of transient peaks, while the Fast parameter makes the attack respond more quickly.

Timing directly adjusts the speed of Attack and Release, while Release Hysteresis links the Fast detector to the signal’s volume, reacting faster to loud sounds and slower to quiet ones.

A bit tricky, right? 😄

Also, this compressor has automatic Make-Up Gain, so you’ll need to slightly reduce the Output Gain to balance the sound.

In terms of frequency response, it slightly boosts the low end, and when compression kicks in, the high end gets a subtle lift. True to its “Mastering Compressor” name, it’s very clean with minimal harmonic distortion.

Millennia TCL-2

The Millennia TCL-2 is a plugin emulation of Millennia’s opto compressor, often compared to the Avalon AD2044 as a top-tier stereo opto compressor.

It’s exceptionally clean, producing very little harmonic distortion even under compression. You won’t notice significant changes in the frequency response either.

The parameters are fairly standard, so there’s not much to dive into here.

From my experience, it’s ideal when you want a smooth opto compressor without expecting high-frequency saturation.

Mäag Audio Magnum-K

The Mäag Audio Magnum-K is a compressor that incorporates Mäag Audio’s signature Air Band EQ.

This one’s a bit complex to use. It’s easiest to think of it as three sections: Magnum Compressor, K Compressor, and EQ2.

The Magnum section should feel familiar, but the FB/FF (Feedback/Feedforward) setting on the far right is unique. Feedback mode offers smooth compression, while Feedforward mode is more aggressive.

The K Compressor is a one-band compressor centered at 3kHz, essentially functioning as a de-esser to tame vocal sibilance.

The EQ2 section operates in parallel with the original signal, blending with the Magnum and K Compressor signals before soft clipping kicks in.

It adds some coloration, and when compression engages, the midrange feels fuller. The left and right channels can slightly differ, creating a richer effect. If you don’t like this, you can use M/S mode or Digital Mode for uniform channel processing.

Until the end of this month, these compressors and other Brainworx plugins are on sale at Plugin Boutique, so it’s worth checking them out.

Plus, if you buy any plugin from Plugin Boutique this month, you’ll get Bitwig Studio 8-Track DAW for free, so don’t miss out!

See you in the next post! 😊

5 Brainworx Bettermaker Plugins Review (Bus Compressor, C502V, EQ232D, Passive Equalizer, BM60)

Hello! This is Jooyoung Kim, a mixing engineer & music producer.

Today, I’d like to talk about some plugins from Brainworx’s Bettermaker lineup:

  1. Bus Compressor DSP – Compressor
  2. C502V – Compressor
  3. EQ232D – EQ
  4. Passive Equalizer – EQ
  5. BM60 – Reverb

I originally planned to introduce these plugins last month when they were on sale, but things got a bit hectic, and now I’m sharing them when they’re not discounted… oops! 😅 Still, after testing them out, I can confidently say they’re really well-crafted plugins. If you’re interested, it’s worth keeping an eye out for a sale.

These plugins were provided to me by Brainworx via Plugin Boutique in NFR (Not For Resale) format. If you purchase through the links I’ll include later, I’ll earn a small commission, which genuinely helps me keep doing what I do. 😊

Ready? Let’s dive in!


1) Bettermaker Bus Compressor DSP

The Bettermaker Bus Compressor is a plugin recreation of Bettermaker’s hardware Bus Compressor. The original hardware allows digital recall and adjustments, and the plugin’s interface mirrors that design pretty closely.

The plugin’s parameters are similar to most compressors, but a few features stand out:

  1. You can listen to the sidechain.
  2. You can choose between Peak Level or RMS detection.
  3. You can dial in the amount of THD (Total Harmonic Distortion).

These three features are the heart of the Bettermaker Bus Compressor DSP. The sidechain splits the incoming signal, applies a filter, and uses the filtered signal as the key—pretty standard for bus compressors, but super useful.

The VCA THD feature adds harmonic distortion.

On the left, you’ve got the clean signal; on the right, it’s with THD applied. Looking at an oscilloscope, you’ll notice more changes—sonically, it starts to feel very mechanical. A subtle touch adds an edgy vibe, but crank it too much, and it feels overly distorted.

The frequency response is flat except in the ultra-low end, and the compression curve is smooth as butter. After messing around with it, I think it’s an incredibly well-made bus compressor. SSL-style compressors sometimes smear the low end or feel a bit hollow, but this one keeps the lows tight and solid without eating them up.

This one’s a winner. Out of the five plugins I’m covering today, it’s my favorite. It’s usually a steal during sales (probably around $29, so I’d recommend testing it out and grabbing it when it’s discounted.


2) Bettermaker C502V

This is another plugin modeled after Bettermaker’s C502V hardware. It offers three modes:

  • BM – Bettermaker Compressor
  • SG – SSL G-Compressor
  • DX – dbx 160 Compressor

Switching modes even changes the UI, which is a nice touch.

After testing, I could hear what each mode was going for. The SSL mode feels clean and polished, while the dbx mode has that signature gritty snap. The Bettermaker mode, though, sounds a bit different from the Bus Compressor DSP—it’s more forward and punchy, at least to my ears.

Here’s the harmonic distortion in BM mode with THD maxed out.

First is BM mode, second is SG, and third is DX. The differences in harmonic distortion and compression curves explain why this plugin sounds distinct from the Bus Compressor DSP. The C502V has a steeper knee, and it varies by mode.

I’d recommend this one too—it’s like having three compressor flavors in one. I especially liked the BM and DX modes. If you don’t already own a dbx-style compressor, this could be a solid solution.


3) Bettermaker EQ232D

This plugin recreates Bettermaker’s EQ232P MKII hardware—a super clean EQ with no THD, just pure frequency shaping.

It’s split into sections:

  1. A high-pass filter (HPF) for cutting lows.
  2. EQ 1, handling lows to mid-highs.
  3. EQ 2, covering mid-highs to ultra-highs.
  4. A P EQ section with Pultec-style frequency response.

Think of it as a mastering EQ (sections 1–3) plus a Pultec-inspired EQ combined into one.

On the left, I activated just the P EQ section and tweaked it a bit. The curve is as complex as you’d expect from a Pultec-style EQ. Harmonic distortion is pristine, and there’s no compression curve to speak of—it’s just an EQ, plain and simple.

It’s perfect for mastering when you need something ultra-clean. Definitely worth checking out.


4) Bettermaker Passive Equalizer

This one looks like a Pultec clone at first glance, but it’s actually Bettermaker’s unique take on a valve-based passive EQ, turned into a plugin. The hardware allowed computer-based recall, and the plugin follows suit with a similar UI.

The frequency response is close to the Bus Compressor DSP.

But as a valve design, the saturation is intense! Left is the default state; right is with Heat engaged.

Looking at the compression curve and oscilloscope, it’s far from flat.

Honestly, it feels more like a saturation box with EQ tacked on than a pure EQ. And as a saturation tool, it’s got charm—the Heat setting is pretty tasty.


5) Bettermaker BM60

The BM60 is a reverb plugin based on the Lexicon PCM 60. The original hardware had intuitive controls, and this plugin adds extras like Predelay, Width, Monofilter, and a Ducker, making it really versatile.

It offers two reverb types—Room and Plate—with Size and Reverb Time split into four steps. The parameters are straightforward, and the sound feels just as intuitive.

It’s great for light, easy reverb duties. Reverbs and delays are tough to describe with numbers, but I’d recommend this one as much as the Bus Compressor DSP.


They’re not on sale right now, but I’ve left a link to Brainworx’s plugins for future reference. Take a look when you get a chance!


Bonus: This month, if you buy anything from Plugin Boutique, you can snag either Audiomodern’s Freezr (a freeze sequencer plugin) or Heavyocity’s MicroFX Refiner (a bus processor plugin) for free. Don’t miss out when you shop!

That’s it for now—see you in the next post! 😊

After Modifying My Stam Audio SA-2A

Hello! I’m Jooyoung Kim, mixing engineer & music producer.

Today, I’ll talk about what I did after the article, Record Before Modifying the Stam Audio SA-2A, and how sound changed.


First, let’s review the problems I encountered.

  1. Output gain is similar to input gain, when the GAIN knob is too low.
  2. Compression is started when PEAK REDUCTION knob is too high.
  3. It sounds so dull, like high frequency response is cut off

Otherwise, The Compress and Limit switch was positioned incorrectly. It was simply solved by wrench.


1) Potentiometer Changed..1

If you take off the cover of SA-2A’s knob, you could see a100k potentiometer at each parts. So, I thought that if I change a100k to a50k for gain knob, amount of change is more lower. Also, change a100k to a250k for peak reduction knob, compression would be change more earlier.

So I changed them first.

The green line is SA-2A hardware, the pink line is Waves’ CLA-2A.

It doesn’t seem bad at all! Otherwise, output gain is similar to input gain, when the GAIN knob is too low yet, I ordered A25K and A10K potentiometer too.


2) Vacuum Tubes Changed

I changed my 12AX7 tubes from jj electronics to mullard.

Frequency response and compression curve was not that different compared to jj electronics’. But it sounds much better than before. Harmonic distortion seems to have changed many aspects of the sound.


3) Changed Potentiometer Once Again..2

Upper image is a25k, The lower image shows the a10k potentiometer. You could see frequency response improved when the lower value of potentiometer is used! The problem isn’t solved but it sounds really good.

Red curve is UAD LA-2A Silver face, pink curve is WAVES CLA-2A, green curve is SA-2A.

Compared to UAD, it’s nice that it doesn’t add such an overwhelming saturation. And compared to Waves, I like that it doesn’t have that overly compressed feel.

I think it’s worth trying out more simple tools like this in the future. Next time, maybe an EQ or a Comp DIY kit…!

See you in next post! 🙂