Scaler EQ and Scaler 2 on Sale (Free Scaler 3 Update with Scaler 2 Purchase, Until 3/31)

Hey there! I’m Jooyoung Kim, an engineer and music producer.

Today, I want to talk about two standout plugins from Plugin Boutique that are currently on sale: Scaler EQ and Scaler 2. I’ve been lucky enough to receive these plugins as NFR (Not for Resale) copies from Plugin Boutique. Also, if you purchase through the links in this post, I’ll earn a small commission that really helps me keep going—so thanks in advance for the support! 😊

Let’s dive in!


Scaler EQ

Scaler EQ is one of the flagship plugins from Scaler Music, distributed by Plugin Boutique. Sure, it has all the standard EQ features you’d expect, but what sets it apart are these three unique tricks up its sleeve:

  1. Key-Based Boosting and Cutting: It can boost sounds that fit the song’s key while reducing those that don’t.
  2. Magic Shelf Bands with Mid/Side Control: Adjust frequency responses using Mid/Side processing for a wider or more focused sound.
  3. Dynamic Control: Fine-tune the loudness with built-in dynamics processing.

Let’s take a closer look at how it works.

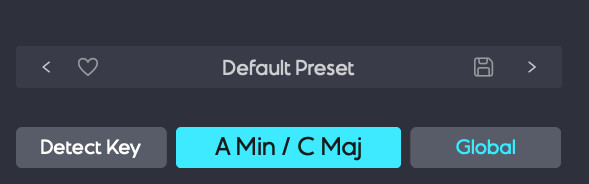
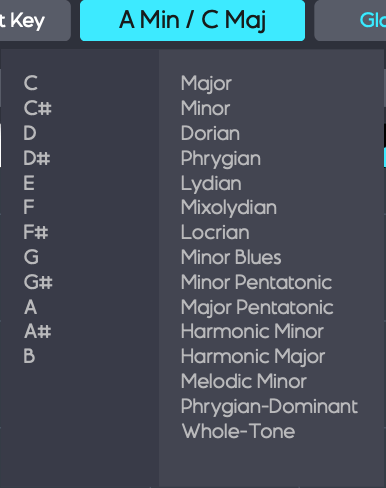
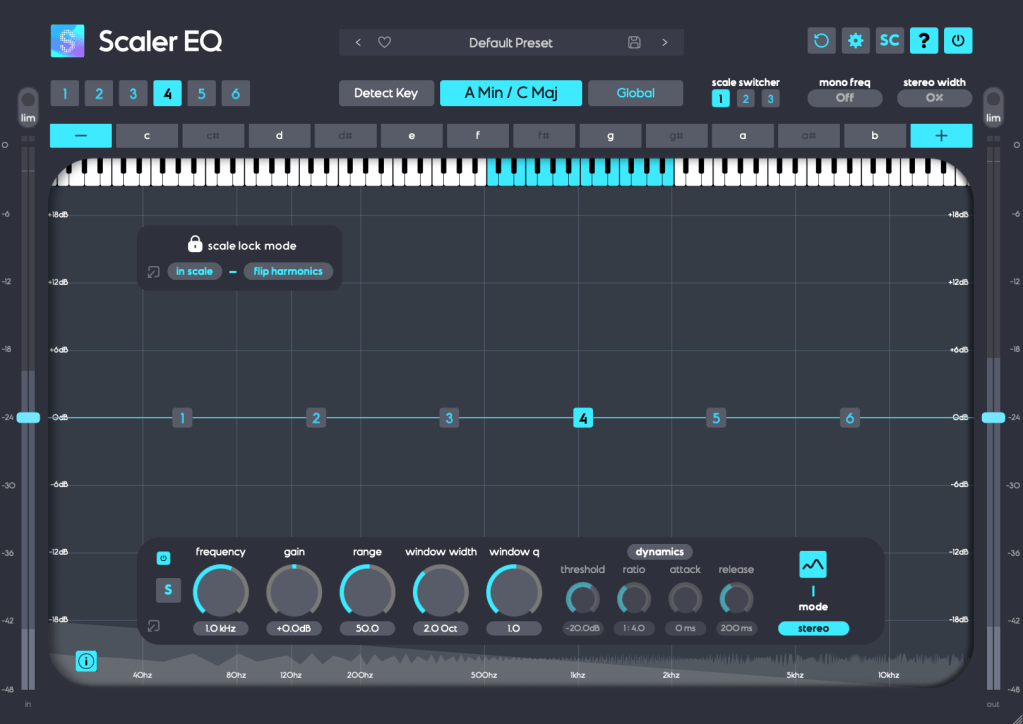
Play your track and hit the Detect Key button—it’ll automatically figure out the key of your song. You can also manually pick a key by clicking the middle key selection button. The Global button applies that key across all EQ bands.

In Scale Lock Mode, the In Scale setting boosts notes within the key when using Harmonic Peak mode (highlighted in white on the piano roll). Turn it off, and it’ll boost whatever notes you’ve selected instead.

The Flip Harmonics option comes into play when the gain is negative in Harmonic Peak mode—it cuts notes outside the key. Disable it, and it’ll cut the in-key notes instead.

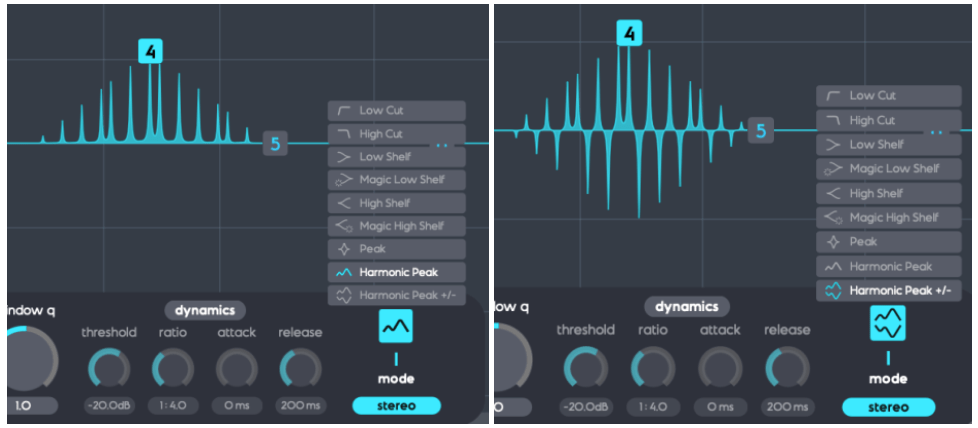
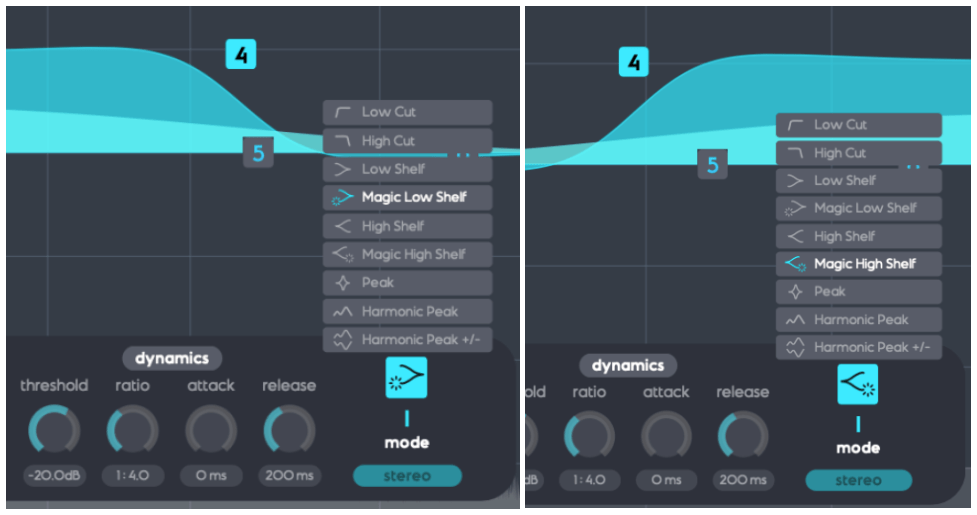
The Dynamics section feels pretty standard for a dynamic EQ, but the real stars here are Harmonic Peak, Harmonic Peak +/-, and Magic Low/High Shelf.

  • Harmonic Peak: Emphasizes notes within your chosen key.
  • Harmonic Peak +/-: Boosts in-key notes and cuts out-of-key ones at the same time.
  • Magic Low Shelf: Highlights the Mid over the Side for a punchier low end.
  • Magic High Shelf: Boosts the Side over the Mid for a wider, airier top end.

These features might sound simple, but when used well, they can bring out the harmonics of your key in totally unique ways, adding fresh colors to your sound.

As far as I know, Scaler EQ is the only EQ out there that adjusts sound based on musical scales like this. It’s a rare gem, and with it on sale, now’s a great time to grab it! 😊


Scaler 2

Scaler 2 is a versatile tool packed with features to help you create music. Here’s the core of what it does:

  1. Extract Chord Progressions: Pull chords from MIDI or audio files.
  2. Rearrange or Reharmonize: Tweak and transform those chords however you like.
  3. Choose Presets: Pick lines or voicings from its built-in instruments.
  4. Export as MIDI: Capture everything and drag it into your DAW.

When you download Scaler 2, you’ll get three versions:

  • Scaler2: The virtual instrument version.
  • ScalerAudio2: An effect version tailored for analyzing audio tracks.
  • ScalerControl2: An AU MIDI plugin, perfect for controlling external instruments in DAWs like Logic Pro.

You could take chords from a song you love and use them to build something entirely new. Or start fresh with over 400 genre-based chord sets and 200+ artist chord sets included as presets.

Personally, I think it’s a lifesaver when you’ve got a rough chord progression but can’t figure out the bass, melody, or guitar lines. It’s also great for nailing piano or guitar voicings if those feel tricky. Plus, it’s a handy tool for studying music—perfect for copying and analyzing songs you admire.

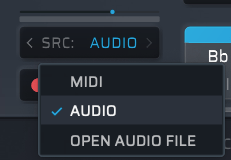
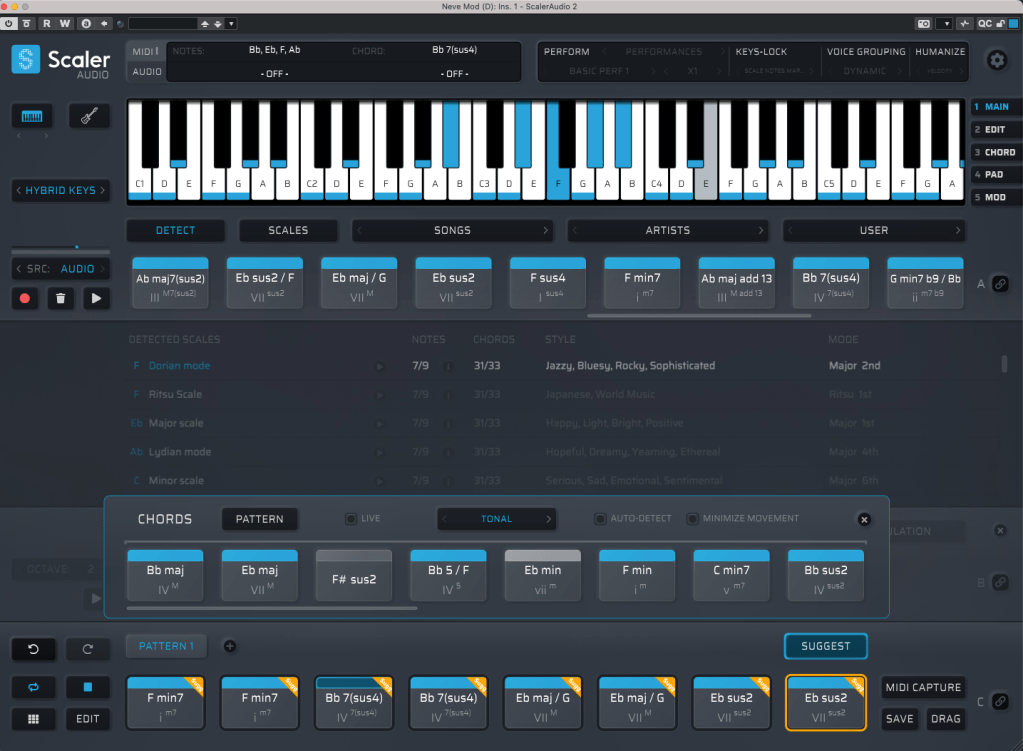
It might look overwhelming with all its features, but spend about 30 minutes messing around, and it’s not hard to get the hang of it. On the left, under SRC, you’ll see three options: MIDI, AUDIO, and OPEN AUDIO FILE. MIDI and AUDIO let you record in real-time to extract chords, while OPEN AUDIO FILE pulls them straight from an audio file. Once you do that, chords pop up alongside the detected scale, like in the image above.

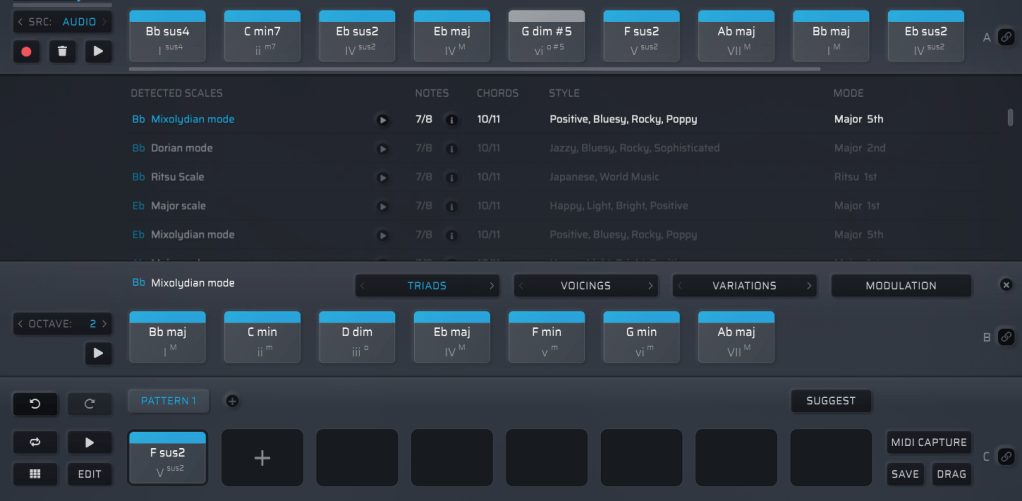
Chords in blue are within the detected scale, while those in gray are outside it. You can drag these chords down to create a pattern.

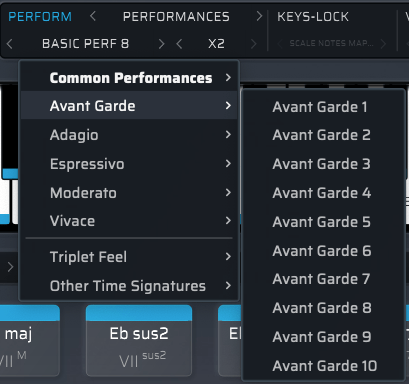
Once you’ve got a pattern, head to the top right where you’ll find Perform, Keys-Lock, Voice Grouping, and Humanize. These let you tweak the MIDI patterns—think arpeggios, strumming, or natural timing variations.

The catch? You can only preview sounds using Scaler 2’s built-in virtual instruments. That said, there’s a decent variety, so you can get a rough idea of how it’ll sit in your track.

When you’re happy with everything, hit the MIDI CAPTURE button at the bottom right, play it back, and record the pattern as MIDI.

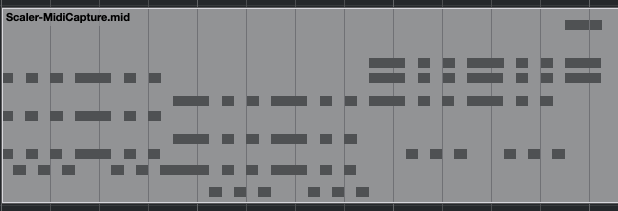
Then, drag the DRAG button into your DAW’s MIDI channel, and boom—your pattern’s ready to go!

Beyond that, Scaler 2 can suggest modulation paths (like where and how to change keys) and even hook up external instruments via MIDI routing—though that’s a bit trickier to set up.

Having used it myself, I can say it’s a super useful tool in tons of ways. It’s especially awesome for beginners learning to compose—it takes the intimidation factor out of chord progressions and music theory.


Bundle Deal and Final Thoughts

The sale runs until March 31st, and bundling Scaler 2 and Scaler EQ together gets you an even better deal. Plus, if you buy Scaler 2 now, you’ll get the upcoming Scaler 3 update (slated for this month) for free. It’s a steal at this price, so I’d highly recommend jumping on it while it lasts.

That’s it for now—hope to see you in the next post! 😊

Output Portal Granular FX 50% Off Sale (Until August 16th)

Hello, this is Jooyoung Kim, mixing engineer and music producer.

Today, I’m excited to share that Output is having a summer sale with 50% off on their plugins!

Output is a well-known company that creates fantastic plugins. If you’ve been into music production, you’ve likely heard of them.

Since this sale is a rare opportunity, I requested NFR (Not for Resale) codes for three of Output’s flagship plugins—Portal, Thermal, and Movement—from Plugin Boutique to review them.

Instead of covering them all at once, which might be overwhelming for both you and me, I’ll review them one by one. Let’s start with Portal!

Portal is a plugin that transforms incoming audio into a granular synthesizer-like sound. But first, let’s explore what a granular synthesizer is.

A granular synthesizer chops up a sample into tiny grains ranging from 1 to 100ms to synthesize new sounds. As shown in the image, you can slice and rearrange waveforms to create unique sounds.

This technique is particularly effective for creating atmospheric pads, making it a popular choice in movie soundtracks and instrumental genres.

Portal’s user interface is designed to resemble that of a vector synthesizer.

Joystick from a Prophet-VS vector synthesizer plugin

A vector synthesizer can be considered an early form of a wavetable synthesizer. It uses a joystick to blend different waveforms assigned to each direction.

In Output’s Portal, Macro 1 is placed on the vertical axis, while Macro 2 is on the horizontal axis. The values of these macros control various parameters.

You can connect Macro 1 and Macro 2 to different parameters in the Grain Control section. By double-clicking the macro names, you can even rename them.

To assign a macro, click the ‘+’ sign below the name of each knob (like Macro 1 and Macro 2), then drag it to a parameter. A small circle will appear next to the parameter, indicating the range of control the macro has.

Similarly, you can use the LFO in the bottom left to modulate parameters. Think of it as a traditional synthesizer, which should make it easier to approach.

At the bottom center, you can choose between the XY, Effects, and Master sections to adjust various parameters.

The built-in effects include Bit Reducer, Chorus, Distortion, Filter, Phaser, Reverb, and Delay, making for a total of seven options. All these parameters can be linked to the LFO modulation or macro functions for dynamic control.

The Master section includes a built-in filter and compressor, which can also be modulated with LFOs and macros.

Clicking ‘DEFAULT’ at the top right allows you to access various presets. Beginners might find it helpful to start here.

Portal is particularly appealing due to its ability to produce random, evolving sounds based on XY values. It’s an excellent choice for those who don’t already have a granular FX plugin.

Check out the demo video to hear what it can do.

The 50% off sale runs until August 16th! Here’s the purchase link:

Additionally, if you purchase from Plugin Boutique, you can get a free plugin. This month, you can choose between Softube’s VCA Comp or K7D’s Delay.

Softube previously offered the VCA Comp for free in March. It’s a great dbx160-style compressor, perfect if you don’t already have one.

The K7D Delay is a tape delay that sounds great on electric guitars and works well in mixes.

That wraps up the overview of Portal. In the next post, I’ll review another Output plugin, Thermal. Stay tuned!

Introducing Sale! Excite Audio Bloom Vocal Edit Virtual Instrument (Vocal Chop, 39$ ~9/1)

Hello! This is Jooyoung Kim, an audio engineer and music producer.

Today, I’m excited to introduce a new virtual instrument specifically designed for vocal chops, now available at an attractive price. Like my previous posts on sales and new releases, I’ve received an NFR (Not for Resale) code from Plugin Boutique for this review.

Let’s dive right in!

The basic interface is quite similar to the Bloom Bass Impulse.

When I first reviewed a virtual instrument from this company, I thought it was a sophisticated sampler. It’s impressive that Excite Audio has now adapted it for vocal chops, a truly innovative idea.

Upon launching the interface, you can easily add effects like Glue (for compression and saturation), Fuzz, Metallic (short delay), and Doubler.

The lower section displays a keyboard. Pressing the white keys plays the sample assigned to that key, while the black keys offer functionalities like playing the sample at half or double speed, reverse playback, octave shifts, and sequential playback.

You can also assign samples randomly by pressing the dice icon.

The knobs allow you to adjust effects such as Delay, Bitcrush, Reverb, Lo-Cut, and Hi-Cut.

Clicking the key indicator on the lower left automatically adjusts each vocal sample to match the chosen key.

Next to the key indicator, the “Bank” button reveals a collection of 112 samples, offering a rich variety.

Clicking the “Edit” button in the preset window allows you to edit the samples assigned to the white keys and choose how they play back when pressing the black keys (options A, B, C, D, E, etc.).

The parameters visible in the main UI, like Bitcrush, Delay, and Global Reverb, are also adjustable.

The Sample Edit function offers extensive control, including Snap, Attack and Release Time adjustments, speed and BPM Warp functionality, and more.

Most of the other features are straightforward. If you’re unsure about anything, just click the “i” (information) icon next to the preset search bar for a helpful explanation of each feature.

Until now, I’ve used Kontakt or basic DAW samplers for vocal chops, but this new instrument is really impressive.

It comes with pre-calculated pitch adjustments and offers a wide range of sample options, not just short one-shot samples.

A minor drawback is that you can’t import your own samples, but for vocal chops used as ad-libs or fills, this instrument offers plenty of potential to create great sounds.

You can check out the sound demos in the video made by Plugin Boutique.

The current price is $39, which is a 33% discount. With such a clean and intuitive UI, I highly recommend this instrument, especially if you don’t already have a dedicated vocal chop tool.

If you buy from Plugin Boutique today, you can also get Audio Thing’s Frostbite 2 or Newfangled Audio’s EQuivocate for free. Plugin Boutique often offers a free plugin with purchases, though I’m not sure what they’ll offer in August.

Once the freebie for August is announced, I’ll update this post accordingly.

See you in the next post!