UVI Falcon Sale (50% Off, Until May 9)

Hi there! I’m Jooyoung Kim, a mixing engineer and music producer.

UVI is a company renowned for its piano virtual instruments, much like Spectrasonics. These days, they’ve expanded beyond pianos to develop synthesizers and a variety of audio effects.

Recently, UVI joined Plugin Boutique, kicking off an exciting Intro Sale. Currently, Plugin Boutique offers two UVI products:

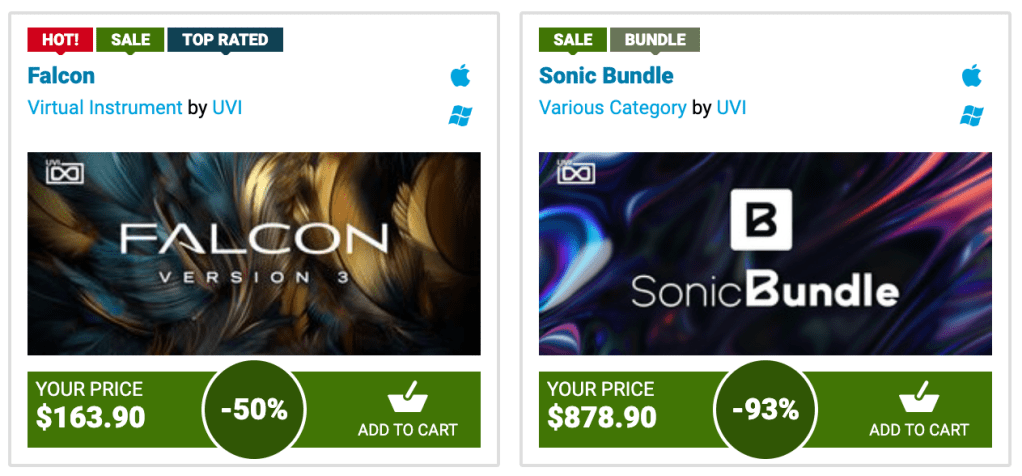
The Sonic Bundle, which includes all of UVI’s products, and FALCON, UVI’s flagship synthesizer/virtual instrument engine. Today, I’ll be diving into Falcon.

Full disclosure: I received an NFR (Not for Resale) code for this product from UVI via Plugin Boutique. If you purchase through the links in this blog, I earn a small commission, which helps me keep creating content and, frankly, survive! Thank you for your support.

Let’s get started!

What is Falcon?

Falcon is a versatile engine, similar to Native Instruments’ Kontakt, capable of loading virtual instruments or functioning as a synthesizer/sampler with 20 oscillators and various synthesis methods.

Like Kontakt, Falcon can feel overwhelming if you dive into all its detailed settings or try to build a sampler from scratch. It’s especially tricky for beginners, particularly when combining FX and modulation with synthesizer configurations.

Instead of trying to master everything at once, let’s start with the basics.

When you first open Falcon, you can choose from 21 default preset synthesizers, including Analog, FM, Additive, Organ, Wavetable, Noise, Pluck, Texture, Sample, Drum, MPE, Granular, Vosim, Harmonic Resonator, Bowed String, and more.

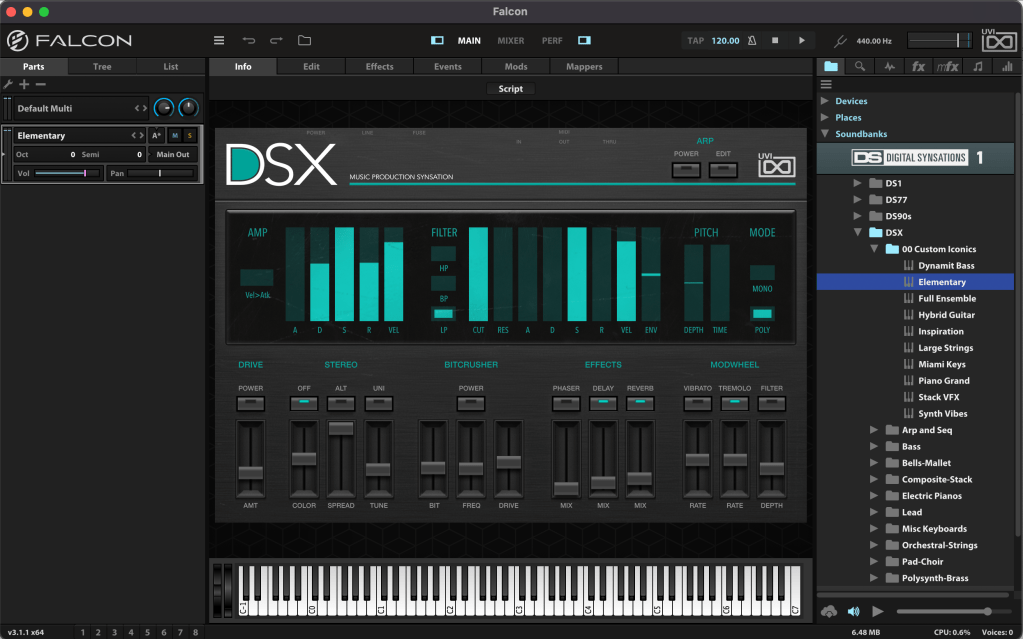
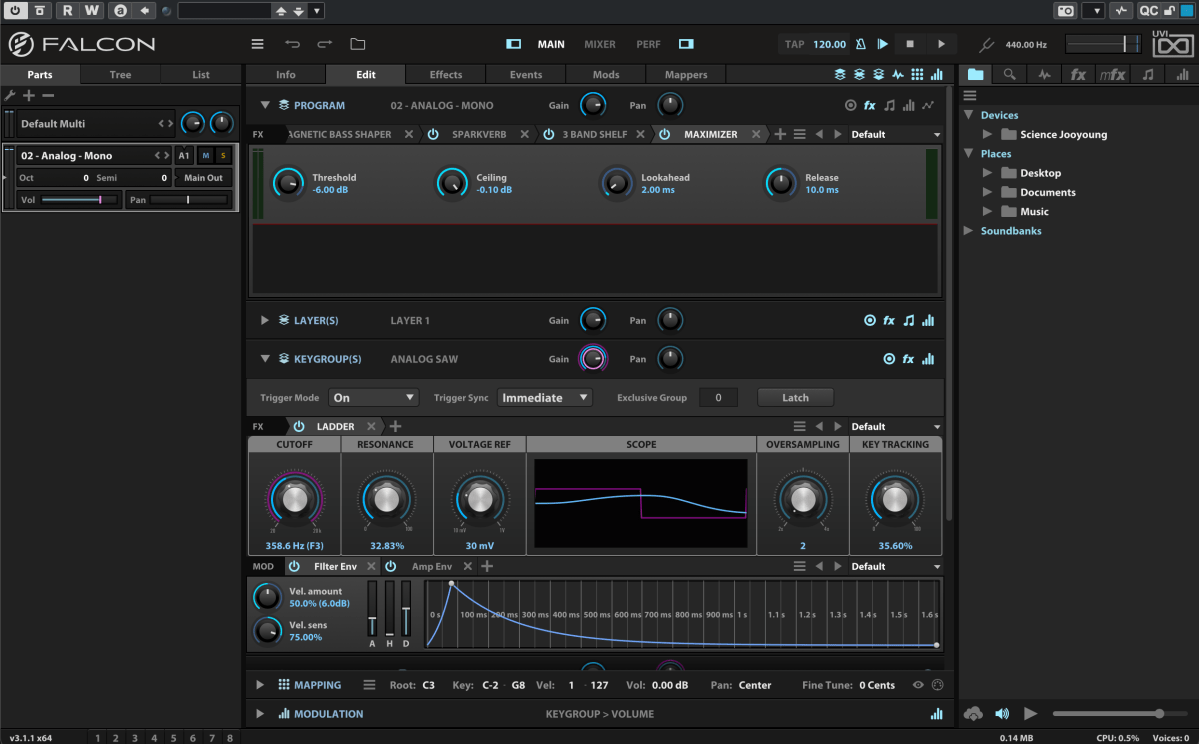
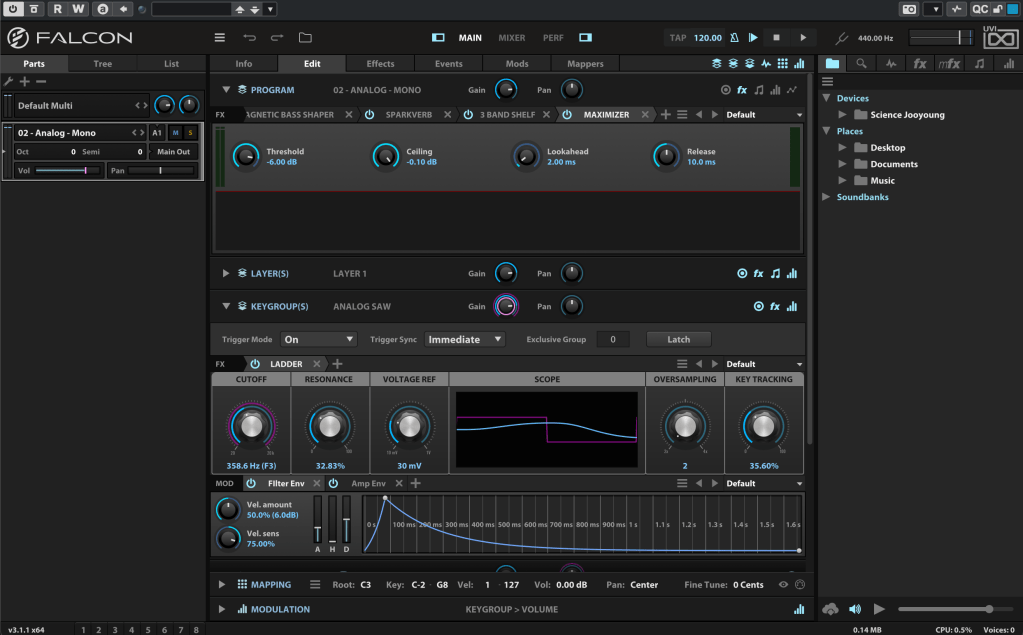
Once loaded, the Info tab displays the most basic parameters for tweaking.

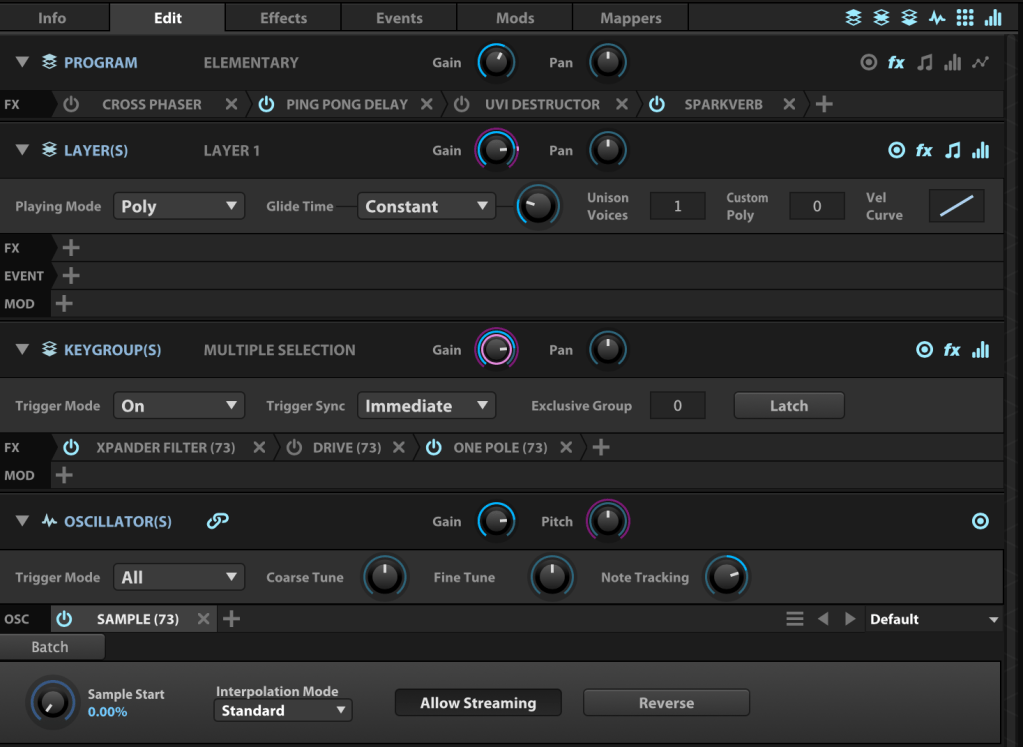
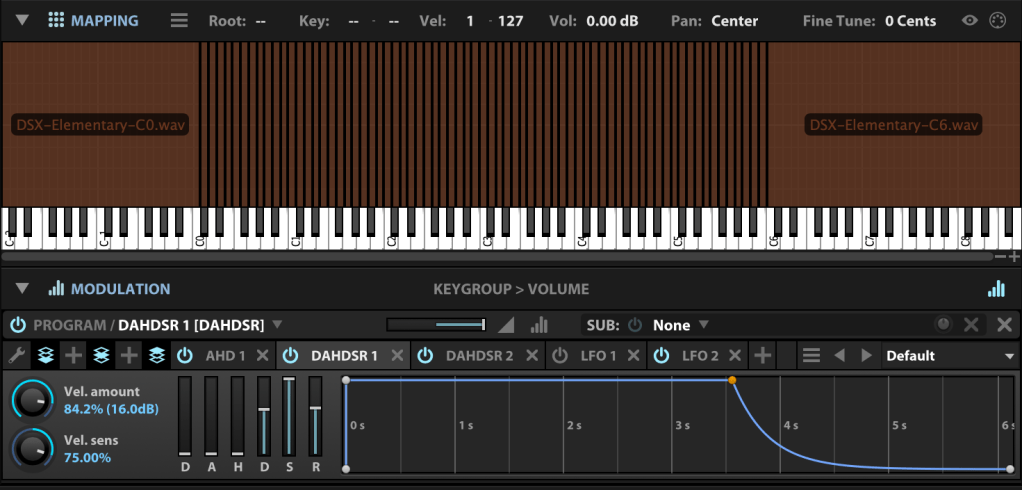
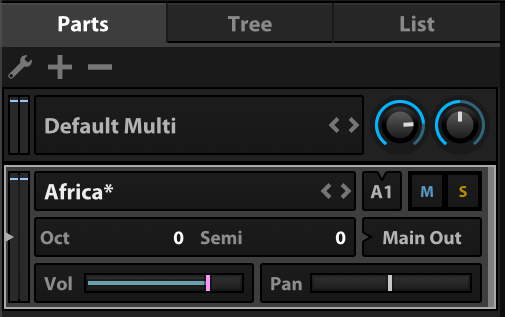
In the Edit tab, you can fine-tune more detailed parameters, such as FX, Layer, Key Group, Oscillator, Mapping, and Modulation for the loaded synthesizer or virtual instrument.

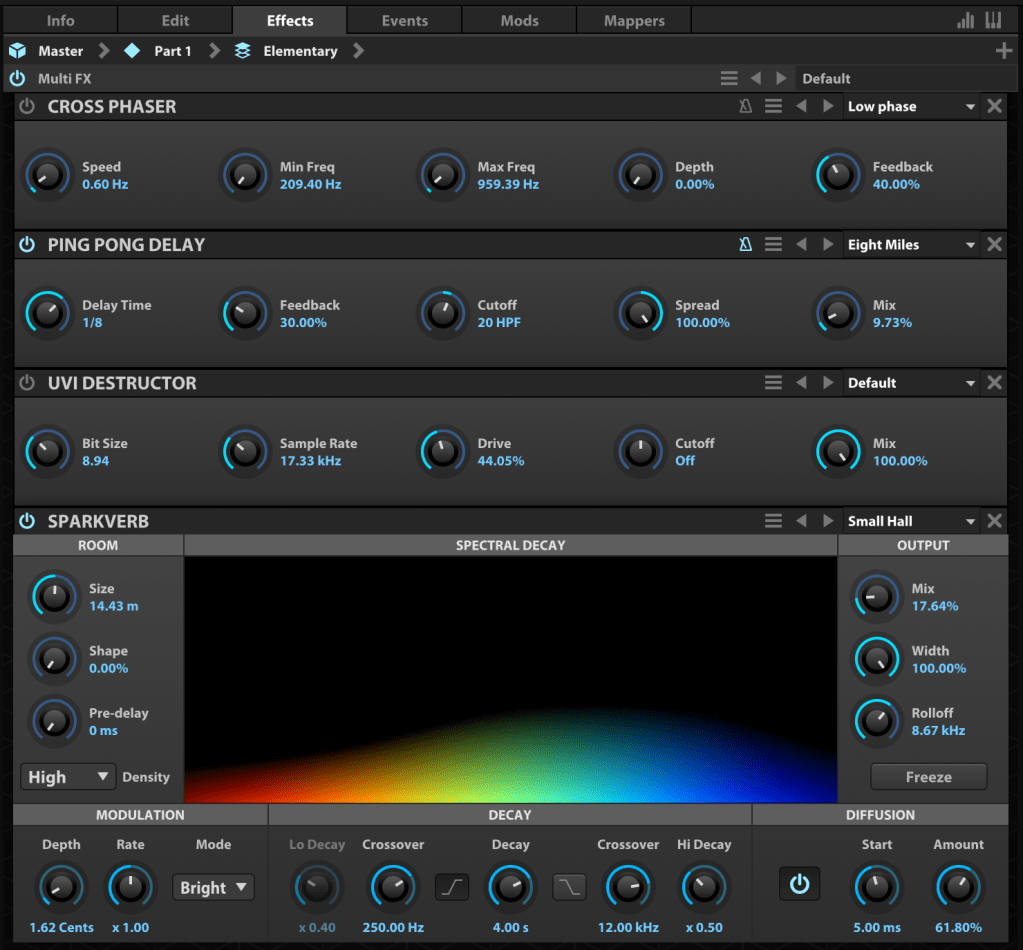
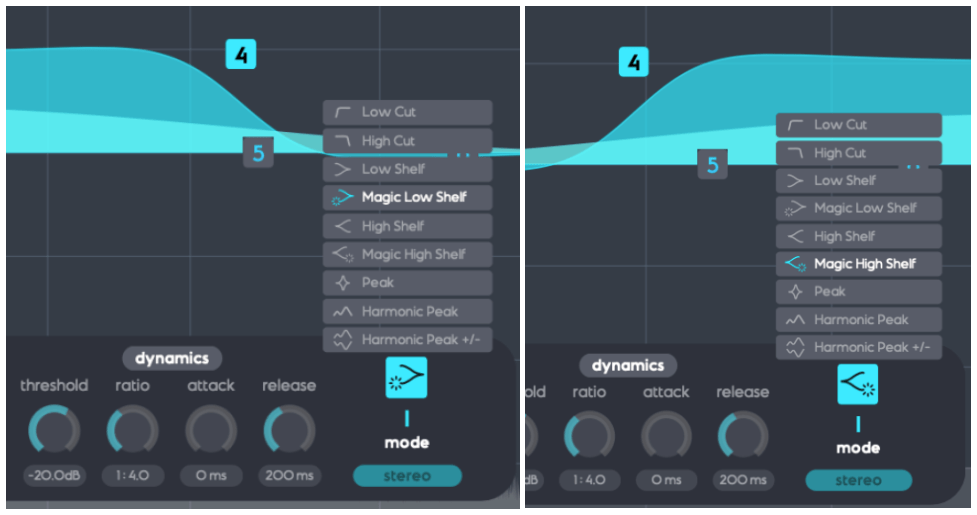
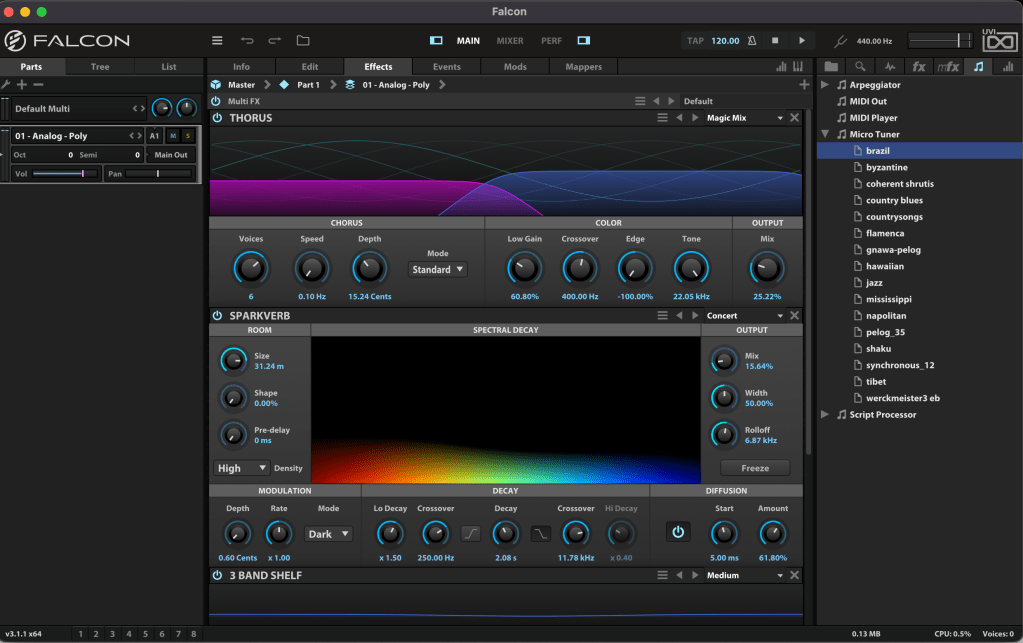
The Effects tab lets you dive deeper into FX adjustments. With over 100 effects included in Falcon, it’s tough to cover them all! They lean more toward sound design than traditional mixing, offering incredible creative possibilities.

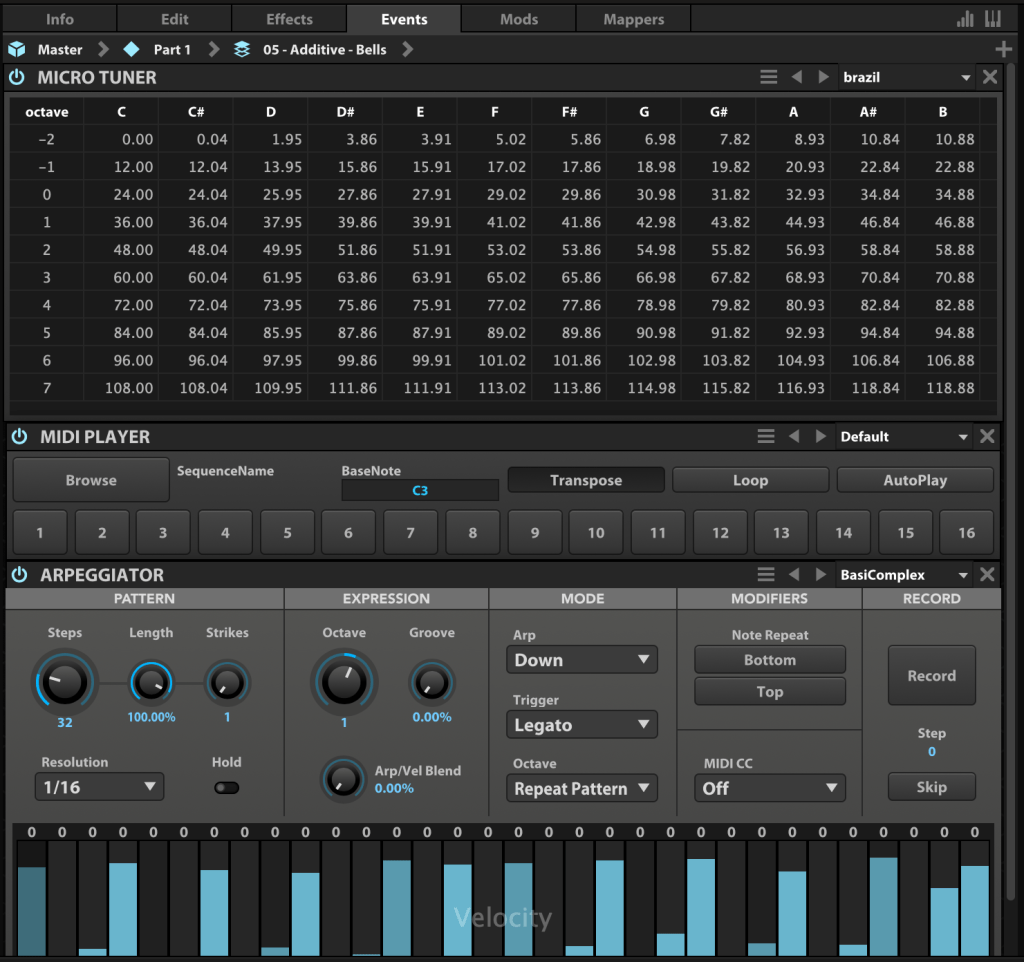
In the Event tab, you can add MIDI FX processors and other MIDI-based effects.

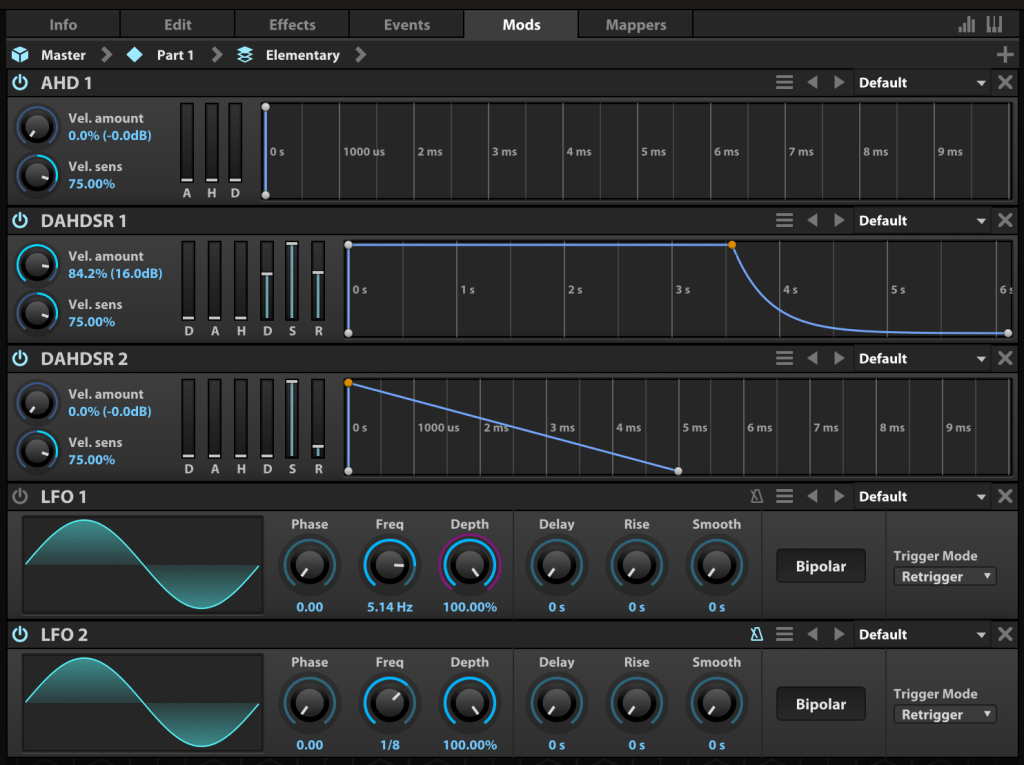
The Mods tab is where you control modulation effects like LFOs and ADSR envelopes.

In the Mappers tab, you can draw shapes to scale, quantize, curve, or pattern modulation source values, allowing you to customize how modulation effects evolve.

On the left, you can add modules to incorporate more virtual instruments or synthesizers.

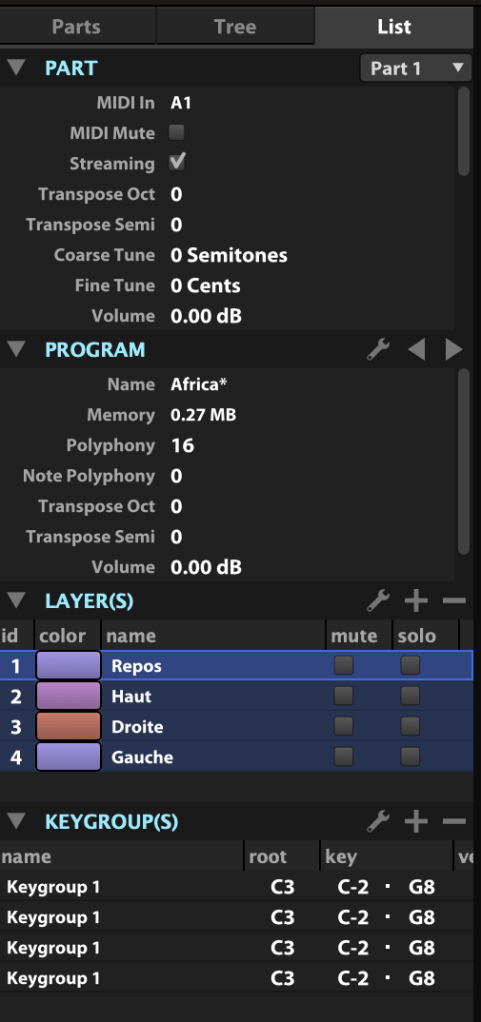
The Tree view shows which sounds or effects are applied to each part, while the List view displays the data settings for the virtual instrument or synthesizer.

On the right, you can browse sounds by folder or soundbank and preview them with a quick click.

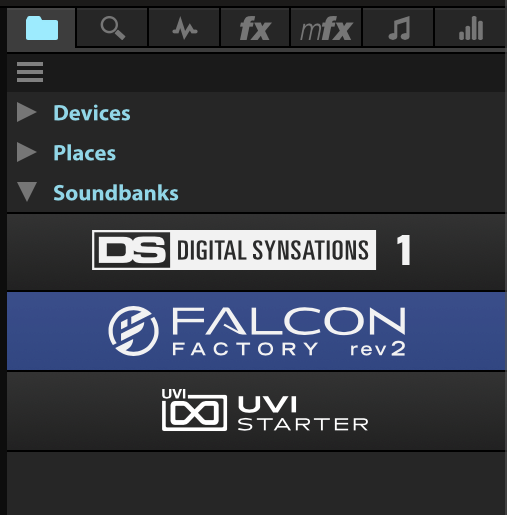
The search bar helps you find presets, while the waveform icon loads sounds into the mapping editor. The “fx” category covers effects, and “mfx” refers to music FX for sound effects. The note icon represents MIDI effects for the Event tab, and the frequency spectrum-like icon is for modulation effects in the Mods tab.

Falcon’s extensive features can take time to master, but its versatility lets you create an incredible range of sounds.

Until May 9, Plugin Boutique is offering a 50% discount on Falcon as part of the Intro Sale. If you’re looking for a single, all-in-one synthesizer virtual instrument, Falcon is a fantastic choice.

Thanks for reading, and I’ll see you in the next post! 😊

Scaler EQ and Scaler 2 on Sale (Free Scaler 3 Update with Scaler 2 Purchase, Until 3/31)

Hey there! I’m Jooyoung Kim, an engineer and music producer.

Today, I want to talk about two standout plugins from Plugin Boutique that are currently on sale: Scaler EQ and Scaler 2. I’ve been lucky enough to receive these plugins as NFR (Not for Resale) copies from Plugin Boutique. Also, if you purchase through the links in this post, I’ll earn a small commission that really helps me keep going—so thanks in advance for the support! 😊

Let’s dive in!


Scaler EQ

Scaler EQ is one of the flagship plugins from Scaler Music, distributed by Plugin Boutique. Sure, it has all the standard EQ features you’d expect, but what sets it apart are these three unique tricks up its sleeve:

  1. Key-Based Boosting and Cutting: It can boost sounds that fit the song’s key while reducing those that don’t.
  2. Magic Shelf Bands with Mid/Side Control: Adjust frequency responses using Mid/Side processing for a wider or more focused sound.
  3. Dynamic Control: Fine-tune the loudness with built-in dynamics processing.

Let’s take a closer look at how it works.

Play your track and hit the Detect Key button—it’ll automatically figure out the key of your song. You can also manually pick a key by clicking the middle key selection button. The Global button applies that key across all EQ bands.

In Scale Lock Mode, the In Scale setting boosts notes within the key when using Harmonic Peak mode (highlighted in white on the piano roll). Turn it off, and it’ll boost whatever notes you’ve selected instead.

The Flip Harmonics option comes into play when the gain is negative in Harmonic Peak mode—it cuts notes outside the key. Disable it, and it’ll cut the in-key notes instead.

The Dynamics section feels pretty standard for a dynamic EQ, but the real stars here are Harmonic Peak, Harmonic Peak +/-, and Magic Low/High Shelf.

  • Harmonic Peak: Emphasizes notes within your chosen key.
  • Harmonic Peak +/-: Boosts in-key notes and cuts out-of-key ones at the same time.
  • Magic Low Shelf: Highlights the Mid over the Side for a punchier low end.
  • Magic High Shelf: Boosts the Side over the Mid for a wider, airier top end.

These features might sound simple, but when used well, they can bring out the harmonics of your key in totally unique ways, adding fresh colors to your sound.

As far as I know, Scaler EQ is the only EQ out there that adjusts sound based on musical scales like this. It’s a rare gem, and with it on sale, now’s a great time to grab it! 😊


Scaler 2

Scaler 2 is a versatile tool packed with features to help you create music. Here’s the core of what it does:

  1. Extract Chord Progressions: Pull chords from MIDI or audio files.
  2. Rearrange or Reharmonize: Tweak and transform those chords however you like.
  3. Choose Presets: Pick lines or voicings from its built-in instruments.
  4. Export as MIDI: Capture everything and drag it into your DAW.

When you download Scaler 2, you’ll get three versions:

  • Scaler2: The virtual instrument version.
  • ScalerAudio2: An effect version tailored for analyzing audio tracks.
  • ScalerControl2: An AU MIDI plugin, perfect for controlling external instruments in DAWs like Logic Pro.

You could take chords from a song you love and use them to build something entirely new. Or start fresh with over 400 genre-based chord sets and 200+ artist chord sets included as presets.

Personally, I think it’s a lifesaver when you’ve got a rough chord progression but can’t figure out the bass, melody, or guitar lines. It’s also great for nailing piano or guitar voicings if those feel tricky. Plus, it’s a handy tool for studying music—perfect for copying and analyzing songs you admire.

It might look overwhelming with all its features, but spend about 30 minutes messing around, and it’s not hard to get the hang of it. On the left, under SRC, you’ll see three options: MIDI, AUDIO, and OPEN AUDIO FILE. MIDI and AUDIO let you record in real-time to extract chords, while OPEN AUDIO FILE pulls them straight from an audio file. Once you do that, chords pop up alongside the detected scale, like in the image above.

Chords in blue are within the detected scale, while those in gray are outside it. You can drag these chords down to create a pattern.

Once you’ve got a pattern, head to the top right where you’ll find Perform, Keys-Lock, Voice Grouping, and Humanize. These let you tweak the MIDI patterns—think arpeggios, strumming, or natural timing variations.

The catch? You can only preview sounds using Scaler 2’s built-in virtual instruments. That said, there’s a decent variety, so you can get a rough idea of how it’ll sit in your track.

When you’re happy with everything, hit the MIDI CAPTURE button at the bottom right, play it back, and record the pattern as MIDI.

Then, drag the DRAG button into your DAW’s MIDI channel, and boom—your pattern’s ready to go!

Beyond that, Scaler 2 can suggest modulation paths (like where and how to change keys) and even hook up external instruments via MIDI routing—though that’s a bit trickier to set up.

Having used it myself, I can say it’s a super useful tool in tons of ways. It’s especially awesome for beginners learning to compose—it takes the intimidation factor out of chord progressions and music theory.


Bundle Deal and Final Thoughts

The sale runs until March 31st, and bundling Scaler 2 and Scaler EQ together gets you an even better deal. Plus, if you buy Scaler 2 now, you’ll get the upcoming Scaler 3 update (slated for this month) for free. It’s a steal at this price, so I’d highly recommend jumping on it while it lasts.

That’s it for now—hope to see you in the next post! 😊

Lewitt LCT 1040 Microphone Review

This post is a translation of a Korean blog post I wrote on February 27, 2022.

Hello, I’m Jooyoung Kim, a mixing engineer and music producer. I recently had the opportunity to review the new Lewitt LCT 1040 microphone, thanks to Sound & Music, Lewitt’s distributor in Korea. They provided me with a demo unit for a week, with no other compensation.

Since I was going to be busy soon, I conducted a quick two-day test as soon as I received the unit and wrote this review. Let’s dive in!

Unboxing and Appearance

I received a brand-new, unopened demo unit, which was a pleasant surprise. The package was quite heavy. The box design was unique, with tear-off strips to open it.

Inside the box, there were two pouches containing cables, manuals, and other documents. Below them were the microphone components.

The photo was taken immediately upon delivery, and you can see some handprints, probably because it was cold.

The pouches are attached magnetically and can be easily removed. The contents include manuals, a recall sheet, and a booklet detailing the development process of the LCT 1040.

They included the names of beta testers, and I was pleased to see my name included!

Underneath the microphone, there were power cables and adapters for different types of outlets. I found this modular system quite innovative.

The control unit is entirely metal and feels hefty. The knobs are both linear and stepped, providing a smooth and convenient experience.

Pressing the “LCT 1040” label in the center allows for the remote to be detached. The remote can then be connected to the microphone using an XLR connector. This is a pretty innovative feature!

Once everything is connected, the lights turn on as shown in the photo below.

The Operational indicator blinks when adjusting the Attenuation (Pad) and Pattern settings, indicating a brief processing time. However, adjustments to Circuit, Tube, and Filter settings are immediate. There’s also a button for switching the front and back diaphragms.

The microphone cable connector clicks securely into place when inserted correctly. The shock mount includes carbon material and features a unique, easy-to-use clamping mechanism.

The pop filter and the microphone’s grill both have double layers, which shows attention to detail. The pop filter, also made of carbon material, attaches magnetically, making it easy to use.

The bottom clamp for mounting the microphone is simple and effective.

The microphone, when powered, looks like this. I think this gives you a good overview of its appearance. Now, let’s move on to the sound test.

Recording Test

For the test, I recorded both vocals and guitar. For vocals, I used a reflection filter and recorded in Clear, Warm, Dark, and Saturated modes with Omnidirectional, Cardioid, and Figure-8 patterns, using three settings: FET, FET=5:5, and Tube.

(Note: FET 100% sounds consistent across Clear, Warm, Dark, and Saturated, so I grouped them under FET.)

Due to the number of recordings, I might have missed some distorted parts in the song. I hope you’ll understand. My voice was a bit worn out, too… 😢

I used a low cut at 80Hz and lightly reduced 148Hz and 179Hz where noted.

For the guitar, I couldn’t use a reflection filter, so I placed the mic in a standard holder. I recorded only in Cardioid, as Figure-8 and Omnidirectional were not necessary. I used a Guild D-150ce with new D’Addario XS Phosphor Bronze light gauge strings.

I applied a low cut at 80Hz and reduced the boominess at 138Hz and 179Hz for fingerstyle, while strumming did not require cuts. The recordings were captured directly into an Apollo x6 interface, with gain set around 53-55dB.

Impressions

FET, Clear

The high frequencies are pleasantly clear. However, the low-mid range feels slightly lacking, making the FET sound somewhat thin and sharp. Still, both the FET and Tube modes produce the expected quality sound.

Warm

The highs are a bit subdued compared to Clear, but they still maintain a presence.

Dark

The highs feel significantly reduced, which might highlight the mids and make the sound somewhat nasal. This could be useful for creating a distant or lo-fi effect.

Saturated

This was my favorite among Warm, Dark, and Saturated. It retains high-frequency clarity while boosting the lows, providing a pleasing sound without much EQ.

The frequency response graphs matched my impressions, which was quite satisfying.

Additionally, the Mix and FET can be recorded separately, which could be handy for saving FET as a backup.

Pros

The detachable remote makes it versatile for studios of all sizes. The dual-layered grill and pop filter demonstrate careful design.

The knobs provide a satisfying tactile response, and the build quality is excellent. They even included a recall sheet, which can likely be requested in PDF form.

Cons

The unit is heavy, and there’s no volume control on the remote, which can be slightly inconvenient. However, this is common for tube microphones, so it’s hard to consider it a significant downside.

Conclusion

The sound quality and attention to detail are impressive, and the price seems justified. Although the absolute price is high, considering you effectively get five distinct tones—FET, Clear, Warm, Dark, Saturated—and can blend Tube with FET, it’s a compelling value.

Buying five high-quality microphones for the price of one LCT 1040 would be challenging. Given the rising cost of equipment, with AKG C414s nearing 2 million KRW, and considering the versatility and quality of this mic, I’d choose the LCT 1040 over a Neumann U87ai. It’s also an excellent option for those looking for a secondary mic.

While I haven’t used it long enough to comment on durability or long-term use, Sound & Music offers a 10-year warranty, which is reassuring.

I hope you enjoyed this review. See you in the next post!

I’m always open to reviewing hardware products! If you’d like me to review a product, please feel free to reach out at joe1346@naver.com.

I Purchased a Boucher Studio Goose OMH Guitar

This post was originally written on June 12, 2022

Hello, I’m Jooyoung Kim, a mixing engineer and music producer.

After parting with my Taylor 220CE K-dlx model, I decided it was time to add a new guitar to my collection, one that differed from my Taylor and Guild preferences.

I visited my favorite shop to test out some guitars and found that the higher-end models from Headway, a Japanese brand, and Boucher, a small Canadian workshop, produced impressive sounds.

I was particularly interested in the seasonal commemorative models from Headway, but unfortunately, they weren’t available in Korea. Ordering directly from Japan would have added nearly 600,000 KRW(about 450$) in shipping and customs fees. Given the high cost, I thought it would be wiser to look for a used Boucher guitar.

As luck would have it, I found a well-maintained Boucher guitar at a reasonable price and traveled to Siheung this morning to pick it up.

Although it’s an older model, the specifications match the SG51. The label inside simply reads “Studio Goose OMH East Indian Rosewood.”

The binding is made of maple, giving it a distinctly high-end appearance.

While I’m not particularly fond of the D’Addario EXP strings currently on it, the balance of the sound is incredible. Throughout my years of playing guitar, I never gave much thought to the balance of sound. However, playing this guitar made me realize what good balance truly means.

I’m curious to see how the sound will change once I switch out the strings.

It’s been a while since I’ve purchased a piece of equipment that brings me this much joy just by looking at it.

*As I translate this post in 2024, I’m still finding this guitar incredibly useful. I’ve used it extensively for recording, and the high-end harmonic overtones that come from such a premium instrument have greatly enhanced my recordings, adding a touch of sophistication to my music.

I look forward to sharing more with you in my next post. See you then!