SSL X-EQ 2 and DeEss Plugin Overview + 90% Off Sale (Ends 1/29)

Hello! I’m Juyoung Kim, a mixing engineer and music producer.

It’s been a while since I shared plugin sale news, hasn’t it?
Over the holiday season and into early January, my manager was on vacation, and most major sales wrapped up at the start of the year. So, I didn’t have much to share.

One notable ongoing deal is IK Multimedia’s Total Studio 4 MAX sale.

That said, I recently came across SSL’s sale on X-EQ 2 and DeEss, and I couldn’t wait to share it with you!

Disclosure

This product was provided as an NFR (Not for Resale) through Plugin Boutique. If you make a purchase using the links in this post, I’ll earn a small commission, which helps me keep doing what I do.

Let’s dive in!


SSL X-EQ 2

The SSL X-EQ 2 is a feature-packed EQ plugin. These days, DAW-native EQs are so powerful that standalone EQ plugins need to have a competitive edge to stand out—and X-EQ 2 delivers.

Key features include:

  • Mid/Side processing
  • Presets to remove 50Hz and 60Hz hum (ideal for handling electrical noise)

You can double-click to create points and adjust EQ type, frequency (Hz), bandwidth (Q), and gain (dB) with ease.

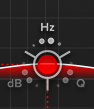
A particularly fun feature is the knob-like interface—select a parameter (Hz, dB, Q) and adjust it by dragging your mouse, mimicking the feel of turning a physical knob.

It also includes an analyzer (activated via the top-right button) and lets you choose between parallel or serial processing from the top-left menu.

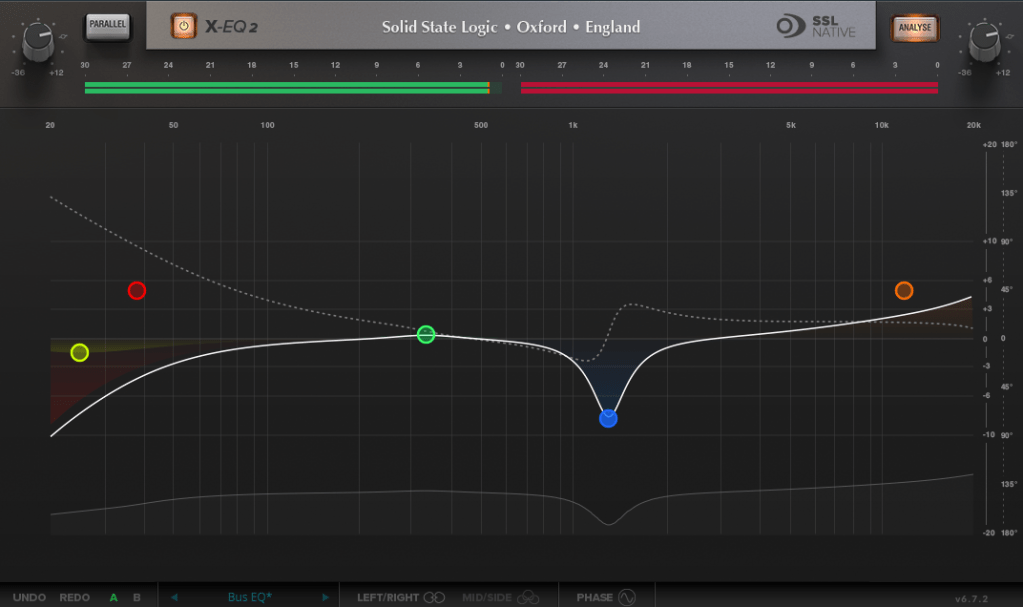
Additionally, you can activate Phase Analysis to see phase shifts (dotted lines) or enable Step Response Mode to view how signals evolve over time after passing through the EQ.

Heaviside Step Function

For those unfamiliar with Step Response:
The Step Response of a system refers to how the system reacts over time to a sudden change in input, specifically when the input shifts instantaneously from 0 to 1 (a Heaviside Step function). It demonstrates:

  1. The system’s transient behavior, showing how it initially reacts to the input change.
  2. The steady-state behavior, revealing how the system settles after the transient phase.
  3. The time it takes to stabilize, which indicates the system’s responsiveness.

In the context of EQs, a longer Step Response often correlates with ringing artifacts, where the EQ introduces unintended resonances that make the sound linger beyond its natural decay. This visualization helps engineers fine-tune the EQ to minimize these artifacts.

I love all the features, but the only downside is that the window size can’t be adjusted. But if you see the price, it could be convinced!


DeEss Plugin

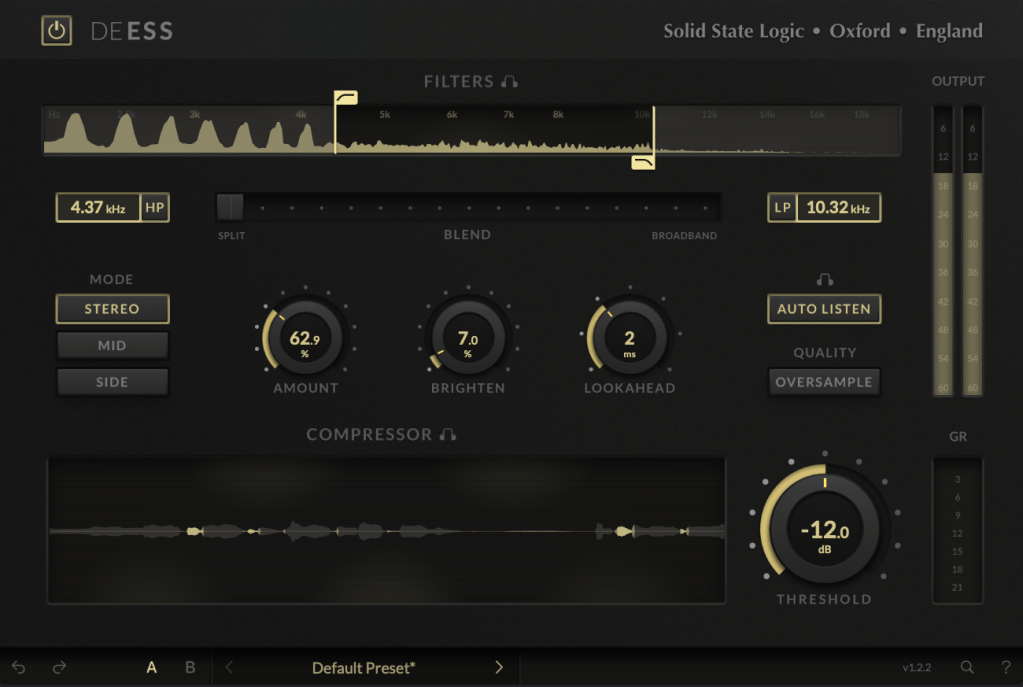
The DeEss plugin offers highly detailed sibilance control.

Key features:

  • Adjustable target range: 1kHz to 20kHz
  • Mid/Side processing
  • Compression intensity and Brighten (high-shelving EQ) controls
  • Lookahead capability for precise processing

A standout feature is the Auto Listen mode, which allows you to hear both the filtered signal and the original detection, making adjustments much easier.

This DeEss plugin is one of the most versatile I’ve come across, and it’s surprisingly lightweight unless oversampling is applied. If you don’t already have a dedicated de-esser, this is an excellent choice.


Bonus: Free Plugin Offer

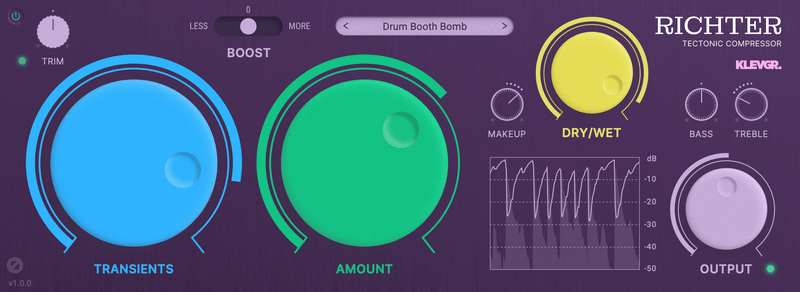
If you purchase any plugin from Plugin Boutique this month, you’ll receive Klevgrand’s Richter Compressor Plugin for free. Don’t forget to claim it when checking out!


Final Thoughts

Both the SSL X-EQ 2 and DeEss plugins are incredibly versatile and user-friendly tools for mixing and production. The 90% discount makes this deal even sweeter—don’t miss out before the sale ends on January 29!

Feel free to reach out if you have any questions. Until next time!

Output Portal Granular FX 50% Off Sale (Until August 16th)

Hello, this is Jooyoung Kim, mixing engineer and music producer.

Today, I’m excited to share that Output is having a summer sale with 50% off on their plugins!

Output is a well-known company that creates fantastic plugins. If you’ve been into music production, you’ve likely heard of them.

Since this sale is a rare opportunity, I requested NFR (Not for Resale) codes for three of Output’s flagship plugins—Portal, Thermal, and Movement—from Plugin Boutique to review them.

Instead of covering them all at once, which might be overwhelming for both you and me, I’ll review them one by one. Let’s start with Portal!

Portal is a plugin that transforms incoming audio into a granular synthesizer-like sound. But first, let’s explore what a granular synthesizer is.

A granular synthesizer chops up a sample into tiny grains ranging from 1 to 100ms to synthesize new sounds. As shown in the image, you can slice and rearrange waveforms to create unique sounds.

This technique is particularly effective for creating atmospheric pads, making it a popular choice in movie soundtracks and instrumental genres.

Portal’s user interface is designed to resemble that of a vector synthesizer.

Joystick from a Prophet-VS vector synthesizer plugin

A vector synthesizer can be considered an early form of a wavetable synthesizer. It uses a joystick to blend different waveforms assigned to each direction.

In Output’s Portal, Macro 1 is placed on the vertical axis, while Macro 2 is on the horizontal axis. The values of these macros control various parameters.

You can connect Macro 1 and Macro 2 to different parameters in the Grain Control section. By double-clicking the macro names, you can even rename them.

To assign a macro, click the ‘+’ sign below the name of each knob (like Macro 1 and Macro 2), then drag it to a parameter. A small circle will appear next to the parameter, indicating the range of control the macro has.

Similarly, you can use the LFO in the bottom left to modulate parameters. Think of it as a traditional synthesizer, which should make it easier to approach.

At the bottom center, you can choose between the XY, Effects, and Master sections to adjust various parameters.

The built-in effects include Bit Reducer, Chorus, Distortion, Filter, Phaser, Reverb, and Delay, making for a total of seven options. All these parameters can be linked to the LFO modulation or macro functions for dynamic control.

The Master section includes a built-in filter and compressor, which can also be modulated with LFOs and macros.

Clicking ‘DEFAULT’ at the top right allows you to access various presets. Beginners might find it helpful to start here.

Portal is particularly appealing due to its ability to produce random, evolving sounds based on XY values. It’s an excellent choice for those who don’t already have a granular FX plugin.

Check out the demo video to hear what it can do.

The 50% off sale runs until August 16th! Here’s the purchase link:

Additionally, if you purchase from Plugin Boutique, you can get a free plugin. This month, you can choose between Softube’s VCA Comp or K7D’s Delay.

Softube previously offered the VCA Comp for free in March. It’s a great dbx160-style compressor, perfect if you don’t already have one.

The K7D Delay is a tape delay that sounds great on electric guitars and works well in mixes.

That wraps up the overview of Portal. In the next post, I’ll review another Output plugin, Thermal. Stay tuned!

Introducing Sale! Excite Audio Bloom Vocal Edit Virtual Instrument (Vocal Chop, 39$ ~9/1)

Hello! This is Jooyoung Kim, an audio engineer and music producer.

Today, I’m excited to introduce a new virtual instrument specifically designed for vocal chops, now available at an attractive price. Like my previous posts on sales and new releases, I’ve received an NFR (Not for Resale) code from Plugin Boutique for this review.

Let’s dive right in!

The basic interface is quite similar to the Bloom Bass Impulse.

When I first reviewed a virtual instrument from this company, I thought it was a sophisticated sampler. It’s impressive that Excite Audio has now adapted it for vocal chops, a truly innovative idea.

Upon launching the interface, you can easily add effects like Glue (for compression and saturation), Fuzz, Metallic (short delay), and Doubler.

The lower section displays a keyboard. Pressing the white keys plays the sample assigned to that key, while the black keys offer functionalities like playing the sample at half or double speed, reverse playback, octave shifts, and sequential playback.

You can also assign samples randomly by pressing the dice icon.

The knobs allow you to adjust effects such as Delay, Bitcrush, Reverb, Lo-Cut, and Hi-Cut.

Clicking the key indicator on the lower left automatically adjusts each vocal sample to match the chosen key.

Next to the key indicator, the “Bank” button reveals a collection of 112 samples, offering a rich variety.

Clicking the “Edit” button in the preset window allows you to edit the samples assigned to the white keys and choose how they play back when pressing the black keys (options A, B, C, D, E, etc.).

The parameters visible in the main UI, like Bitcrush, Delay, and Global Reverb, are also adjustable.

The Sample Edit function offers extensive control, including Snap, Attack and Release Time adjustments, speed and BPM Warp functionality, and more.

Most of the other features are straightforward. If you’re unsure about anything, just click the “i” (information) icon next to the preset search bar for a helpful explanation of each feature.

Until now, I’ve used Kontakt or basic DAW samplers for vocal chops, but this new instrument is really impressive.

It comes with pre-calculated pitch adjustments and offers a wide range of sample options, not just short one-shot samples.

A minor drawback is that you can’t import your own samples, but for vocal chops used as ad-libs or fills, this instrument offers plenty of potential to create great sounds.

You can check out the sound demos in the video made by Plugin Boutique.

The current price is $39, which is a 33% discount. With such a clean and intuitive UI, I highly recommend this instrument, especially if you don’t already have a dedicated vocal chop tool.

If you buy from Plugin Boutique today, you can also get Audio Thing’s Frostbite 2 or Newfangled Audio’s EQuivocate for free. Plugin Boutique often offers a free plugin with purchases, though I’m not sure what they’ll offer in August.

Once the freebie for August is announced, I’ll update this post accordingly.

See you in the next post!

Zynaptiq Pitchmap Sale (until July 28)

Hello, I’m Jooyoung Kim, an engineer and music producer.

Today, I want to introduce Pitchmap, a plugin by Zynaptiq that’s frequently used in color bass music.

For this review, I requested an NFR (Not for Resale) code for Pitchmap from Plugin Boutique. Thankfully, Zynaptiq provided me with the ZAP IV bundle code. I’d like to express my gratitude to them. Besides Pitchmap, I’ll be reviewing other Zynaptiq plugins during their sale periods.

Let’s get started!

Pitchmap is a pitch correction plugin created by Zynaptiq in 2013.

While pitch correction is commonly associated with vocal tuning, Pitchmap is more often used in remixing and sound design.

The horizontal axis represents pitch, similar to a keyboard roll.

Although only three octaves are shown,

you can adjust the display by clicking the light gray area at the top to navigate to the desired pitch range.

The vertical axis represents time, with red/orange markings indicating the pitch at that specific time. Essentially, the X and Y axes are flipped compared to typical vocal tuning plugins.

The white bars show relative volume, and the circles indicate pitch shifts.

For example, moving a circle representing F# upwards changes the sound from F# to G.

This allows you to change the key of the entire piece arbitrarily.

Double-clicking on a circle transforms it into various shapes: inverted triangle, triangle, square, etc.

  1. A square maintains the pitch within the same octave.
  2. A circle shifts to the nearest pitch (up by 9 semitones or down by 3 semitones).
  3. An inverted triangle always shifts downwards.
  4. A triangle always shifts upwards.

In Key Edit mode, you can click on notes in the piano roll to exclude them from playback.

Clicking Bypass and selecting notes in the piano roll means those notes will bypass the effect.

You can also allow MIDI input to select pitches in real-time through a MIDI channel.

You might wonder if these changes would make the sound awkward, but surprisingly, the result is quite cohesive, making Pitchmap ideal for remixing.

The white bars in the top piano roll can be moved to set a specific pitch range. The image above sets the range from Eb downwards to be excluded.

Other parameters include:

  1. Threshold: Determines the extent of tuning (lower values mean more comprehensive processing).
  2. Feel: Controls subtle pitch variations after tuning (higher values retain more nuance).
  3. Purify: Reduces noise above 50% and increases noise below 50%.
  4. Glide: Adds glide/portamento effects.
  5. Electrify: Enhances the synthetic feel or optimizes signal processing.

Exploring the rest of the features will help you understand their functionalities better.

This plugin is not only useful for contemporary music, often centered around remixes and bass, but also for creating unique sounds in other genres. Personally, I enjoy blending these elements into string or band sections for a sophisticated and effective sound.

I’ll share some YouTube videos demonstrating how I use Pitchmap.

The current sale lasts until July 28, and the discount is substantial. If interested, I highly recommend purchasing.

Additionally, purchasing from Plugin Boutique entitles you to a free plugin. This month, the options are Frostbite 2 by AudioThing or EQuivocate by Newfangled Audio.

Frostbite 2 offers various modulation effects, and EQuivocate is a graphic EQ with auditory filters and a Match EQ feature. Personally, I’d choose Frostbite 2.

See you in the next post!